In This Article
- Introduction
- Segment Navigation
- Segment List
- WO Header Notes
- Segment View
- New Segment
- Transfer
- SIMS
- Segment Header
- Financials
- Notes and Special Instructions
- Parts
- Labor
- Misc (Miscellaneous)
- Operations
- Operations List
Introduction
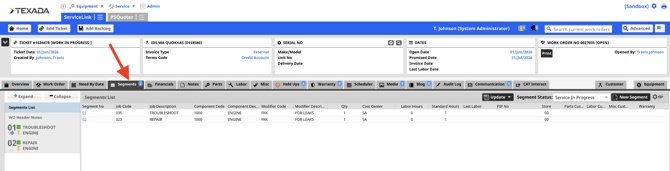
The Segments tab is where you manage the Segments and Operations for the Ticket.
Segment Navigation
When you click the Segments tab, if there are multiple Segments, it will default to the Segments List view. If there is only one Segment, then it will default to the Segment view.
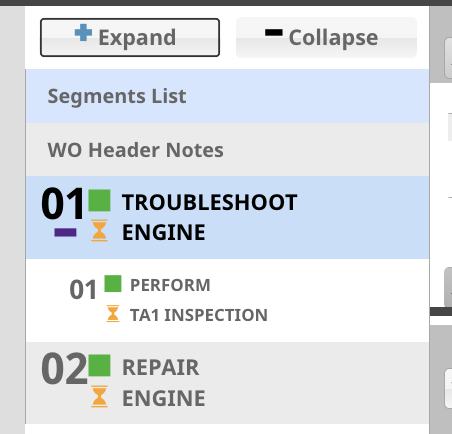
Down the left side are the Segments and Operations for the ticket. You can click on the Expand or Collapse buttons to show any Operations. Segments will be in Number order and then Alphabetical order.
Segment visuals:
- Status Icons:
- (Service) In Progress: Yellow hourglass
- Service Completed: Yellow head and checkmark
- Review Completed: Green head and checkmark
- Color Coding: Once a Ticket is open and communicating with DBS, Segments are marked with a Green Box. If there is a Red Box that means there was an issues connecting to DBS.
- Operations: A Segment with an Operation can be identified by the blue Plus symbol on the Segment.
Segment List
The Segment List view gives an overview for all of the Segments. It gives information such as Job and Component Codes, Cost Center, Store, Labor Hours, and more.
There are buttons along the top of this screen:

- Update: This will Reprice all of the Parts on the job, in case any pricing changes happened.
- Segment Status: You can update all of the Segments status' by changing the status here. Should there be any errors, it will let you know.
- New Segment: You can create a new Segment for the ticket.
WO Header Notes
The Header Notes shows any notes that are on the header of the ticket.

Segment View
Clicking on a Segment will bring up that Segment and all off the information on it.
Along the top, which is frozen on the screen, you will see some buttons and information:
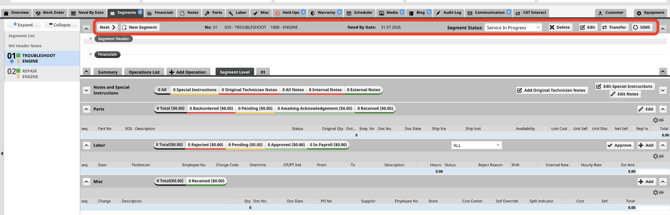
- Previous / Next: These will move you to other Segments.
- New Segment: You can create a new Segment for the ticket. You will then see the Segment Number, Job Code, Component Code, and Need by Date.
- Segment Status: This tells you the status of this Segment and is also where you change it once complete.
- Edit: This will bring up the Segment Header information to view or edit.
- Transfer: This will bring up the transfer screen to transfer Parts, Labor, and Miscellaneous.
- SIMS (Service Information Management System): This is where you will view or add/edit SIMS entries.
New Segment
This is where a user can create a new Segment for the job. A Segment can be created from a number of ways:
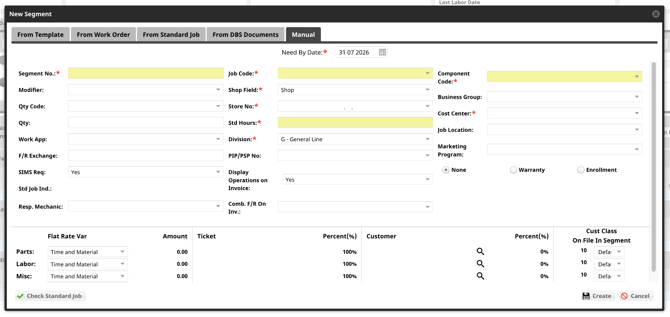
- From Template: Use this option for repetitive or standard jobs where you want a pre-configured structure automatically generated. Templates are pre-made by an administrator and can contain pre-populated job codes, component codes, notes, and even Parts lists. Select the From Template tab and use the search fields to locate and apply the desired template.
- From Work Order: You can copy the exact structure of a Segment from a previous job. Select the From Work Order tab, enter the historical job number in the WO No. field, and perform a search. You can select one or more Segments from the original job to pull into your current ticket, which automatically transfers the associated store, cost center, job codes, and component codes.
- From Standard Job: Standard Jobs and Flat Rate Exchanges represent predefined tasks stored in DBS that include standard Labor hours, descriptions, and optional Parts lists. Select the From Standard Job tab and search by machine model or the name of the flat rate exchange. Once selected, you can also choose to transfer the recommended Parts list (RBOM) directly into the Segment.
- From DBS Documents: If you have an existing Parts document already generated within DBS that you want to associate with this job, select the From DBS Documents tab. This allows you to pull the Parts data directly into the Segment structure, saving valuable administrative time.
- Manual: If none of the automated sources fit your requirements, select the Manual tab to build the Segment from scratch. You must manually fill out all required fields, which are easily identifiable by their yellow color and a red asterisk. As you type descriptions into the Job Code and Component Code fields, the system will search for matches; if a standard job exists for your manual combination, a dialog box will automatically appear prompting you to use the standard job instead.
While creating or copying a Segment, you can establish financial customer splits, assign specific customer classes for Parts, Labor, or Miscellaneous billing, and define a unique Need By Date for that particular Segment.
Transfer
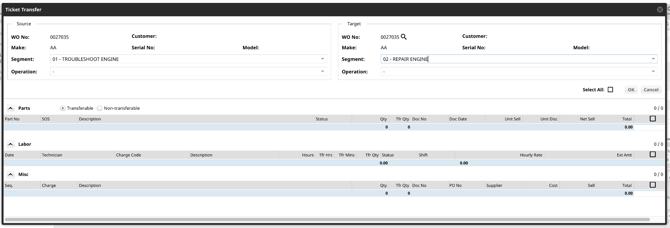
The Transfer function allows you to quickly move job details from one Segment or Operation to another. This flexible tool supports transferring data both within the same job and between entirely different jobs, eliminating the need to manually re-enter Parts, Labor, or Miscellaneous entries.
SIMS
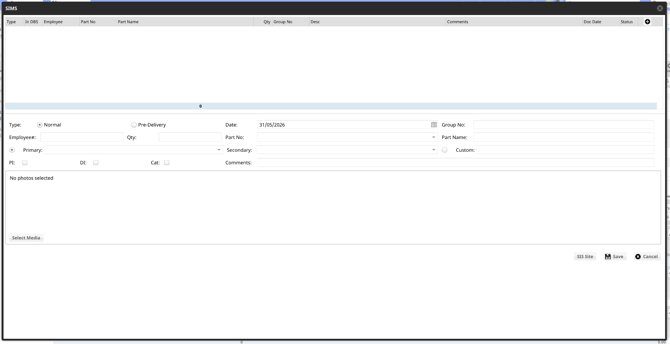
The SIMS (Service Information Management System) function allows you to record and track component failure data directly from a Segment. This critical product information is collected and transmitted back to the manufacturer to help identify and correct equipment problems.
Segment Header
This section shows the Segment Header details.

Financials
This section provides a granular breakdown of costs for each Segment and Operation. Review the “Ticket - Financials” page to see more details on this.

Notes and Special Instructions
This is where Notes are added and can be viewed for the Segment.

You can add notes by using:
- Add Original Technician Notes: These are notes that the Technician would add for the Job.
- Templates can be created, within the ADMIN page, to standardize the format of the notes when adding them.
- Edit Special Instructions: This is where a user can add any notes about the Segment that the Technician, or other users may need to know (e.g. Take lots of photos).
- Edit Notes: This is where a user can add or edit all of the notes for the Segment for the Proforma Invoice.
- Templates can be created, within the ADMIN page, to standardize the format of the notes when adding them.
See “Ticket - Notes” for more information.
Parts
This is where Parts can be added and viewed for the Segment.
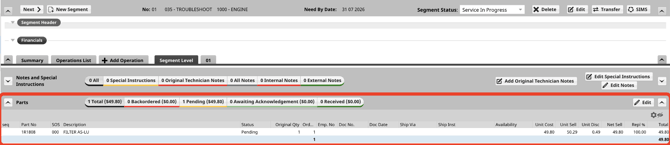
The Parts Edit button allows you to add Parts to the Segment. Clicking it will bring up a pop-up.
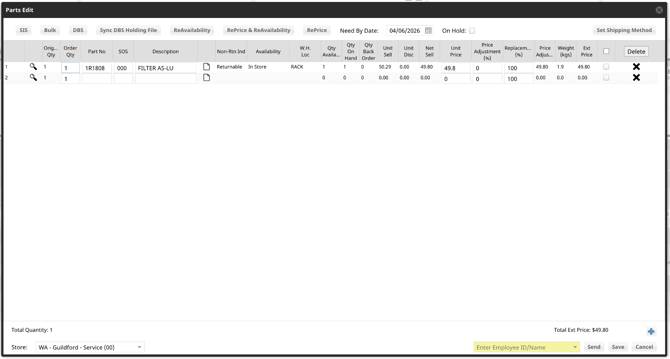
There are multiple ways to add Parts to the Segment:
- Manually enter the Part Number into the Part No column:
- After entering the Part number the system will call PartsStore to gather Pricing, Availability, and other information.
- SIS:
- SIS is the Caterpillar Service Information System.
- You can upload a Parts list that you had previously downloaded.
- You can click SIS Site and it will take you to SIS. There you can add Parts to a cart and then import them into Service Management CD.
- Bulk:
- You can add multiple Parts at once here and then click Validate to call Parts Store one time.
- This is preferred if you already have a list of Parts and need to manually add them.
- DBS:
- If you have a DBS document with a Parts list, you can upload it here.
- Sync DBS Holding File:
- This will pull in Parts located in the Standard Jobs holding File - MNTSJWOPH.
- This file gets populated when creating tickets from Parts & Service Quoting.
- You can choose to sync all Segments and Operations, or just the specific one you are in.
After you have added Parts, you can order them, or save them to the Segment as Pending. Depending on Role access, you may be able to edit certain fields, such as Price Adjustment.
Labor
This is where Labor can be viewed and added for the Segment. Note that you will only be able to see Labor based on your Approval Groups.
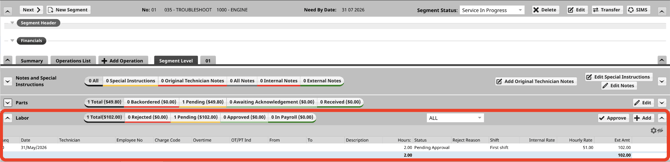
You can filter to only see specific technicians using the dropdown.
You can Approve any unapproved Labor using the Approve button. Click on the Approve button and it will bring up the Labor Approval Screen defaulted to that Segment/Operation.
You can add Labor using the Add button. Click it and then fill out the information for the entry.
See “Ticket - Labor” for more information.
Misc (Miscellaneous)
This is where Miscellaneous items can be added and viewed for the Segment.
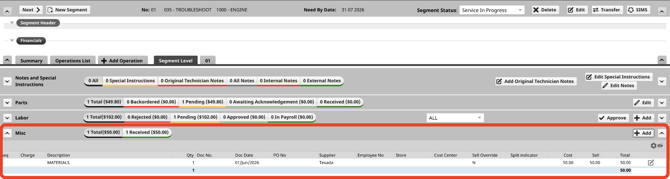
You can add Misc using the Add Misc button. Click it and then fill out the information for the entry.
See “Ticket - Misc (Miscellaneous)” for more information.
Operations
The Operation function allows you to break down a Segment into smaller, more manageable tasks. While all financial pricing, billing splits, and flat rates are strictly controlled at the parent Segment level, Operations are used to organize, track, and schedule the specific step-by-step repair actions required for a ticket. The Notes, Parts, Labor, and Misc sections function identically to the Segment level, but they are filtered to display and manage only the specific line items assigned to that individual Operation.
You can identify that a Segment has an underlying Operation by:
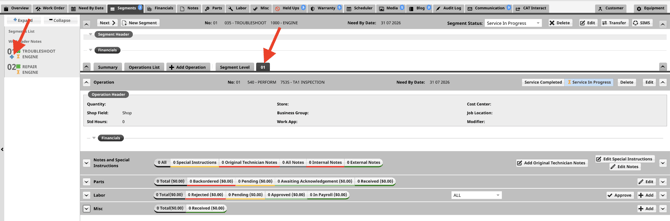
- The Plus Symbol: Spotting the blue plus symbol located directly on the Segment line.
- The Operations Tabs: Seeing the individual Operation number tabs displayed next to the Segment Level button.
You can manually add an Operation to any open Segment by selecting the Add Operation button located below the Financials section.
Operations List
The Operations List view gives an overview for all of the Segments. It gives information such as Job and Component Codes, Cost Center, Store, Labor Hours, and more.
