
In This Article
- Introduction
- Accessing Administrative Settings
- Setup Sequence Overview
- Step 1: Creating Categories
- Step 2: Creating Contract Types
- Step 3: Creating Event Types
- Step 4: Reviewing Standard Jobs and Flat Rate Exchange
- Step 5: Creating Packages
- Step 6: Setting Up Notifications
- Step 7: User Management
- Step 8: Managing Security
- Step 9: CVA Contract Configuration
- Step 10: Form Builder Customization
- Final Steps
- Appendix: Security
Introduction
This training manual provides detailed procedural steps for setting up Service Agreement Quoting (SAQ). SAQ is used for quoting and creating service contracts with enrollment numbers. Follow these steps in the order presented to ensure proper system configuration.
Accessing Administrative Settings
Procedure:
- Log into the SAQ application
- Locate the gear icon in the top right corner of the screen
- Click the gear icon to access the administrative page
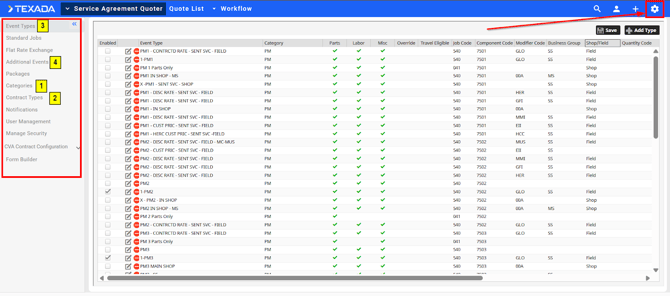
Result: You will see a left-hand menu with the following items:
- Event Types
- Standard Jobs
- Flat Rate Exchange
- Additional Events
- Packages
- Categories
- Contract Types
- Notifications
- User Management
- Manage Security
- CVA
- Contract Configuration
- Form Builder
Setup Sequence Overview
IMPORTANT: The following items must be created in this specific order (see pic above):
- Categories (First)
- Contract Types (Second)
- Event Types (Third - requires Categories and Contract Types to be completed)
- Additional Events(Fourth – requires Categories and Contract Types to be completed
- All other configurations can follow
Standard Jobs and Flat Rate Exchange will appear empty until Event Types are created.
Step 1: Creating Categories
Purpose
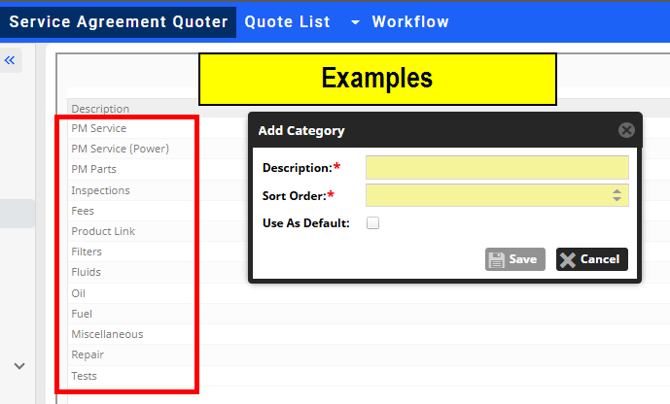
Categories are used to organize event types and additional events. They help classify different types of service activities.
Common Category Examples
- PM Service or PM Event (for preventive maintenance)
- Inspections (for machine inspections)
- Other dealer-specific categories as needed
Procedure
- From the left menu, click Categories
- Click the Add Category button (location varies by interface)
- Enter a descriptive category name
- Save the category
- Repeat for all required categories
Best Practices
- Make category names clear and descriptive
- Consider how services will be grouped
- Create categories that align with your business divisions
Step 2: Creating Contract Types
Purpose
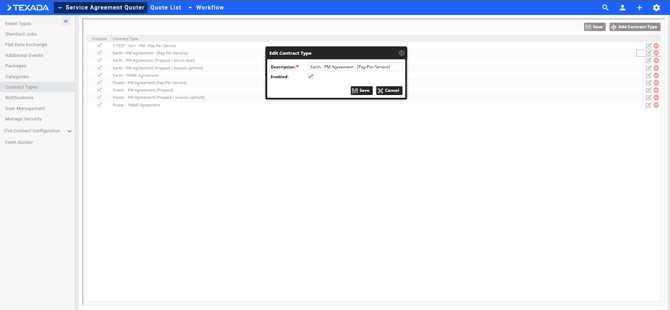
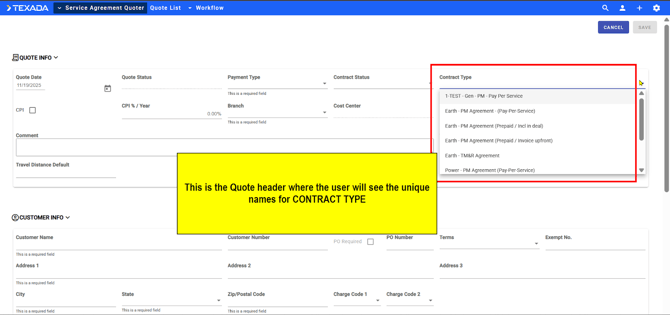
Contract types define unique names for the different types of contracts your dealership will offer.
Dealer Best Practice
Create descriptive contract type names that clearly identify:
- Business division (Earth Moving/General Line vs. Power Systems)
- Service type (PM Agreement, etc.)
- Payment structure (if applicable)
Naming Convention Example
Format: [Division] - [Service Type] - [Payment Type]
Example: "General Line–FULL PM–Pay Per Service"
Procedure
- From the left menu, click Contract Types
- Click the Add Contract Type button
- Enter the contract type name following best practices
- Include division identifier (e.g., "Earth Moving" or "Power Systems")
- Include service description (e.g., "PM Agreement")
- Save the contract type
- Repeat for all divisions and service types needed
Example Contract Types
- Earth Moving - PM Agreement – Pay Per Service
- Power Systems - PM Agreement – Pay Per Service
- General Line - Full Service Contract
- Power Systems - Inspection Services
Step 3: Creating Event Types
Prerequisites
- Categories must be created
- Contract Types must be created
Purpose
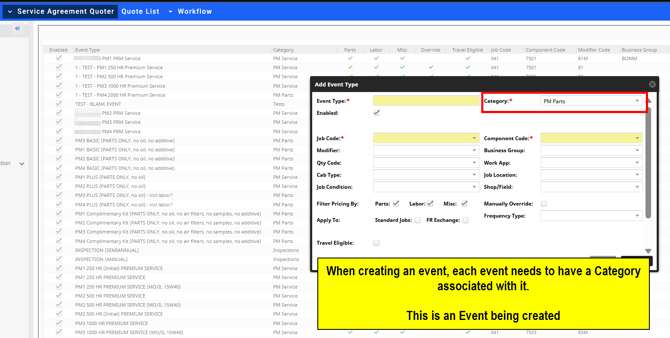
Event types define specific service events using SMCS (Standard Maintenance Code System) code combinations. Each event type represents a unique service activity.
Procedure
- From the left menu, click Event Types
- Click the Add Type button in the far right corner
- A dialogue box will appear
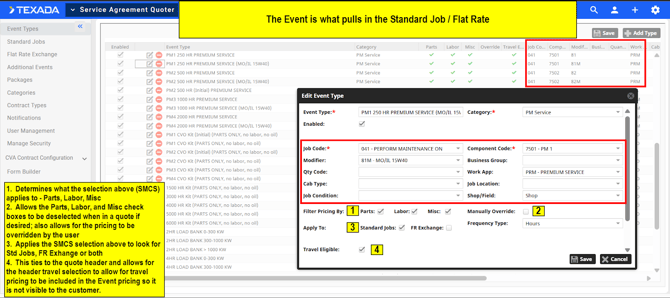
Configuring the Event Type
- Select SMCS Code Combination
Select the appropriate codes from the following options:- Job Code
- Component Code
- Modifier
- Business Group
- Quantity Code
- Work Application Code
- Cab Type
- Job Location
- Job Condition
- Shop or Field Indicator
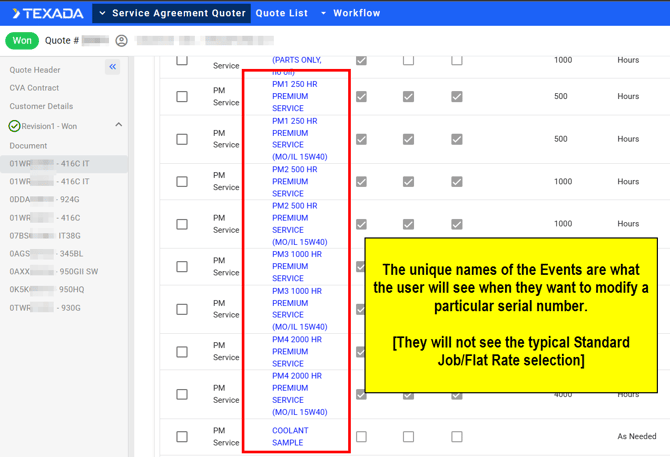
- Name the Event Type
- After selecting SMCS codes, enter a unique, descriptive name for the event type
- Example: "PM1 - 250 Hour Service"
- NOTE: This unique name will be critical for the user o easily understand what it is as they will no longer be selecting the complete SMCS code combination.
- Select Category
- From the Category dropdown, select the appropriate category created in Step 1
- Example: For a PM1 event, select "PM Service" category
- Enable the Event Type
- Check the Enabled checkbox
- This makes the event type selectable when creating quotes
- Configure Filter Pricing
Three checkboxes control what pricing components to include for the SMCS code selection:- Parts - Check to include parts pricing
- Labor - Check to include labor pricing
- Miscellaneous - Check to include miscellaneous costs
- Manually Override Checkbox:
- When checked, users can deselect/reselect parts, labor, and miscellaneous when building quotes
- When unchecked these selections are locked on the quote and the user cannot Unselect any of them.
- Apply To Options
Select where this event (SMCS code selection) type applies:- Standard Jobs - Check to make available for standard job quotes
- Flat Rate Exchange - Check to make available for flat rate exchange quotes
- You can check both boxes as needed
- Set Frequency Type
- Hours – Typically used for general line/earth moving equipment
- Days – Typically used for power systems equipment
- Travel Eligibility
- Check Travel Eligible if you want to apply travel charges from the Header portion of the qutoe to this event type when quoting. This allows the cost of travel to become a part of the Event price so that the customer does not see a line item for travel on the quote.
- Save the Event Type
- Review all selections
- Click the Save button
- Repeat Process
- Repeat this procedure for all event types needed (PM1, PM2, PM3, PM4, inspections, etc.)
Step 4: Reviewing Standard Jobs and Flat Rate Exchange
What Happens After Creating Event Types?
Once event types are created:
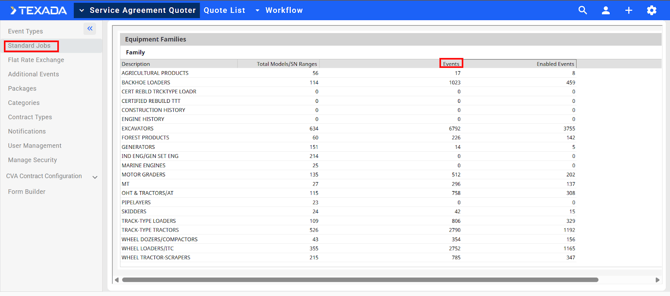
- Navigate to Standard Jobs in the left menu
- You will now see counts of events by equipment family
- Navigate to Flat Rate Exchange in the left menu
- You will see counts of events with descriptions
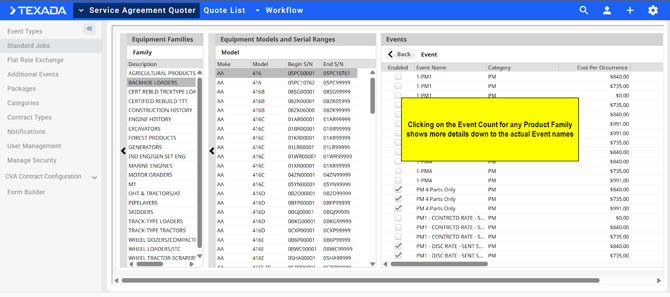
Viewing Event Details
For Standard Jobs:
- Click on any count number for an equipment family (e.g., Articulated Trucks)
- The view expands to show:
- List of models
- Serial number ranges
- Associated events
For Flat Rate Exchange:
- Click on the count for a particular description
- The view expands to show:
- Event name
- Category
- Cost per occurrence
- Additional details
Purpose
This verification step confirms that your event types are properly configured and linked to equipment families.
Step 5: Creating Packages
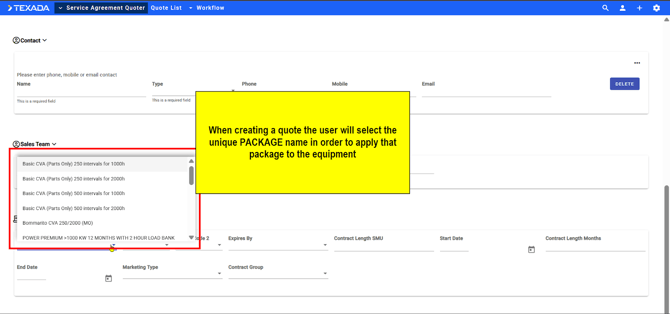
Purpose
Packages contain Events and the number of their occurrences. Packages define contract terms (hours or days) and are displayed in iQuote (the machine sales rep quoting tool). Machine sales reps select CVA packages when quoting new and used machines.
Package Concept
Think of a package as the term of the contract that includes:
- Service interval (e.g., 250 hours, 500 hours)
- Total contract duration (e.g., 2,000 hours, 5,000 hours)
- Coverage level (e.g., parts only, parts + labor, full coverage)
- Individual PM events included
Package Naming Best Practice
Format: [Coverage Level] - [Service Interval] - [Total Duration]
Example: "Premium Package - 250 Hour Interval - 2,000 Hours"
Coverage Level Definitions (examples):
- Premium = Parts, Labor, and Miscellaneous
- Standard = Parts and Labor
- Basic = Parts only (or as defined by your dealership)
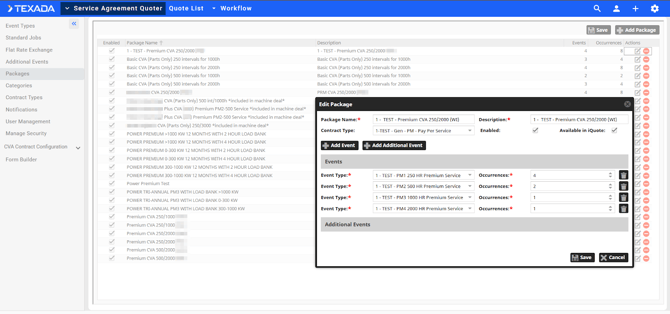
Procedure
- From the left menu, click Packages
- Click the Add Package button
- Complete the following fields:
- Package Name and Description
- Enter a clear, descriptive Package Name
- Include service interval and total hours in the description
- Example: "Premium Package - 250 Hour Interval - 2,000 Hours"
- Select Contract Type
- From the Contract Type dropdown, select the appropriate contract type
- Match the contract type to your business division
- Example: For general construction PM packages, select "General Line - PM Agreement"
- Enable the Package
- Check the Enabled checkbox
- Make Available in iQuote
- Check the Available in iQuote checkbox
- This allows machine sales reps to select this package when quoting
- Add Events to the Package
- Adding PM Events:
- Click the Add Event button
- Select Event Type from dropdown (e.g., PM1)
- Enter Number of Occurrences
- Calculate based on total hours ÷ service interval
- Example: 2,000 hours ÷ 250 hours = 8 PM1 occurrences
- Click Add or Save
- Repeat for each PM level (examples):
- Add PM1 events with occurrence count
- Add PM2 events with occurrence count
- Add PM3 events with occurrence count
- Add PM4 events with occurrence count
- Adding Additional Events:
Additional events are non-PM services such as TA1 / TA2 inspections, undercarriage inspections, or other dealer-specific services.- Click Add Event or Add Additional Event
- Select the additional event type from dropdown
- Enter number of occurrences
- Click Add
- Adding PM Events:
- Save the Package
- Review all events and occurrences
- Click the Save button
Example Package Configuration
Package Name: Premium Package - 250 Hour Interval - 2,000 Hours
Contract Type: General Line - PM Agreement - Payer Service
Events Included:
- PM1 (250 hours): 8 occurrences
- PM2 (500 hours): 4 occurrences
- PM3 (1,000 hours): 2 occurrences
- PM4 (2,000 hours): 1 occurrence
- TA1 Inspection: 2 occurrences
- Undercarriage Inspection: 1 occurrence
Step 6: Setting Up Notifications
Purpose
Notifications automatically alert specified users when certain events occur in SAQ (e.g., quote created, submitted for approval, won).
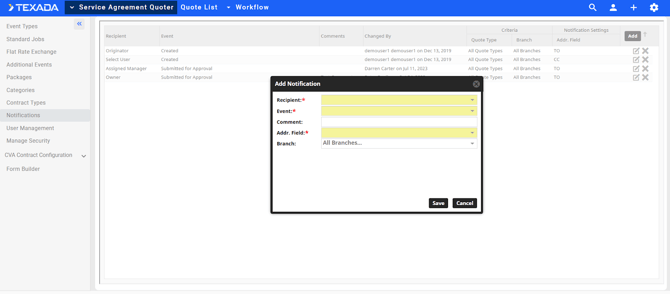
Procedure
- From the left menu, click Notifications
- Click the Add button in the top right corner
- Configure the notification:
- Select Recipient Type
Choose from the following recipient options:- Owner - The person who owns the quote/contract
- Originator - The person who created the quote/contract
- Assigned Rep - The sales representative assigned
- Sales Manager - The assigned sales manager
- Assigned Manager - The assigned manager
- Email Distribution List - A predefined distribution list
- Select User - A specific individual user
- Select Event Type
Choose which action triggers the notification:- Created Events - When a new quote/contract is created
- Deleted Events - When a quote/contract is deleted
- Submitted for Approval - When a quote is submitted for approval
- Won - When a quote is marked as won
- Add Comment (Optional)
- Enter any relevant comment text for this notification
- This helps recipients understand the notification purpose
- Select Address Field
- To - Primary recipient(s)
- CC (Carbon Copy) - Secondary recipient(s)
- Select Branch
- All Branches - Send to all locations
- Select Branch - Choose specific branch(es)
- Note: You can select multiple branches for one notification
- Save the Notification
- Review all settings
- Click the Save button
- Select Recipient Type
Example Notification Configurations
Example 1: New Quote Created
- Recipient: Sales Manager
- Event: Created Events
- Address: To
- Branch: All Branches
Example 2: Quote Won
- Recipient: Assigned Rep, Sales Manager
- Event: Won
- Address: To (Rep), CC (Manager)
- Branch: Select Branch
Step 7: User Management

Purpose
User Management controls which users have access to SAQ and what level of access they have.
Available Roles
- Public
- Not Set
- No Access
- Admin - Full administrative rights
- Power User - Advanced user capabilities
- Sales Rep - Standard sales representative access
Procedure
- From the left menu, click User Management
- Search for the user you want to add
- Select the user from search results
- Choose the appropriate Role from the dropdown
- Save the user assignment
Important Note: CSA Quoter Compatibility
If your organization uses both CSA Quoter and Service Agreement Quoting, you must:
- Select the same role for both modules for each user
- This ensures consistent access and functionality across both systems
Best Practices
- Assign Admin role sparingly (only to system administrators)
- Most users should be Power Users or Sales Reps
- Review user access quarterly
- Remove access for users who no longer need it
Step 8: Managing Security
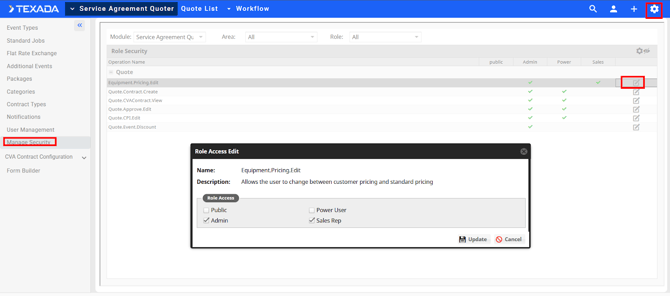
Purpose
Manage Security controls specific permissions for different user actions within SAQ.
Accessing Security Settings
- From the left menu, click Manage Security
- Confirm Service Agreement Quoting is selected in the module dropdown
- Note: You can also access Service Link and Parts and Service Quoting, but this training covers SAQ only
Available Security Role Functions
- Equipment Pricing Edit
- Permission: Allows users to change between customer pricing and standard pricing
- Assign to: Power Users, Admins
- Quote Contract Create
- Permission: Allows users to create a contract after a quote is won
- Assign to: Power Users, Admins, specific Sales Reps as needed
- Quote CVA Contract View
- Permission: Allows users to view CVA contracts or quotes
- Assign to: All users who need to reference contracts
- Quote Approve Edit
- Permission: Allows users to change quote status to "Approved"
- Assign to: Sales Managers, Admins
- Quote CPI Edit
- Permission: Allows users to change the CPI (Cost Per Year Index) on a quote
- Assign to: Admins, specific Power Users with pricing authority
- Quote Event Discount
- Permission: Allows users to apply discounts within a quote
- Assign to: Sales Managers, authorized Power Users
- Important Note: Discounting in SAQ currently discounts the entire event (parts, labor, and miscellaneous together)
Procedure to Assign Security Permissions
- Ensure Service Agreement Quoting module is selected
- Select the security function you want to configure
- Assign the permission to appropriate user roles
- Save changes
- Repeat for each security function
Step 9: CVA Contract Configuration
Overview
CVA Contract Configuration defines the field values and settings that push into the CT menu in DBS (Dealer Business System) when creating contracts.
Accessing CVA Configuration
- From the left menu, click CVA
- Two sub-items will appear:
- Global Defaults
- Contract Configurations
Understanding Global Defaults
Global Defaults displays the default settings for SAQ contract creation with various fields available in the CT menu in DBS.
Purpose: Reference only - shows system-wide defaults
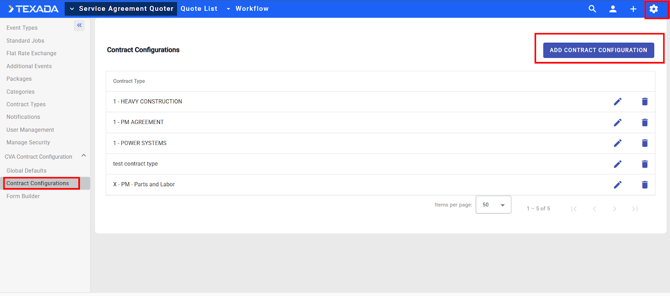
Creating Contract Configurations
Contract Configurations is where you create specific configurations for your contract types as your dealership requires.
Procedure
- Click Contract Configurations in the left menu
- Click Add Contract Configuration button in the top right corner
- Configure the following:
- Basic Configuration
- Enter a Contract Configuration Name
- Select the appropriate Contract Type from dropdown
- This dropdown contains the contract types you created in Step 2
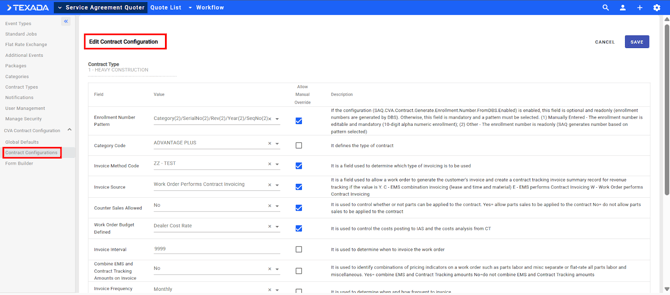
- Configure Field Values
The following fields will push to the CT menu in DBS:- Enrollment Number Pattern
- Options:
- Option 1 - Manually Entered: Enrollment number is editable and mandatory
- Option 2 - Auto-Generated: Enrollment number is read-only; SAQ generates the number based on selected pattern
- Settings:
- When enabled, field is optional and read-only
- Enrollment numbers generated by DBS
- If pattern must be selected, field becomes mandatory
- Options:
- Category Code
Select appropriate category for contract classification - Invoice Method Code
Define how invoices are generated - Counter Sales Allowed
Enable/disable counter sales for this contract type - Work Order Budget Defined
Specify if work order budgets are required - Invoice Interval
Set the interval for invoicing (e.g., monthly, quarterly) - Combine EM and Contract Tracking Amounts on Invoice
Choose whether to combine equipment management and contract tracking amounts - Invoice Frequency Code
Define invoicing frequency - Invoice Arrears or Future
Set whether invoices are billed in arrears or in advance - Invoice Sales Entry Code
Define sales entry classification for invoicing - Automatically Renew Contract
Enable/disable automatic contract renewal - Usage Rate Calculation
Define how usage rates are calculated - Usage Code
Specify usage code for tracking
- Enrollment Number Pattern
- Allow Manual Override Column
For each field listed above, there is an Allow Manual Override checkbox.- Purpose:
- When checked, users can manually override the default field value in DBS
- When unchecked, the field value is locked
- Decision Guidelines:
- Check for fields where flexibility is needed
- Leave unchecked for fields that should remain consistent
- Consider organizational policies and controls
- Purpose:
- Save Configuration
- Review all field settings
- Review manual override selections
- Click Save
- Basic Configuration
Best Practices
- Create separate configurations for different divisions
- Document why specific fields are locked or unlocked
- Test configurations before deploying to production
- Train users on which fields they can modify
Step 10: Form Builder Customization
Purpose
Form Builder allows you to create custom fields for Quotes, Equipment, and Equipment Lists to capture additional information specific to your dealership's needs.
Accessing Form Builder
- From the left menu, click Form Builder
- Select a form name from the Pick a Form Name dropdown
Available Form Types
- Quote - Custom fields for quote-level information
- Equipment - Custom fields for individual equipment records
- Equipment List - Custom fields for equipment list views
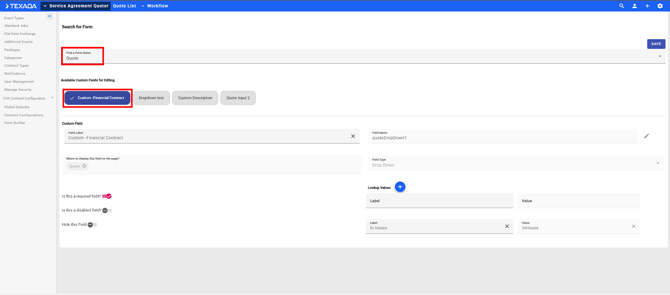
Custom Field Configuration
Each form type provides four available custom fields that you can configure.
Procedure for Each Custom Field
- Select the form name (Quote, Equipment, or Equipment List)
- Choose one of the four available field slots
- Configure the field with the following parameters:
- Custom Field Name
- Enter a descriptive name for the field
- Example: "Customer PO Number", "Special Instructions", "Territory Code"
- Lookup Values (If Applicable)
- For dropdown fields:
- Define the labels (what users see)
- Define the values (what the system stores)
- Example: Label: "High Priority" / Value: "HIGH_PRI"
- For text fields:
- Leave blank
- For dropdown fields:
- Field Requirements
- Required Field
- Checked: Users must complete this field before proceeding
- Unchecked: Field is optional
- Disable Field
- Checked: Field is visible but not editable (display only)
- Unchecked: Field is editable
- Hide Field
- Checked: Field is not visible to users
- Unchecked: Field is visible
- Required Field
- Save Custom Field
- Review all settings
- Click Save
- Repeat for additional custom fields as needed
- Custom Field Name
Custom Field Examples
Example 1: Quote Form - Customer PO Number
- Form Name: Quote
- Field Slot: Custom Field 1
- Field Name: Customer PO Number
- Field Type: Text entry
- Required: Yes
- Disabled: No
- Hidden: No
Example 2: Equipment Form - Warranty Status
- Form Name: Equipment
- Field Slot: Custom Field 2
- Field Name: Warranty Status
- Field Type: Dropdown
- Lookup Values:
- Label: "Under Warranty" / Value: "WARRANTY"
- Label: "Out of Warranty" / Value: "NO_WARRANTY"
- Label: "Extended Warranty" / Value: "EXTENDED"
- Required: Yes
- Disabled: No
- Hidden: No
Best Practices
- Only create custom fields you will actually use
- Use clear, concise field names for the end user
- Document custom field purposes for training
- Test custom fields before deploying to all users
- Review custom field usage periodically
Final Steps
Verification Checklist
Before using SAQ for quoting and creating contracts, verify:
- [ ] All Categories are created
- [ ] All Contract Types are created with descriptive names
- [ ] All Event Types are created and enabled
- [ ] Standard Jobs and Flat Rate Exchange are populated
- [ ] Packages are created and available in iQuote
- [ ] Notifications are configured for key events
- [ ] Users are assigned appropriate roles
- [ ] Security permissions are configured correctly
- [ ] CVA Contract Configurations are created for each contract type
- [ ] Custom fields are configured (if needed)
System Readiness
Once all left menu items are properly configured:
✓ The SAQ application is ready for use
✓ Users can begin quoting contracts
✓ Quotes can be converted to contracts
✓ Enrollment numbers will be generated/returned
Next Steps
- Conduct User Training - Train sales reps and power users on quoting procedures
- Create Test Quotes - Run several test scenarios to verify configuration and results
- Document Processes - Create quick reference guides for common tasks
- Establish Support Procedures - Define who users contact for help
Appendix: Security
Security Permissions Matrix
|
Permission |
Admin |
Power User |
Sales Rep |
|---|---|---|---|
|
Equipment Pricing Edit |
|||
|
Quote Contract Create |
|||
|
Quote CVA Contract View |
|||
|
Quote Approve Edit |
|||
|
Quote CPI Edit |
|||
|
Quote Event Discount |