
In This Article
- Introduction
- Procedure
- Step 1: Access the Quote Creation Screen
- Step 2: Complete the Quote Header Information
- Step 3: Configure Travel Settings
- Step 4: Select the Customer
- Step 5: Add Contact/Influencer Information
- Step 6: Assign the Sales Team
- Step 7: Configure Equipment Defaults
- Step 8: Save the Quote Header
- Step 9: Add Equipment to the Quote
- Step 10: Save and Process Equipment
- Step 11: Review Equipment and Resolve Errors
- Step 12: Final Save
- Step 13: Submit for Approval
- Step 14: Generate the Quote Document
- Step 15: Obtain Customer Signature
- Step 16: Finalize the Contract
- Quick Reference Checklist
- Troubleshooting
Introduction
This manual provides step-by-step instructions for creating a Customer Value Agreement (CVA) quote in Service Agreement Quoter (SAQ) when quoting multiple units for a single customer.
Procedure
Step 1: Access the Quote Creation Screen
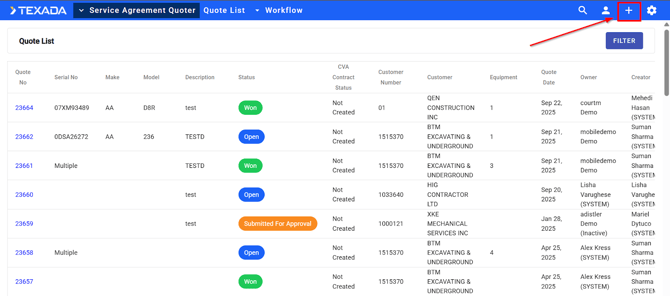
- Log into SAQ
- You will land on the main page displaying a list of existing quotes
- Click the plus sign (+) in the top right corner to create a new quote
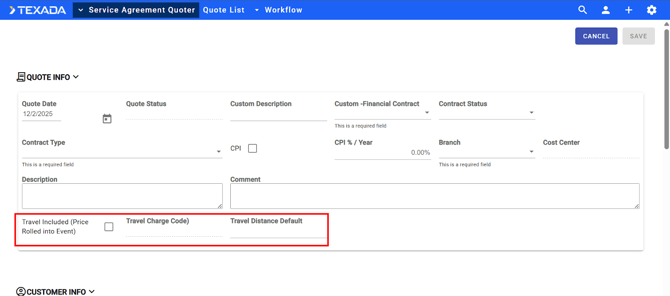
Step 2: Complete the Quote Header Information

Complete the following fields on the quote form. Note that some fields may be custom-configured by your dealership using the admin function within SAQ.
Dealer-Specific Fields (if applicable)
- Payment Type — Select from available options:
- Pay Per Service
- Prepaid Included in Deal
- Prepaid Invoice Upfront
- TM&R
- Contract Status — Select:
- New
- Renewal
Standard Quote Fields
|
Field |
Description |
Action |
|---|---|---|
|
Contract Type |
Defines the type of agreement (Earth Moving, Power Systems, etc.) |
Select from the dropdown list |
|
Cost Per Year Index |
Percentage increase over the contract term |
Enter the annual escalation percentage |
|
Branch |
Dealership branch location |
Select from dropdown |
|
Cost Center |
Cost center for the quote |
Select from dropdown |
|
Description |
Brief description of the quote |
Enter descriptive text (e.g., "Full CVA Quote") |
Step 3: Configure Travel Settings
|
Field |
Description |
Action |
|---|---|---|
|
Travel Included |
When checked, travel costs are rolled into each PM event and hidden from the customer |
Check if you want travel costs embedded in event pricing |
|
Travel Charge Code |
The charge code for travel (mileage or zone) |
Select appropriate code |
|
Travel Distance/Quantity |
Miles or zone quantity per event |
Enter value (e.g., "50" for 50 miles, or "1" for zone charges) |
Tip: If using zone charges, enter "1" as the quantity since you want one zone charge per event.
Step 4: Select the Customer
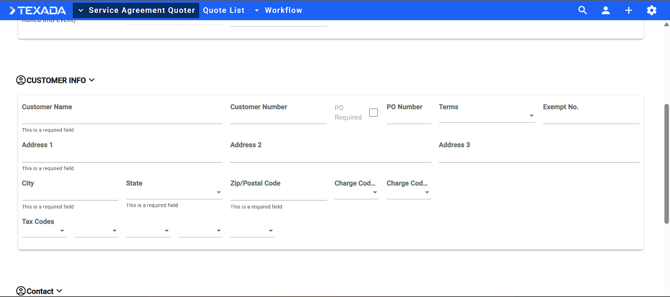
- Click in the Customer Name field a separate dialog box will appear in which you can search
- Type a portion of the customer name to search
- Review the search results, which display:
- Customer Number
- Customer Name
- Equipment Count (number of CAT and non-CAT units on file)
- Phone
- Address
- City
- Click to select the appropriate customer
- Customer information will auto-populate based on system records
Step 5: Add Contact/Influencer Information
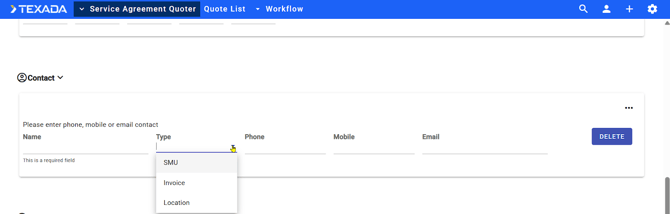
- Under Contact Type, select the role of the contact:
- Location
- Invoicing
- Hours
- To add additional contacts, click the three dots (...) to the right and select Add Contact
Step 6: Assign the Sales Team

- Click the Sales Team dropdown
- Search for and select the account owner/sales representative
- The representative's phone, mobile, and email will populate after saving
Step 7: Configure Equipment Defaults
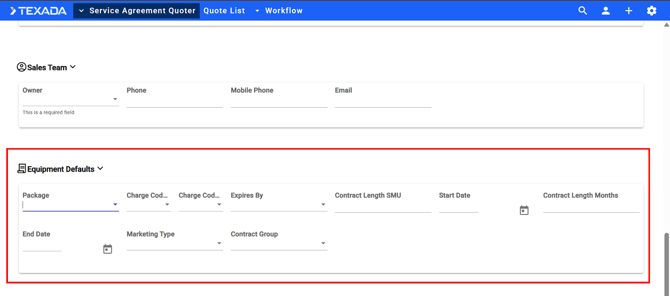
|
Field |
Description |
Action |
|---|---|---|
|
Package |
Contains PM events and occurrence counts |
Select the appropriate package |
|
Charge Code 1 & 2 |
Header charge codes |
Select if applicable |
|
Expires By |
How the contract expires |
Select: Date, Hours, or Both |
|
Contract Length SMU |
Service Meter Units for contract duration |
Enter hours (e.g., 2000) |
|
Contract Start Date |
When the contract begins |
Select date |
|
Contract Length (Months) |
Duration in months |
Enter number (e.g., 24 for 2 years) |
|
Marketing Type |
Classification for CVA team |
Leave for CVA team to complete |
|
Contract Group |
Grouping for CVA team |
Leave for CVA team to complete |
Note: The end date calculates automatically based on start date and contract length.
Step 8: Save the Quote Header
- Scroll to the top of the form
- Click Save
- A "Success" message will appear
- The screen will refresh and switch to another screen to Adde Equipment and will display a Submit for Approval button in the top right corner
Step 9: Add Equipment to the Quote
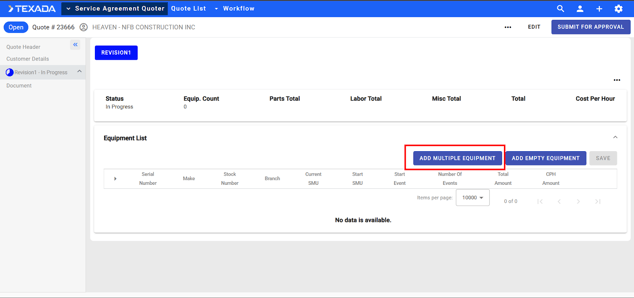
Adding Multiple Units from Customer's Fleet
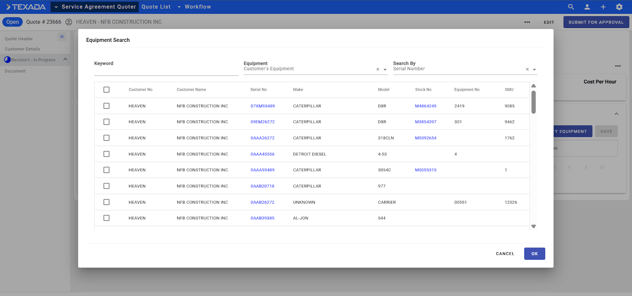
- Click Add Multiple Equipment
- A list of all units on the customer's account will display
- The list can be sorted by:
- Customer Number
- Name
- Serial Number
- Make
- Model
- Stock Number
- Equipment Number
- SMU
- Select individual units by checking their boxes, OR click the checkbox at the top to select all units
- Click OK
Adding Equipment Not in System
If a customer has equipment not yet in the system:
- Click Add Empty Equipment
- Enter Serial Number then click OK
- Manually enter the equipment details
- Click Save
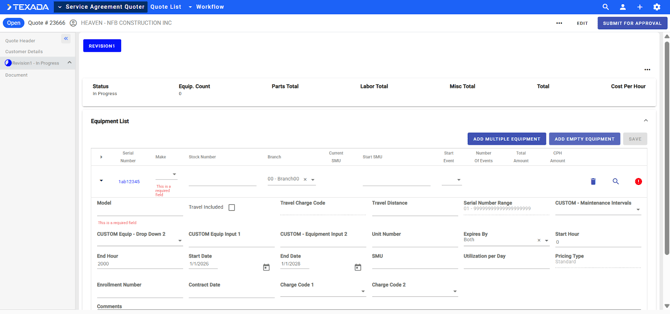
Step 10: Save and Process Equipment
- Click Save immediately after adding equipment
- The system will:
- Process each serial number against the package's PM events
- Match SMCS codes to standard jobs in the ERP/DBS system
- Calculate pricing for each unit
- Wait for the save process to complete (this may take a moment)
Step 11: Review Equipment and Resolve Errors
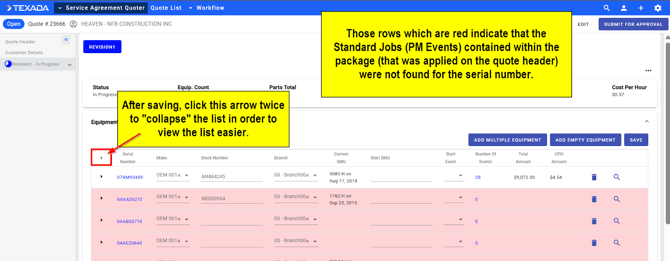
- Click the collapse arrow twice to collapse all serial numbers for an overview
- Review the Total Amount and Cost Per Hour columns for each unit
- Units highlighted in red indicate missing standard jobs for those serial numbers
Resolving Red-Highlighted Units
- Note the serial numbers highlighted in red as those indicate that the Standard Job Events contained in the applied Package (on the quote header) were not found for that serial number).
NOTE: if you believe that the standard job should exist as you see it in ServiceLink or PSQ you will need to verify the SMCS code combination for that Event is the same in SAQ as it is in SVL/PSQ. Ensure ALL of the codes are the same (job, comp, business group, shop/field, etc). - Send this information to your Standard Jobs team
- Request standard jobs be created for those serial numbers
- Once created, return to the quote—the pricing will populate
- Alternatively, delete units without standard jobs by clicking the Delete button next to them
Step 12: Final Save
- After resolving any errors or removing incomplete units, click Save again
- The quote is now ready for approval
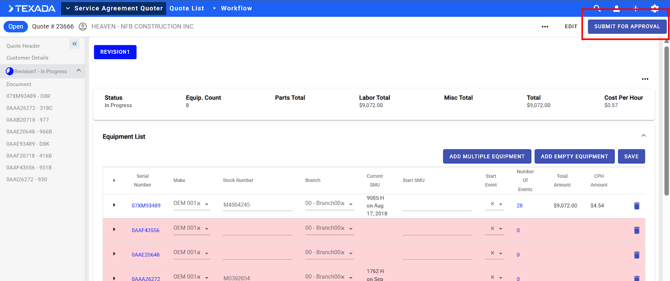
Step 13: Submit for Approval
- Click Submit for Approval in the top right corner
- The appropriate approver(s) will be notified based on SAQ workflow configuration
- Approvers (Sales Manager, CVA Administrator, etc.) will review and either:
- Modify the quote as needed
- Click Approve
- Once approved, the button changes to One W (indicating ready for contract creation)
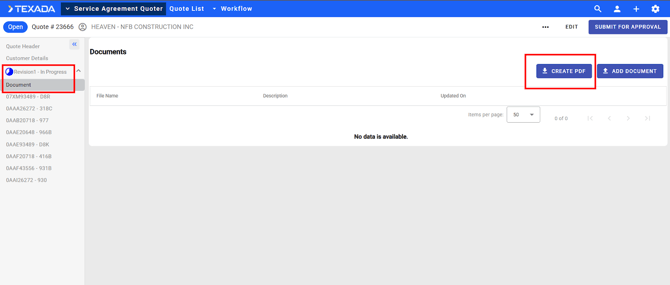
Step 14: Generate the Quote Document
- In the left menu, click Revision 1
- Click on Word Document
- Click Create PDF
PDF Contents
The generated PDF includes:
- Customer information header
- Contact information
- Summary of all quoted units
- Detailed breakdown for each unit:
- Serial number and model
- Unit number (if applicable)
- CVA start dates and start SMUs
- List of included PM events with quantities
- Cost per service
- Terms and conditions
- Signature line
NOTE: There is no current functionality to email a quote directly from SAQ. The user will need to download a PDF then either print out and review with the customer or attach it to an email.
Step 15: Obtain Customer Signature
Important: SAQ does not include DocuSign functionality or the ability to email PDFs directly from the system.
To obtain signature:
- Print the PDF and present to customer in person, OR
- Save the PDF and send via email outside of SAQ
- Obtain customer signature on the document
Step 16: Finalize the Contract
- Once the signed document is received, return to SAQ
- Open the approved quote
- Click the WON button to initiate contract creation
Quick Reference Checklist
- [ ] Create new quote (+)
- [ ] Complete header fields (payment type, contract status, contract type, etc.)
- [ ] Configure travel settings
- [ ] Select customer
- [ ] Add contacts/influencers
- [ ] Assign sales team
- [ ] Select package and equipment defaults
- [ ] Save header
- [ ] Add equipment (multiple or empty)
- [ ] Save and process equipment
- [ ] Resolve any red-highlighted units
- [ ] Save final quote
- [ ] Submit for approval
- [ ] Generate PDF after approval
- [ ] Obtain customer signature
- [ ] Complete contract creation (One W)
Troubleshooting
|
Issue |
Cause |
Solution |
|---|---|---|
|
Units highlighted in red |
No standard jobs for serial number |
Contact Standard Jobs team to create jobs for those serial numbers |
|
Long save times |
System processing against ERP |
Wait for completion; training environments may be slower |
|
Missing sales rep contact info |
Data populates after save |
Save the quote to populate phone, mobile, and email |
For information on modifying quotes from standard packages per individual serial numbers, see "Modifying Quotes by Serial Number".