In This Article
- Introduction
- Accessing the Quote and Serial Numbers
- Modifying Equipment Details (Contractual Information)
- Reviewing Event History and Pricing
- Adding or Deleting PM Events
- Editing PM Event Structure (Parts vs. Labor Selection)
- Modifying Parts Lists
- Modifying Labor and Miscellaneous Charges
Introduction
This guide outlines the procedures for modifying a quote at the individual serial number level within Service Agreement Quoting (SAQ). This includes customizing equipment details, changing PM event structures (e.g., Parts Only vs. Full Service), and modifying specific parts, labor, and miscellaneous charges.
Accessing the Quote and Serial Numbers
To begin modifying a specific unit within a quote, you must navigate to the specific revision level.
- Open the Quote List: From the main SAQ dashboard, locate your target quote.
- Select the Quote: Click the hyperlink of the Quote Number (e.g., 20394) to open it.
- Select the Revision: On the left-hand menu, click on Revision 1.
- Result: The left-hand menu will display the list of serial numbers included in the quote. The main screen will display the Equipment List.
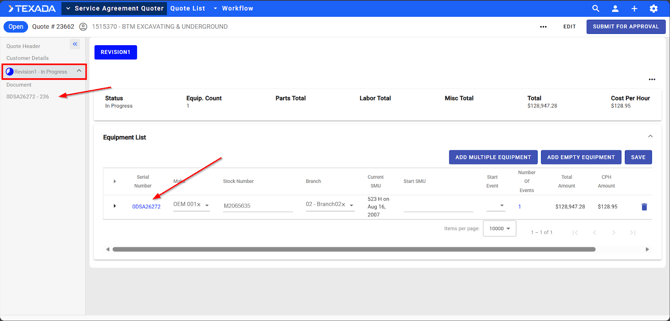
Modifying Equipment Details (Contractual Information)
This section covers customizable fields at the equipment level, such as start hours, start events, and travel charges.
Procedure:
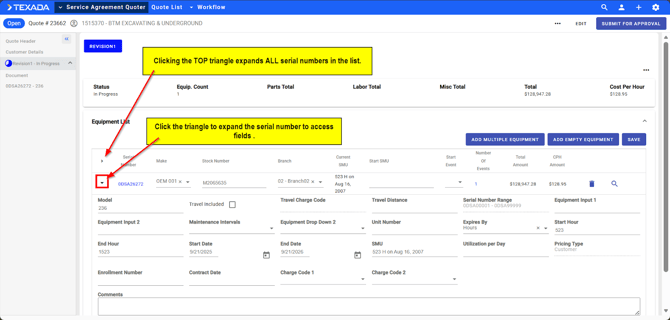
- Expand the Serial Number in the list: Click on the triangle in the equipment list to expand its details. Clicking the TOP triangle in the equipment list expands ALL serial numbers (see pic)
- Review/Edit Custom Fields:
- Check for dealer-specific custom fields (e.g., "Custom Parts" - Yes/No).
- These fields identify if a unit has been modified from the standard job.
- Update Start Information:
- Start SMU: If the unit is not connected or data is missing, manually enter the current hours (e.g., 12,350).
- Start Event: Select the specific service event that needs to be performed first (e.g., 500-hour service).
- Update Logistics/Travel:
- Travel Charge Code: Change or delete the code if necessary.
- Zone Charge: Update if applicable.
- Travel Distance: Manually enter the distance (e.g., 25 miles).
- Save Changes: Click the Save button to commit these changes to the specific serial number.
Note: You can collapse the current serial number and expand the next one to repeat this process for multiple units efficiently.
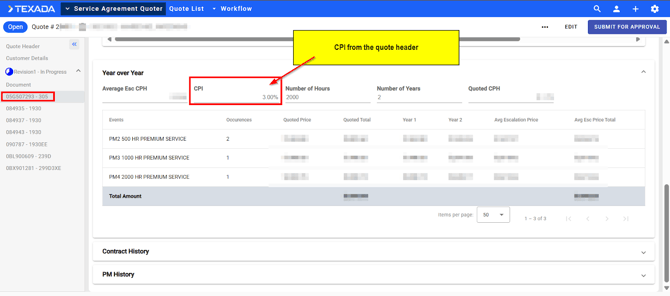
Reviewing Event History and Pricing
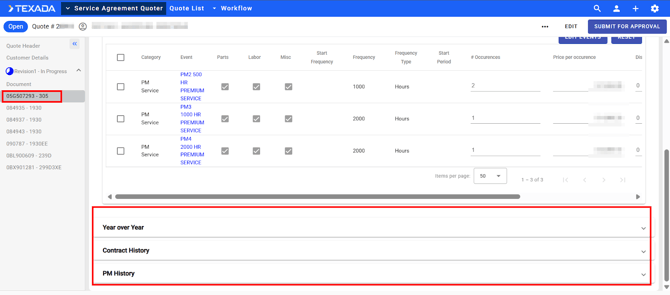
Before making any modifications to a serial number, it is recommended to review the pricing breakdown and previous history of the unit.
- Select the Serial Number: Click on the serial number to open the detailed view.
- View Financials:
- Review the Year-Over-Year section to see CPI (Consumer Price Index) amounts (e.g., 3%).
- Review Quoted Price, Year 1/Year 2 totals, and Average Escalation Price.
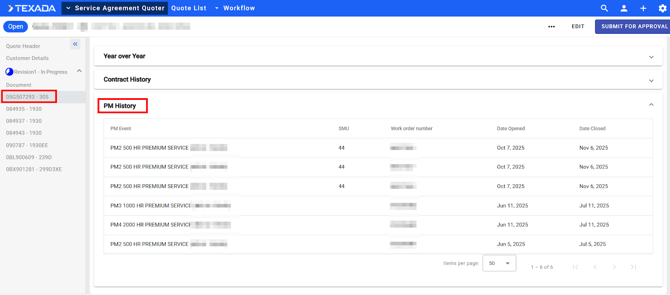
- Review Contract History: Scroll down to see prior contract Start/End dates and SMU data (if available).

- Review PM History:
- Locate the PM History section.
- View the last PM Event performed, the SMU at that time, the Work Order Number, and Open/Close dates.
- Usage: Use this data to determine the correct "Start Event" for the new contract.
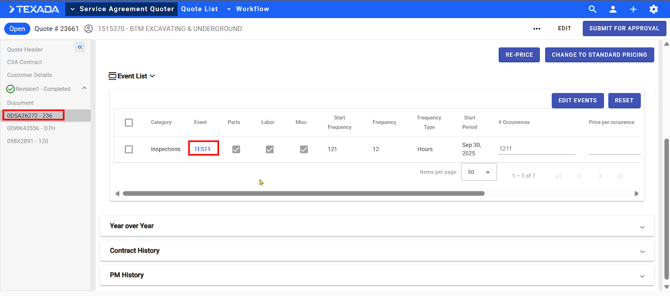
Adding or Deleting PM Events

This procedure allows you to add or delete an event/additional event. Packages contain a preset list of events/additional events for which may need to be modified per serial number.
Prerequisite: The "Edit Events" capability must be enabled by your CVA administrator during the initial setup.
- Select the serial number: Either on the left or from the list in the center
- Enter Edit Mode: Click the Edit Events button located above the event list
Editing PM Event Structure (Parts vs. Labor Selection)
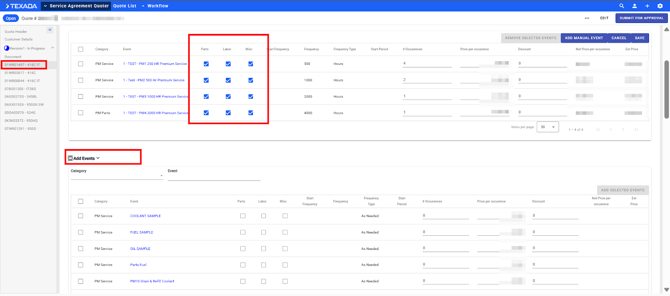
This procedure allows you to mix "Parts Only" events with "Full Service" events within the same quote (e.g., making 250hr/500hr events "Parts Only" while keeping 1,000hr events "Full Service").
Prerequisite: The "Edit Events" capability must be enabled by your CVA administrator during the initial setup at each individual Event level.
- Select the serial number: Either on the left or from the list in the center.
- Enter Edit Mode: Click the Edit Events button located above the event list.
- Toggle Components: You will see checkboxes for Parts, Labor, and Miscellaneous.
- To create a Parts Only event: Deselect Labor and Miscellaneous for the specific event (e.g., 250 Hr).
- To create a Full Service event: Ensure Parts, Labor, and Miscellaneous are all checked (e.g., 1,000 Hr).
- Modify Occurrences/Discounts:
- Update the number of occurrences if needed.
- Apply a discount percentage in the Discount column if required (Note: This discounts the entire event).
- Save Changes: Click Save to apply the structure changes.
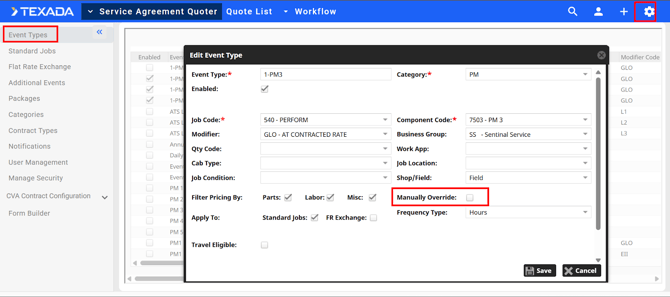
NOTE: If the check boxes are not DE-selectable after the Edit button has been pressed, it is due to the individual Events needing to be enabled (see pic).
Modifying Parts Lists
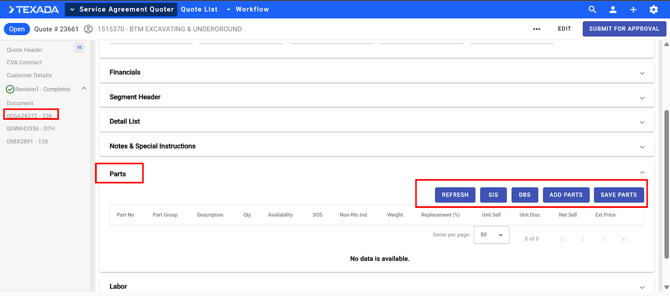
If a specific unit requires additional filters or part removals, follow these steps.
- Select the Event: Click on the specific PM Event you wish to modify (e.g., PM1 - 250 Hour).
- Navigate to Parts: Scroll down past the event header information to the Parts section.
- Add/Modify Parts: You have three options to add parts:
- Option A: SIS Integration: Click the SIS Site button to open SIS, select parts, and return them to SAQ. Alternatively, use SIS Upload to upload a saved list.
- Option B: DBS Document: Enter a DBS Document Number to pull parts from an existing quote.
- Option C: Manual Search:
- Type the part number in the search bar (e.g., 1R0751).
- Select the part from the inventory list.
- If an alternate part is available, you may select it here.
- Adjust Quantities: Locate the newly added part in the list and change the Quantity field as needed (e.g., change 12 to 1).
- Save Parts: Click the Save Parts button to confirm the addition/modification.
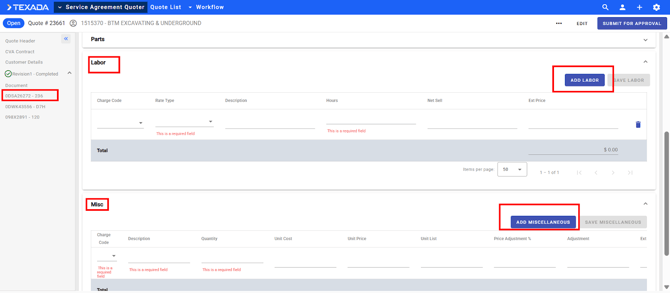
Modifying Labor and Miscellaneous Charges
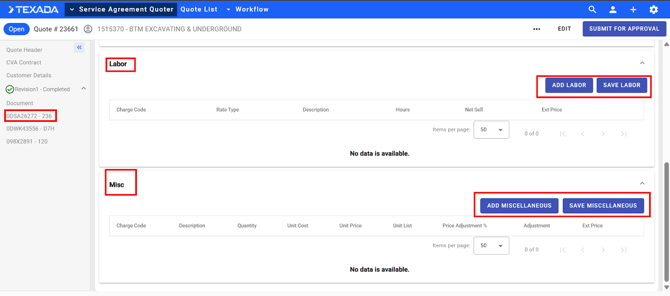
To adjust labor hours or add miscellaneous fees to a specific event:
- Select a Full Service Event: Click on an event where Labor/Misc is enabled (e.g., PM3).
- Modify Labor:
- Scroll to the Labor section.
- Edit: Change the Charge Code, Rate Type, or Hours.
- Add: Click the option to add a labor line item.
- Delete: Select a line item to remove it.
- Modify Miscellaneous:
- Scroll to the Miscellaneous section.
- Add: Select a charge type from the drop-down menu. The description will auto-populate.
- Quantity: Enter the quantity for the charge.
- Save: Ensure you save the event changes before navigating away.