
In This Article
- Introduction
- Timeline: What to Expect
- Extend Microsoft EWS Access
- Remove an Application ID
- Longer Term: Migrating to Microsoft Graph
Introduction
Microsoft recently announced that it will be retiring Exchange Web Services (EWS) in Exchange Online. EWS will be disabled for all tenants by default on October 1, 2026, with the service becoming permanently unavailable on April 1, 2027.
This change will impact Equipment CRM’s integration with Microsoft Outlook Calendars. As such, Texada is actively working on transitioning this integration from EWS to Microsoft’s Graph APIs. More information on this transition will become available as the cutoff date approaches.
As a temporary measure, adding Equipment CRM to your Microsoft 365 EWS Allow List will allow the integration to remain functional from October 2026 - April 2027. Keep reading to learn how to complete this process.
Timeline: What to Expect
October 1, 2026 – Microsoft begins disabling EWS by default across Exchange Online tenants. Any tenant that has not explicitly enabled EWS with an Allow List is switched off.
April 1, 2027 – Microsoft permanently removes EWS. There is no re-enablement after this date, and the configuration in this guide will no longer help.
Complete this guide as early as you can. Two reasons it matters even if you cannot finish immediately:
- Your Allow List configuration persists through Microsoft's October 1 change. If your tenant is switched off, restoring your sync is a single command rather than starting over.
- Configuring early gives you time to inventory your other EWS applications (see the tenant-wide warning below) without doing it under outage pressure.
A brief interruption around October 1 is possible. Microsoft's guarantee of no interruption applied only to tenants configured before the end of August 2026. If you are reading this afterwards, follow this guide now and then complete the October 1 verification described below — that check turns a potential multi-day outage into a few minutes of work.
⚠️ STOP: READ BOTH REQUIREMENTS BEFORE YOU BEGIN ⚠️
1. Permission requirement
Microsoft does not provide a visual interface to configure this setting; it must be done through PowerShell.
The person running the PowerShell commands below must be an IT administrator holding the Exchange Administrator or Global Administrator role in your Microsoft 365 environment. If you do not hold one of these roles, the commands will fail with a "Command Not Found" error even though you signed in successfully — Exchange Online hides commands your account isn't authorized to run.
If you are not an Exchange admin, please forward this guide to your IT department.
2. This is a tenant-wide change
Once you set an Allow List and enable EWS, only the applications on that list can use EWS. Any other application in your tenant that relies on EWS — backup tools, archiving or migration products, Skype for Business hybrid, Power Query for Excel — will stop working unless its Application ID is also on the list.
Before you start: review the EWS usage report in the Microsoft 365 admin center (Reports → Usage → Exchange → EWS Usage) to identify every application currently using EWS in your tenant. Collect the Application IDs of everything you intend to keep, not just ours. Step 6 lets you add them all in a single command.
Allow yourself time for this. Tracking down which teams own which applications often takes longer than the configuration itself.
Extend Microsoft EWS Access
Step 1: Retrieve your Application (client) ID
First, you need the unique ID of the application set up for your Equipment CRM integration.
- Log into the Microsoft Azure Portal using your administrator credentials. (The Microsoft Entra admin center works too, if you prefer it.)
- In the top search bar, type App registrations and select it from the services list.
- Click the All applications tab.
- Find and click the application created for your Equipment CRM integration (e.g. “saleslink-collaboration”).
- On the Overview page, locate Application (client) ID. Copy this ID into a Notepad file — you will need it in Step 6.
Use Notepad, not Word. Word and other rich-text editors silently convert straight quotes (' and ") into curly quotes, which will cause the PowerShell commands in this guide to fail with a confusing syntax error.
Repeat this step for any other applications you identified in the tenant-wide change section above, collecting all of their Application IDs in the same Notepad file.
Step 2: Open PowerShell as an Administrator
- On a Windows computer, open the Start Menu and type “PowerShell”.
- Right-click on Windows PowerShell and select Run as Administrator. Click "Yes" if Windows asks for permission.
Step 3: Install the Exchange Management Module
Complete this step even if you have installed the Exchange Management module before, to make sure you have a current version.
- Run the following command in PowerShell:
Install-Module -Name ExchangeOnlineManagement -Force -AllowClobber
- If you see a prompt about a "NuGet provider" or an "Untrusted repository", type “Y” and press Enter to approve it.
- Wait for the installation to finish.
Step 4: Connect to Exchange Online
- Run the following command in PowerShell:
Connect-ExchangeOnline
- Sign in with your Microsoft 365 Exchange Administrator or Global Administrator account. Wait for the login window to finish, then return to the blinking PowerShell cursor.
Step 5: Record your current configuration
- Before changing anything, run the following command to capture the current state so you have something to restore from:
Get-OrganizationConfig -RetrieveEwsOperationAccessPolicy | Format-List EwsEnabled, EwsAllowedAppIDs
- Take a screenshot of this output. If anything needs to be validated or reverted later, this is the first thing support will ask for.
Step 6: Apply the Extension Command
This adds your applications to Microsoft's EWS Allow List and enables EWS for them.
- Copy the following line of code into your Notepad file:
$appIdsToAllow = @("YOUR-APPLICATION-ID-HERE"); $current = (Get-OrganizationConfig -RetrieveEwsOperationAccessPolicy).EwsAllowedAppIDs; if ([string]::IsNullOrWhiteSpace($current)) { $existing = @() } else { $existing = @($current -split ',' | ForEach-Object { $_.Trim() } | Where-Object { $_ }) }; foreach ($id in $appIdsToAllow) { if ($existing -notcontains $id) { $existing += $id } }; Set-OrganizationConfig -EwsAllowedAppIDs ($existing -join ','); Set-OrganizationConfig -EwsEnabled:$true - Replace YOUR-APPLICATION-ID-HERE with the Application (client) ID from Step 1. Make sure to keep the quotation marks on either side.
- If you have more than one Application ID to allow, list them all inside the parentheses, comma-separated, each in its own quotation marks:
@("ID-ONE","ID-TWO","ID-THREE") - Once updated, copy the entire line, paste it into PowerShell, and press Enter.
Notes
- Do not worry if the command wraps across multiple lines in your PowerShell window — it will run correctly as a single command.
- This command preserves any Application IDs already on your Allow List and will not create duplicates. It is safe to run again if you need to add more applications later.
- If the command fails with an error on -EwsAllowedAppIDs, this feature may not have finished rolling out to your tenant yet. Wait a few days and try again. If it still fails after a few days, contact support.
Step 7: Verify the Configuration
- Run the following command in PowerShell:
Get-OrganizationConfig -RetrieveEwsOperationAccessPolicy | Format-List EwsEnabled, EwsAllowedAppIDs
- If EwsEnabled shows as True and your Application ID appears under EwsAllowedAppIDs, you are done. Take a screenshot of the completed configuration for your records, then close the PowerShell window.
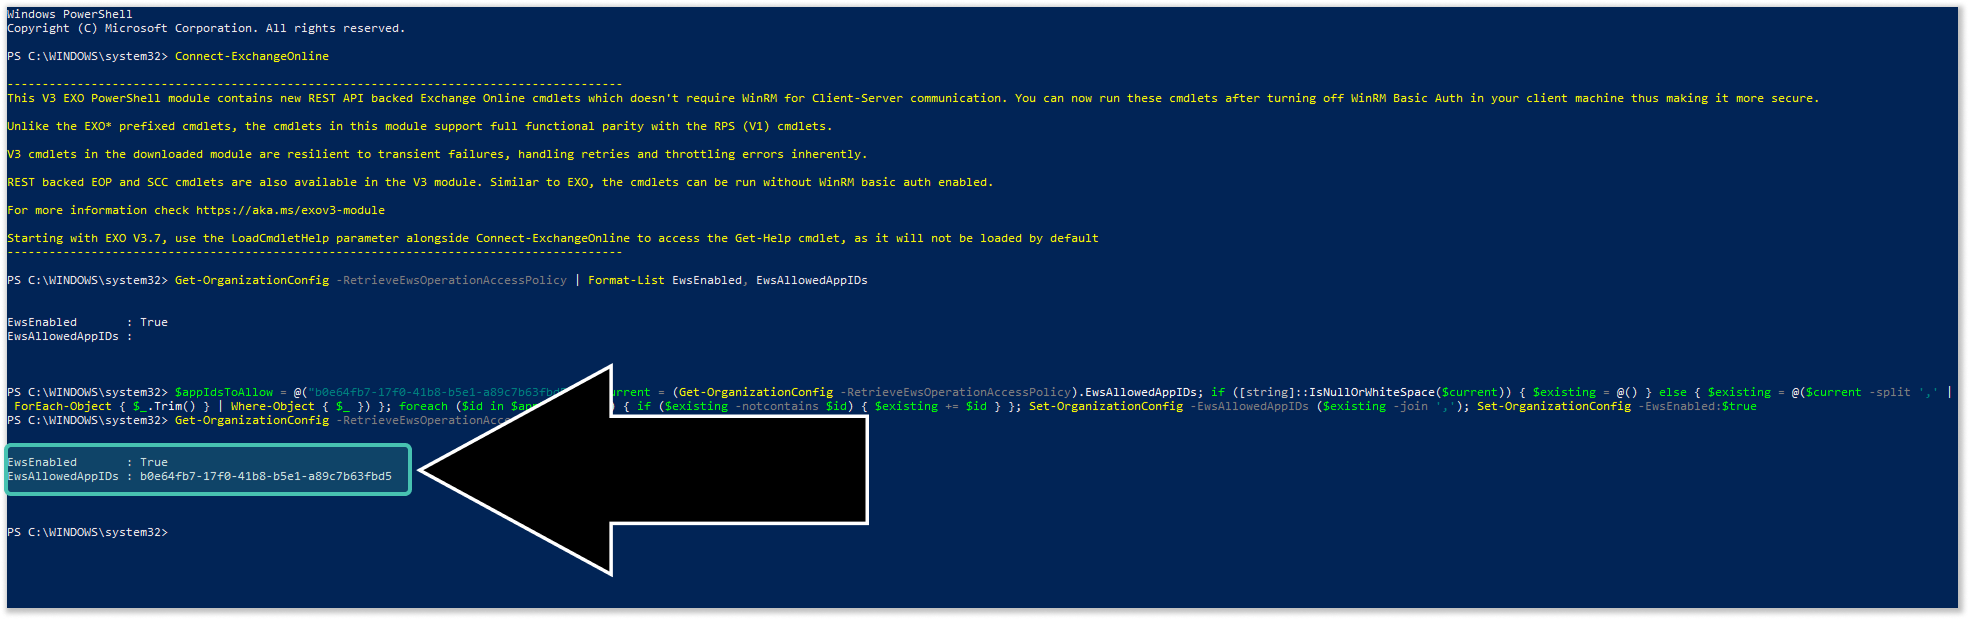
Changes can take up to 24 hours to fully apply. If the verification above does not show what you expect but you are confident you followed the instructions correctly, wait 24 hours and check again before making further changes.
Step 8: Re-verify on October 1, 2026 (Important)
- Set a calendar reminder for October 1, 2026. On or shortly after that date, run the verification command from Step 7 one more time:
Get-OrganizationConfig -RetrieveEwsOperationAccessPolicy | Format-List EwsEnabled, EwsAllowedAppIDs
|
Result |
What it means |
What to do |
|
EwsEnabled is True and your ID is listed |
Your tenant was not affected by Microsoft's automatic change |
No further action needed |
|
EwsEnabled is False |
Microsoft's automatic change was applied to your tenant |
Re-run the command in Step 6 to restore access. Your Application IDs are still saved, so this takes effect as soon as it propagates. |
This check takes under a minute and is the difference between a short, controlled interruption and an outage that goes unnoticed for days.
If you configure this guide after October 1, 2026, you do not need a separate check — Step 7 already confirms your configuration is correct, and your sync resumes once the change propagates.
Remove an Application ID
⚠️ STOP: OPTIONAL ROLLBACK SECTION ⚠️
You only need this section if you entered the wrong Application ID during setup. Otherwise, you can ignore it.
This removes only the Application ID you specify, leaving all other IDs on the list intact.
If the incorrect ID is the only one on your list, add the correct Application ID first by re-running Step 6, then remove the incorrect one. This keeps at least one application on the list at all times. Never leave the Allow List empty while EWS is enabled — from October 1, 2026, an empty Allow List blocks all EWS access rather than allowing it.
Step 1: Open PowerShell and Connect
- If you closed your previous session, open PowerShell as an Administrator and run:
Connect-ExchangeOnline
- Sign in with your Exchange Administrator or Global Administrator account.
Step 2: Run the Rollback Command
- Copy the following command into Notepad and replace YOUR-APPLICATION-ID-HERE with the incorrect Application ID you want to remove:
$appIdToRemove = "YOUR-APPLICATION-ID-HERE"; $current = (Get-OrganizationConfig -RetrieveEwsOperationAccessPolicy).EwsAllowedAppIDs; if (-not [string]::IsNullOrWhiteSpace($current)) { $newList = @($current -split ',' | ForEach-Object { $_.Trim() } | Where-Object { $_ -and $_ -ne $appIdToRemove }); if ($newList.Count -eq 0) { Set-OrganizationConfig -EwsAllowedAppIDs $null } else { Set-OrganizationConfig -EwsAllowedAppIDs ($newList -join ',') } } - Copy the entire command, paste it into PowerShell, and press Enter.
Step 3: Verify the Removal
- Run the following command in PowerShell:
Get-OrganizationConfig -RetrieveEwsOperationAccessPolicy | Format-List EwsAllowedAppIDs
- Confirm that the incorrect Application ID is no longer listed, and that any other Application IDs are still present. If you have not already added the correct Application ID, return to Step 6 and add it now.
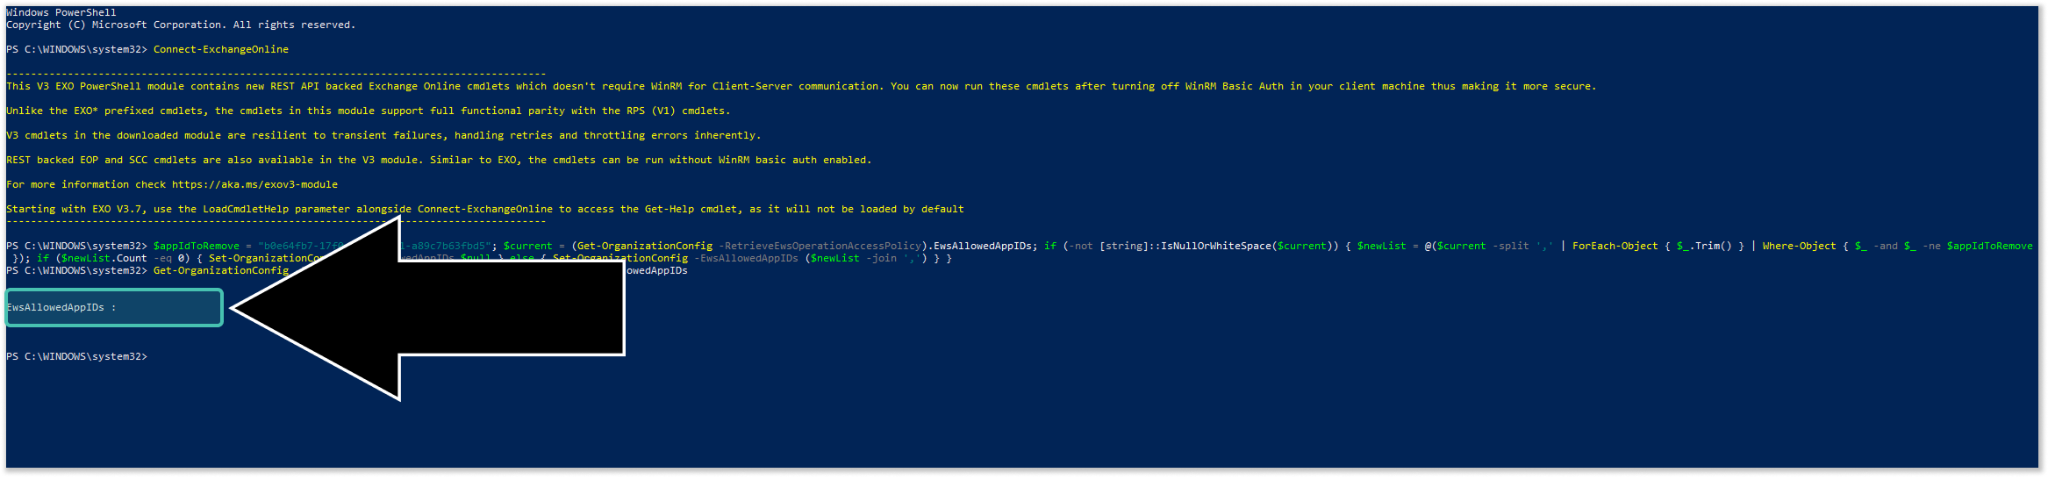
Remember that changes can take up to 24 hours to fully apply.
Longer Term: Migrating to Microsoft Graph
The Allow List is a temporary bridge, not a permanent solution. Microsoft will permanently remove EWS on April 1, 2027.
Texada is actively working on a permanent solution that utilizes Microsoft’s Graph APIs. We will be providing detailed instructions on implementing this solution as we get closer to completing the new integration. Please stay tuned for more information.