CloudLink Console: UCC And OLGA File Upload
New functionality that allows CloudLink Console users to upload updated UCC and OLGA files directly into CloudLink platform.
This feature is not configurable and is available for all dealers who use OLGA and UCC.
Who (is this for): Authorized CloudLink Console users.
What (is it): The ability to upload new UCC and OLGA files.
Why (is this important): As there is no longer a need to initiate a support ticket to have files uploaded, this saves time and increases visibility to the file upload process.
When (would you use this): When uploading new UCC or OLGA files.
Where / How (would you use it): CloudLink Console → Uploads → Uploads List.
Feature Overview
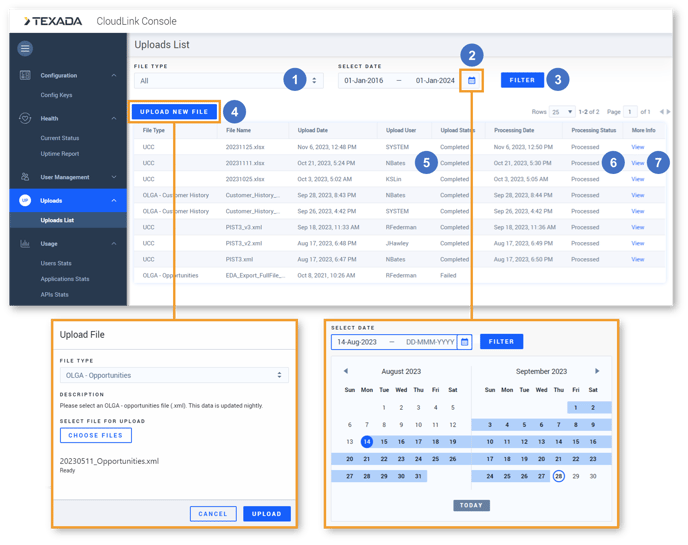
- File Type
Select a file type from the drop-down list to only display files of that type. - Select Date
Displays the range of dates for which files are shown. Click on a date in the text box to manually enter a start or end date. Dates must be entered in the format DD-MMM-YYYY. Click the calendar iconto open the calendar, then click on a pair of dates to set a start and end date.
- Filter Button
Once you have selected a file type (1) and date range (2), click this button to apply the filter. - Upload New File Button
Click to open the “Upload File” pop-up. Select a file type from the drop-down, then click the “Choose Files” button to select a file to upload from your computer.
After a file is successfully uploaded, a backend process will be triggered. OLGA files are processed nightly and UCC files are processed hourly.
Users can only upload one file at a time. .zip files are not supported. - Upload Status
Uploaded files will show one of the following statuses:- Completed: The file has been uploaded.
- Failed: The upload has failed.
- Canceled: A user has manually canceled the upload.
- Processing Status
Files being processed with show one of the following statuses:- Scheduled: The file is awaiting to be processed.
- Processed: The file was successfully processed.
- Canceled: A user has canceled the request to process.
- Failed: Processing has failed.
- More Info
This column contains additional actions depending on the file’s status:- Cancel: Click to cancel processing for a file that is currently processing or scheduled to be processed.
- View: Click to view the details of a processed file.
.png?width=365&height=50&name=Texada%20Logo%20(Black).png)
