
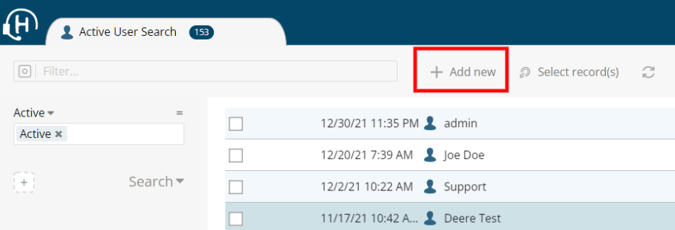
Add a New User
From any saved search in admin tools, you can select “Add new.” You’ll then need to set permissions for that specific user. Here’s how to do that:
Step 1: Profile Tab
Starting with the “Profile” tab, fill in the required fields:
- LoginID: This is the 1.0 login id. It can’t be updated after the initial user creation.
- Password: This is a generic password. The system will prompt the user to create their own personal password.
- First Name: This is the name the user wants to use in the system. It may be a nickname.
- Last Name
Then, add in these additional fields:
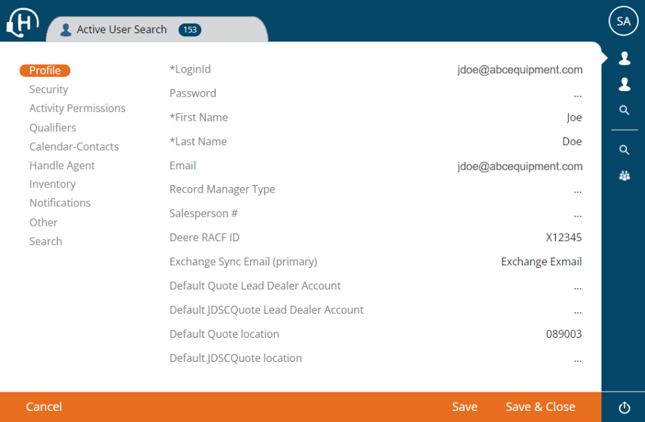
- Email: This is not a required field to create a user, but an email is required to activate their login access. Please double check there are no spelling errors in the email address.
- Record Manager Type
- Salesperson #: Choose from a drop-down list of all salespeople in the business system. Used for salesperson drop-down menus.
- Deer RACF ID - XID#: Used for Quote Sync.
- Branch/Location: Choose from a drop-down of all possible locations.
- Exchange Sync Email (primary): Used in the Outlook/Gmail integration.
- Default Quote Lead Dealer Account (full users only)
- Default Quote Location (full users only)
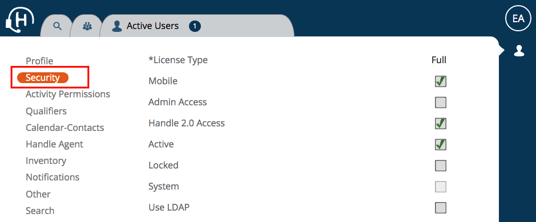
Step 2: Security Tab
Under the “Security” tab, set these parameters:

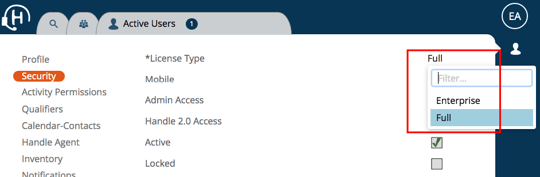
- Choose the license type. For enterprise, set it to Limited. For full users, set it to Full.
- If the user requires a mobile license, select the checkbox next to that field. Verify the status is set as active.
- Select Handle 2.0 access to turn on their login access.
- If you want to force the user to reset their password for any reason, select “Force Reset Password.”
If You See this Error: Email [Address] Is Already Taken
When you’re trying to create a new account, you may encounter an error that says, “Email [Address] Is Already Taken. Please Try a Different Email Address.”
Here’s how to resolve this issue:
- Go to the Handle Admin Menu
- Create a search that shows both active & inactive users
- Update to a grid view and use the filter to search by email address
- The results should include accounts that have the desired email address
- Update the unwanted accounts' email addresses. The easiest thing to do is to add a +1 before the @. For example, Name#1@domain.com.
- Update the desired user profile with the correct address and update the security permission to “Active” & “Handle 2.0 Access” and click save.
Give Enterprise or Full Access to the User
- Log into ADMIN.
- Search for and select a user.
- Select “Security” in the navigation bar.
- Under License Type, select “Full” or “Enterprise” from the dropdown.
- Click Save.
The Enterprise user is a free user type with significant limits on data access. They are not able to view quotes or inventory.