
Give a User Access to Data Types
- Search for and select a user.
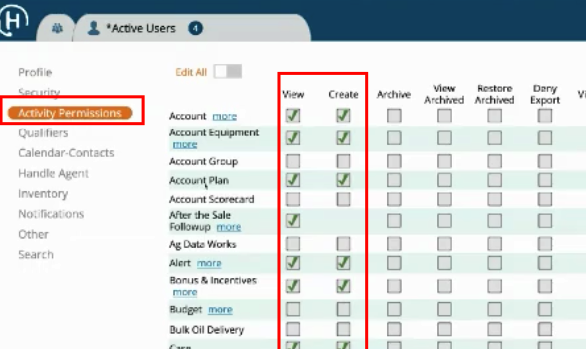
- Select “Activity Permissions” from the navigation bar.
- Ensure the first two checkboxes, View and Create, are checked.
- Ensure the first two checkboxes for “Team” are checked.
- If required, allow the user to see all.
- Click Save.

Modify Existing User Permissions
Handle lets you modify permissions for individual users or do a mass update for all users.
Update permissions for single users
In the user’s profile, go to the “Activity Permissions” tab. From there, you can check the permissions you want that user to have.
Mass update user permissions
For all users set the following permissions:
- JDQuote Trade
- View = True
- View Others = All
- Searching (Deal-Searching)
- View = True
- Edit = True
- View Others = All
- Edit Others = All
- Can view JdQuote TradeIn = True
Activate an Existing User for 2.0 Access
- Select the user’s profile.
- Go to the “Security” tab.
- Check the box for “Handle 2.0 Access.”
Default 2.0 Username and Password
When you select “Handle 2.0 Access” from the security tab, this defaults the username and password for 2.0 based on the following:
Username is the email address, which is pulled from the email field on the “Profile” tab.
Password is a combination of three fields from the “Profile” tab: Firstname.Lastname.XID#. It is case sensitive, so if you entered their xid# as lower case, wit will be lower case in the password.
For example, for this user:
- FirstName = Larissa
- LastName = Boecker
- Deere Racf id = x123456
The password = Larissa.Boecker.x123456
If the user does not have an XID# entered, the default password then becomes Firstname.Lastname.