
Quick Reference
- To create a new User in the GateWay Administration Panel:
- Navigate to Users → User List in the left navigation menu.
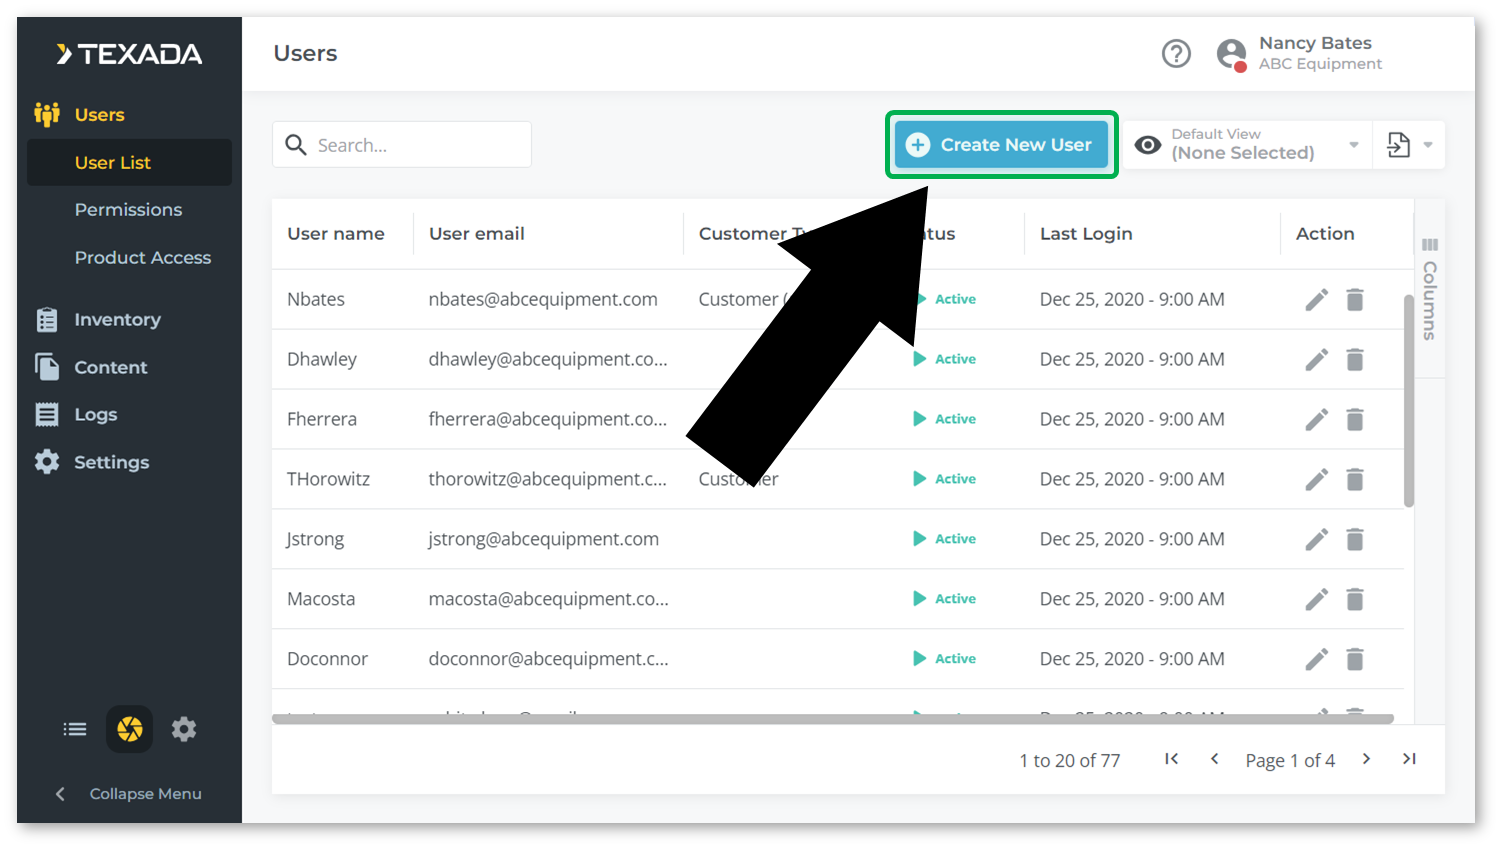
- Click the “Create New User” button in the top-right corner of the page.
- Fill out the information for the new User, then click the “Create” button.
- To edit an existing User in the GateWay Administration Panel:
- Navigate to Users → User List in the left navigation menu.
- Locate the User you’d like to edit and click the pencil icon
under the Action column.
- Edit the User’s information as desired, then click the “Save” button.
- There are three different portal access levels for GateWay Users, which can be set using the Portal Access buttons under the Access panel:
- Customer w/o Access: The User does not have access to the Customer Access Portal.
- Customer: The User can access the Customer Access Portal as a Customer.
- Salesman: The User can access the Customer Access Portal as a Salesman, meaning they can potentially access the portals for multiple different companies.
Introduction
Adding new GateWay Users, as well as modifying existing Users, can be accomplished via the User List page in the GateWay administration panel. The following article will detail the process of creating and editing Users.
Create a User
To create a new User in the GateWay Administration Panel:
- Navigate to the User List page by selecting Users → User List in the left navigation menu.
- Click the “Create New User” button in the top-right corner of the page.
- Fill out the information for the new User, including at minimum a name and email address. For more information on the contents of the Create User page, see “The Create / Edit User Page”.
- Once you are finished, click the “Create” button to create the User.
Edit a User
To edit an existing User in the GateWay Administration Panel:
- Navigate to the User List page by selecting Users → User List in the left navigation menu.
- Locate the User you’d like to edit and click the pencil icon
- Edit the User’s information as desired, then click the “Save” button. For more information on the contents of the Edit User page, see “The Create / Edit User Page”.
The Create / Edit User Page
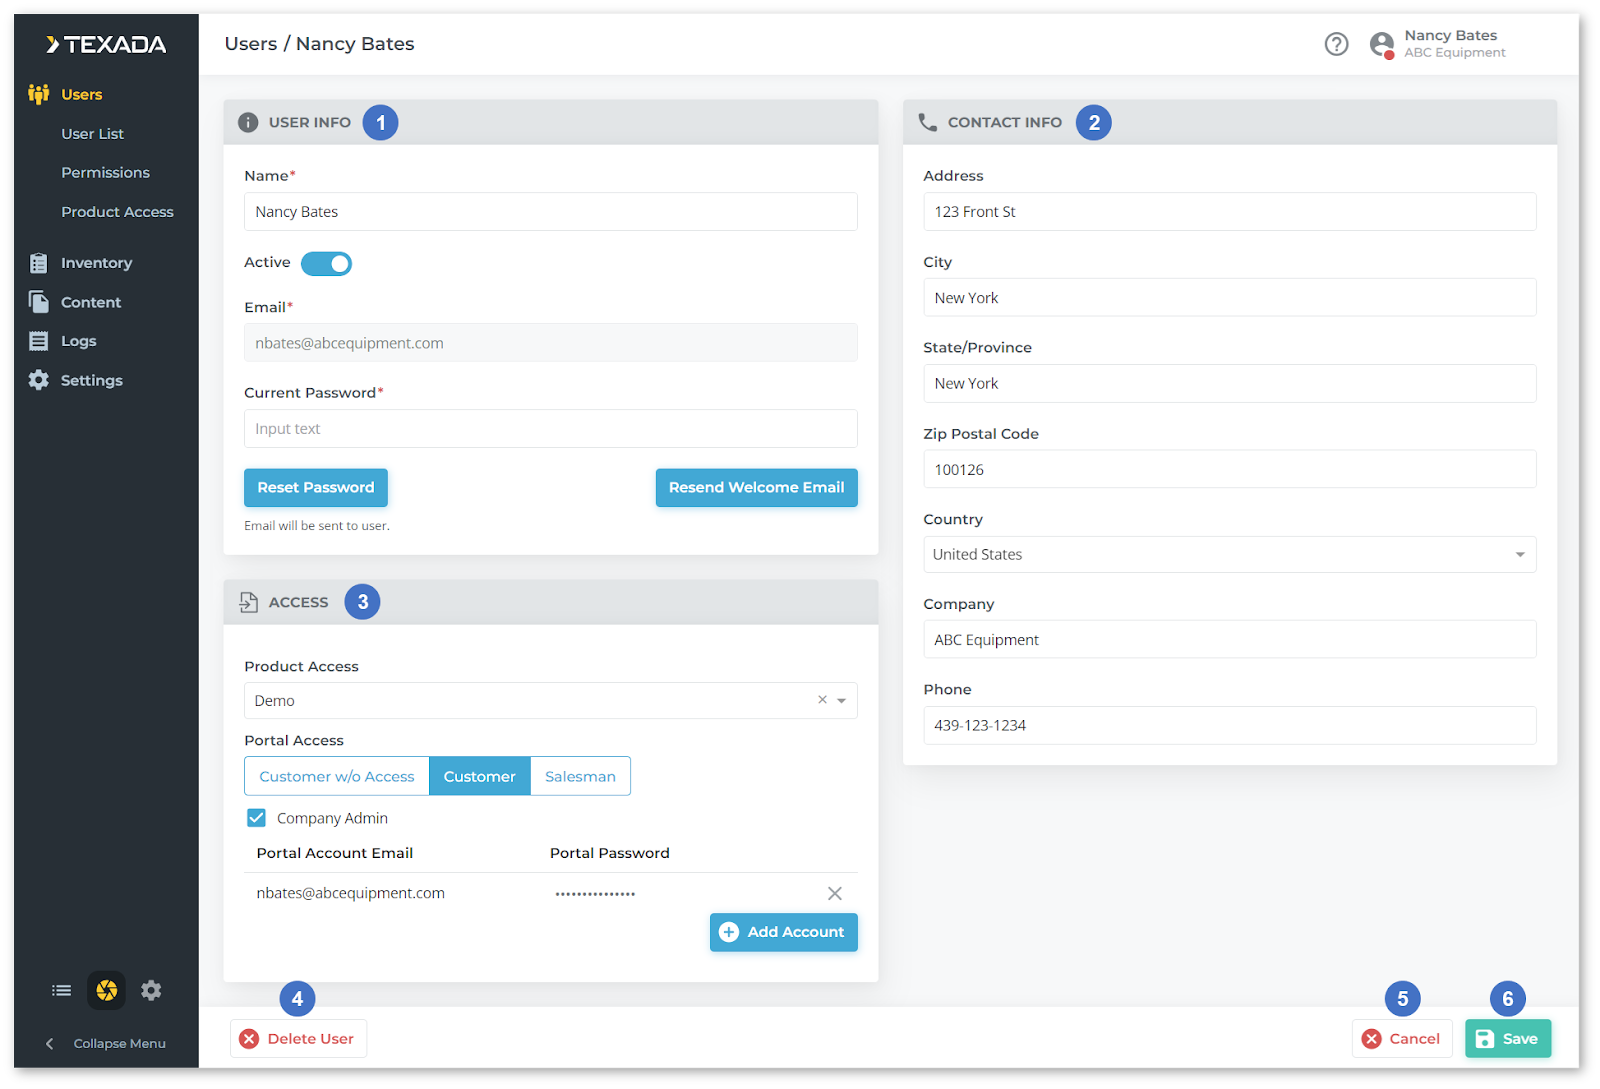
- User Info Panel
Contains basic information about the User, including name and email address. - Contact Info Panel
Contains the User’s contact information. - Access Panel
Allows you to control the User’s access type and portal credentials, if applicable. - Delete User Button
Edit mode only. Click the delete the User. - Cancel Button
Click to exit creation or editing without saving your changes. - Create / Save Button
Click to save your changes.
User Info Panel
This panel contains basic information about the User, including name and email address.
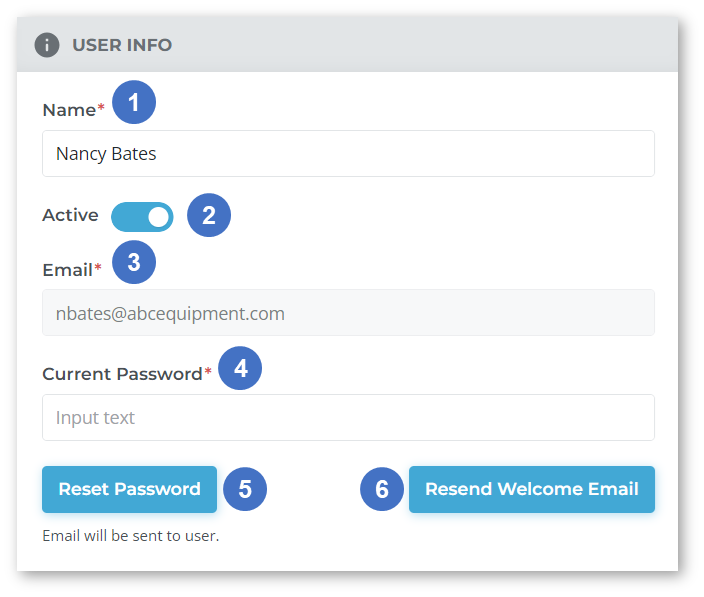
- Name
The User’s name. - Active
Uncheck this toggle to set the User’s status to inactive. Inactive Users are not able to log in. - Email
The email address associated with the User’s account. Password reset emails and other system emails will be sent to this address. - Current Password
The User’s current password. - Reset Password Button
Click to send a password reset email to the address specified in the email field (3). The User can then follow the instructions in the email to reset their password. - Resend Welcome Email Button
Click to resend a welcome email (account activation email) to the address specified in the email field (3).
Contact Info Panel
This panel contains the User’s contact information.
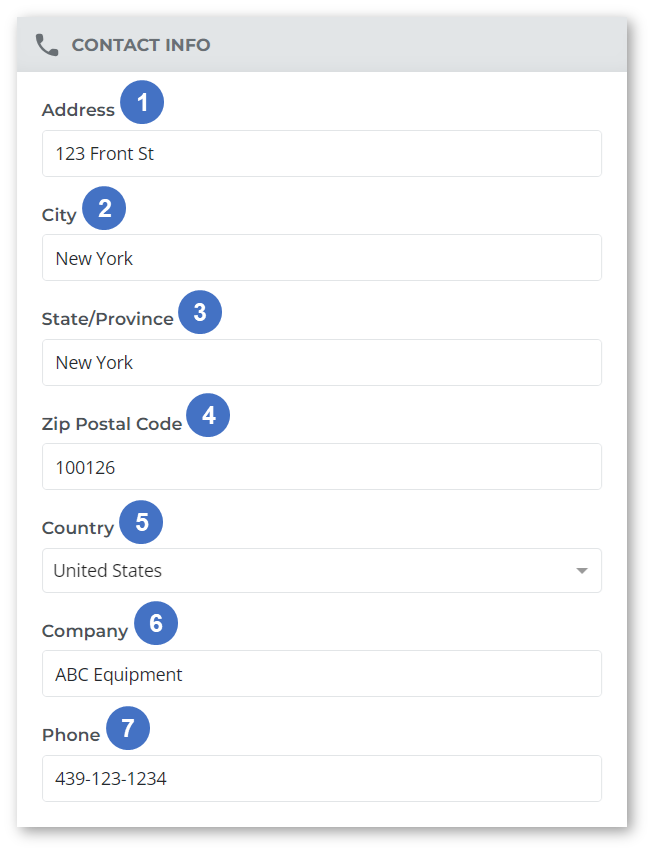
- Address
The User’s street address. - City
The User’s city. - State/Province
The User’s state or province. - Zip Postal Code
The User’s zip or postal code. - Country
The User’s country of residence. - Company
The company to which the User belongs. - Phone
The User’s phone number.
Access Panel
This panel allows you to control the User’s access to GateWay. The appearance of this panel will change depending on the option selected under “Portal Access”.
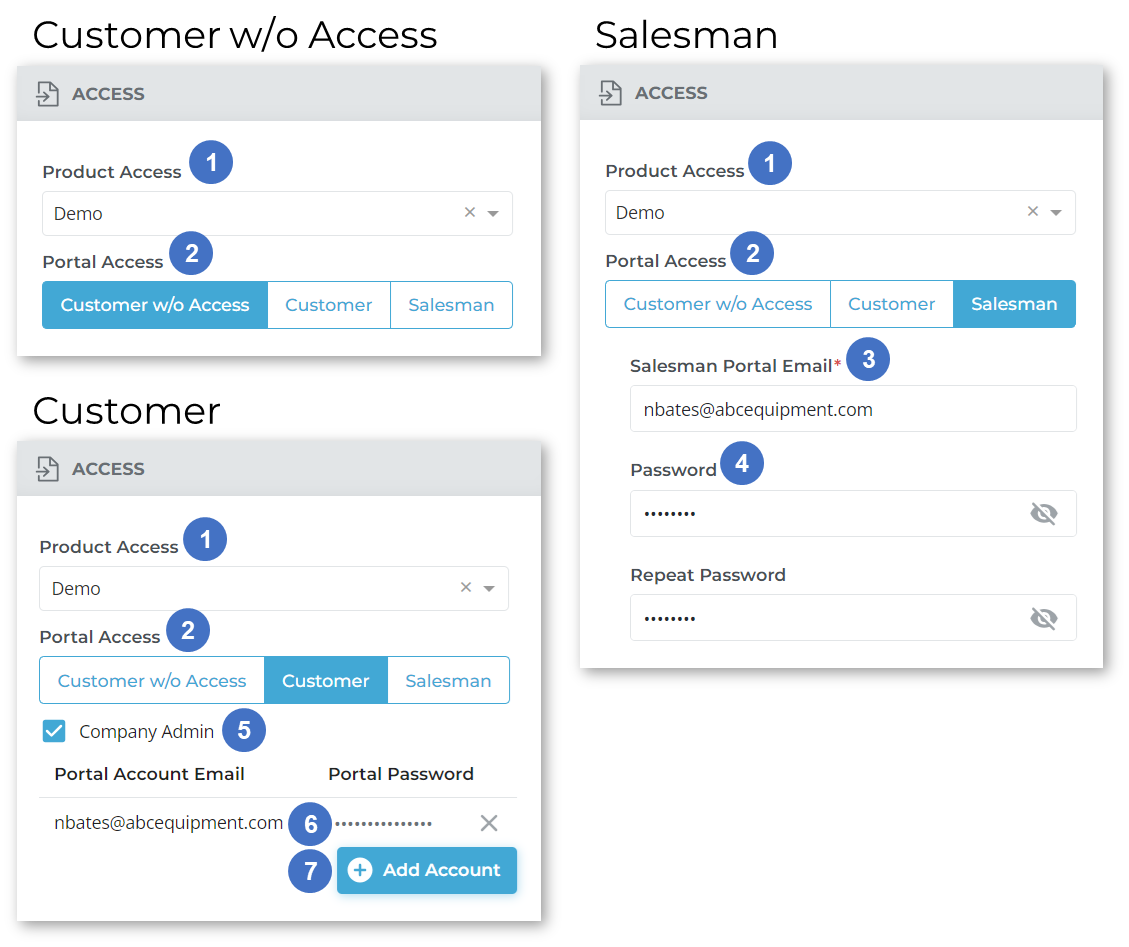
- Product Access Drop-Down
The User’s Product Access level. This determines which categories of Product the User is able to see and interact with on your eCommerce website. Product Access levels are managed via the Product Access screen. - Portal Access
Select the User’s access level to the GateWay Customer Access Portal:- Customer w/o Access: The User does not have access to the Customer Access Portal.
- Customer: The User can access the Customer Access Portal as a Customer.
- Salesman: The User can access the Customer Access Portal as a Salesman, meaning they can potentially access the portals for multiple different companies.
- Salesman Portal Email
Salesman only. The email address with which the salesperson can access the User Access Portal. - Password / Repeat Password
Salesman only. The password with which the salesperson can access the User Access Portal. - Company Admin Checkbox
Customer only. Check this box to designate the User as an administrator for their organization. - Portal Account Credentials
Existing portal credentials for the User are listed here. Click the X buttonnext to an email / password pair to remove it from the User’s account.
- Add Account Button
Click to add a new email / password pair to the User’s account. Multiple sets of credentials can exist for a single User.