
Quick Reference
- The Products page in Texada GateWay allows you to manage the Products that appear on your eCommerce website. To reach this page, select Inventory → Product List in the left navigation menu of the GateWay Administration Panel.
- Click the “Sync with SRM” button
at the top-left corner of the screen to fetch the latest Product information from Texada SRM.
- Check the “Display” checkbox next to a Product to display it on your website. Uncheck this box to hide it.
- Click on a Product in the Products table to edit it.
- Use the “Selected Category” drop-down to select the category under which this Product will appear on your website.
- Drag and drop an image into the upload area under the Images panel to submit a new featured image for the Product.
- Use the “Attributes” panel to assign attributes to the Product. Click the “Add Attribute” button
to add a blank attribute, then use the “Name” and “Select” drop-downs to select an attribute and a value.
- Click the “View Product” button
in the bottom-left corner of the screen to view the Product on your website.
Introduction
The Products page in Texada GateWay allows you to manage the Products that appear on your eCommerce website. The Products available in GateWay are the same as those in your organization’s Texada SRM database. This means that most Product management is done in Texada SRM; however, there are still a number of GateWay-specific configurations that can be made via the Products page.
To reach the Products page, select Inventory → Product List in the left navigation menu of the GateWay Administration Panel.
The Product List
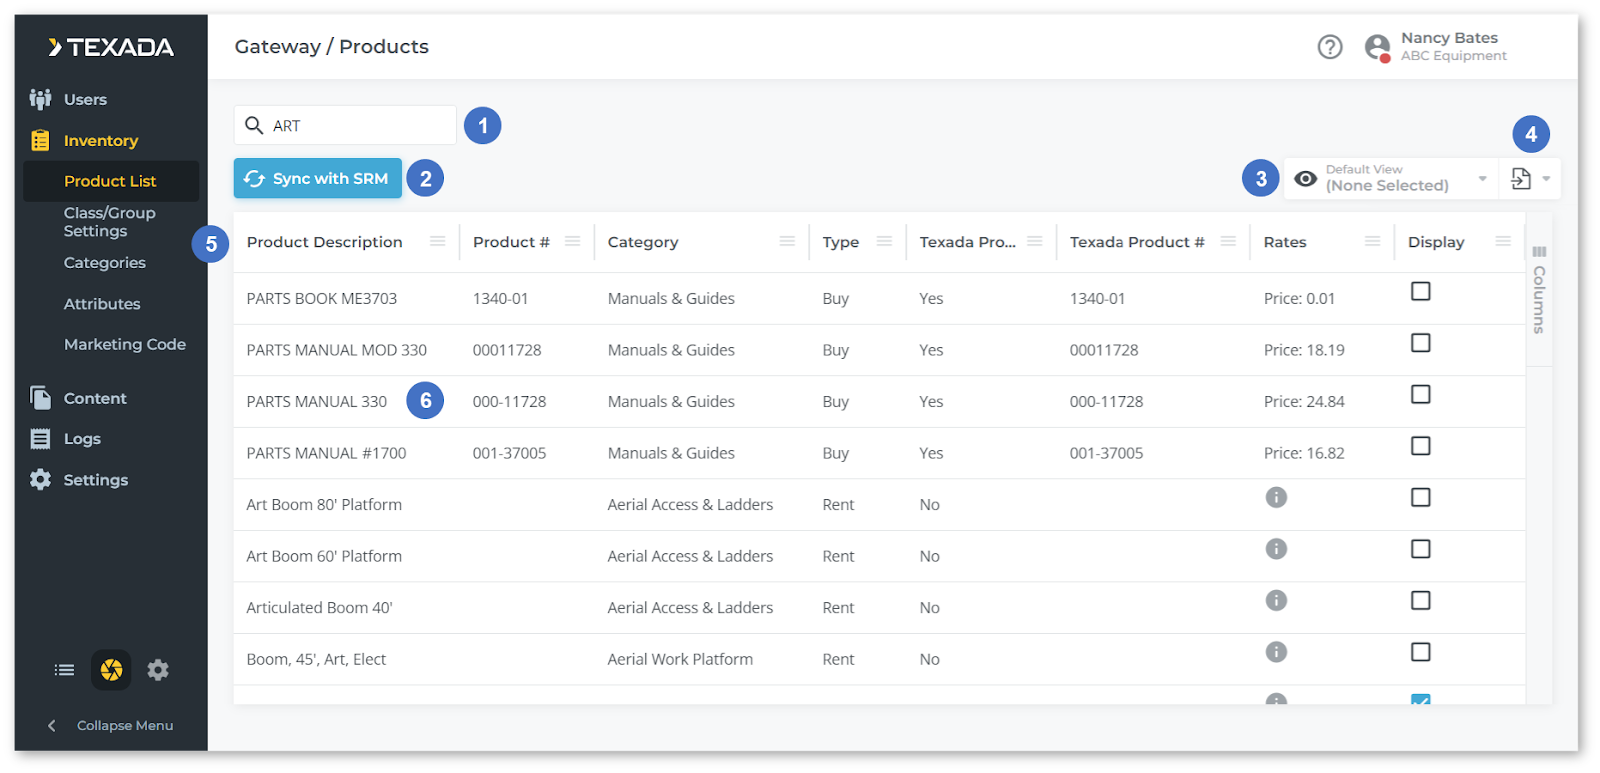
- Search Bar
Begin typing into the search bar to filter the list of Products by the text entered. This will search by Product Description and Product #. - Sync with SRM Button
Click to open the Sync Products window and select which rental Product rates should be displayed on your website. See “Sync Products” for more information. - View Manager
Click to manage views for the Products table. See “The View Manager” for more information. - Export Button
Click to export the contents of the Products table. See “Exporting the Contents of a Table” for more information. - Products Table
Products are listed here. The appearance of this table can be modified; see “Working with Tables” for more information. - Product
Click on a Product’s row to edit it. See “Edit Product” for more information.
Products Table - Columns
The products table comprises the following columns:
- Product Description: The Product’s description. Equivalent to the “Description” field in Texada SRM.
- Product #: The Product’s number. Equivalent to the “Product Number” field in Texada SRM.
- Category: The Product’s category. This refers to the Product’s GateWay category and is not to be confused with its Group or Class.
- Type: Whether the Product is a Rent or Buy Product.
- Texada Product: Indicates whether the Product exists in Texada SRM (Yes) or not (No).
- Texada Product #: If “Texada Product” is “Yes”, the Product’s number in SRM.
- Rates: The Product’s rental or sale price. For rental Products, hover your mouse over the information symbol
to view a breakdown of rental rates.
- Display: Check this box to display the Product on your GateWay eCommerce website. Uncheck this box to hide the Product. Equivalent to the “Show on Website” field in Texada SRM.
Edit Product
Click on a Product’s row in the Products table to open the Edit Product screen. This allows you to edit the Product at it appears on your eCommerce website.
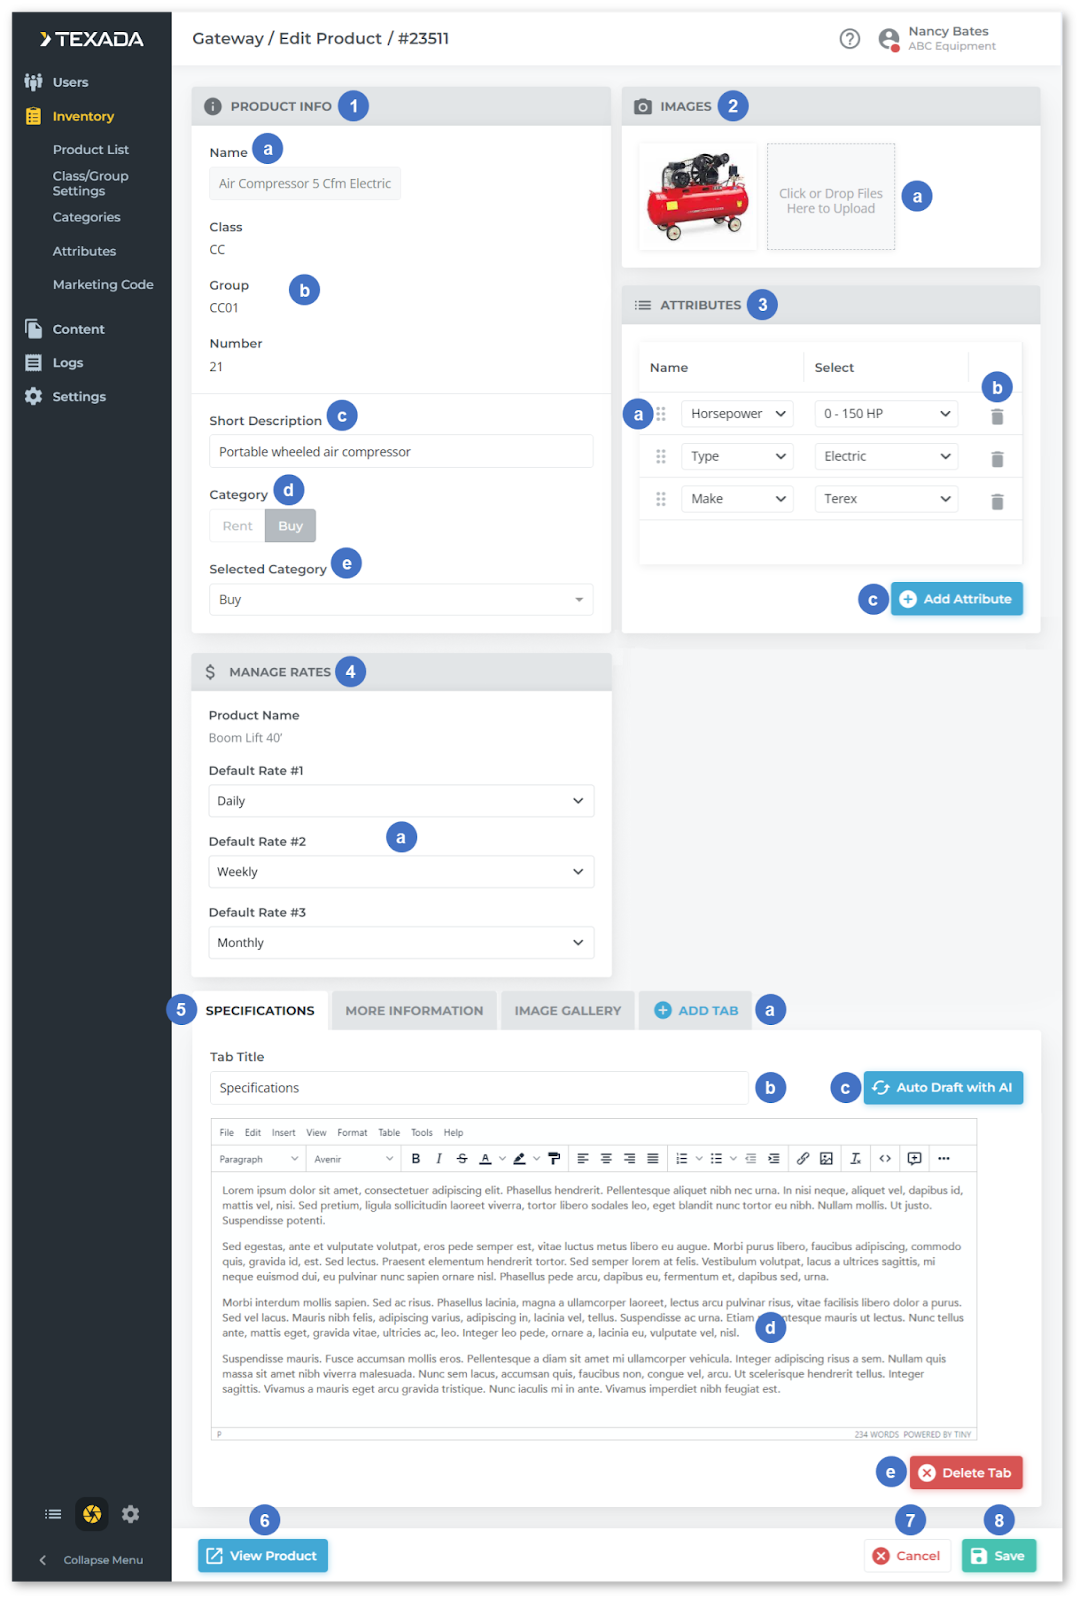
- Product Info Panel
This panel contains basic information about the Product.- Name
The Product’s name. This is not editable in GateWay. - Product Information
The Product’s Class, Group, and number. This information comes from Texada SRM and is not editable in GateWay. - Short Description
A brief, plain-text description of the Product. This will appear beneath the Product on your website. - Category
The Product’s primary category (Rent or Buy). This is determined by whether the Product is a Rental Product or a Sale Product in Texada SRM, and cannot be changed in GateWay. - Selected Category
The GateWay category under which this Product will appear on the website.
- Name
- Images Panel
This panel allows you to upload a featured image for the Product.- Image
The featured image representing this Product on your website is displayed here. Hover over the image and click the expand iconto open it full-size, or click the X icon
to delete it. Drag and drop an image into the upload area to upload it as the new image for this Product. Alternatively, you can click the upload area to open your machine’s file browser and select an image.
- Image
- Attributes Panel
This panel allows you to assign attributes to this Product. See “Attributes” for more information on attributes.- Attributes
Attributes assigned to this Product are listed here. Use the drop-down under “Name” to select an attribute, then use the drop-down under “Select” to select the Product’s value for that attribute. Click and drag the six dotsto the left of an attribute to change the order of the attributes.
- Delete Attribute
Click the bin iconnext to an attribute to delete it.
- Add Attribute Button
Click to add a new attribute to the Product.
- Attributes
- Manage Rates Panel
Rental Products only. This panel allows you to select up to 3 rental rates to be displayed with the Product’s listing on your eCommerce website.
This panel allows you to modify the default rates of a single Product. If you would like to bulk update the default rates of all rental Products, refer to the Sync Products window.- Default Rate #1 / #2 / #3
Use the drop-downs to select which of the Product’s rental rates should be displayed on your eCommerce website. These rates come from the Product’s Rental Information in Texada SRM.
- Default Rate #1 / #2 / #3
- Description Panel
This panel allows you to add tabs containing additional information to this Product’s listing on your eCommerce website. Click on a tab to view its contents. If no tabs exist, click the “Add Descriptions” buttonto create a new tab.
- Add Tab Button
Click to add a new tab. - Tab Title
The tab’s title. This will be visible on your eCommerce website. - Auto Draft with AI Button
Click to automatically generate content for the current tab using information present in GateWay and SRM. Note that this will overwrite the tab’s existing content. - Tab Content
The tab’s contents. Use the controls at the top of the editable area to add media and incorporate different text stylings. - Delete Tab Button
Click to delete the current tab.
- Add Tab Button
- View Product Button
Click to view the Product on your website. - Cancel Button
Click to cancel your changes. - Save Button
Click to save your changes.
Sync Products
Click the “Sync with SRM” button at the top-left corner of the Product List screen to open the Sync Products window. This allows you to select 3 rates to display alongside each rental Product on your eCommerce website.
Depending on the options chosen, you can either bulk update all rental Products, or only those Products whose rates have not yet been selected. If you would like to individually select the default rates for a particular Product, refer to the Manage Rates panel of the Edit Product screen.
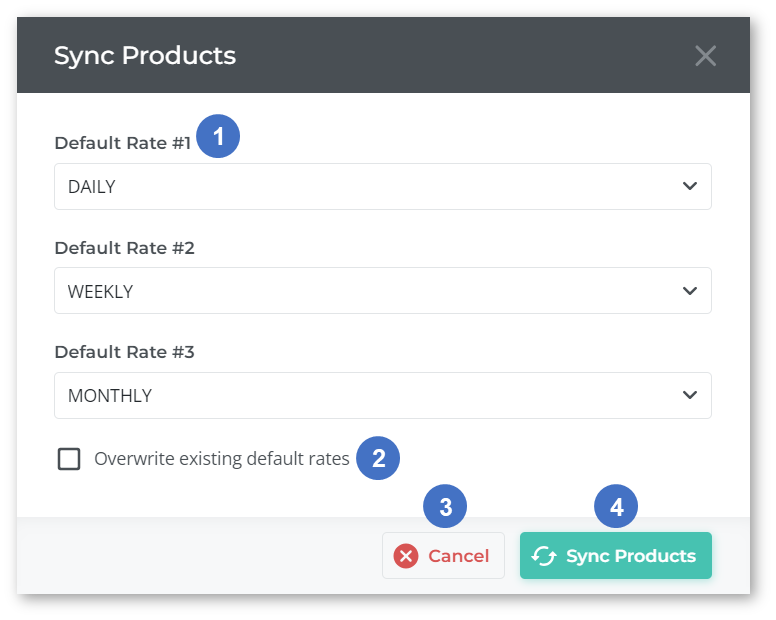
- Default Rate #1, #2, #3
Use the drop-downs to select which of the Products’ rental rates should be displayed on your eCommerce website. - Overwrite Existing Default Rates Checkbox
Check this box to overwrite all rates across all Products when the “Sync Products” button (4) is clicked. Uncheck this box to only update Products whose rates have not yet been set. - Cancel Button
Click to cancel your changes without updating rates. - Sync Products Button
Click to update the default rates of GateWay Products to the rates selected above (1). If the “Overwrite Existing Default Rates Checkbox” is checked, all 3 default rates for all Products will be set to the rates above. If this checkbox is unchecked, only the rates that have not yet been set will be updated.