
Quick Reference
- The Menu page in the GateWay Administration Panel allows you to manage the header and footer menus of your eCommerce website. To reach this page, select Content → Menu in the left navigation panel.
- Use the Header / Footer toggle in the top-right corner of the page to switch between managing header content and footer content.
- Click the “Add Menu Item” or “Add Footer” button in the bottom-right corner of the screen to create a new menu item.
- Click the pencil icon
next to an existing menu item to edit it.
- Header menu items fall into three categories:
- Menu: A main menu item that serves as a folder containing one or more sub menu items.
- Sub Menu: A sub menu item that lives under a menu item. A sub menu item can either be a page created via the Pages screen, or a link to an external page or document.
- Link: A main menu item that links to a page created via the Pages screen, or to an external page or document.
Introduction
The Menu page in the GateWay Administration Panel allows you to manage the header and footer menus of your eCommerce website. Pages that were previously created via the Pages screen can be published using this page.
To reach the Menu page, select Content → Menu in the left navigation panel.
Menu Page
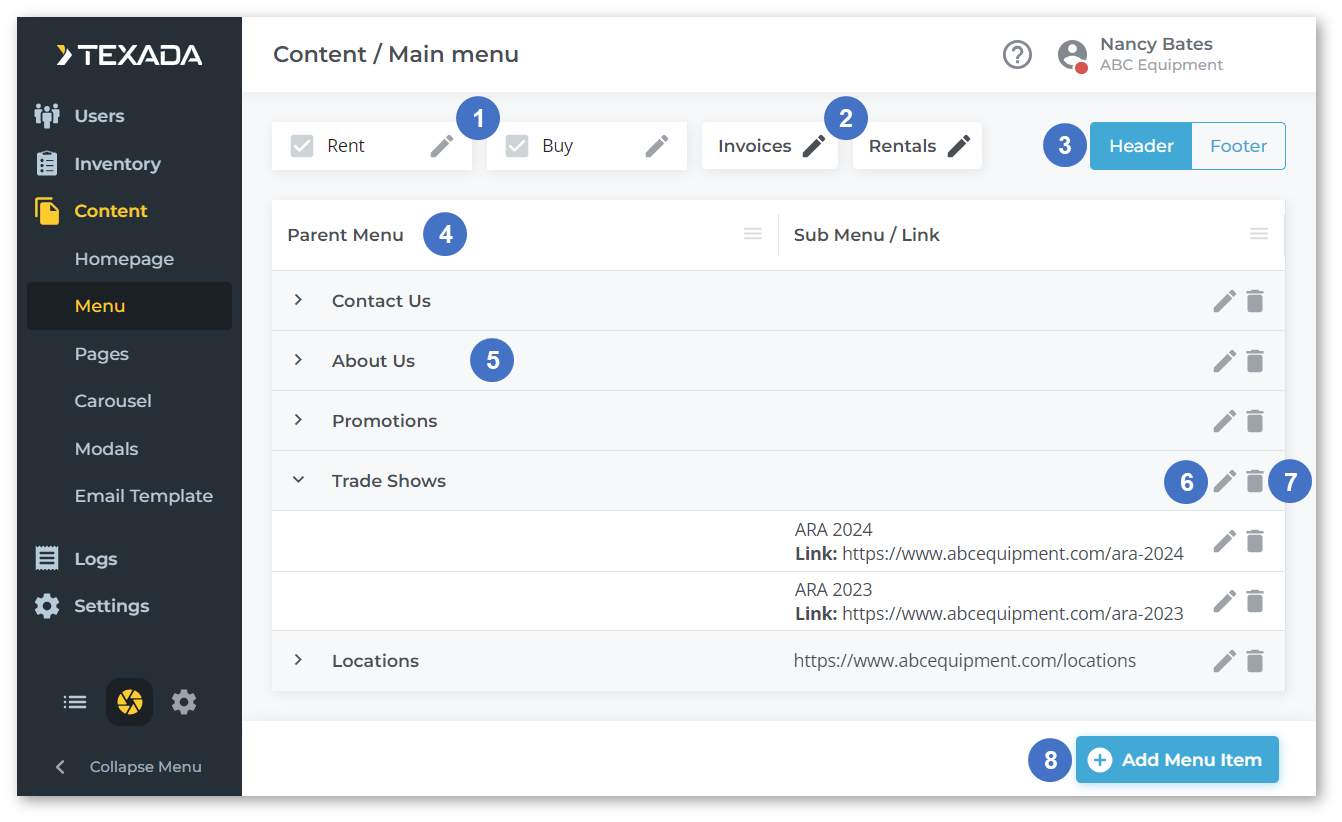
- Rent / Buy Menu Items
These panels allow you to include or remove the “Rent” and “Buy” options in your site’s top menu. Click on the pencil iconto save your changes.
- Invoices / Rentals Menu Items
These panels allow you to edit the default columns included in the tables that appear on the Invoices and Rentals pages in the GateWay Customer Access Portal. Click the pencil iconto open a drop-down list, then select a table to edit it. While viewing a table, you can use the “Columns” and “Filters” options on the right side of the screen to edit the table’s default behavior. See “Working with Tables” for more information.
- Header / Footer Toggle
Use to toggle between viewing and editing the items in your website’s header menu (at the top of the screen) and the footer menu (at the bottom of the screen). This will update the contents of the menu item table (3) to reflect the current structure of your header or footer. - Menu Item Table
Contains a list of all the menu items that currently exist in your website’s header or footer, depending on the current setting of the header / footer toggle (2). - Menu Item
Each menu item appears in its own row in the menu item table. Menu item names are displayed in the “Parent Menu” column, and sub items and hyperlinks are displayed in the “Sub Menu / Link” column. Click the right arrownext to a menu item to expand its sub items.
- Edit Menu Item
Click the pencil icon - Delete Menu Item
Click the pencil iconnext to a menu item to edit it.
- Add Menu Item Button / Add Footer Button
Click to add a new menu item or footer item. See “Add / Edit Menu Item / Footer” for more information.
Add / Edit Menu Item / Footer
Click the “Add Menu Item” button or the “Add Footer” button
in the bottom-right corner of the Menu screen to create a new menu or footer item. Click the pencil icon
next to an existing menu or footer item to edit it. This will open the Add / Edit Menu Item window for header items, or the Add / Edit Footer window for footer items.
Header menu items fall into three categories, determined by the Choose Menu Type toggle: Menu, Sub Menu, and Link. Footer menu items only have one type, as sub menus cannot exist in the footer.
The appearance of the Add / Edit Menu Item window will change depending on the item’s type:
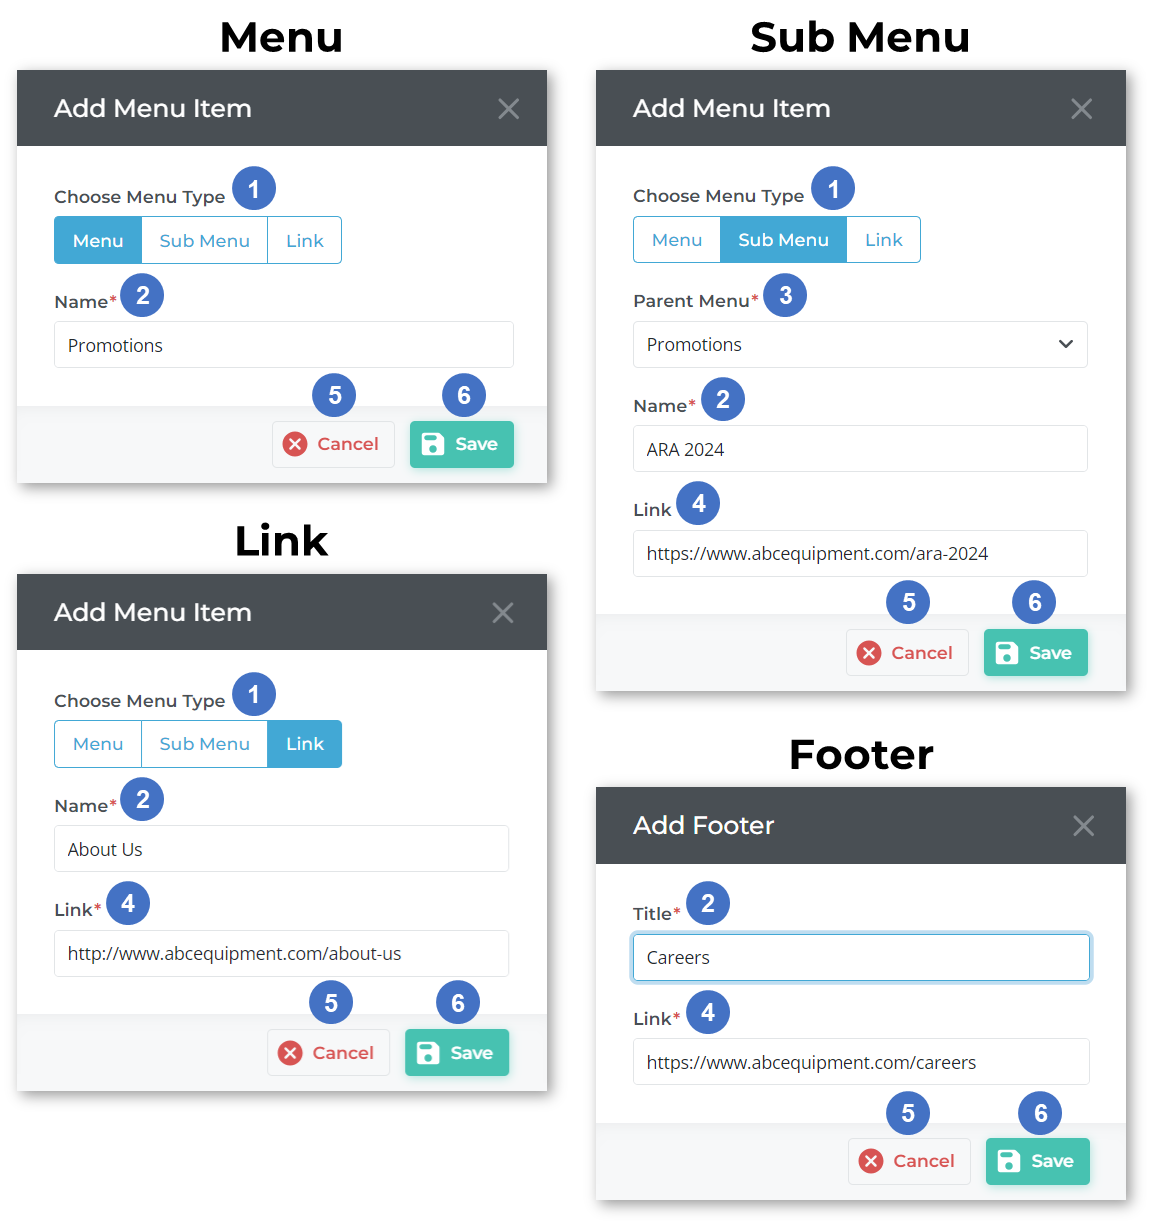
- Choose Menu Type
Select between the three types of menu item:- Menu: A main menu item that serves as a folder containing one or more sub menu items. Menu items are not pages in their own right; when clicked, they simply expand to display their sub menu items.
- Sub Menu: A sub menu item that lives under a menu item. A sub menu item can either be a page created via the Pages screen, or a link to an external page or document.
- Link: A main menu item that links to a page created via the Pages screen, or to an external page or document.
- Name / Title
The menu item’s name. This is the name that will appear in your website’s header or footer. - Parent Menu
Sub menu items only. The menu item under which this sub menu item can be found. - Link
Sub menu items, links, and footer items only. The page or other resource to which the menu item links. When entering a URL into this field, make sure to include the entire URL starting with http:// to ensure that the user is sent to the correct address. - Cancel Button
Click to cancel your changes. - Save Button
Click to save your changes.