
Quick Reference
- The Email Server page in the GateWay Administration Panel allows you to configure the email service that will be used to send system messages from GateWay. To reach this page, navigate to Settings → Email Server in the left menu.
- First, select a provider using the Provider drop-down. Three options are available: Google, Office 365, and Other.
- If Google or Office 365 is selected, click the “Authorize” button to log in to that service and provide GateWay with permission to send emails using your address.
- If Other is selected, enter the email address and SMTP information for your email provider manually.
- To test your email configuration, enter an address into the Recipient Email field, then click the Send Test Email button.
Introduction
The Email Server page in the GateWay Administration Panel allows you to configure the email service that will be used to send system messages from GateWay.
To reach this page, navigate to Settings → Email Server in the left menu.
Email Server Page
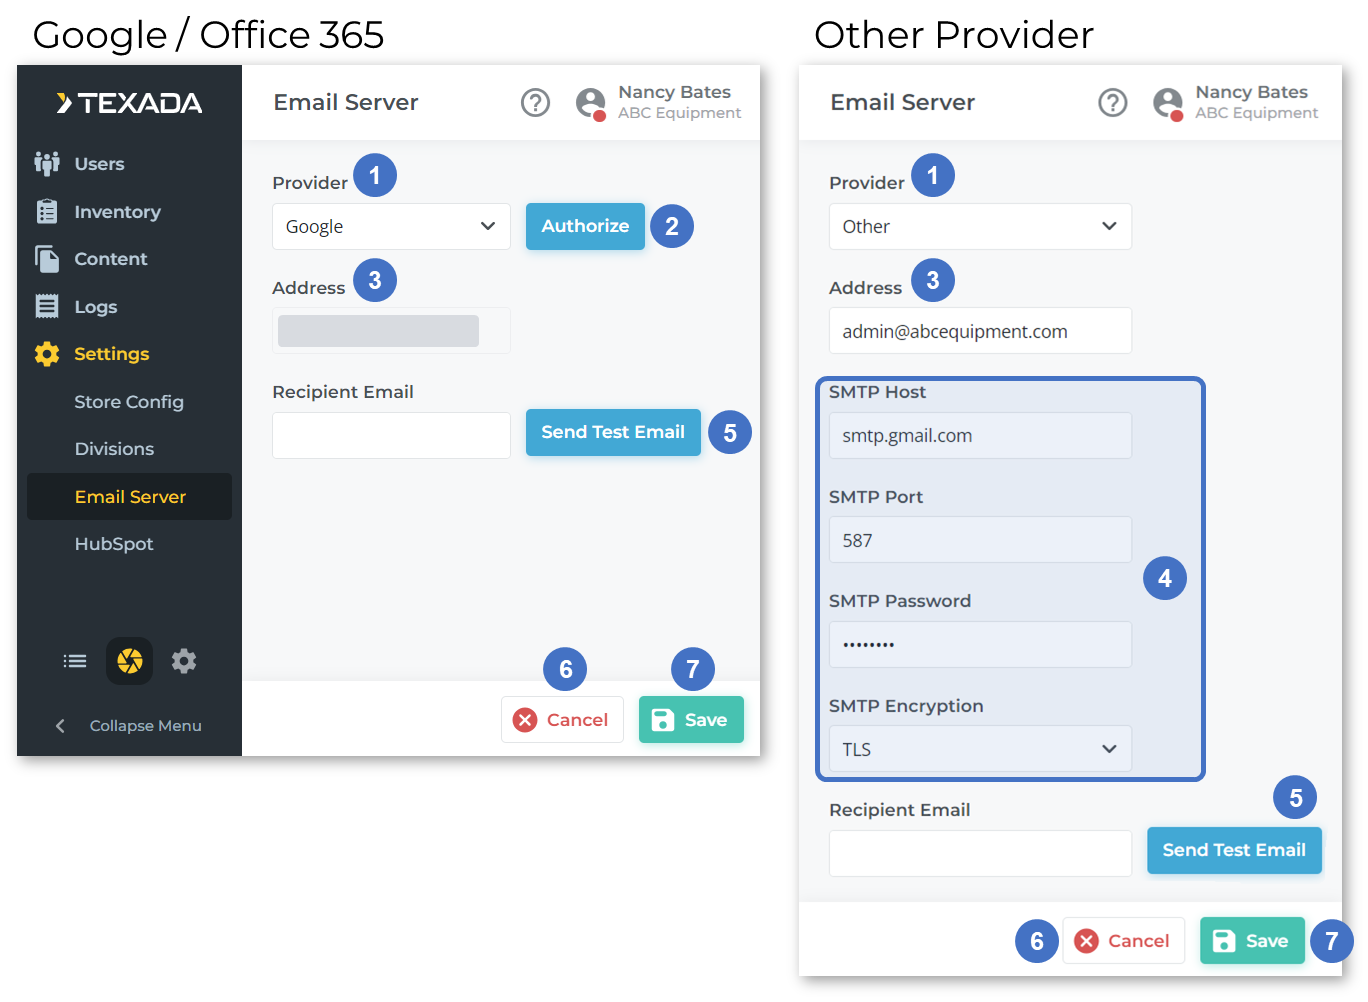
- Provider
The email provider that will be used to send system emails from GateWay. Three options are available: Google, Office 365, and Other.
If Google or Office 365 is selected, you will be able to click the “Authorize” button to log in to that service and skip the configuration process.
If Other is selected, you will be able to manually input SMTP information for your email provider. - Authorize Button
Google / Office 365 only. Click to open a login window for the selected provider (1). Enter your Google or Microsoft credentials to log in, then follow the prompts to connect your account to GateWay and provide it with permission to send emails from your account. - Address
The email address from which system emails will be sent.
If Google or Office 365 was selected as a provider (1), this field will be read-only, and will be automatically populated with the email address used to log in via the Authorize button (2).
If Other was selected as a provider, you will be able to input an email address manually. - SMTP Information
If Other was selected as a provider (1), use these fields to input SMTP information for your email provider. - Recipient Email / Send Test Email Button
Use these fields to test your email configuration. Enter an email address into the Recipient Email field, then click the Send Test Email button to send a test email to that address using the current email settings. If you receive the test email, your email settings have been configured correctly. - Cancel Button
Click to cancel your changes and reset the fields on this screen to their previous configuration. - Save Button
Click to save your changes.