Availability Calendar
All about the Availability Calendar in Texada Web.
Quick Reference
- The availability calendar feature in Texada Web allows you to check and compare your Products’ availability in a visual way when creating or editing a Contract.
- To view the availability calendar when searching for a Product to add to a Contract:
- Open the Create / Edit Contract page for the Contract you’d like to edit.
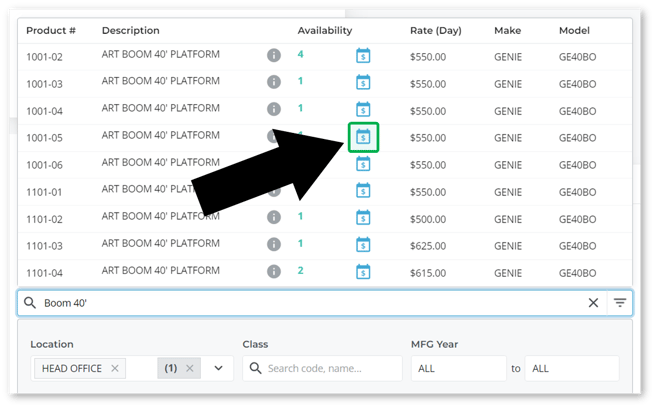
- Scroll down to the Products tab and begin typing into the search bar to view the list of Products.
- Click the calendar icon
 under “Availability” to view a Product’s availability calendar.
- To view the availability calendar for a Product that’s already been added to a Contract:
- Open the Create / Edit Contract page for the Contract you’d like to edit and scroll down to the Products tab.
- Click the three dots
 next to the Product you’d like to view and select “Availability Calendar”.
- When viewing the availability calendar, select a Product from the list on the right side of the window to replace the originally-selected Product on the Contract.
Introduction
The availability calendar feature in Texada Web allows you to check and compare your Products’ availability in a visual way when creating or editing a Contract. This makes it much easier to understand Product availability over time and select the right Product to send out on your Contract.
Availability calendars can be viewed in two different ways: when searching for a Product to add to a Contract, and when reviewing a Product that has already been added to a Contract.
View the Availability Calendar
When Adding a Product to a Contract
To view the availability calendar when searching for a Product to add to a Contract:
- Open the Create / Edit Contract page for the Contract you’d like to edit.
- Scroll down to the Products tab and begin typing into the search bar to view the list of Products.
- Click the calendar icon
 under “Availability” to view a Product’s availability calendar.
When Reviewing a Product on Contract
To view the availability calendar for a Product that’s already been added to a Contract:
- Open the Create / Edit Contract page for the Contract you’d like to edit and scroll down to the Products tab.
- Click the three dots
 next to the Product you’d like to view and select “Availability Calendar”.
Availability Calendar

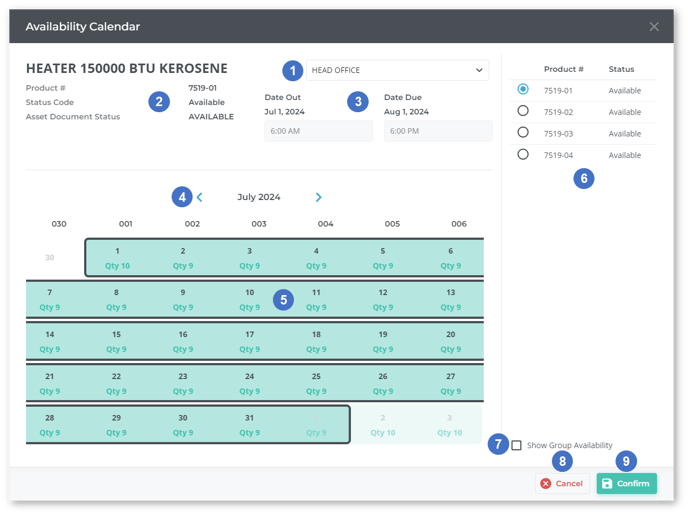
- Location
Use the drop-down to view availability for Products at a different location. - Product Information
The Product number, current status, and availability of the currently-selected Product. - Date Out / Date Due
The start and end times of the Contract. - Change Month
Use the left and right arrows to view availability for different months.
 - Calendar
The quantity of the selected Product available each day is displayed below the calendar date. Dates on which the Product is available will be colored green, while dates on which the Product is not available will be colored red. The current rental period, as indicated by the Date Out and Date Due above (3), will be highlighted with a thick black border. - Products in Group
Products belonging to the same Group as the selected Product are listed here. Click on a Product to select it and view its availability. This will automatically refresh the calendar (5) and Product information (2) above. If you click the Confirm button (9) after selecting a new Product this way, it will replace the original Product on the Contract. - Show Group Availability Checkbox
Check this box to view availability across all Products in the selected Group. This makes it easier to locate a possible rental window when working with Products with low individual availability. - Cancel Button
Click to close the availability calendar without saving your changes. - Confirm Button
Click to close the availability calendar. If a new Product was selected from the list, it will replace the originally-selected Product on the Contract.
.png?width=365&height=50&name=Texada%20Logo%20(Black).png)