
In This Article
Introduction
A kit is a set of Products that are often rented or sold together, such as an air compressor being rented out with couplings, cleaning tools, and spare hoses. Kits can be used when creating or editing a Contract in Rental Management (Classic or Next) to quickly pull lists of related equipment and add them to the Contract.
Kits are managed via the Product Kits utility in Service, Rental, and Financials (Classic), located at System Maintenance → Configure System Settings → Operations → Kits.
The Kit associated with each Product can be managed at the Group level via the Groups utility located at System Maintenance → Configure System Settings → Operations → Groups, or at the Product level via the Rental Inventory utility located at Inventory Control → Rental Inventory.
Filter by Product Kit
When creating or editing a Contract in Rental Management (Next), you can use filters to search only for Products that belong to a certain kit. To do this, follow the steps below.
- Open the Contract you’d like to edit and scroll down to the Products tab.
- Click the filter icon
 to the right of the Product search bar to view filter options, then begin typing into the Kits search bar. Once you have located the kit you’d like to search for, click on it to select it.
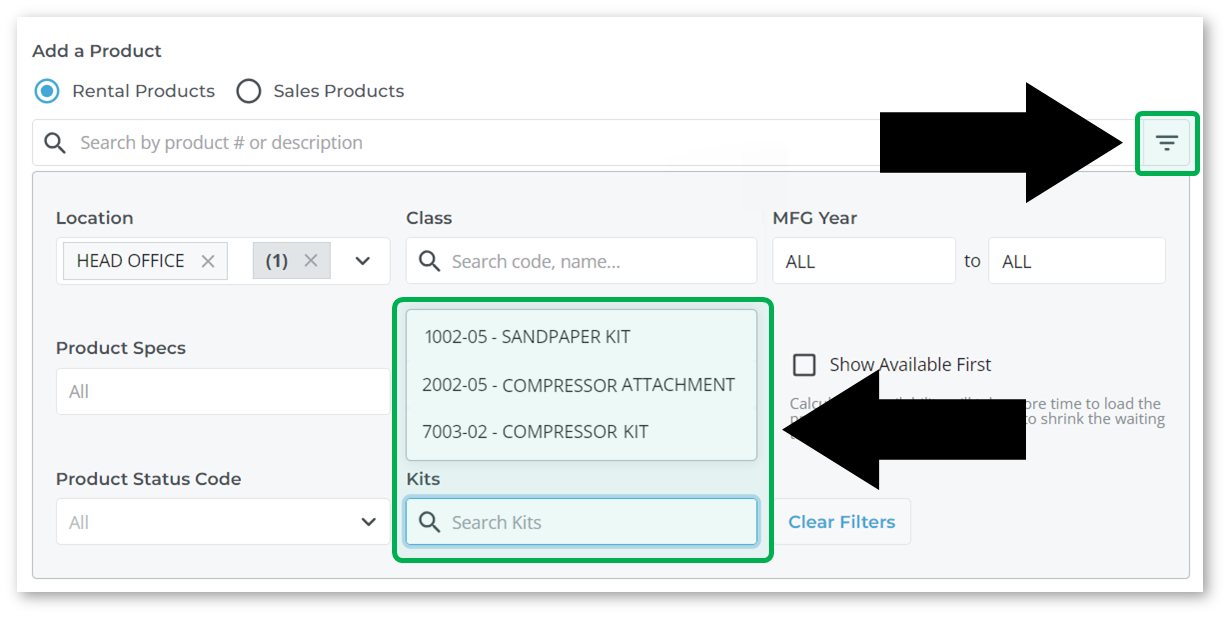
- Your search results will now only contain Products belonging to the selected kit.
Add Kit Items
When creating or editing a Contract in Rental Management (Next), clicking the blue plus icon ![]() next to a Product with an associated Product Kit in the Products Tab will open the Add Kit Items window. This window allows you to view and modify the Kit items included on the Contract.
next to a Product with an associated Product Kit in the Products Tab will open the Add Kit Items window. This window allows you to view and modify the Kit items included on the Contract.
This window will also appear automatically whenever you add a Product belonging to a Product kit to a Contract.
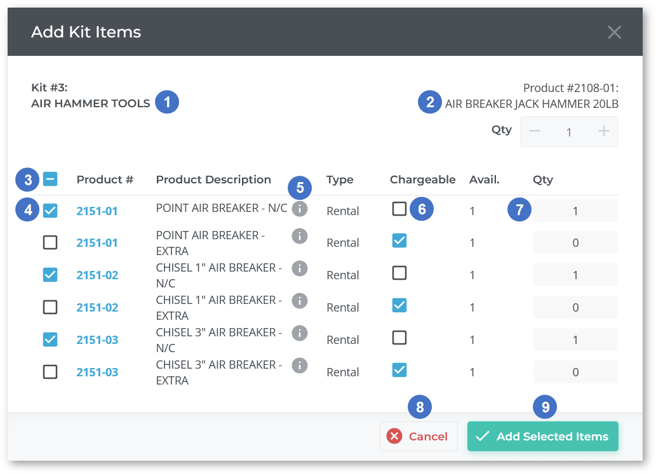
- Kit Information
The number and name of the Product Kit associated with the selected Product. - Product Information
Information on the Product with which the Kit is associated. - Select All / Deselect All Toggle
Use this toggle to quickly select or deselect all of the Products included in the Kit. - Kit Item
Check the checkbox next to a Kit item to include it on the Contract. Click on the item’s Product number to open its details in a new browser tab. See “View and Edit an Asset in Service, Rental, and Financials (Next)” or “View and Edit a Part in Service, Rental, and Financials (Next)” for more information. - View More Info
Hover your mouse over the information icon to view more detailed information about the Kit item.
 - Chargeable
Check this box to indicate that the Kit item is chargeable. Uncheck this box to indicate that the Kit item should be included on the Contract for free. - Qty
The quantity of the Kit item to include on the Contract. Entering a quantity of 1 or greater will automatically select the item; entering a quantity of 0 will automatically deselect the item. - Cancel Button
Click to close the window without saving your changes. - Add Selected Items
Click to add the selected Kit items to the Contract.