Quick Reference
- Avalara is tax compliance software that integrates with Texada SRM to automatically calculate tax rates for USA-based transactions, saving time and effort and ensuring that your organization remains tax compliant.
- Enabling Avalara in Texada SRM involves switching SRM’s Taxing Method to “A - Avalara”. This must be done by a Texada administrator. If you would like to change your organization’s Taxing Method, please contact Texada support for assistance.
- Configuring Avalara once it has been enabled can be done via the Avalara Tax Settings screen, available at System Maintenance → Configure System Settings → System → Company Parameters → Taxing Parameters → Avalara Settings.
- The Account Name, Account Number, License Key Play, License Key Live, X-Avalara-Client-Prefix, User Name, and User Password fields on this screen are used to configure your Avalara integration, and will be provided by Avalara.
- If the “Enable Address Validation” option is enabled, each address entered into a document will be automatically tested for validity by Avalara.
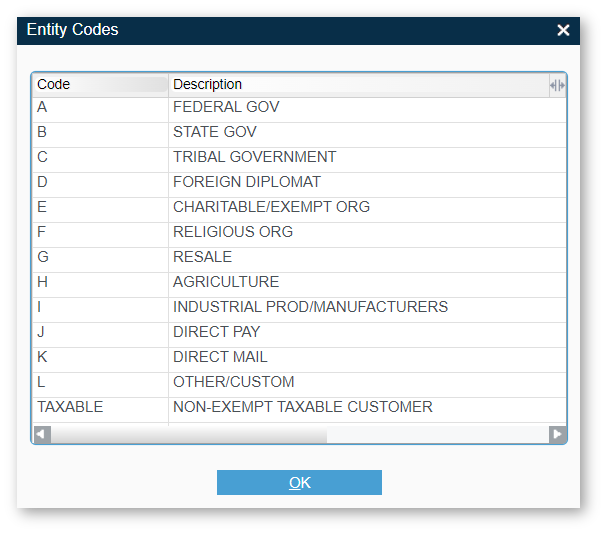
- Click the “Entity Codes” option to view Avalara’s list of entity codes. Entity codes are used to identify business entities with special taxation rules or exemptions, such as government entities or religious organizations.
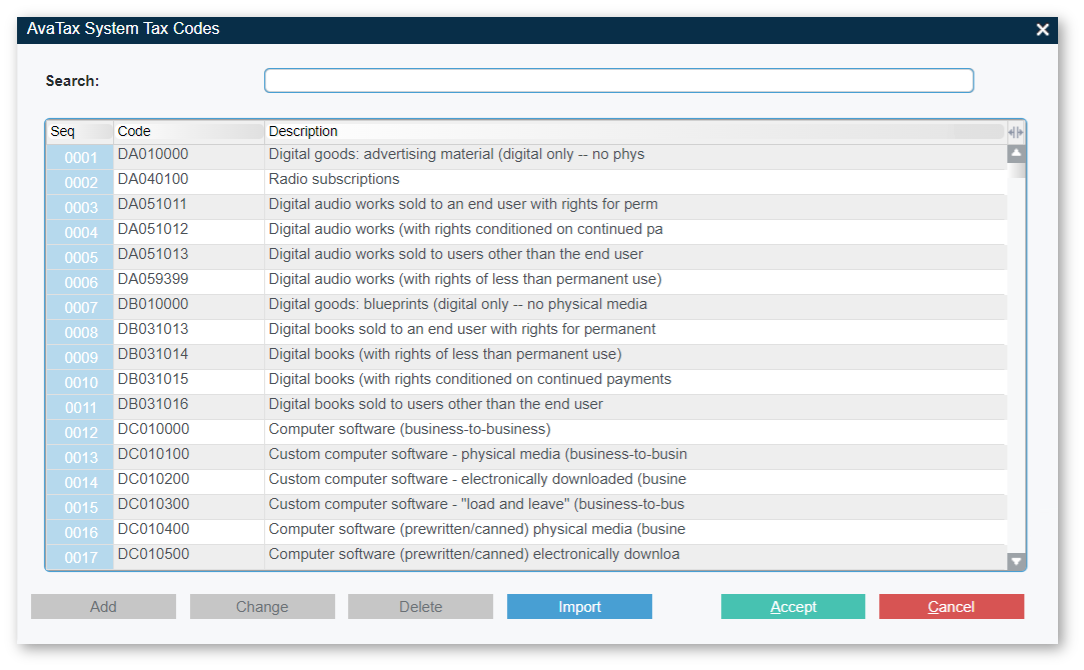
- Click the “AvaTax Codes” option to view the list of AvaTax codes in your system. These are the tax codes that determine the tax rates of products and services when Avalara is integrated with Texada SRM.
- Click the “Test Connection” button to test SRM’s connection with Avalara using the current configurations.
- AvaTax codes are Avalara-managed tax codes that determine the tax rates of products and services when Avalara is integrated with Texada SRM. Enabling Avalara will cause AvaTax Code and AvaTax Disposal code fields to appear on a number of screens throughout Texada SRM.
- To import the latest AvaTax codes from Avalara into Texada SRM:
- Open your web browser and navigate to https://taxcode.avatax.avalara.com/.
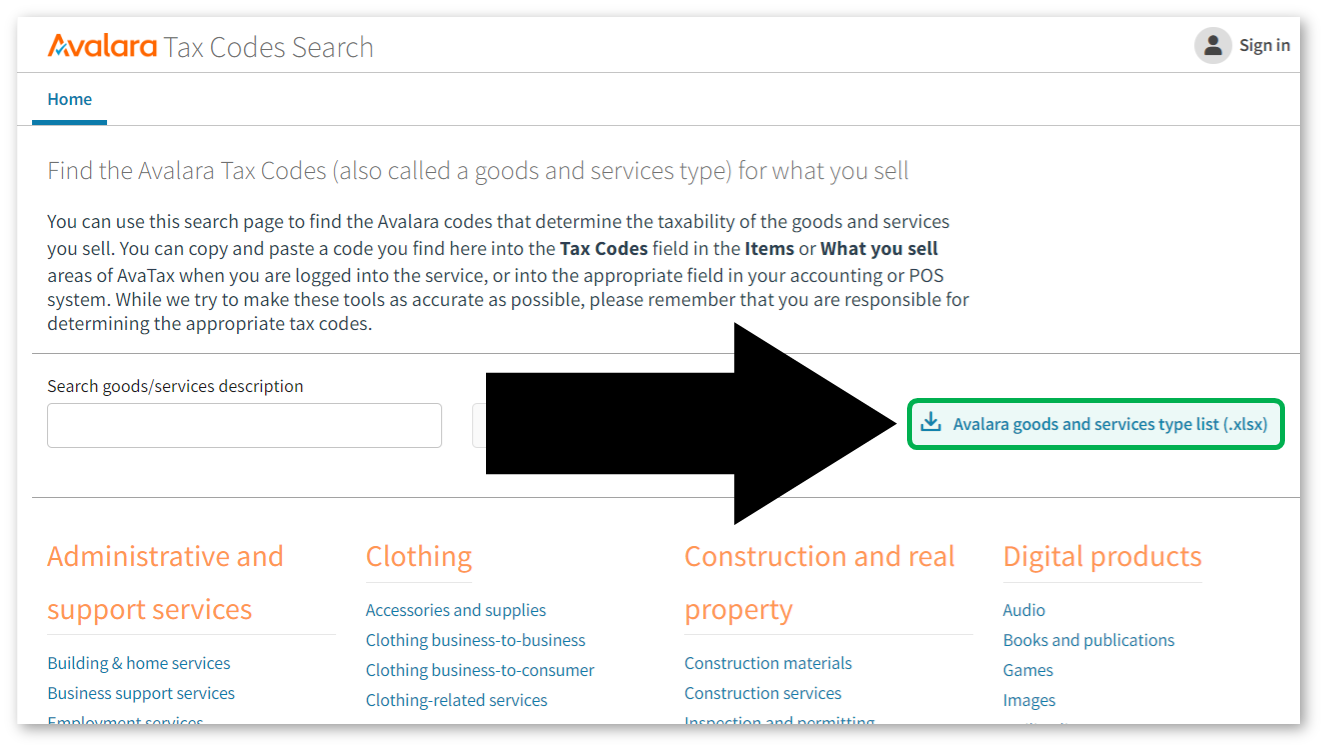
- Click the “Avalara goods and services type list (.xlsx)” hyperlink near the right side of the page to download an Avalara_goods_and_services.xlsx file.
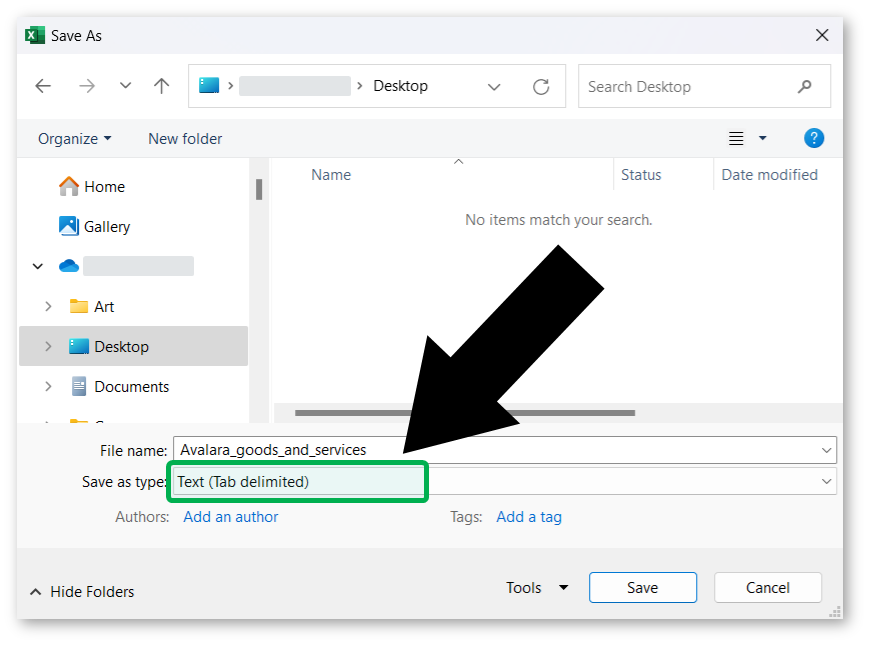
- Save Avalara_goods_and_services.xlsx as a tab-delimited text (.txt) file to prepare it for import into Texada SRM.
- Log in to Texada SRM and navigate to System Maintenance → Configure System Settings → System → Company Parameters → Taxing Parameters → Avalara Settings → AvaTax Codes.
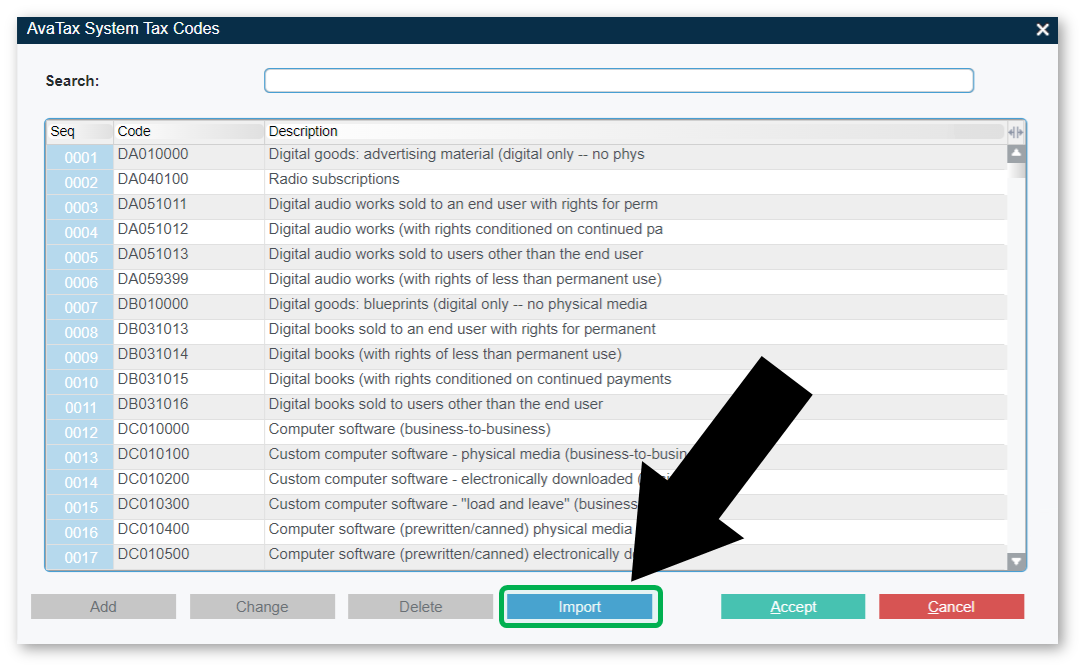
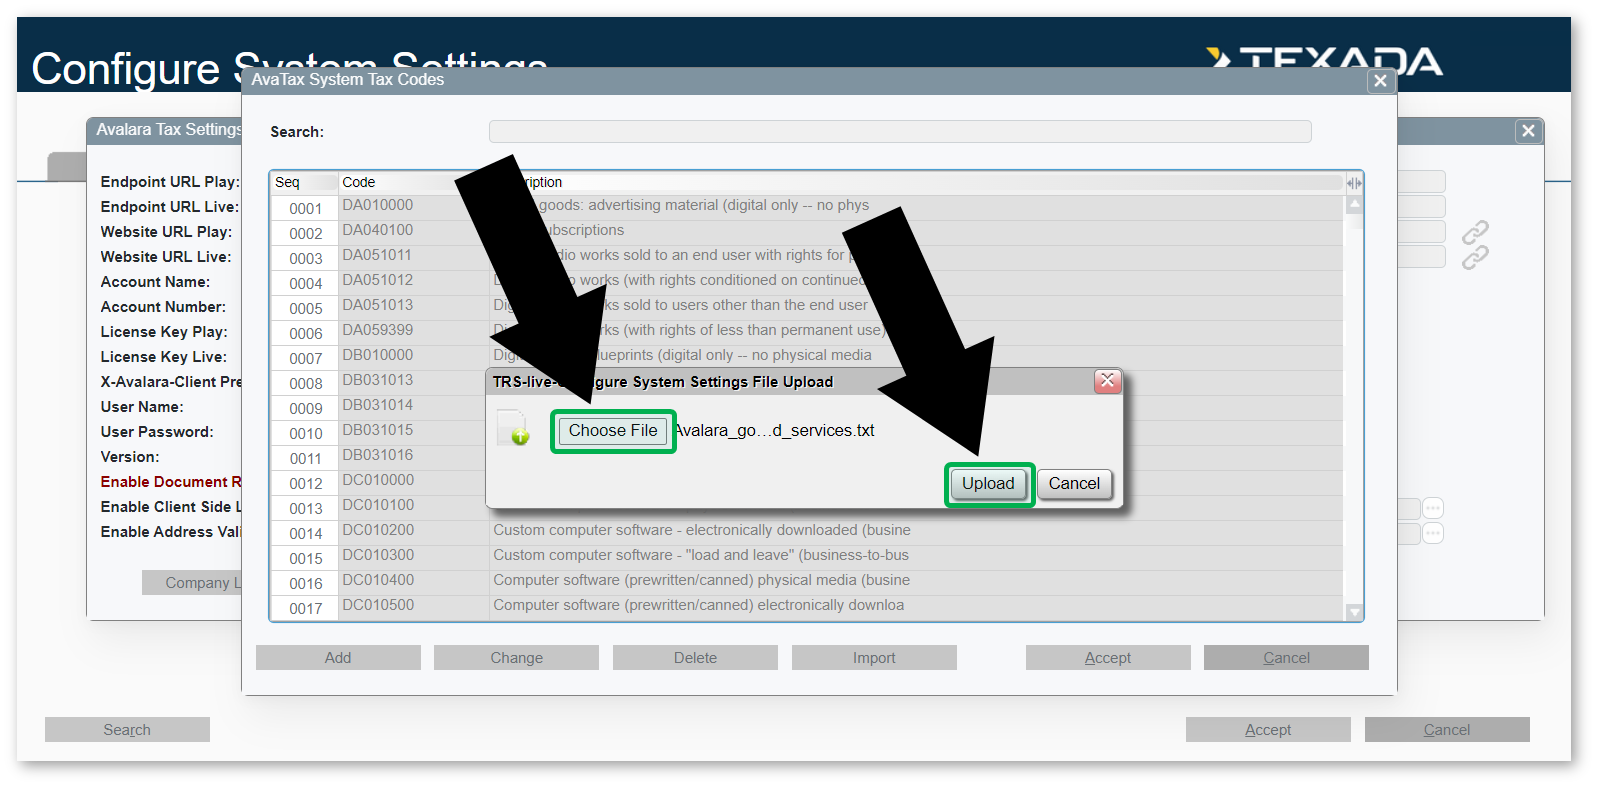
- Click the “Import” button at the bottom of the AvaTax System Tax Codes window, then follow the prompts to upload a new AvaTax code file. Select the Avalara_goods_and_services.txt file you created in step 4, then click “Upload”.
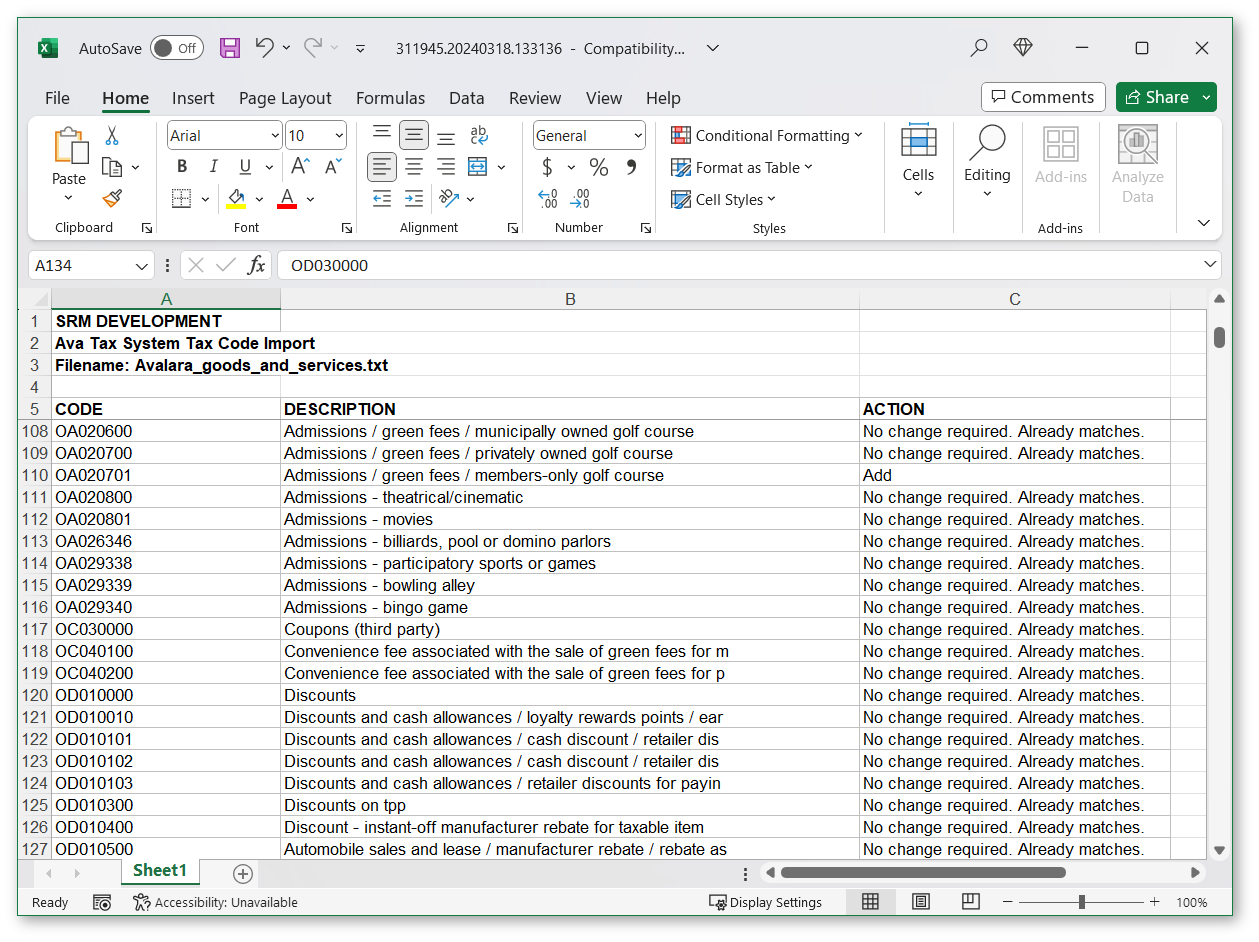
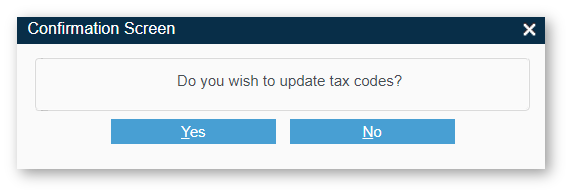
- After your file has finished uploading, a confirmation box that reads “Do you wish to update tax codes?” will pop up, and an .xls file will be automatically downloaded to your machine. Open this file to see what the effects of the import will be if carried out. Once you have finished your review, select “Yes” to run the import.
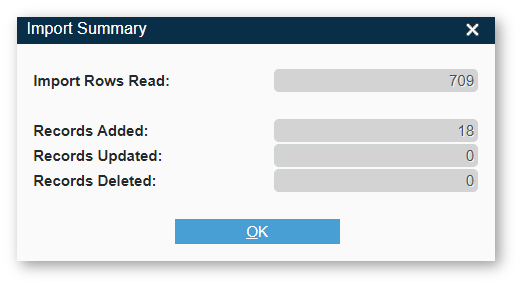
- After the import has finished running, an Import Summary window will open showing the number of records that were read, added, updated, and deleted. Click “OK” to close the window.
- Locations where AvaTax Code and AvaTax Disposal code fields will appear in SRM include:
- Damage Waivers: At System Maintenance → Configure System Settings → Accounting → Waiver Codes. Click the Exp/Con button to reveal the AvaTax Code field.
- Services: At System Maintenance → Configure System Settings → Accounting → Service Codes.
- Rental Classes: At System Maintenance → Configure System Settings → Accounting → Rental Classes.
- Sales Classes: At System Maintenance → Configure System Settings → Accounting → Sales Classes.
-
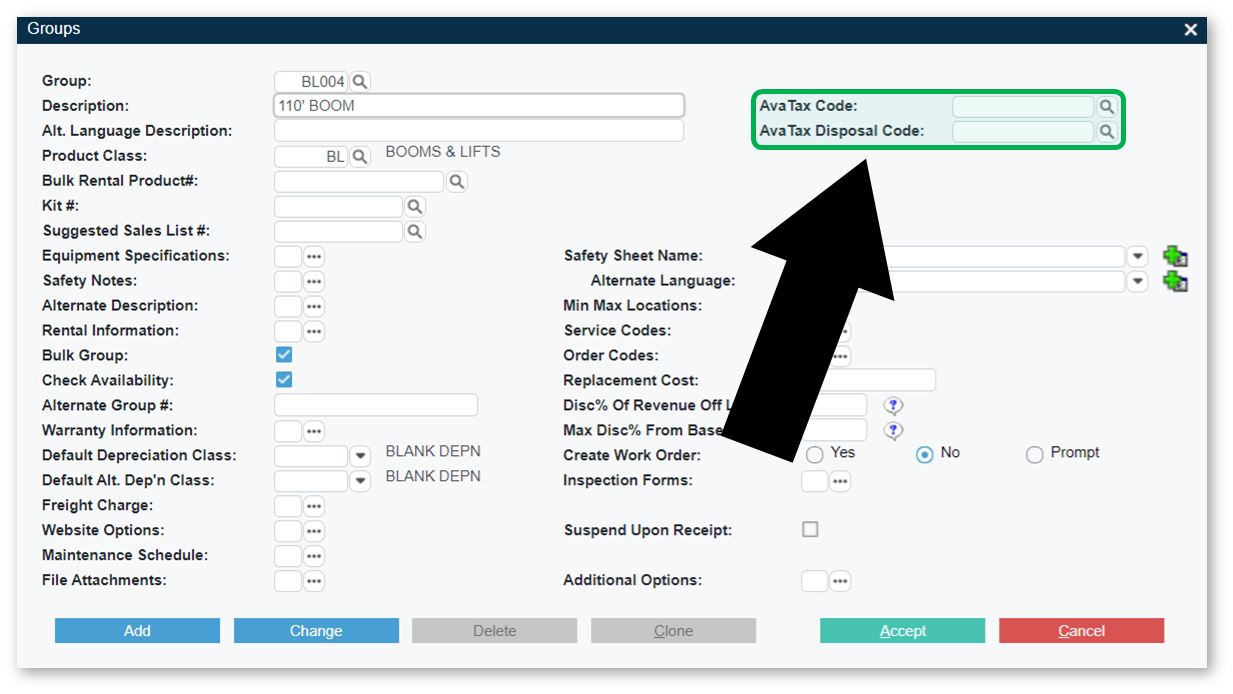
- Groups: At System Maintenance → Configure System Settings → Operations → Groups.
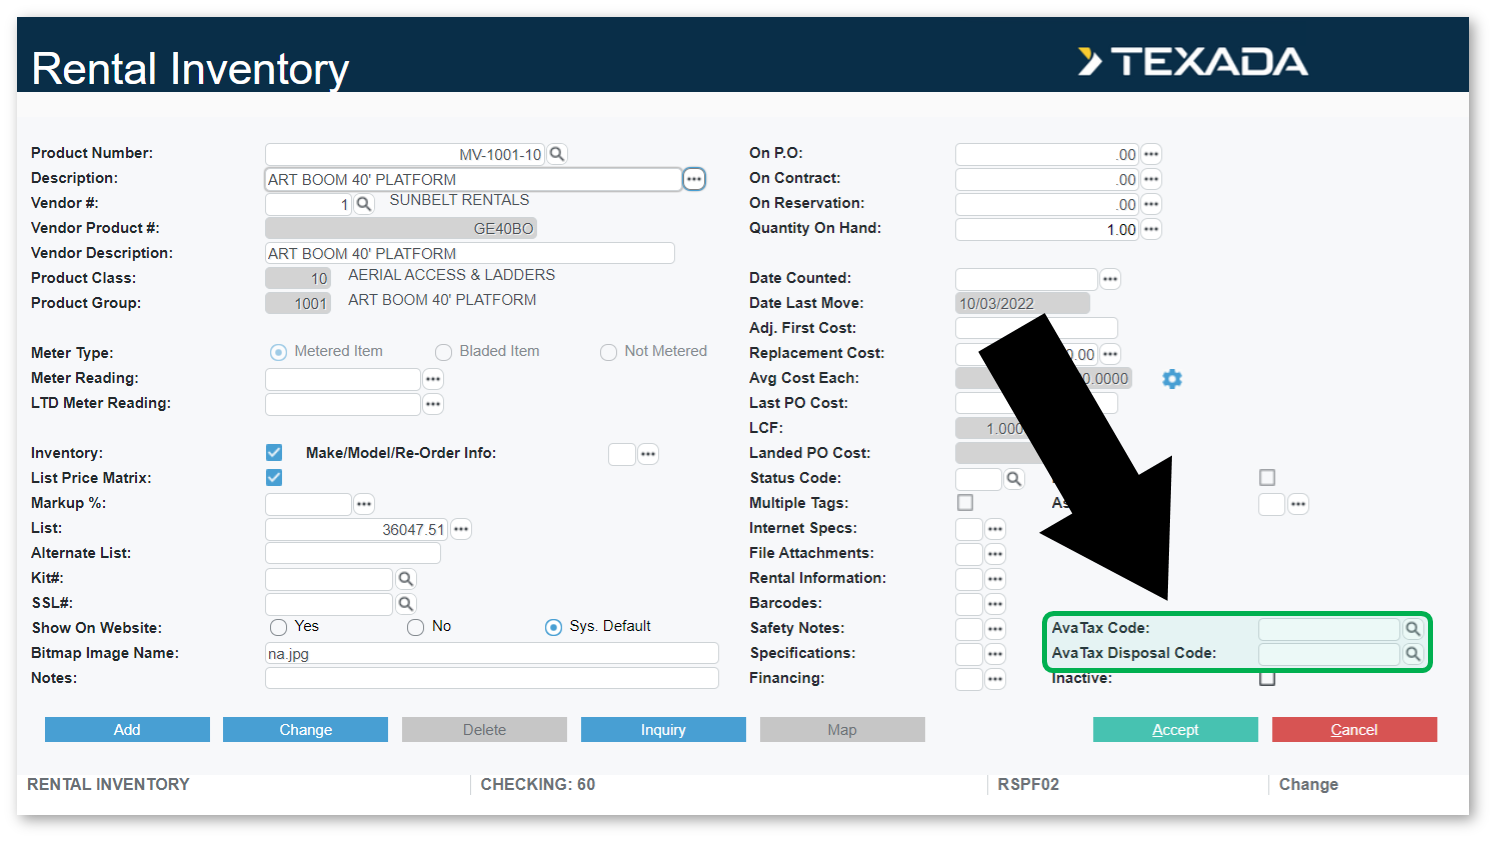
- Rental Products: At Inventory Control → Rental Inventory.
- Sales Products: At Inventory Control → Sales Inventory.
- To import the latest AvaTax codes from Avalara into Texada SRM:
- To assign an Avalara entity code to a Customer in Texada SRM:
- Navigate to Accounts Receivable → Customer Information.
- Enter or search for a Customer, then press Enter to load its details.
- Click the three dots
next to “Codes”, then click the three dots
- Click the three dots
- Click “OK, “OK”, then “Accept” to save your changes.
- When Avalara is enabled for your system, only 2 tax options will be available on documents. This applies to all types of documents where taxes are calculated, including Contracts, Reservations, Quotes, Work Orders, Sales Orders, and Invoices:
- Y - TAXABLE: Tax rate for this item will be calculated by Avalara.
- NTX - NO TAX: Taxes will not be applied to this item.
In This Article
- Introduction
- Before You Begin
- Enable Avalara in Texada SRM
- Configure Avalara
- The Avalara Tax Settings Screen
- AvaTax Codes
- Customer Entity Codes
- Document Taxes
Introduction
Avalara is tax compliance software that allows equipment companies doing business in the USA to automatically calculate tax rates for rental and sale transactions. By integrating Avalara AvaTax with Texada SRM and assigning tax codes to various products and services, Texada users can outsource the process of tax calculation to Avalara. This ensures that your organization remains tax compliant and allows Avalara to build a paper trail of transactions.
The following article will detail the process of configuring Avalara for Texada SRM.
Before You Begin
This article assumes that your organization is already a client of Avalara, and has been provided the information necessary to integrate AvaTax with external applications. This information includes:
- Account Name
- Account Number
- License Keys (Play and Live)
- Avalara Client Prefix
- User Name
- Password
If you do not have access to this information or are unsure where to locate it, please contact Avalara support or Texada support for assistance.
Enable Avalara in Texada SRM
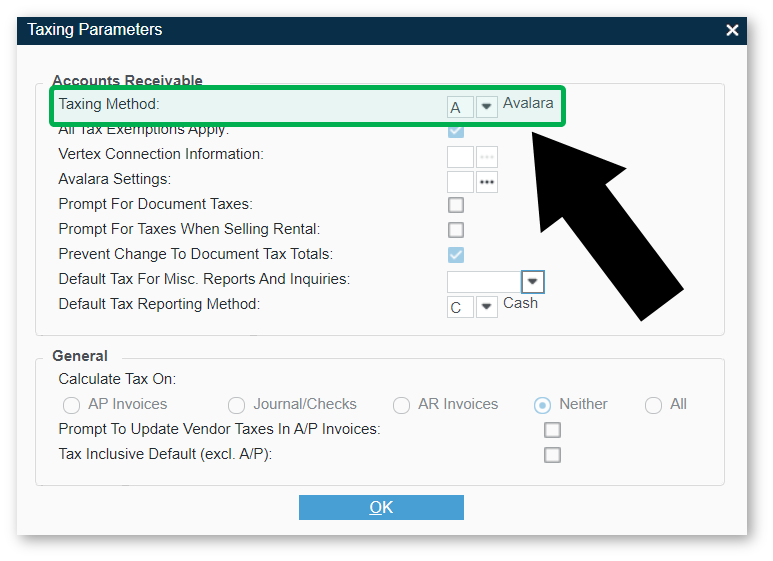
The first step in integrating Avalara with Texada SRM is to switch SRM’s Taxing Method to “A - Avalara”. This will change SRM’s tax calculation logic and will enable a number of Avalara-specific configurations throughout the system.
This step can only be performed by a Texada administrator. If you would like to change your organization’s Taxing Method, please contact Texada support for assistance.
- Log in to Texada SRM as a Texada administrator and navigate to System Maintenance → Configure System Settings → System → Company Parameters → Taxing Parameters.
- Set “Taxing Method” to “A - Avalara”.
- Click “OK”.
Configure Avalara
Once Avalara is enabled for your system, there are a number of Avalara-specific configurations to make.
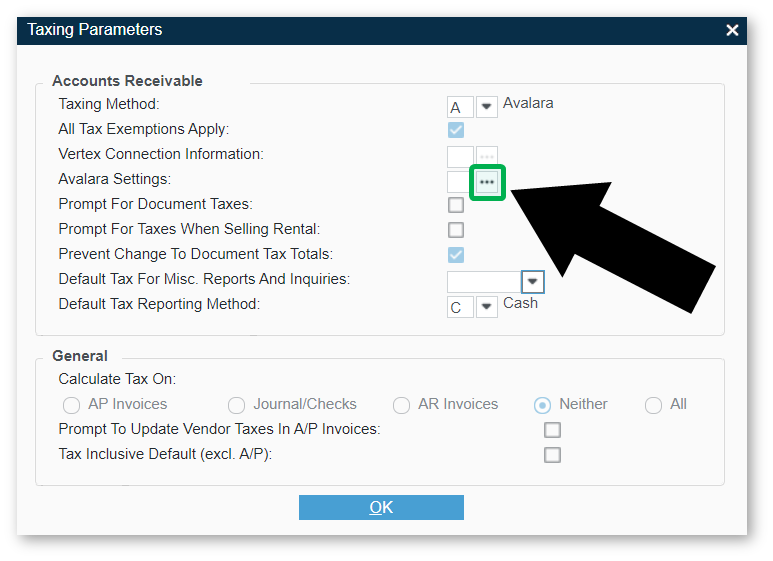
- Log in to Texada SRM and navigate to System Maintenance → Configure System Settings → System → Company Parameters → Taxing Parameters.
- Click the three dots
next to “Avalara Settings” to open the Avalara Tax Settings window.
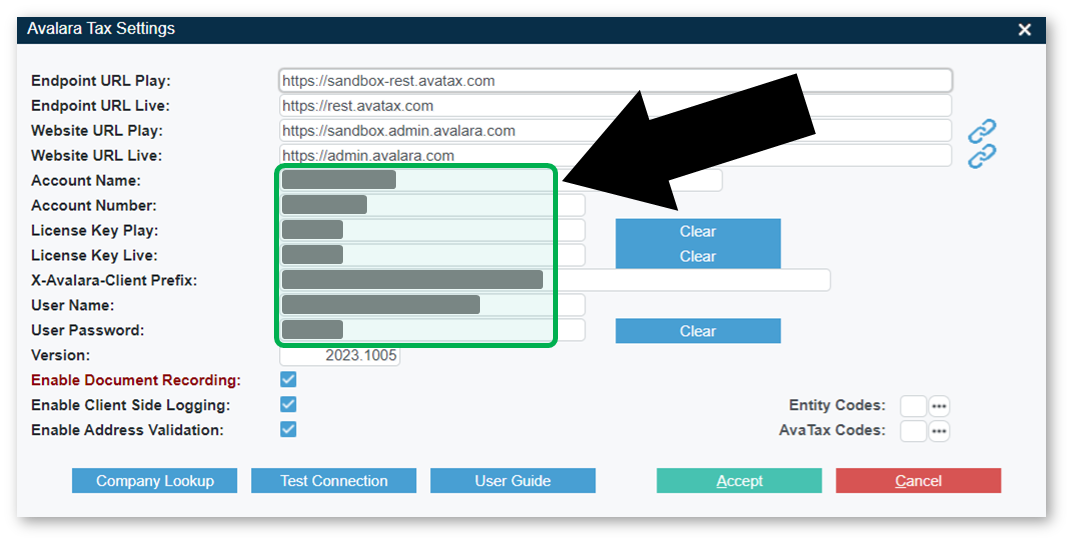
- The Avalara Tax Settings window contains all the fields necessary for configuring your Avalara integration. The first 4 fields (Endpoint / Website URLs) are shared across all Texada customers and do not need to be changed. The “Version” field may be set by a member of Texada staff.
Fill out the following remaining fields using the account information provided to your organization by Avalara:- Account Name
- Account Number
- License Key Play
- License Key Live
- X-Avalara-Client-Prefix
- User Name
- User Password
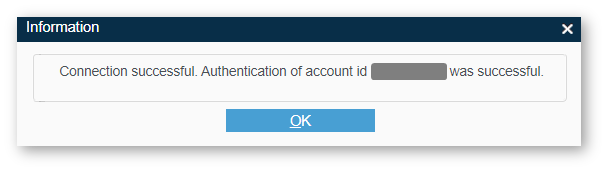
- Once you have entered your Avalara account information, click the “Test Connection” button to test your configurations. If the information you entered was correct, you will receive a message reading “Authentication of account id [ID] was successful.”
If you do not receive this message, double-check the account information entered in step 3 and try again.
The Avalara Tax Settings Screen
The Avalara Tax Settings screen in Texada SRM contains all of the options and features you will need to configure Avalara for your system.
To reach this screen, log in to Texada SRM and navigate to System Maintenance → Configure System Settings → System → Company Parameters → Taxing Parameters → Avalara Settings.
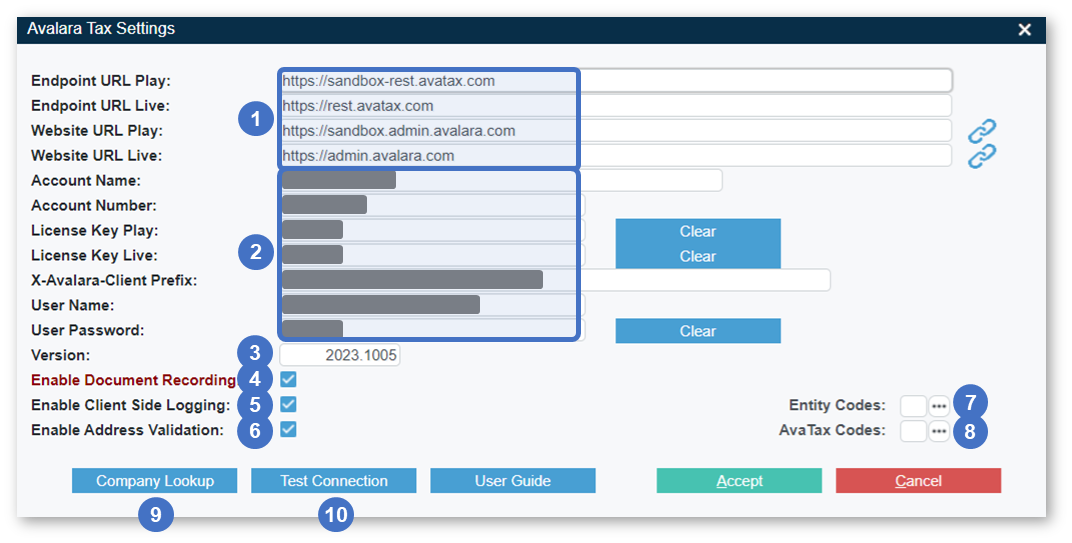
- Endpoint / Website URLs
URL values used to communicate with Avalara. These fields are shared across all Texada customers and do not need to be changed. - Avalara Account Information
Account-specific information used to communicate with Avalara. This information should be provided to your organization by Avalara when you first become an Avalara customer. - Version
The version of your Avalara integration. This field is maintained by Texada staff for recordkeeping purposes. - Enable Document Recording
If this option is enabled, transactions made through SRM will be posted to Avalara. If this option is disabled, Avalara will still be used to calculate taxes for transactions made in SRM, but transactions will not be recorded on Avalara’s side.
Note: Transactions will be posted to Avalara whenever the Daily Close #3 process is completed in Texada SRM. - Enable Client Side Logging
Check this box to enable backend logging of the transaction data sent to Avalara. These logs can only be viewed by Texada staff, and will only be reviewed in the event of a system error or query from your organization. It is recommended to leave this option enabled to allow for easier troubleshooting. - Enable Address Validation
If this option is enabled, each address entered into a document will be automatically tested for validity by Avalara. If an address is found to be invalid, a message to that effect will be displayed. This feature is useful for ensuring that addresses are entered in such a way that their tax calculations can be correctly handled by Avalara. - Entity Codes
Click to view Avalara’s list of entity codes. Entity codes are used to identify business entities with special taxation rules or exemptions, such as government entities or religious organizations. The list of entity codes is maintained by Avalara and is retrieved from Avalara in real-time when the Entity Codes button is pressed.
For more information on how to assign entity codes to Customers in Texada SRM, see “Customer Entity Codes”. - AvaTax Codes
Click to view the list of AvaTax codes in your system. These are the tax codes that determine the tax rates of products and services when Avalara is integrated with Texada SRM.
For more information on AvaTax codes, see “AvaTax Codes". - Company Lookup Button
Click to download a Microsoft Excel (.xls) file containing the information that Avalara has stored for your company or companies. This feature is useful for verifying that the information Avalara has on file for your organization is correct. - Test Connection Button
Click to test SRM’s connection with Avalara using the current configurations.
AvaTax Codes
AvaTax codes are the tax codes that determine the tax rates of products and services when Avalara is integrated with Texada SRM. Unlike SRM’s native Tax Codes, the list of AvaTax codes is managed by Avalara, and must be periodically downloaded from Avalara’s website and imported into SRM in order to remain current.
AvaTax codes are not to be mistaken with Texada SRM’s native Tax Codes, which can be managed at System Maintenance → Configure System Settings → Accounting → Tax Codes. These two kinds of tax codes are managed independently of one another, do not affect one another, and are mutually exclusive: SRM’s native tax codes will be used when SRM’s Taxing Method is set to Standard or Enhanced, whereas AvaTax codes are used when the Taxing Method is set to Avalara.
Import AvaTax Codes
To import the latest AvaTax codes from Avalara into Texada SRM, follow the steps below.
- Open your web browser and navigate to https://taxcode.avatax.avalara.com/.
- Click the “Avalara goods and services type list (.xlsx)” hyperlink near the right side of the page. This will download an Avalara_goods_and_services.xlsx file. This is the most current version of Avalara’s AvaTax codes list. Depending on your browser’s configuration, you may be prompted to select a download location, or the file may be automatically downloaded to your Downloads folder.
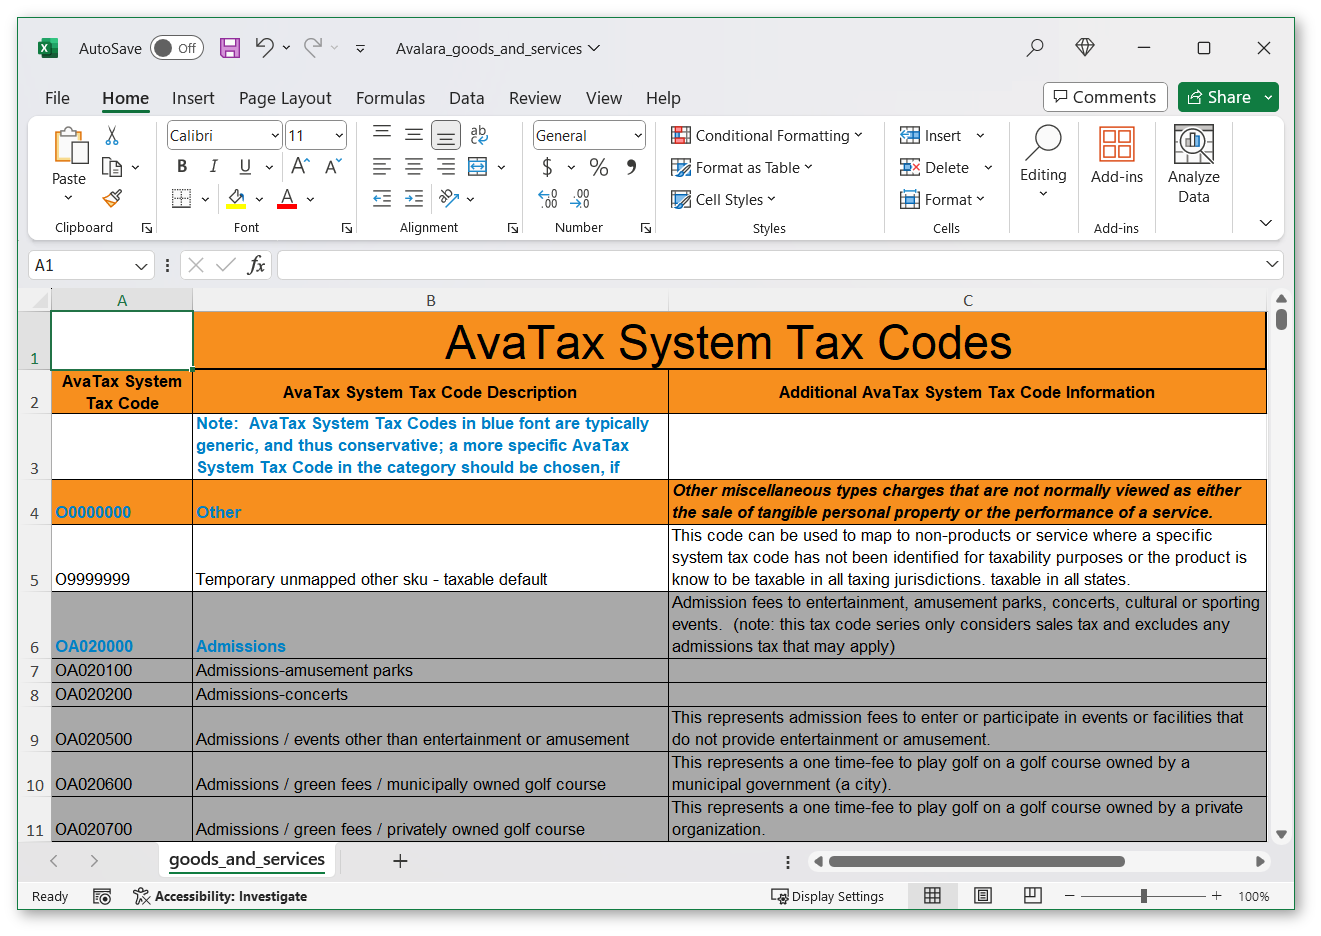
- Open Avalara_goods_and_services.xlsx using Microsoft Excel or other spreadsheet-viewing software.
- Save Avalara_goods_and_services.xlsx as a tab-delimited text file. This is an important step that must be completed to prepare the file for import into Texada SRM. In Microsoft Excel, this can be done by selecting File → Save As, then selecting “Text (tab delimited)” from the “Save as type” drop-down.
- Log in to Texada SRM and navigate to System Maintenance → Configure System Settings → System → Company Parameters → Taxing Parameters → Avalara Settings → AvaTax Codes. This utility allows you to browse and manage the current list of AvaTax codes present in Texada SRM.
- Click the “Import” button at the bottom of the AvaTax System Tax Codes window, then follow the prompts to upload a new AvaTax code file. Select the Avalara_goods_and_services.txt file you created in step 4, then click “Upload”.
- After your file has finished uploading, a confirmation box that reads “Do you wish to update tax codes?” will pop up. Before selecting “Yes” or “No”, you will have the opportunity to review the effects of the import.
At the same time that the confirmation box appears, an .xls file will automatically be downloaded to your machine. Open this file in Microsoft Excel or similar to see what the effects of the import will be if carried out. The “ACTION” column (column C in the screenshot below) indicates which action will be taken for each tax code. A blank ACTION value means that the code is new and will be imported. - Once you have finished your review of the import’s effects, select “Yes” for “Do you wish to update tax codes?” to run the import.
- After the import has finished running, an Import Summary window will open showing the number of records that were read, added, updated, and deleted. Click “OK” to close the window.
Assign AvaTax Codes
Once Avalara has been enabled in your system and the current list of AvaTax codes has been imported, it is time to assign these tax codes to the products and services offered by your organization. The following section will detail the places throughout Texada SRM where AvaTax codes can be assigned.
The AvaTax Code and AvaTax Disposal Code fields described in this section will only be visible if SRM’s Taxing Method is set to “A - Avalara”. This means you must enable Avalara in Texada SRM before making these configurations.
AvaTax codes applied to Rental or Sales Classes, Groups, and Products follow the same principles of inheritance that often apply when working with Products in Texada SRM: specifically, Products inherit the properties of their parent Group, which in turn inherit the properties of their parent Class.
When a Product is rented or sold, the system will apply the AvaTax code set at the Product level. If none exists, the Group’s code will be used, followed by the Class’s code. This means that it is not necessary to assign AvaTax codes to each Product individually.
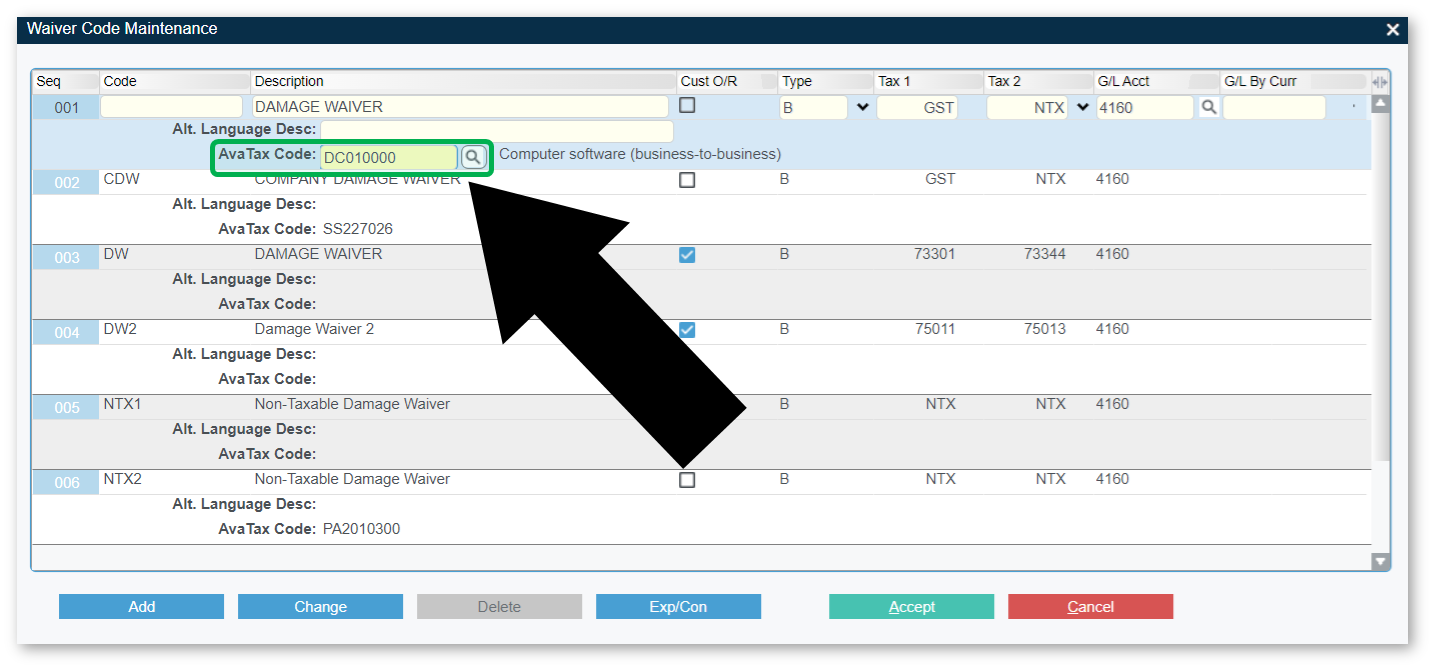
Damage Waivers
To view and modify the AvaTax codes that apply to damage waivers in Texada SRM, follow the steps below.
- Navigate to System Maintenance → Configure System Settings → Accounting → Waiver Codes.
- Click the Exp/Con button at the bottom of the Waiver Code Maintenance window to view additional details for each waiver code.
- An AvaTax Code field will now be visible for each damage waiver. Click the search icon
next to the field to search for and select a new AvaTax code for that waiver.
- Click “Accept” to save your changes.
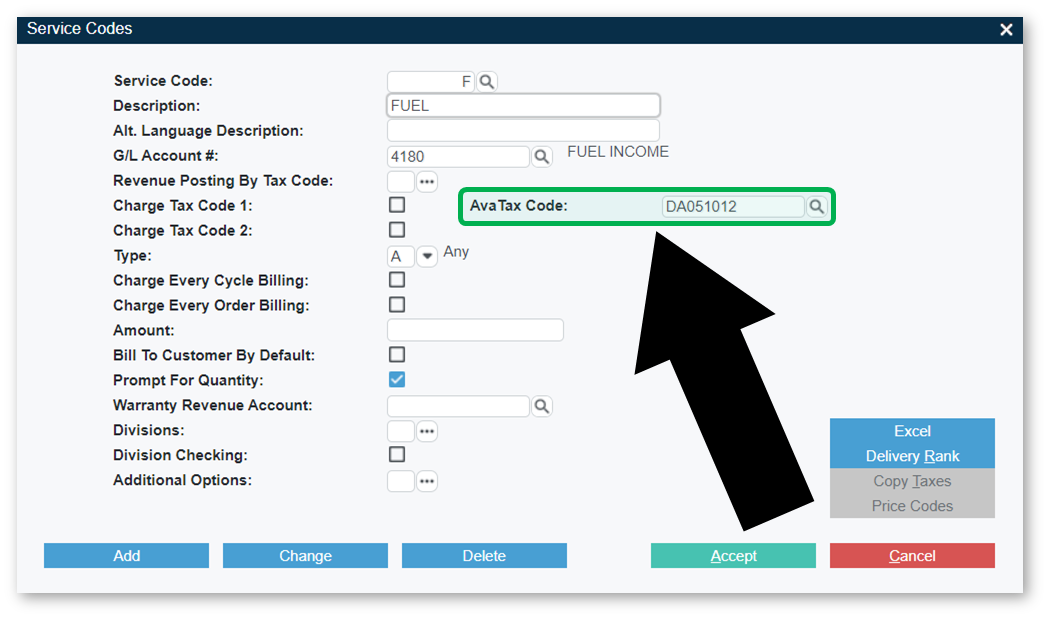
Services
To view and modify the AvaTax codes that apply to various services in Texada SRM, follow the steps below.
- Navigate to System Maintenance → Configure System Settings → Accounting → Service Codes.
- Enter or search for a service code, then press Enter to load its details.
- The AvaTax Code value for that service will now be visible. Click the search icon
- Click “Accept” to save your changes.
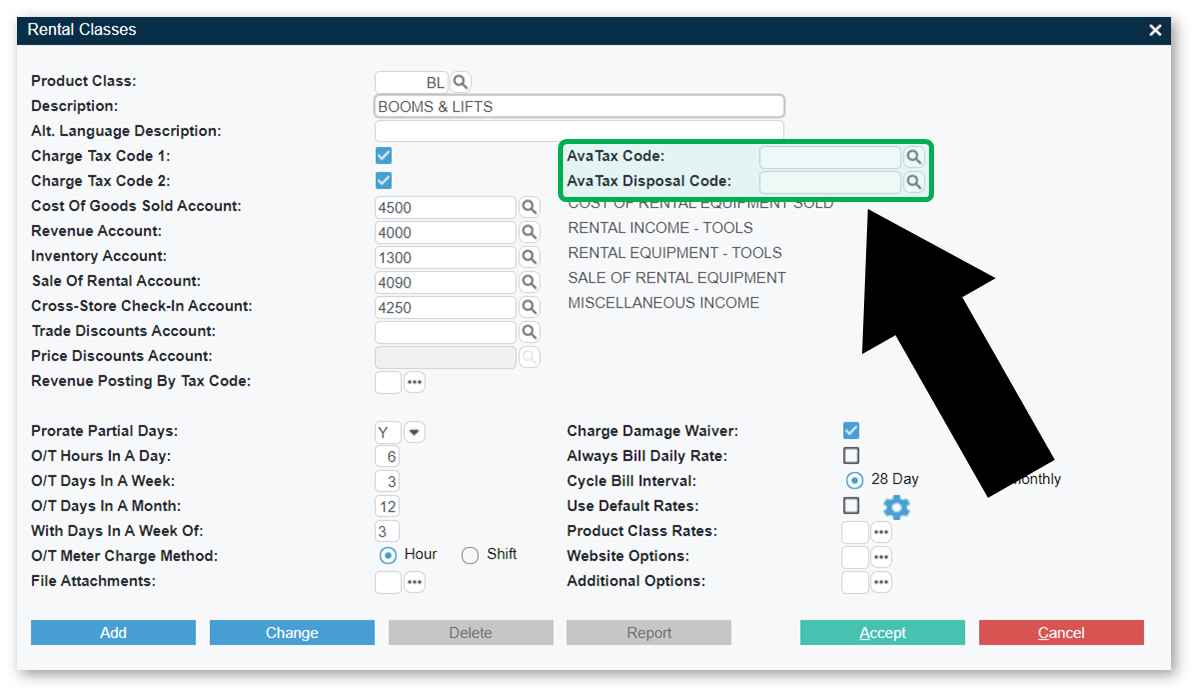
Rental Classes
Each Rental Class in Texada SRM has two AvaTax codes:
- AvaTax Code: The tax code that will be applied when Products of that Class are rented out.
- AvaTax Disposal Code: The tax code that will be applied when Products of that Class are sold.
To view and modify the AvaTax codes that apply to Rental Product Classes in Texada SRM, follow the steps below.
- Navigate to System Maintenance → Configure System Settings → Accounting → Rental Classes.
- Enter or search for a Product Class, then press Enter to load its details.
- The AvaTax Code and AvaTax Disposal Code values for that Class will now be visible. Click the search icon
- Click “Accept” to save your changes.
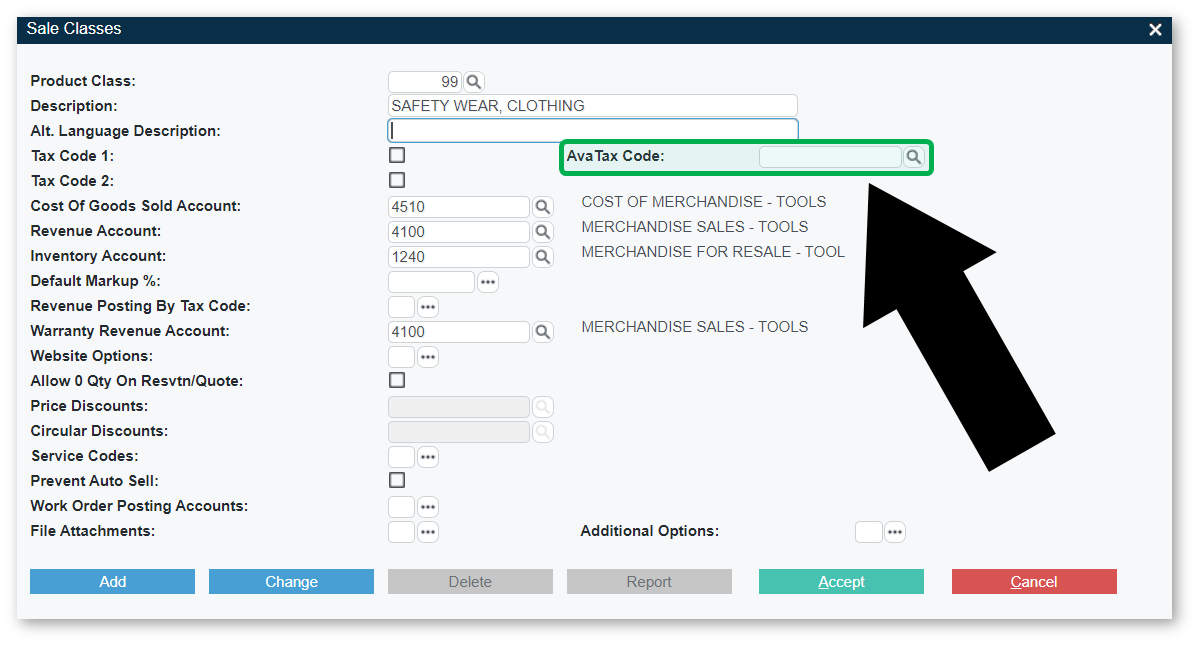
Sales Classes
To view and modify the AvaTax codes that apply to Sale Product Classes in Texada SRM, follow the steps below.
- Navigate to System Maintenance → Configure System Settings → Accounting → Sales Classes.
- Enter or search for a Sales Class, then press Enter to load its details.
- The AvaTax Code value for that Class will now be visible. Click the search icon
- Click “Accept” to save your changes.
Groups
If no AvaTax Codes are set at the Group level, the Group will inherit tax information from its parent Class. This means that you do not need to configure AvaTax codes for a Group unless you want it to have different codes from its parent Class.
For more information on inheritance, see “Classes, Groups, and Products”.
Each Group in Texada SRM has two AvaTax codes:
- AvaTax Code: The tax code that will be applied when Products of that Group are rented out.
- AvaTax Disposal Code: The tax code that will be applied when Products of that Group are sold.
To view and modify the AvaTax codes that apply to Product Groups in Texada SRM, follow the steps below.
- Navigate to System Maintenance → Configure System Settings → Operations → Groups.
- Enter or search for a Group, then press Enter to load its details.
- The AvaTax Code and AvaTax Disposal Code values for that Group will now be visible. Click the search icon
- Click “Accept” to save your changes.
Rental Products
If no AvaTax Codes are set at the Product level, the Product will inherit tax information from its parent Group. This means that you do not need to configure AvaTax codes for a Product unless you want it to have different codes from its parent Group.
For more information on inheritance, see “Classes, Groups, and Products”.
Each Rental Product in Texada SRM has two AvaTax codes:
- AvaTax Code: The tax code that will be applied when that Product is rented out.
- AvaTax Disposal Code: The tax code that will be applied when that Product is sold.
To view and modify the AvaTax codes that apply to Rental Products in Texada SRM, follow the steps below.
- Navigate to Inventory Control → Rental Inventory.
- Enter or search for a Product, then press Enter to load its details.
- The AvaTax Code and AvaTax Disposal Code values for that Product will now be visible. Click the search icon
Sales Products
If no AvaTax Codes are set at the Product level, the Product will inherit tax information from its parent Group. This means that you do not need to configure AvaTax codes for a Product unless you want it to have different codes from its parent Group.
For more information on inheritance, see “Classes, Groups, and Products”.
To view and modify the AvaTax codes that apply to Sales Products in Texada SRM, follow the steps below.
- Navigate to Inventory Control → Sales Inventory.
- Enter or search for a Product, then press Enter to load its details.
- The AvaTax Code value for that Product will now be visible. Click the search icon
- Click “Accept” to save your changes.

Bulk Update AvaTax Codes
A number of import/export utilities in Texada SRM have been updated with AvaTax Code fields, allowing you to update Classes, Groups, and Products with AvaTax information in bulk.
The following table outlines the changes made to various import/export utilities.
|
Utility Name |
Location |
Update |
|
Utilities → Data Export/Import Utilities → Export/Import Standard Data Files |
|
|
|
Utilities → Data Export/Import Utilities → Export/Import Group Information |
|
|
|
Utilities → Data Export/Import Utilities → Export/Import Inventory Clean-Up → Product |
|
|
|
Utilities → Data Export/Import Utilities → Export/Import Service Codes |
|
Customer Entity Codes
Once Avalara is enabled for your system, it is possible to assign Avalara Entity Codes to your Customers. Entity codes are used to identify business entities with special taxation rules or exemptions, such as government entities or religious organizations. The list of entity codes is managed by Avalara and can be reviewed via the Avalara Tax Settings screen.
Assign Customer Entity Codes
To assign an entity code to one of your Customers in Texada SRM, follow the steps below.
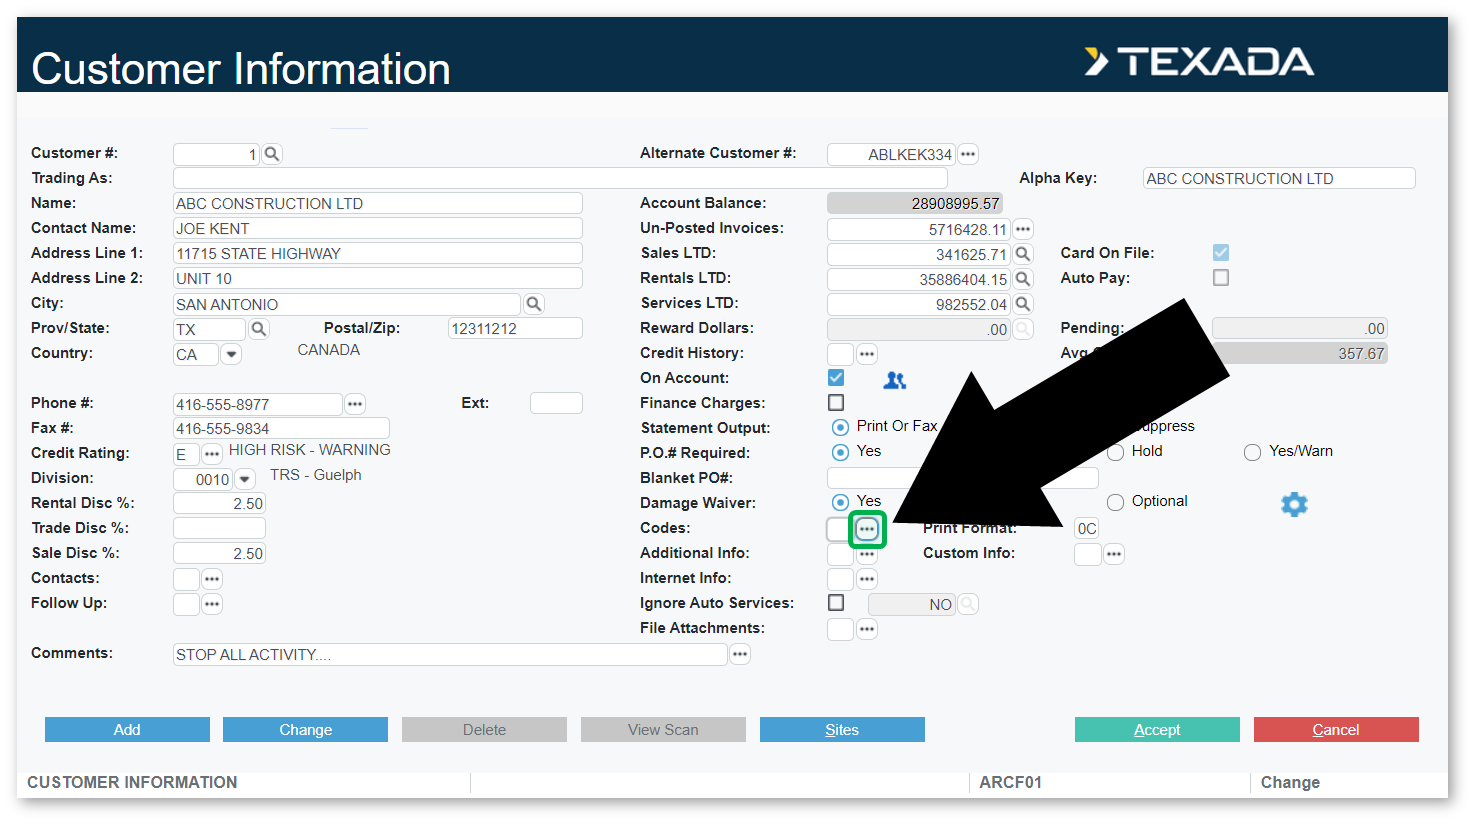
- Navigate to Accounts Receivable → Customer Information.
- Enter or search for a Customer, then press Enter to load its details.
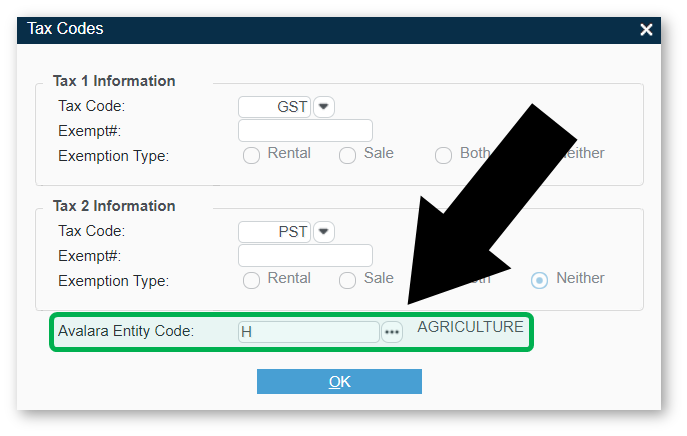
- Click the three dots
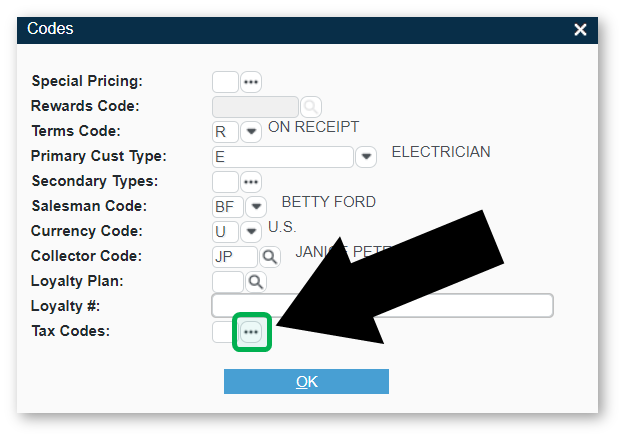
next to “Tax Codes” to open the Tax Codes window.
- Click the three dots
next to the Avalara Entity Code field to select a new entity code for the Customer.
- Click “OK, “OK”, then “Accept” to save your changes.
Document Taxes
Once Avalara is enabled for your system, the way that taxes are calculated on documents will change. This applies to all types of documents where taxes are calculated in Texada SRM, including Contracts, Reservations, Quotes, Work Orders, Sales Orders, and Invoices.
Contract Changes
Two new fields will appear on the Contracts page in SRM: Avatax Codes and Tax Rate.
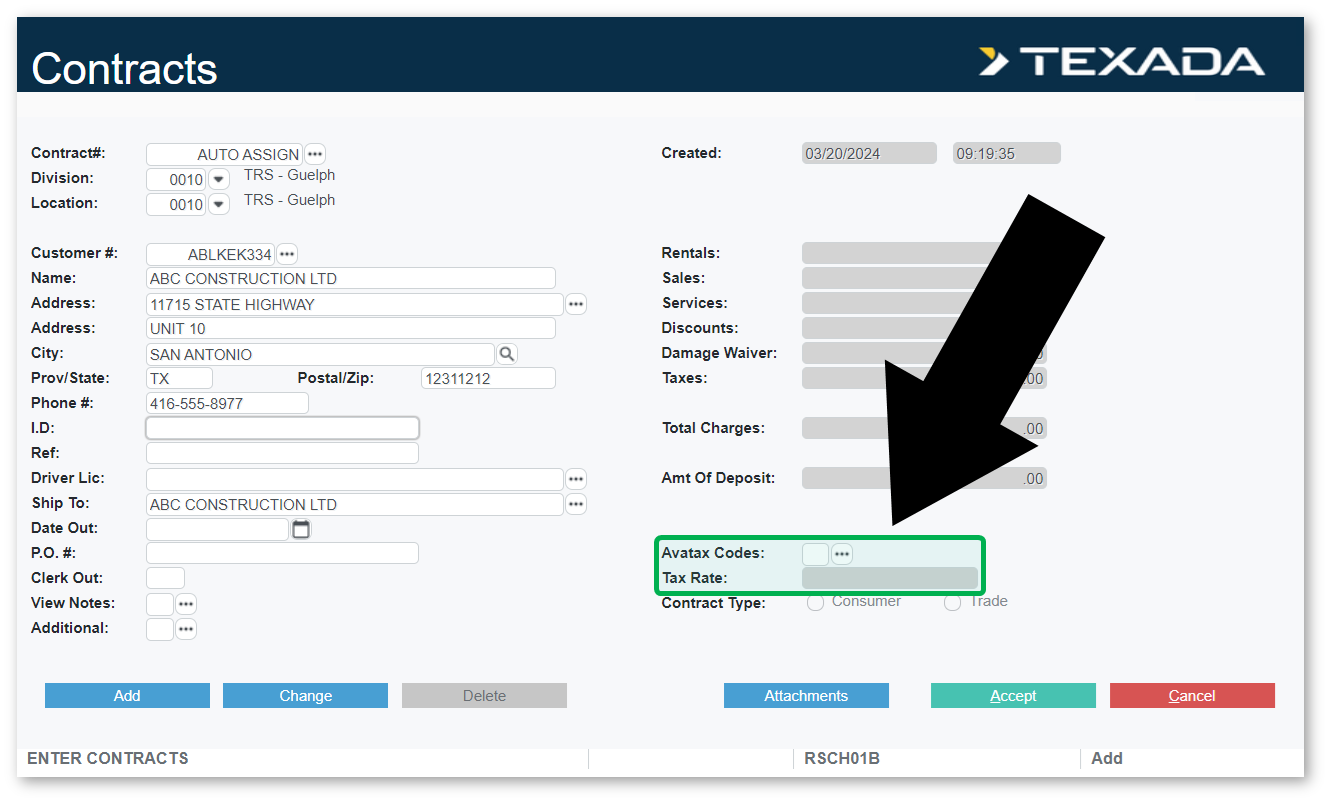
Click the three dots next to “Avatax Codes” to open the Avalara Information window. The “Calculate Taxes Based On” field in this window allows you to select whether taxes should be calculated based on the Customer’s Bill To address or their Ship To address.
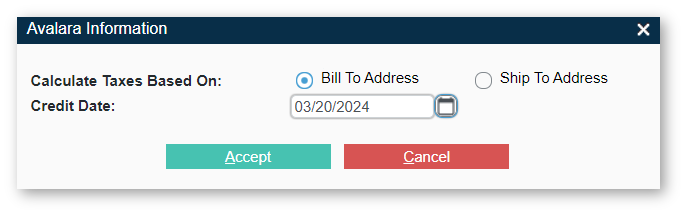
Once you have clicked “Accept” in the Avalara Information window, the Tax Rate field will be automatically populated with an estimated tax rate for the Contract (for example, 15.00 for 15%). Note that this tax rate is only an estimate, and the true tax rate may change depending on the products and services added to the Contract.
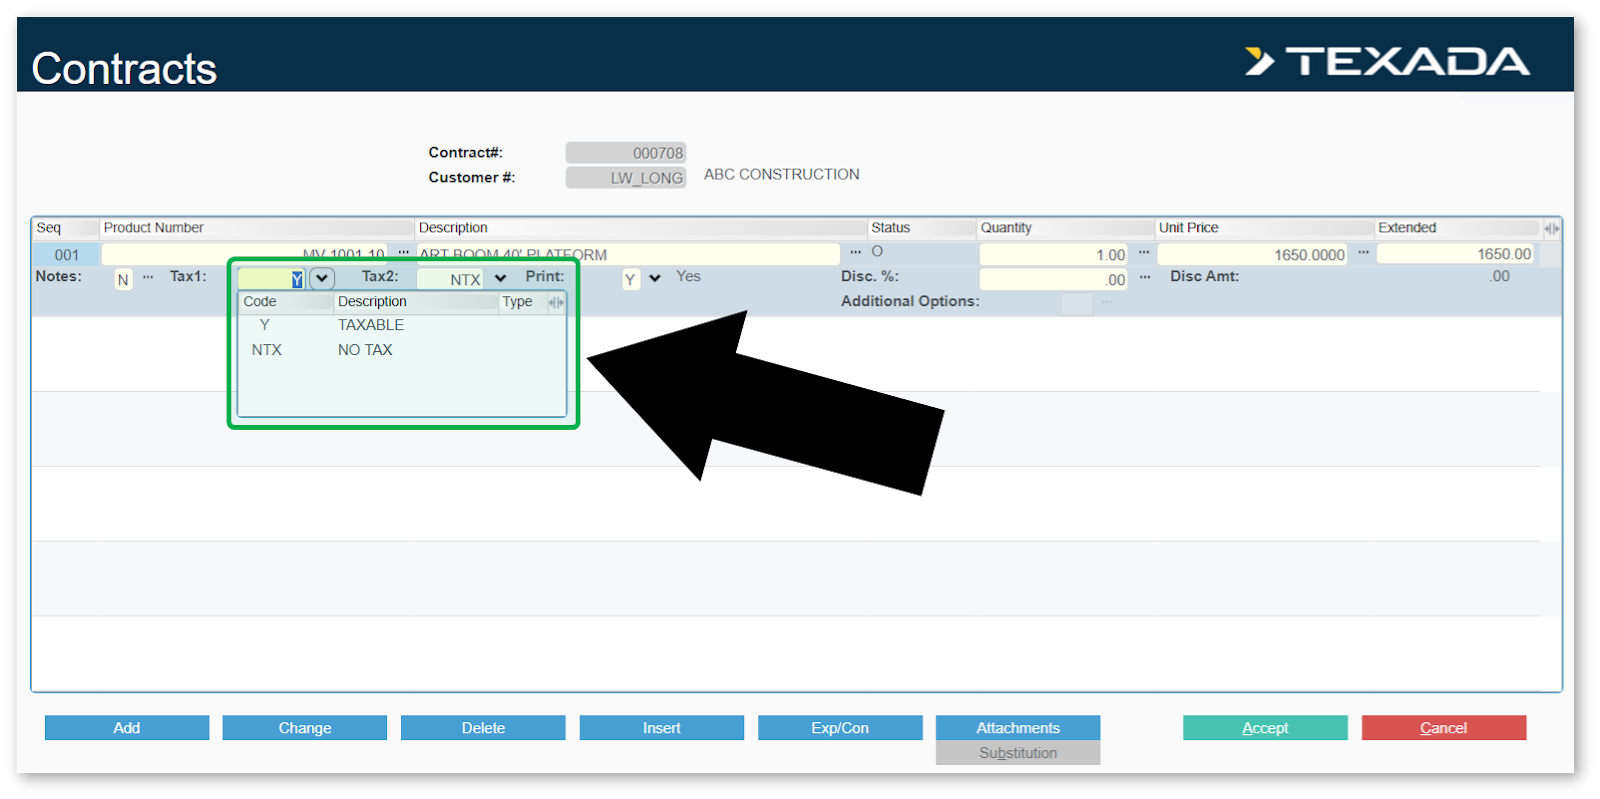
When adding Products or Services to a Contract, click the Exp/Con button at the bottom of the screen to reveal the Tax1 field. Unlike when using Standard or Enhanced taxing, only 2 options will be available for this field:
- Y - TAXABLE: Tax rate for this item will be calculated by Avalara.
- NTX - NO TAX: Taxes will not be applied to this item.
When using Avalara, the Tax2 field will always default to NTX and cannot be changed. The Tax1 field alone will determine the behavior of the item.
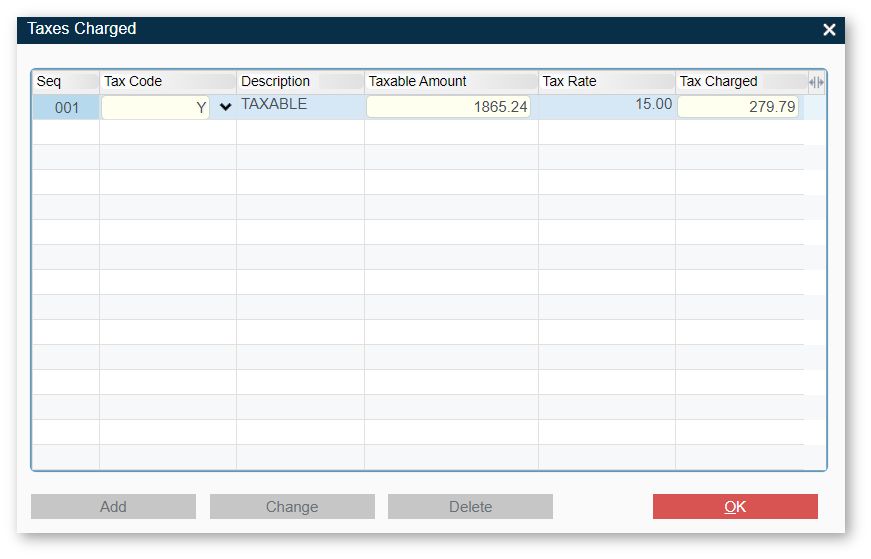
As with Standard and Enhanced taxing, you can open the Taxes Charged window from the Contract Totals screen to review the calculations the system used to arrive at the Contract’s tax amount. Here you can see the final Tax Rate and Tax Charged as calculated by Avalara.