.png?width=365&height=50&name=Texada%20Logo%20(Black).png)
In This Article
Introduction
A Ticket is a document indicating that Assets need to be moved between locations. Tickets are created in Rental Management (Classic or Next), and are fulfilled by a Driver using Service & Rental Mobile.
There are three types of Ticket:
- Delivery: Deliver Assets from inventory to the Customer’s work site.
- Pickup: Pick up Assets from the Customer’s work site and return them to inventory.
- Task: Move Assets from one location to another.
The following article will cover the process of creating a new Pickup, Delivery, or Task Ticket in Rental Management (Next).
Create a Ticket
- Initialization
Log in to Rental Management (Next) and select Tickets → Create Ticket from the left navigation menu. On the following screen, select the type of Ticket you would like to create - Delivery, Pickup, or Task.
If you are creating a Delivery or Pickup Ticket, you will be taken to the Asset Selection Screen (step 2). If you are creating a Task Ticket, you will go directly to the Create Ticket Screen (step 3).
- Asset Selection Screen
On the following screen, you will see a list of Assets currently out on open Contracts. Use the controls at the top of the screen to search and filter the list of Assets. Once you have located the Asset you want to transport, click on its row to select it, then click “Next”. Note that while you can only select a single Asset on this screen, you will have the option of selecting additional Assets from the same Contract on the following screen.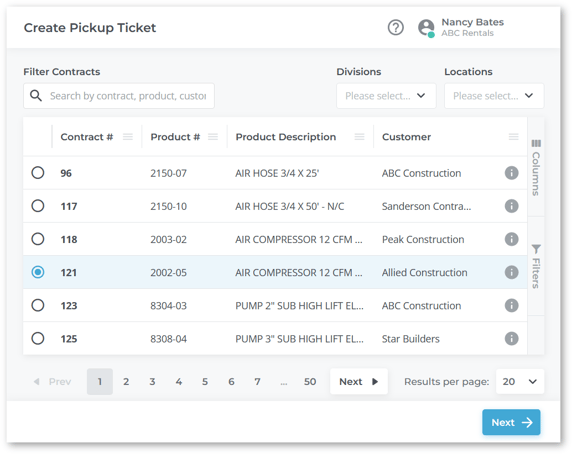
- Create Ticket Screen
On the Create Ticket screen, fill out the details of the Ticket.
For Pickup and Delivery Tickets, most of the fields will be automatically populated using information from the parent Contract, but can be overwritten if necessary. The Products tab will contain a list of all the Products out on the parent Contract; use the checkboxes down the left side of this tab to select the Products to be transported. You can also use the Services tab to add additional Services; they will be included in the Invoice that is generated when the parent Contract is closed.
For Task Tickets, you will need to fill out the information for the Ticket manually, including at minimum a Scheduled date and time, a Location, Origin and Destination Addresses, and at least one Product to transport. Begin typing into the search bar under the Products tab to search and add Products to the Ticket. Note that you cannot add Services to a Task Ticket.
Once you are satisfied with the contents of the Ticket, click “Create Ticket” to create the Ticket. If you have assigned a Driver to the Ticket, they will receive a notification of the assignment on their mobile device.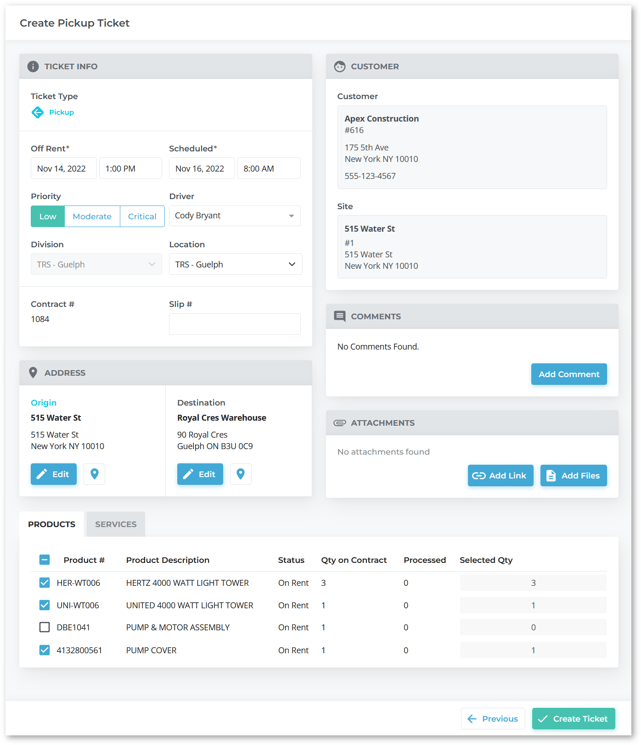
See below for more detailed information on the Asset Selection and Create Ticket screens.
Asset Selection Screen
This screen contains a list of all the Assets that are currently out on Contracts. It is used when creating Delivery and Pickup Tickets.

- Contracts Filter
Begin typing here to filter the list of Assets by the text entered. This will search by Contract #, Product #, Product Description, Customer name, Site, and Vendor Product Number. - Divisions Selector
Use to filter the list of Assets by Division. Click the drop-down to open a list of Divisions, then select one or more Divisions for which to display Assets. - Locations Selector
Use to filter the list of Assets by Location. Click the drop-down to open a list of Locations, then select one or more Locations for which to display Assets. - Asset Selection Table
This table contains a list of Assets that are currently out on open Contracts. The appearance of this table can be modified in a number of ways; see “Working With Tables” for more information. - Asset
Click on an Asset’s row to select it to be picked up. Note that you will have the option of selecting additional Assets from the same Contract on the following screen. - Next Button
Once you have selected an Asset to be picked up, click this button to advance to the Create Pickup Ticket screen.
Asset Selection Table - Columns
The Asset selection table comprises the following columns:
- Contract #: The Contact # of the Contract the Asset is out on.
- Product #: The Asset’s Product #.
- Product Description: The Asset’s description.
- Customer: The Customer with which the Asset is currently out on Contract. Hover your mouse over the “i” symbol
 to view their Customer # and primary address.
 - Site: The Site at which the Asset is located.
- Date Out: The date on which the Asset was rented out (i.e. the start date of the Contract’s rental period).
- Date Due: The date on which the Asset is due to be returned (i.e. the end date of the Contract’s rental period).
Create Ticket Screen
This screen allows you to view and modify all of the information about the Ticket.

- Ticket Info Panel
Contains basic information about the Ticket, such as its Division and Location, its scheduled date and time, and its assigned Driver. - Customer Panel
Contains information on the Customer for whom the Ticket is being completed. For Pickup and Delivery Tickets, this will be the owner of the Ticket’s parent Contract. For Task Tickets, any Customer can be selected, or the Customer can be left blank. - Address Panel
Contains the Origin and Destination Addresses of the Ticket. - Comments Panel
Contains any comments posted on the Ticket by a dispatcher using Rental Management (Next) or Driver using Service & Rental Mobile. - Attachments Panel
Contains any links or files that have been attached to the Ticket. - Products Tab
Allows you to select the Products to be transported on the Ticket. For Delivery and Pickup Tickets, this tab will contain a list of all the Products out on the TIcket’s parent Contract. For Task Tickets, this tab will contain a search bar with which you can search and select Products to be transported. - Services Tab
Delivery and Pickup Tickets only. Contains any additional services that have been added to the Ticket, such as cleaning or refueling fees. - Previous Button
Delivery and Pickup Tickets only. Click to return to the Asset Selection screen. - Create Ticket Button
Click to save your changes and create the Ticket. If you have assigned a Driver to the Ticket, they will receive a notification from Service & Rental Mobile at this time.
Ticket Info Panel
This panel contains basic information about the Ticket.
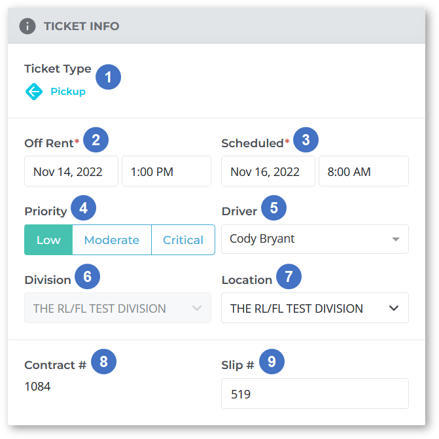
- Ticket Type
The Ticket’s type - Pickup, Delivery, or Task. - Contract Out / Off Rent Date and Time
Delivery and Pickup Tickets only. The date and time at which the Assets on the Contract will be out on rent (Delivery Tickets), or off rent (Pickup Tickets). This value is used to help schedule the Ticket near the Contract’s start or end time. - Scheduled Date and Time
The date and time for which the Ticket is scheduled. This is the date the Driver will see when reviewing the Ticket in Service & Rental Mobile. For Delivery and Pickup Tickets, this date must be after the parent Contract’s date/time out. - Priority
The Ticket’s priority - Low (green), Moderate (orange), or Critical (red). This will be visible in a number of places throughout Rental Management, providing a quick visual indication of which Tickets should be prioritized. - Driver
The Driver responsible for fulfilling the Ticket. Click on the drop-down to open the list of registered Drivers, then begin typing to filter the list and click on a Driver’s name to assign them to the Ticket. You do not need to assign a Driver to a Ticket in order to create it. If you opt not to assign a Driver at the time of creation, you can do so later via the Pickup Tickets list, the Ticket Map, or the Ticket Scheduling page. - Division
Delivery and Pickup Tickets only. The Ticket’s Division. This is inherited from the Division of the parent Contract and cannot be changed. - Location
The Ticket’s Location. - Contract #
The Contract # of the Ticket’s parent Contract. For Delivery and Pickup Tickets, this field is read-only. For Task Tickets, this field can be freely typed. - Slip #
An optional pickup slip number that will be displayed on the printed and .pdf versions of the Ticket.
Customer Panel
This panel contains information on the Customer for whom the Ticket is being created. For Delivery and Pickup Tickets, this information is inherited from the Ticket’s parent Contract and cannot be changed. For Task Tickets, any Customer can be associated with the Ticket, or the Customer can be left blank.

- Customer Information
The Customer’s basic information, including their name, Customer number, primary address, and phone number. - Site Information
Delivery and Pickup Tickets only. Information on the Customer Site at which the Contract took place, including its name, Site number, and address. - Search Bar
Task Tickets only. Begin typing into the search bar to search for a Customer to associate with the Ticket.
Address Panel
This panel contains information on the Origin and Destination Addresses of the Ticket.
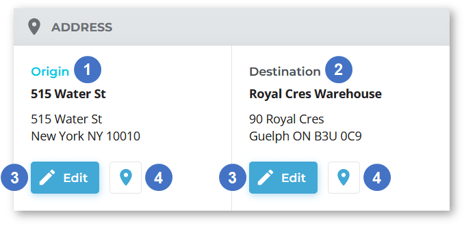
- Origin Address
The address from which the Assets on the Ticket are being picked up. - Destination Address
The address to which the Assets on the Ticket will be delivered. - Edit Address
Click to edit the Origin or Destination Address. See “Edit the Origin or Destination Address of a Ticket in Rental Management (Next)” for more information. - Open in Google Maps
Click the pin icon to view the Origin or Destination Address in Google Maps. This will open Google Maps in a new browser tab. It is highly recommended to use this feature to ensure that Google Maps is able to recognize the Origin and Destination Addresses and provide accurate directions to the Driver.
Comments Panel
This panel contains any comments posted to the Ticket, either by a dispatcher using Rental Management (Classic or Next) or a Driver using Service & Rental Mobile.

- Commenter Name
The name of the user who posted the comment. - Timestamp
The date and time at which the comment was posted. - Comment Visibility
Indicates whether the comment is customer-facing or internal only. Customer-facing comments will be included on the printed and .pdf versions of the Ticket. - Edit Comment
Click the pencil icon next to a comment to edit it.
 - Delete Comment
Click the bin icon next to a comment to delete it.
 - Comment Body
The contents of the comment. Comment bodies are limited to 250 characters. - Add Comment Button
Click to add a new comment.
Attachments Panel
This panel contains any URLs or files that have been attached to the Ticket.
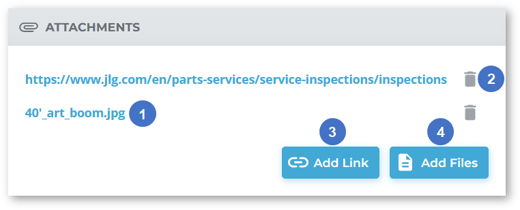
- Attachments
Attachment filenames and URLs are listed here. Note that attachments are not saved until the Ticket is created; once the Ticket has been created, you can click on an attachment to open it in a new browser tab. - Delete Attachment
Click the bin icon next to an attachment to delete it. - Add Link Button
Click to add a new URL attachment to the Ticket. URLs must be valid in order to be attached; the easiest way to ensure this is to navigate to the desired page in your browser, then copy and paste the URL from the address bar. - Add Files Button
Click to add new file attachments to the Ticket. Clicking this button will open your computer’s file explorer, allowing you to select files to upload. You can attach multiple files at once by ctrl+clicking or clicking and dragging to select multiple files.
Products Tab
This tab allows you to select the Products to be transported on the Ticket.
For Delivery and Pickup Tickets (above), this tab will contain a list of all the Products out on the Ticket’s parent Contract. You can use the checkboxes down the left side of the tab to select which of these Products to deliver or return.
For Task Tickets (below), this tab will contain a search bar with which you can search for Products to transport on the Ticket.

- Select All / Deselect All Button
Delivery and Pickup Tickets only. Click the checkbox in the top-left corner of the table to select or deselect all Products. - Select / Deselect Product
Delivery and Pickup Tickets only. Click the checkbox next to a Product to mark it for transport. Three options are available: Unchecked: This Product will not be transported.
Checked: All of the Products of this type will be transported.
Partial Check: Some of the Products of this type will be transported. This symbol will appear if you enter a custom quantity under “Selected Qty”.
- Product
The information included for each Product is as follows:- Product #: The Product’s number.
- Product Description: The Product’s description.
- Status: The Product’s current status.
- Qty on Contract: The quantity of the Product that was rented out on the parent Contract.
- Processed: The quantity of the Product that has already been processed by Drivers on other Tickets. This number is updated whenever a Driver loads Products onto their truck in Service & Rental Mobile.
- Selected Qty: The quantity of the Product to be transported on this Ticket. This field is editable; use the + and - buttons on either side of the field to increase or decrease the quantity to be picked up, or type a number directly.
- Delete Button
Task Tickets only. Click the bin icon to remove a Product from the Ticket. - Search Bar
Task Tickets only. Begin typing into the search bar to search the list of Products by Product # and description. Click on a Product to add it to the Ticket.
Services Tab
This tab, exclusive to Delivery and Pickup Tickets, allows you to add additional Services such as pickup, refueling, or cleaning services. Fees incurred by these Services will be included in the Invoice that is generated when the Ticket’s parent Contract is closed.
Services are managed via the Service Codes utility in Service, Rental, and Financials (Classic), at System Maintenance → Configure System Settings → Accounting → Service Codes.
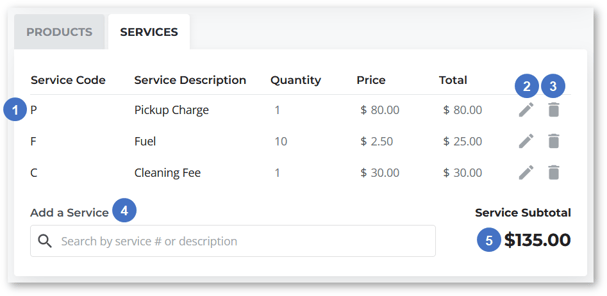
- Service
The information included for each Service is as follows:- Service Code: The Service’s unique code.
- Service Description: The Service’s description.
- Quantity: The quantity of the Service purchased.
- Price: The price per unit of the Service.
- Total: The total cost of the Service. Equal to Quantity * Price.
- Edit Service
Click the pencil icon next to a Service to edit it, including its quantity, price, and date. You are only able to edit the quantity of Services for which the “Prompt For Quantity” checkbox in Service, Rental, and Financials (Classic) is checked; all other Services will be given a quantity of 1. - Delete Service
Click the bin icon next to a Service to remove it from the Ticket. - Add a Service
Begin typing into the search bar to search the list of Services, then click on a Service to add it to the Ticket. - Service Subtotal
The total cost of all Services on the Ticket. Equal to the sum of Totals for each individual Service.