In This Article
- Introduction
- UCC Data Providers
- Upload UCC Data to CloudLink Console
- Matching UCC Filings to SalesLink Customers
- Verify Uploaded UCC Data
- Appendix A: UCC Upload File Requirements
- Appendix B: UCC Admin Screens
- Manage - UCC All Filings
- Manage - UCC BuyCty To Customer
- Manage - UCC BuyId To Customer
- Manage - UCC BuyZIP To Customer
- Manage - UCC Major Segment
- Manage - UCC Manufacturers
- Manage - UCC Mapping Major Segment
- Manage - UCC Rep. Status Codes
- Manage - UCC Size Class
- Manage - UCC Status Codes
- Manage - UCC Unmatched by Customer
- Manage - UCC Unmatched by Equipment
- Appendix C: Other UCC Pages
Introduction
Uniform Commercial Code data, or UCC data, is a valuable resource used by dealers to track metrics such as lost sales. Each unit of UCC data, referred to as a filing, represents a piece of equipment sold to a customer within a dealer’s territory but not sold by the dealer.
UCC filings can be uploaded to CloudLink via CloudLink Console, enabling dealers to make use of this data in SalesLink.
The following article will cover everything you need to know about UCC data, including:
- The difference between the two UCC data formats supported by CloudLink (EDA and CAIS).
- How to upload UCC data to CloudLink Console.
- How UCC filings are matched to SalesLink customers after importing.
- Where UCC data and import behavior can be managed in SalesLink and CloudLink Console.
UCC Data Providers
Not all UCC data follows the same format. Depending on its source, the structure of the data and its requirements for being uploaded into CloudLink will differ. CloudLink currently supports UCC data from two different providers:
- EDA
Fusable’s EDA is a UCC data provider that provides organizations with UCC data for a number of industries, including agriculture, construction, trucking, and machine tools. - CAIS
CAIS, or CAT Insights, is a UCC data service provided by Caterpillar.
IMPORTANT
CloudLink Console is able to accept UCC data downloaded from either EDA or CAIS; however, the system must be configured for that particular data format by Texada.
This means that if your organization would like to switch UCC providers, you will need to contact Texada support with a request to configure the system for your new provider.
Upload UCC Data to CloudLink Console
To upload a new UCC file, follow the steps below.
- Download a UCC file from your organization’s UCC provider (EDA or CAIS). Do not make any modifications to the file; UCC data files should already be formatted for importing into CloudLink when they are downloaded.
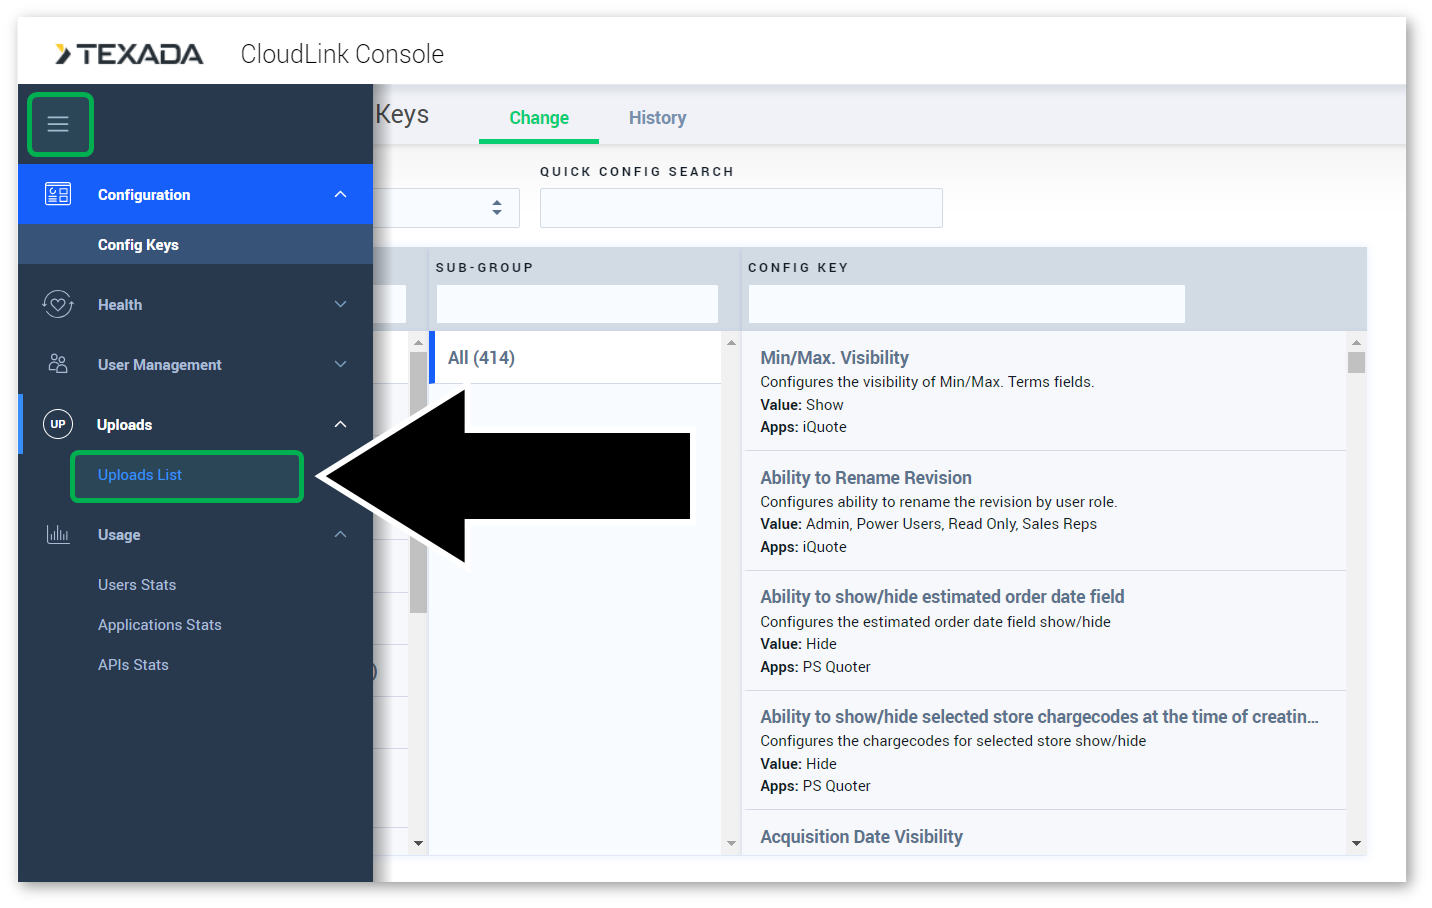
- Log in to CloudLink Console, then open the left navigation menu and navigate to Uploads → Upload List.
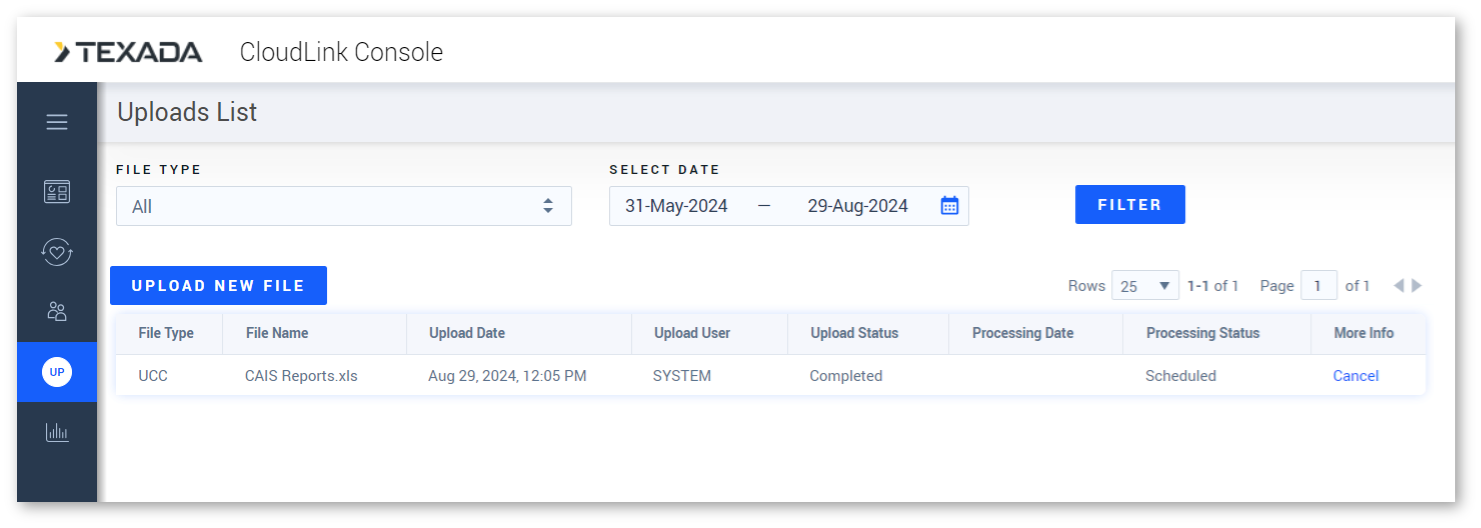
- Click the “UPLOAD NEW FILE” button near the top-left corner of the Uploads List page. This will open the Upload File window.
Select “UCC” from the File Type drop-down, then click “CHOOSE FILES”. In your device’s file explorer, locate and select the UCC data file you downloaded in step 1.
Once you have selected a file, the Upload File window will update with the name of the file and the word “Ready”. Click the “UPLOAD” button to upload your file. - As your file starts processing, the word “Ready” in the Upload File window will change to “In Progress”. Depending on the size of your file, this may take a couple of minutes. Once your file has finished processing, the Upload File window will close automatically and the Uploads List page will refresh. Your file will now appear in the list of uploaded files.
- UCC data is updated hourly. Once your file has been uploaded, its status in the Processing Status column will be set to “Scheduled”. Click “Cancel” under More Info to cancel the update.
Once the system has been successfully updated with the contents of your file, its Processing Status will change to “Completed”. Click “View” under More Info to jump to the UCC All Filings screen.

Matching UCC Filings to SalesLink Customers
Whenever a UCC data file is uploaded to CloudLink Console, each filing is matched to an existing SalesLink customer. This matching is done in five progressive stages: if the system fails to find a match for the filing during the first stage, it will move on to the second stage, and so on.
The behavior of this mapping process is determined by a number of UCC admin screens accessible from SalesLink - Executive. Appendix B: UCC Admin Screens lists these screens and their functions.
A note on phantom accounts
This section makes use of the term “phantom account”. A phantom account is simply a placeholder SalesLink customer created to act as a catch-all for UCC records that would otherwise go unmatched.
Phantom accounts can work either at the county level or at the zip code level. For example, if you have a county called Adams, you could create a customer called “UCC – PHANTOM COUNTY: ADAMS” and assign this account to a sales rep. If a UCC filing located in the Adams county does not match to a real customer, it will match to this account instead.
The Five Stages of UCC Mapping
- Direct Match to Customer
In this phase, the system will look at the contents of the UCC BuyId To Customer screen to see if the UCC filing’s BuyID matches a SalesLink customer.
If a match is found, the filing will be attributed to that customer. - Possible Match to Customer
In this phase, the system will attempt to match the Zip Code and Phone Number of the UCC filing to those of a SalesLink customer.
If a match is found, the UCC filing will be attributed to that customer. Additionally, an entry will be added to the UCC BuyId To Customer screen mapping the UCC BuyID to the SalesLink Customer Number. This means that future UCC filings with the same BuyID will be attributed to the same customer, even if the customer’s phone number or zip code are changed. - Match to Phantom by Zip Code
In this phase, the system will look at the contents of the Manage - UCC BuyZIP To Customer screen to see if UCC filing’s Zip Code matches a SalesLink phantom account.
If a match is found, the UCC filing will be attributed to that phantom account. - Match to Phantom by County
In this phase, the system will look at the contents of the Manage - UCC BuyCty To Customer screen to see if the UCC filing’s County matches a SalesLink phantom account.
If a match is found, the UCC filing will be attributed to that phantom account. - Remain Unmatched
If no match is found for the UCC filing throughout the four stages listed above, it will remain unmatched. These filings can be reviewed via the Manage - UCC Unmatched by Customer and Manage - UCC Unmatched by Equipment screens.
Verify Uploaded UCC Data
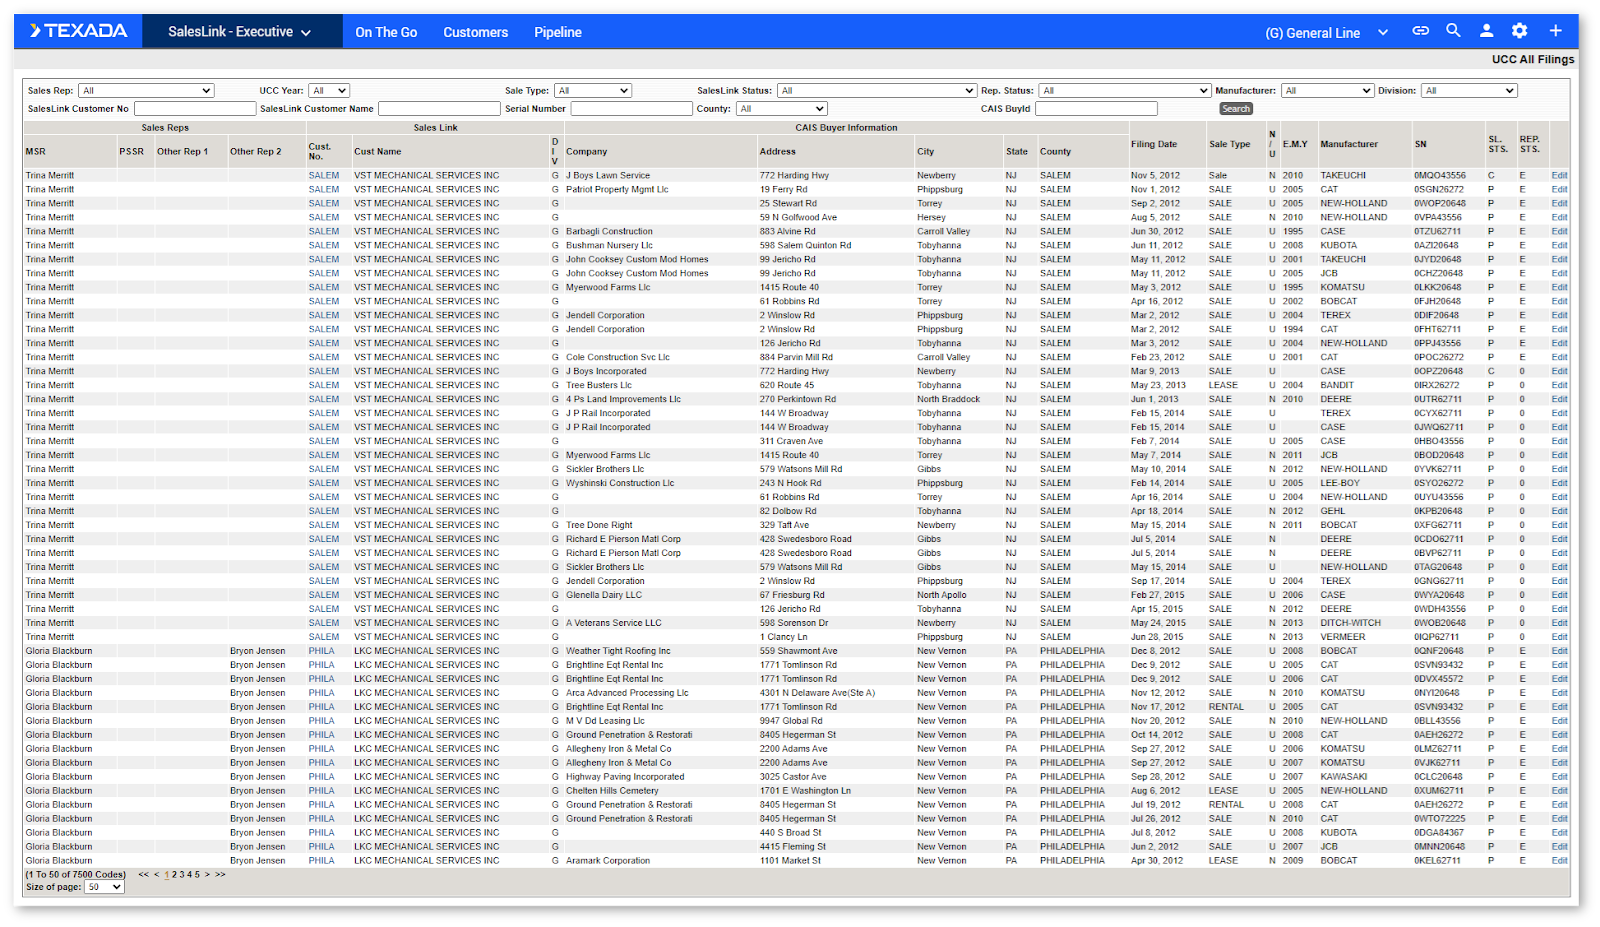
Uploaded UCC data can be verified via the UCC All Filings screen in SalesLink - Executive.
- Log in to SalesLink - Executive, then navigate to the System Menu (cog wheel icon in the top-right corner of the screen) → UCC → Manage - UCC All Filings. Note that this option will only be visible to users who have been given the appropriate permissions via Secured Modules.
- The UCC All Filings screen contains a list of all UCC filings uploaded through CloudLink Console. Click on the “Filing Date” column header to sort UCC uploads by date and see the newest UCCs first.
Appendix A: UCC Upload File Requirements
The following section describes how CAIS / EDA files should be formatted in order to be uploaded successfully into CloudLink.
The requirements outlined in this section are provided for informational and troubleshooting purposes. UCC files should already be formatted correctly for uploading when they are downloaded from CAIS / EDA. You should not need to make any modifications to these files before uploading.
CAIS
Click the button below to download a sample of a properly-formatted CAIS UCC data file.
CAIS files uploaded to CloudLink Console must fulfill the following requirements:
- The file must be saved in one of the following formats:
- .xls
- .xlsx
- The file must consist of a single sheet containing 53 columns. The columns must have the following headers, in order:
- ROW_ORDER
- CUSTOMER ID - UCC
- CUSTOMER NAME - UCC
- SIC
- REGION
- DISTRICT
- DEALER CODE
- PRODUCT LINE
- MBD
- PRODUCT FAMILY
- PRODUCT GROUP
- SIZE CLASS
- SIZE CLASS CODE
- SIZE CLASS RANGE
- SALES MODEL
- SERIAL NUMBER
- MANUFACTURER
- CAT NON CAT
- COMPETITOR INDICATOR
- MARKET SEGMENT
- PWC
- UCC EQUIPMENT USAGE STATUS
- UCC TRANSACTION TYPE
- UCC FILE DATE
- YEAR OF BUILD
- CURRENT OWNER INDICATOR
- CUSTOMER - PRIMARY CONTACT NAME
- CUSTOMER - PRIMARY CONTACT TITLE
- CUSTOMER - SECONDARY CONTACT NAME
- CUSTOMER - SECONDARY CONTACT TITLE
- ADDRESS LINE 1
- ADDRESS LINE 2
- STATE CODE
- COUNTY NAME
- CITY NAME
- ZIP CODE
- GEOGRAPHY CODE
- PHONE NUMBER
- FAX NUMBER
- CUSTOMER LATITUDE
- CUSTOMER LONGITUDE
- AVERAGE INVOICE NET PRICE
- EQUIPMENT VALUE AMOUNT
- EQUIPMENT VALUE ASSESSMENT TYPE
- SECURED PARTY IDENTIFIER
- SECURED PARTY NAME
- SECURED PARTY CLASSIFICATION CODE
- SECURED PARTY STATE CODE
- SECURED PARTY CITY NAME
- CUSTOMER ASSET COUNT
- CUSTOMER SIZE
- CAT ASSET COUNT
- CAT CUSTOMER
EDA
Click the button below to download a sample of a properly-formatted EDA UCC data file.
EDA files uploaded to CloudLink Console must fulfill the following requirements:
- The file must be saved in one of the following formats:
- .dbf
- .xls
- .xlsx
- The file must consist of a single sheet named “DBS Revenue Accounts”. This sheet must contain 23 columns with the following headers, in order:
- BUYID
- UCCID
- EQTUNIT
- FIRST
- LAST
- COMPANY
- ADR 1
- ADR 2
- CITY
- STATE
- ZIP
- PH
- COUNTY
- DESC
- BUYDOLA
- MANU
- MODEL
- DESCR
- SN
- EQTEDAYR
- EQTATTACH
- EQTVALUE
- PROSPECTPROFILELINK
Appendix B: UCC Admin Screens
A number of UCC administration screens are available to SalesLink users with the appropriate permissions. These screens allow you to control the behavior of the UCC mapping process.
These screens can be enabled for individual users via Secured Modules:
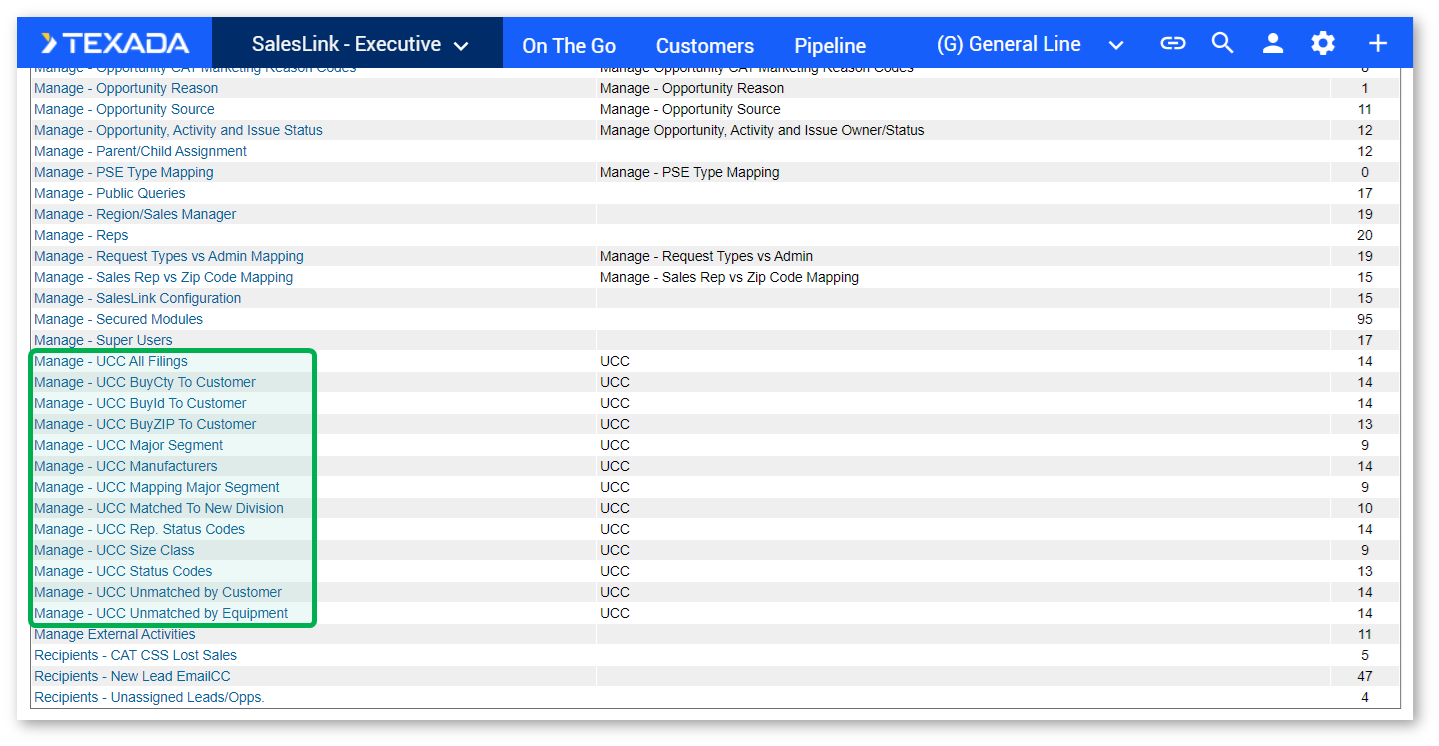
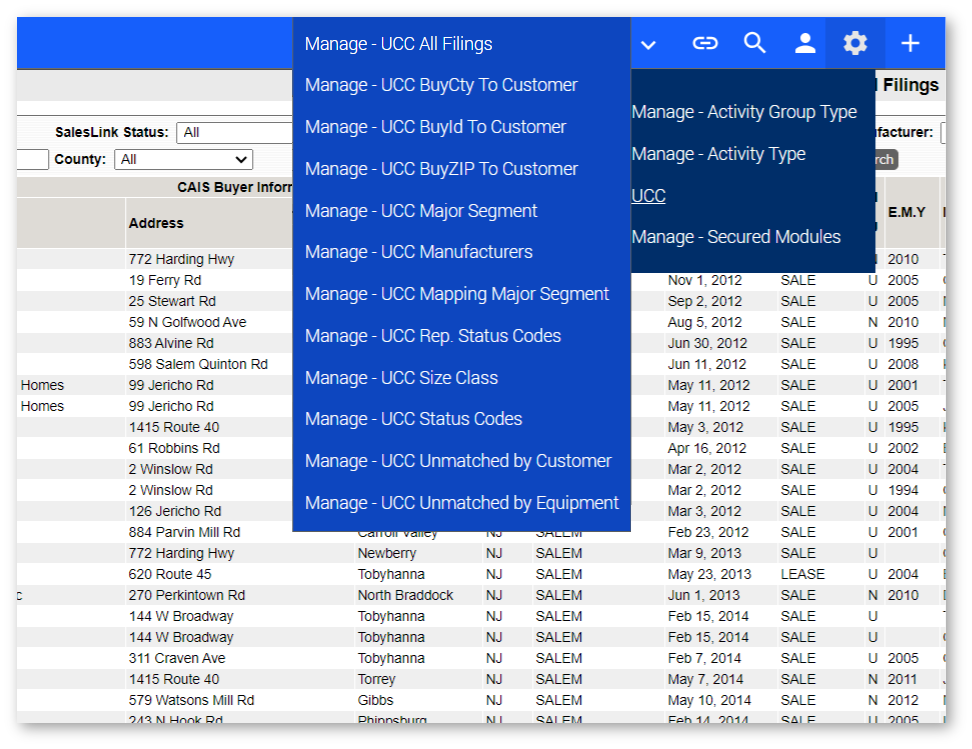
Once enabled, these screens will be available under the System Menu (cog wheel icon in the top-right corner of the screen) → UCC:
Manage - UCC All Filings
This screen lists all the UCC filings uploaded into SalesLink and can be used to verify uploaded UCC data.
Manage - UCC BuyCty To Customer
This screen allows you to map UCC counties to SalesLink phantom accounts. This list is used during phase four of the UCC mapping process to determine which phantom account UCC filings should be attributed to based on their county of origin.
For example, this list might contain an entry mapping the “Adams” county to a phantom account called “UCC – PHANTOM COUNTY: ADAMS”. This means that any Adams county UCC filings not matched to a SalesLink customer will be matched to UCC – PHANTOM COUNTY: ADAMS instead.
Manage - UCC BuyId To Customer
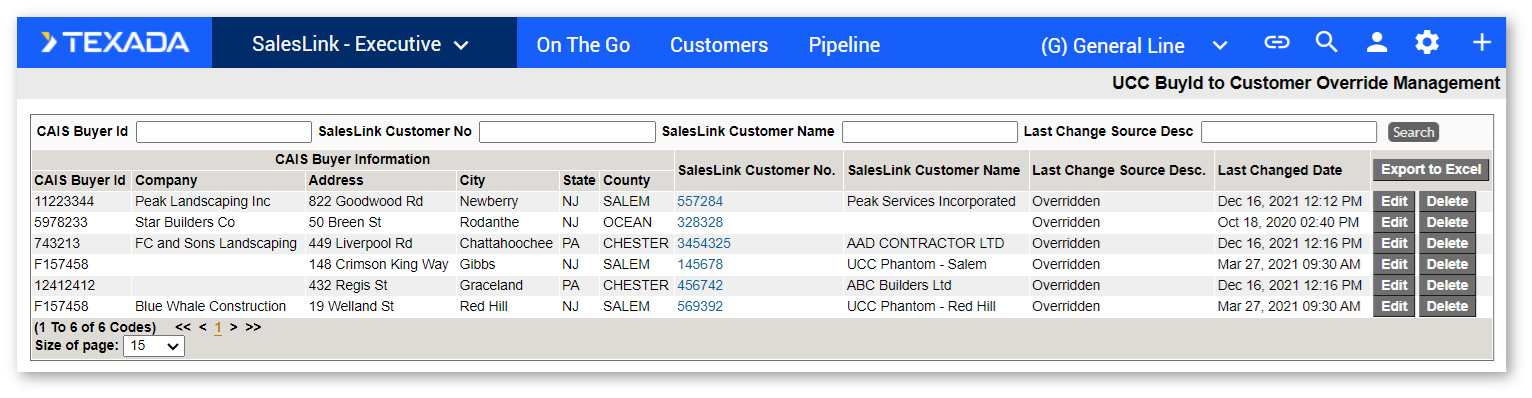
This screen allows you to map UCC BuyIDs to SalesLink Customer Numbers. This list is used during phase one of the UCC mapping process to determine which SalesLink customer UCC filings should be attributed to based on their BuyID.
For example, this list might contain an entry mapping the SalesLink Customer Number “17839” to the UCC BuyID “8220”. This means that all UCC filings with the BuyID 8220 will be attributed to customer 17839.
Manage - UCC BuyZIP To Customer
This screen allows you to map UCC zip codes to SalesLink phantom accounts. This list is used during phase three of the UCC mapping process to determine which phantom account UCC filings should be attributed to based on their zip code.
For example, this list might contain an entry mapping the “1880” zip code to a phantom account called “UCC – PHANTOM ZIP CODE: 1880”. This means that any 1880 zip code UCC filings not directly matched to a SalesLink customer will be matched to UCC – PHANTOM ZIP CODE: 1880 instead.
Manage - UCC Major Segment

This screen allows you to define the major segments present in the Lost Sales From UCC - By Sales Rep screen.
Manage - UCC Manufacturers
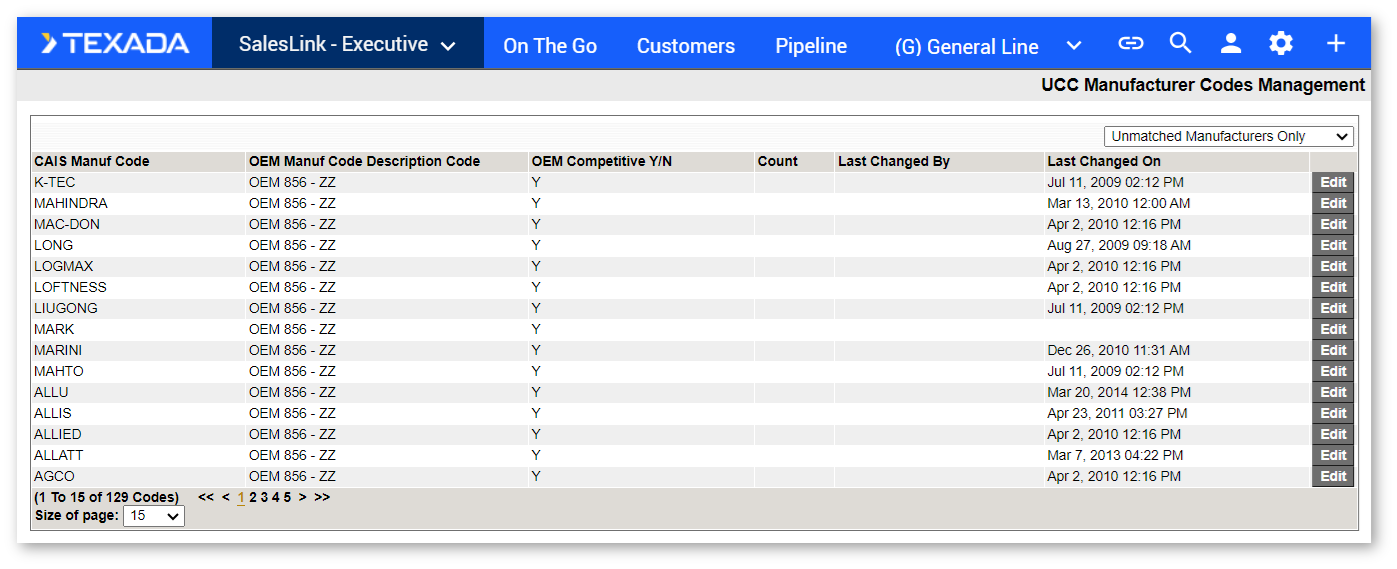
This screen allows you to map UCC manufacturing codes to OEM manufacturing codes. This list is used during the UCC mapping process to attribute the correct manufacturer to imported UCC filings.
Manage - UCC Mapping Major Segment
This screen allows you to define which divisions and CAT Family product codes should appear in the major segments in the Lost Sales From UCC - by Sales Rep report.
Manage - UCC Rep. Status Codes
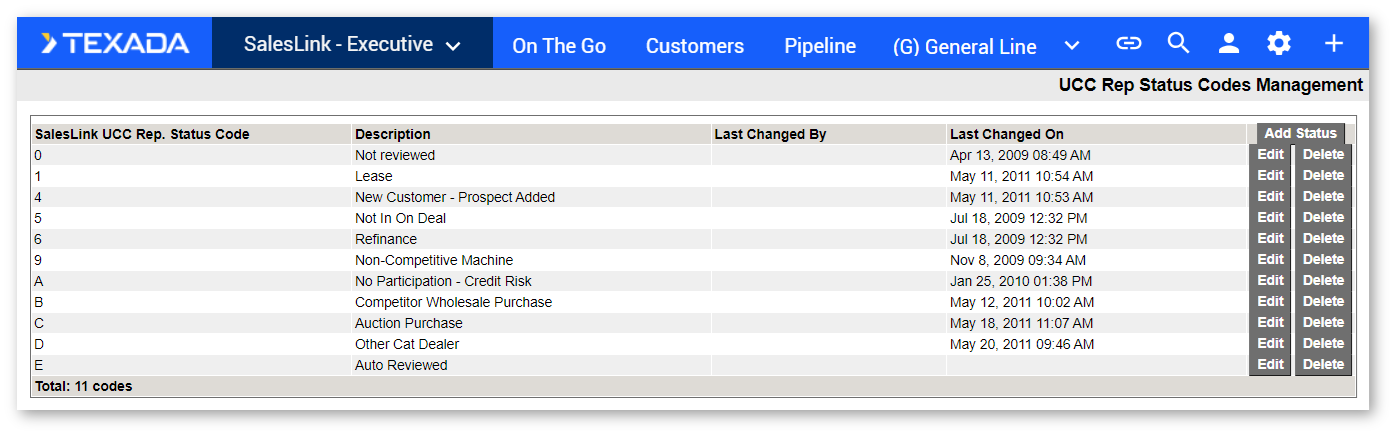
This screen allows you to manage the list of UCC sales rep status codes. This determines the options available in the “SalesLink Rep. Status Description” drop-down on the UCC Detail page:
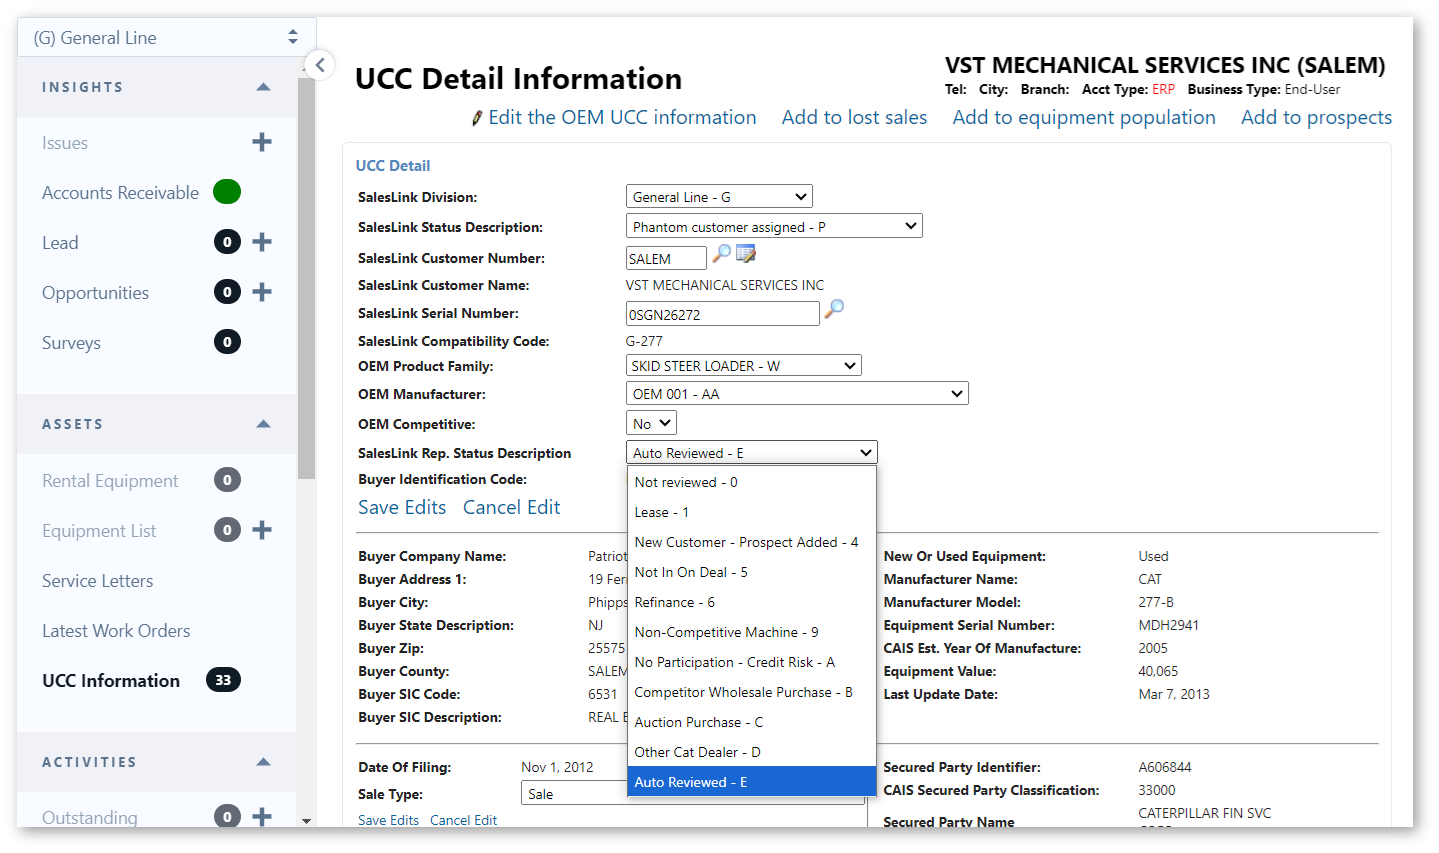
If a filing’s SalesLink Rep. Status Description is set to 0 (not reviewed), it will appear in the Not Reviewed UCC List on the sales rep’s page. Once changed from 0 to another value, the filing will be removed from this list.
Manage - UCC Size Class
This screen allows you to map UCC division and family product codes to SalesLink division and CAT family product codes. This list is used during the UCC mapping process to attribute the correct division and family to imported UCC filings.
Manage - UCC Status Codes
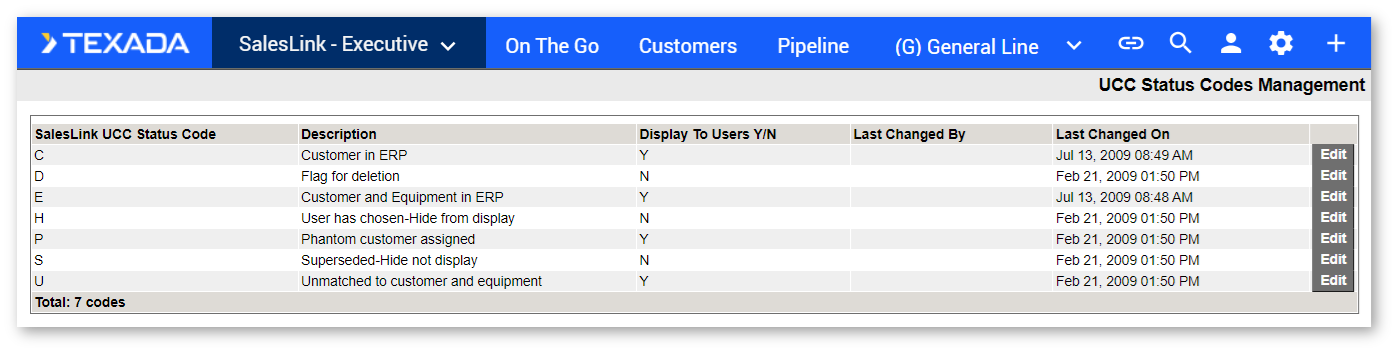
This screen allows you to manage SalesLink UCC Status Codes. All systems must include at least status C (Customer in ERP) and status U (Unmatched to customer and equipment). All other statuses can be edited freely.
Manage - UCC Unmatched by Customer
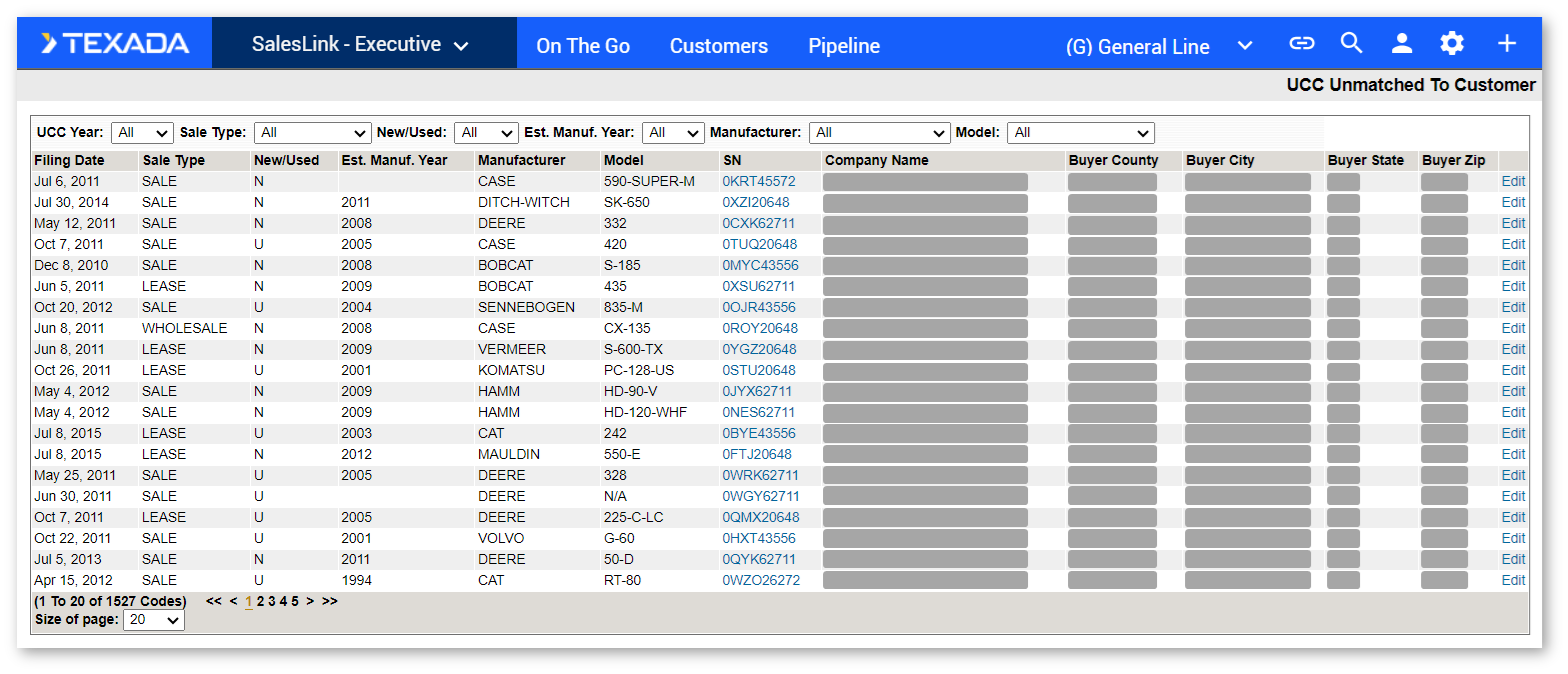
This screen lists all the UCC filings that did not match to a SalesLink customer.
Manage - UCC Unmatched by Equipment
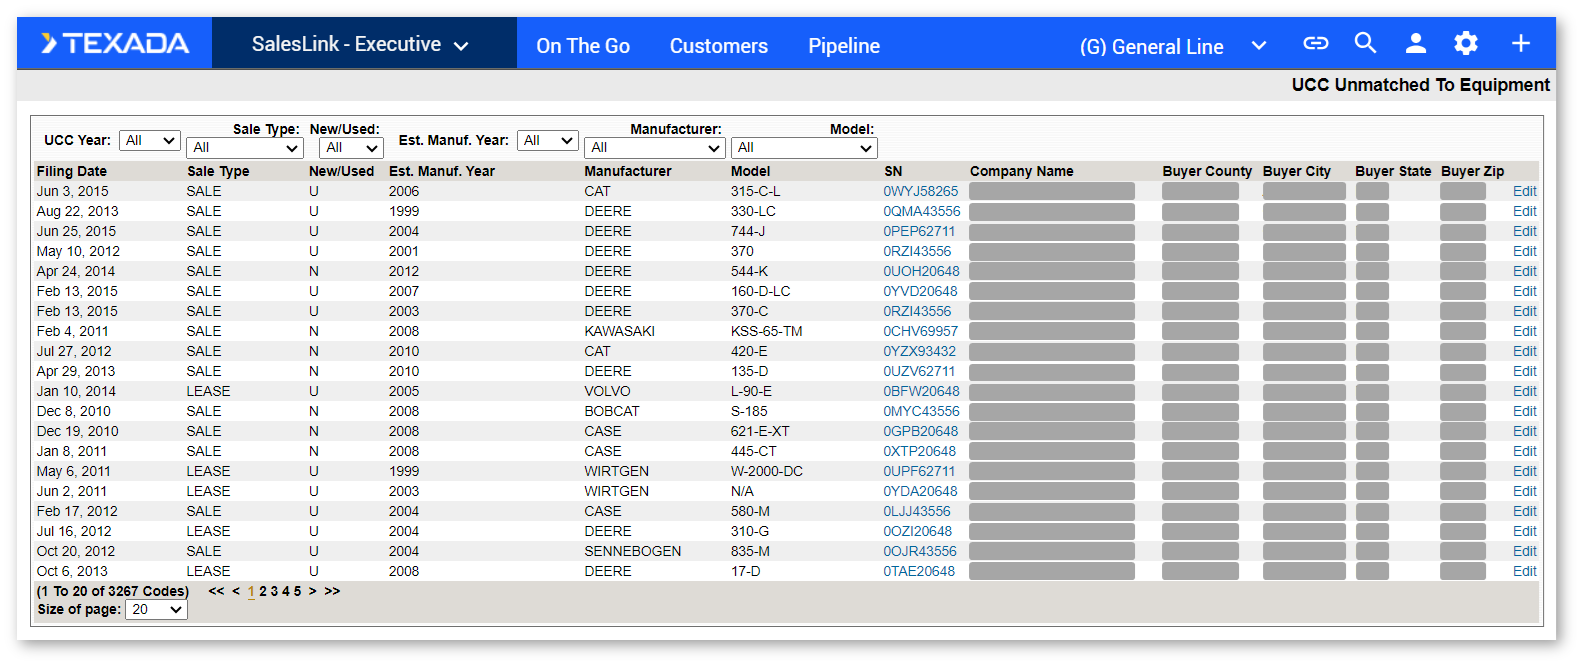
This screen lists all of the UCC filings that matched to a SalesLink customer, but did not match any of their equipment.
Appendix C: Other UCC Pages
The following section provides a list of the various places throughout SalesLink where UCC information can be viewed or modified.
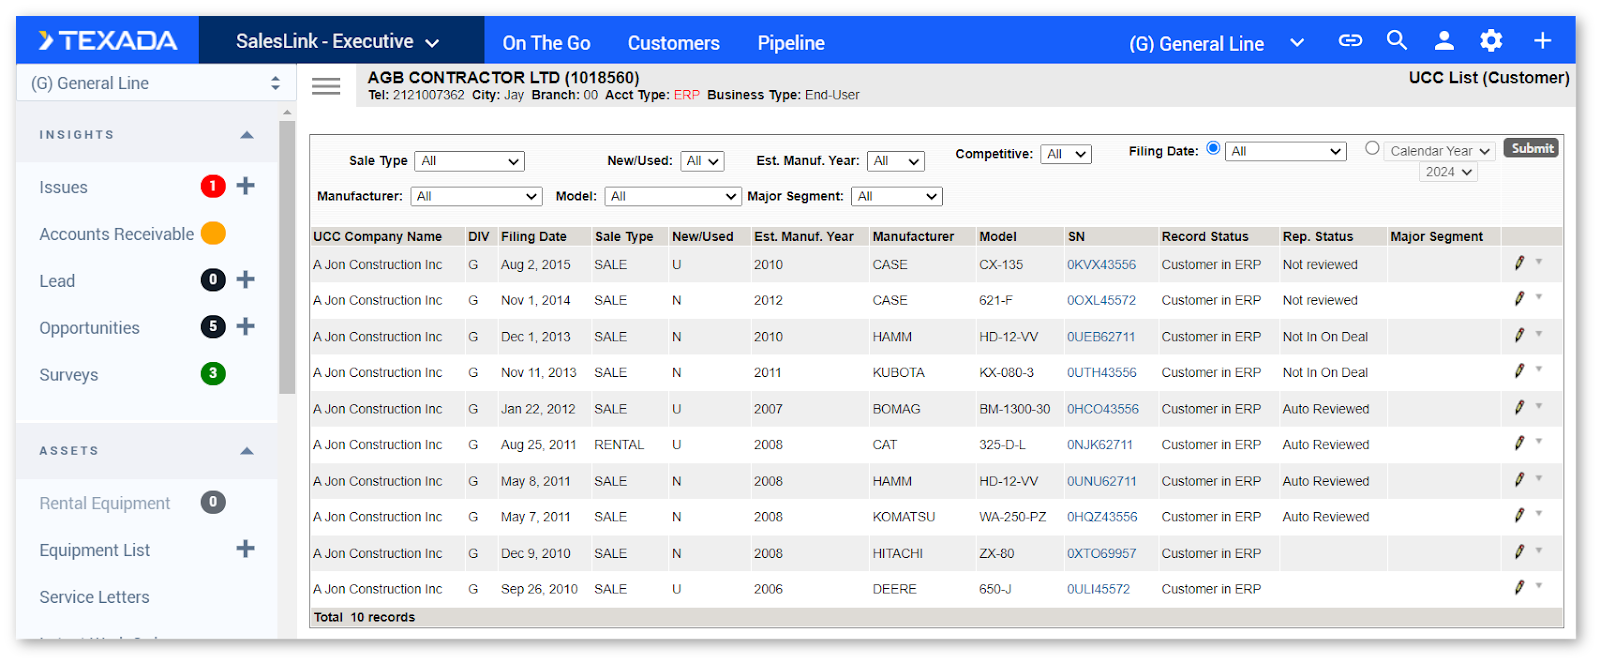
UCC List (Customer)
When viewing a customer profile in SalesLink - Sales Rep or SalesLink - Executive, click on “UCC Information” in the left navigation menu to view the “UCC List (Customer)” screen. This screen contains a list of all the UCC filings for this customer.
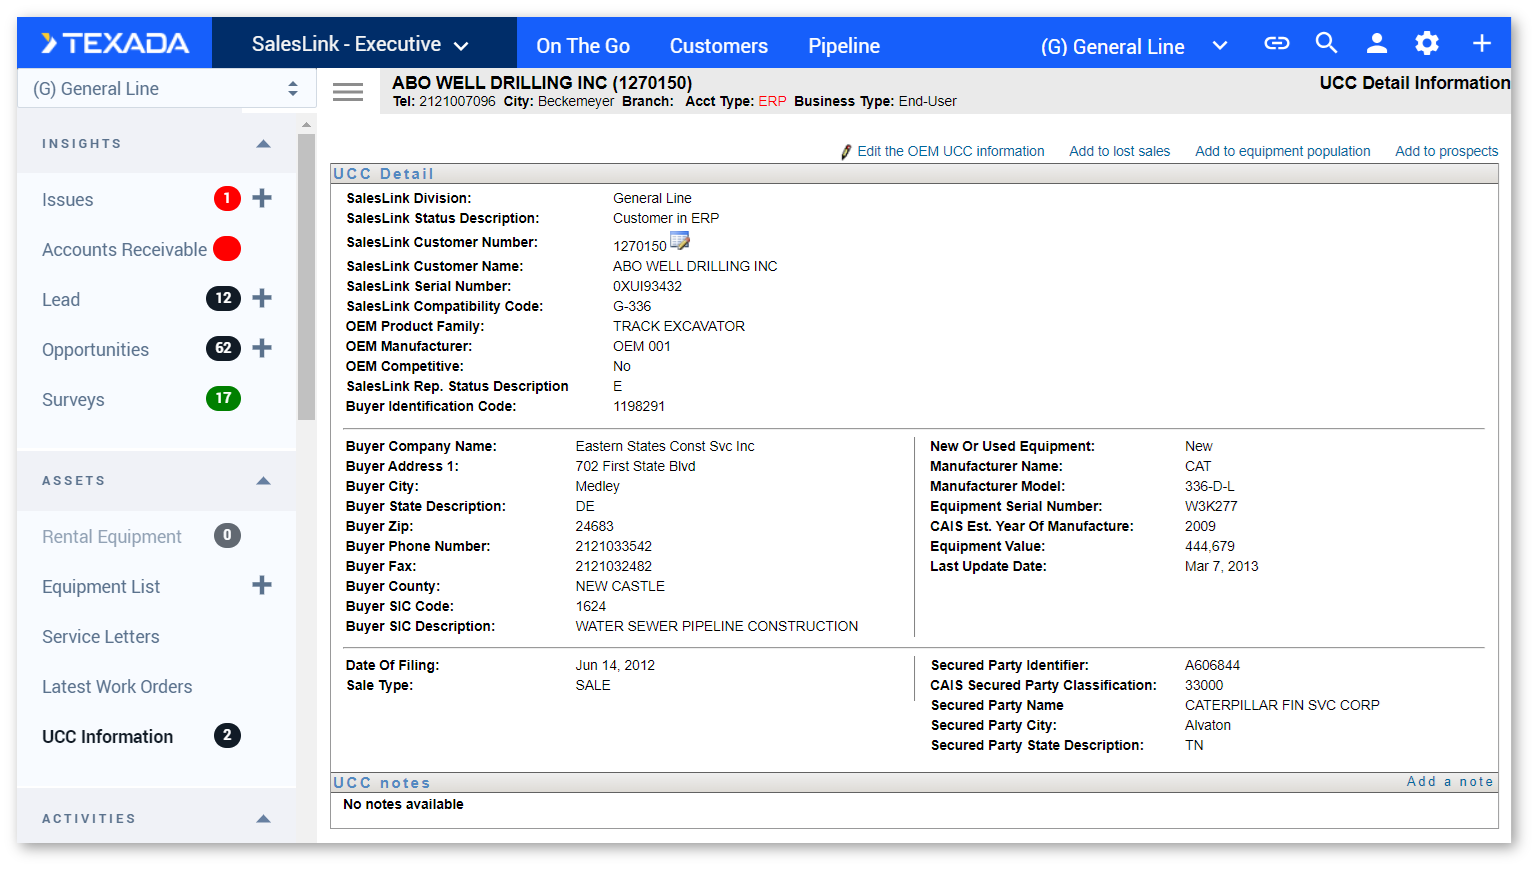
UCC Detail
Click on the pencil icon next to a UCC filing on the UCC List (Customer) screen to open the UCC Detail screen. This screen contains more detailed information about a singular UCC filing.
Click “ Edit the OEM UCC information” in the top-right corner of the screen to edit the UCC filing.
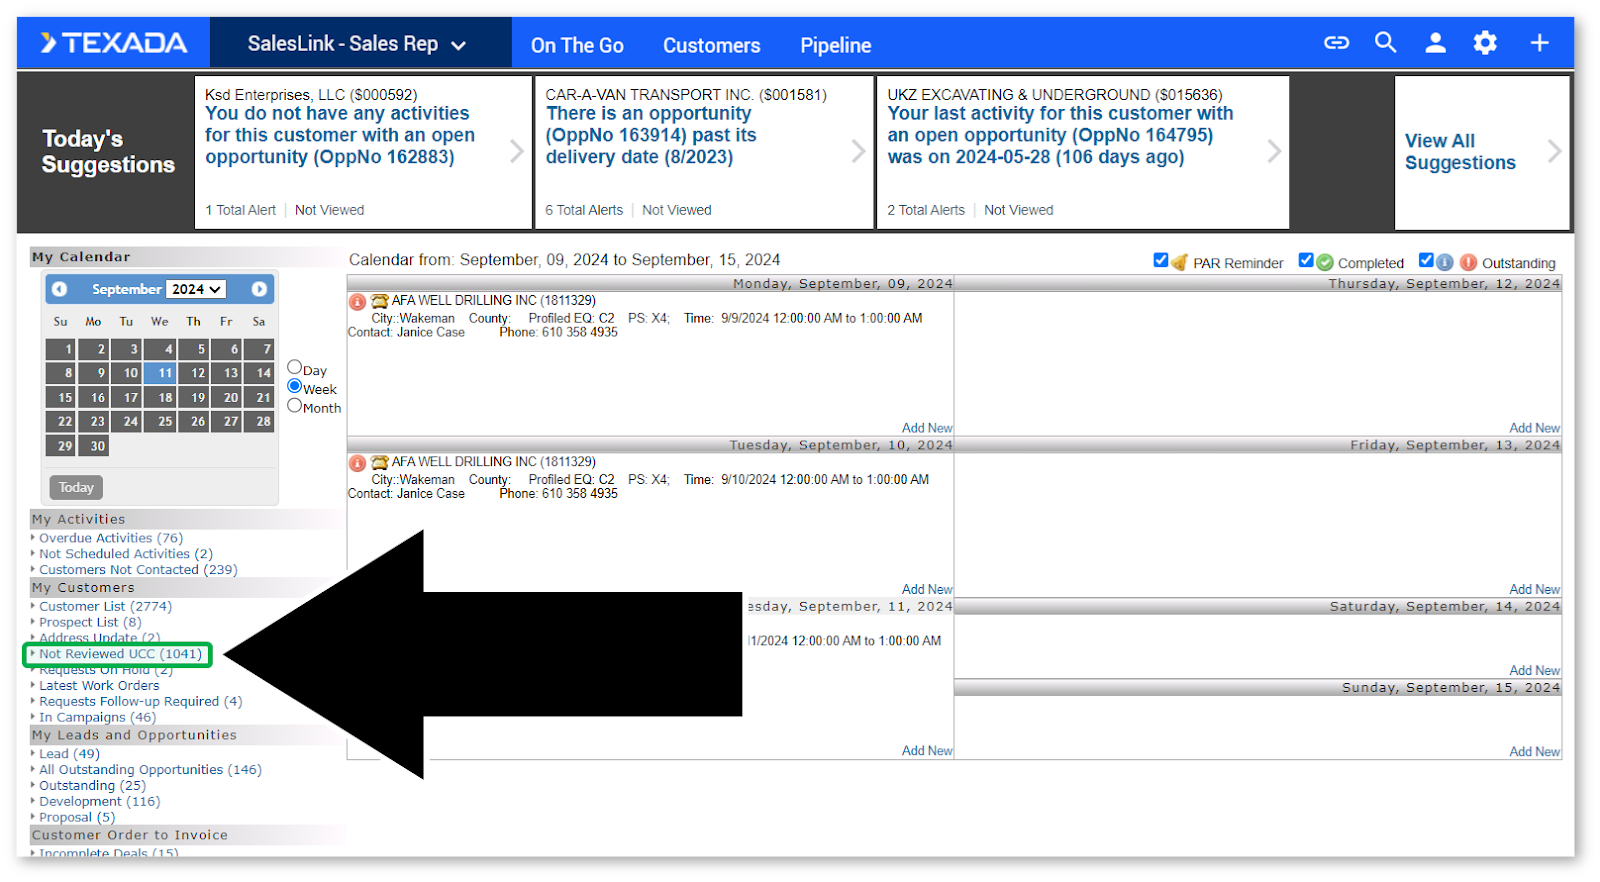
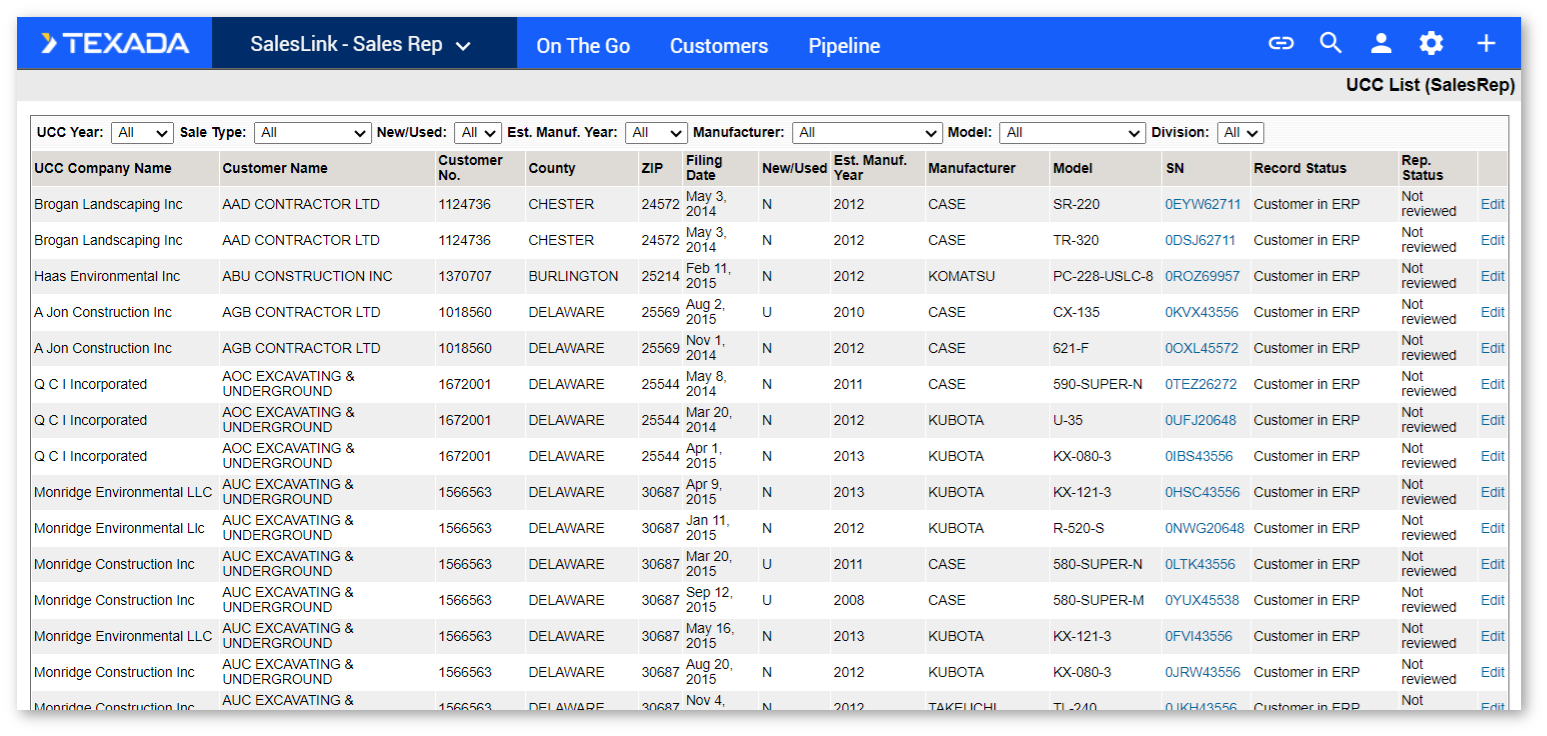
Not Reviewed UCC List (Sales Rep)
From the My Calendar page in SalesLink - Sales Rep, click on “Not Reviewed UCC” under “My Customers” in the left navigation menu to view the UCC List (Sales Rep) page. This page lists the UCC filings matched to that sales rep’s customers that have not yet been reviewed.
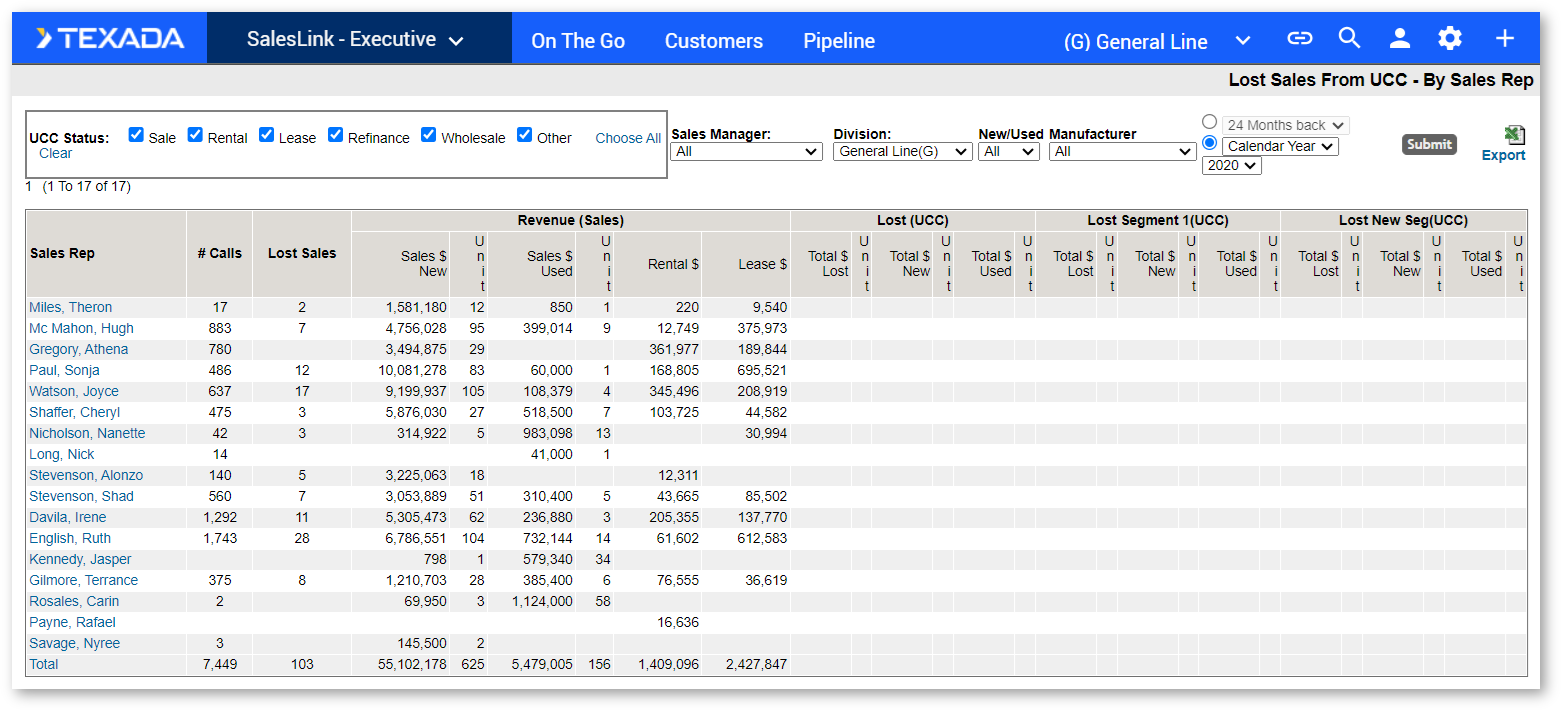
Lost Sales From UCC - by Sales Rep
This report uses UCC data to break down lost sales based on each sales rep and their assigned customers. It can be accessed from the top menu of SalesLink - Executive, at Pipeline → Lost Sales From UCC.
The segments present on this screen are determined by the Manage - UCC Major Segment screen.