.png?width=365&height=50&name=Texada%20Logo%20(Black).png)
In This Article
- Introduction
- ServiceLink Enhancements
Introduction
A wealth of new features and quality-of-life changes have recently come to Texada ServiceLink! Keep reading to learn all about these new changes.
Many of these new features can be managed using configuration keys. For more information on how to use CloudLink Console to configure your system, see “Manage Configuration Keys”.
ServiceLink Enhancements
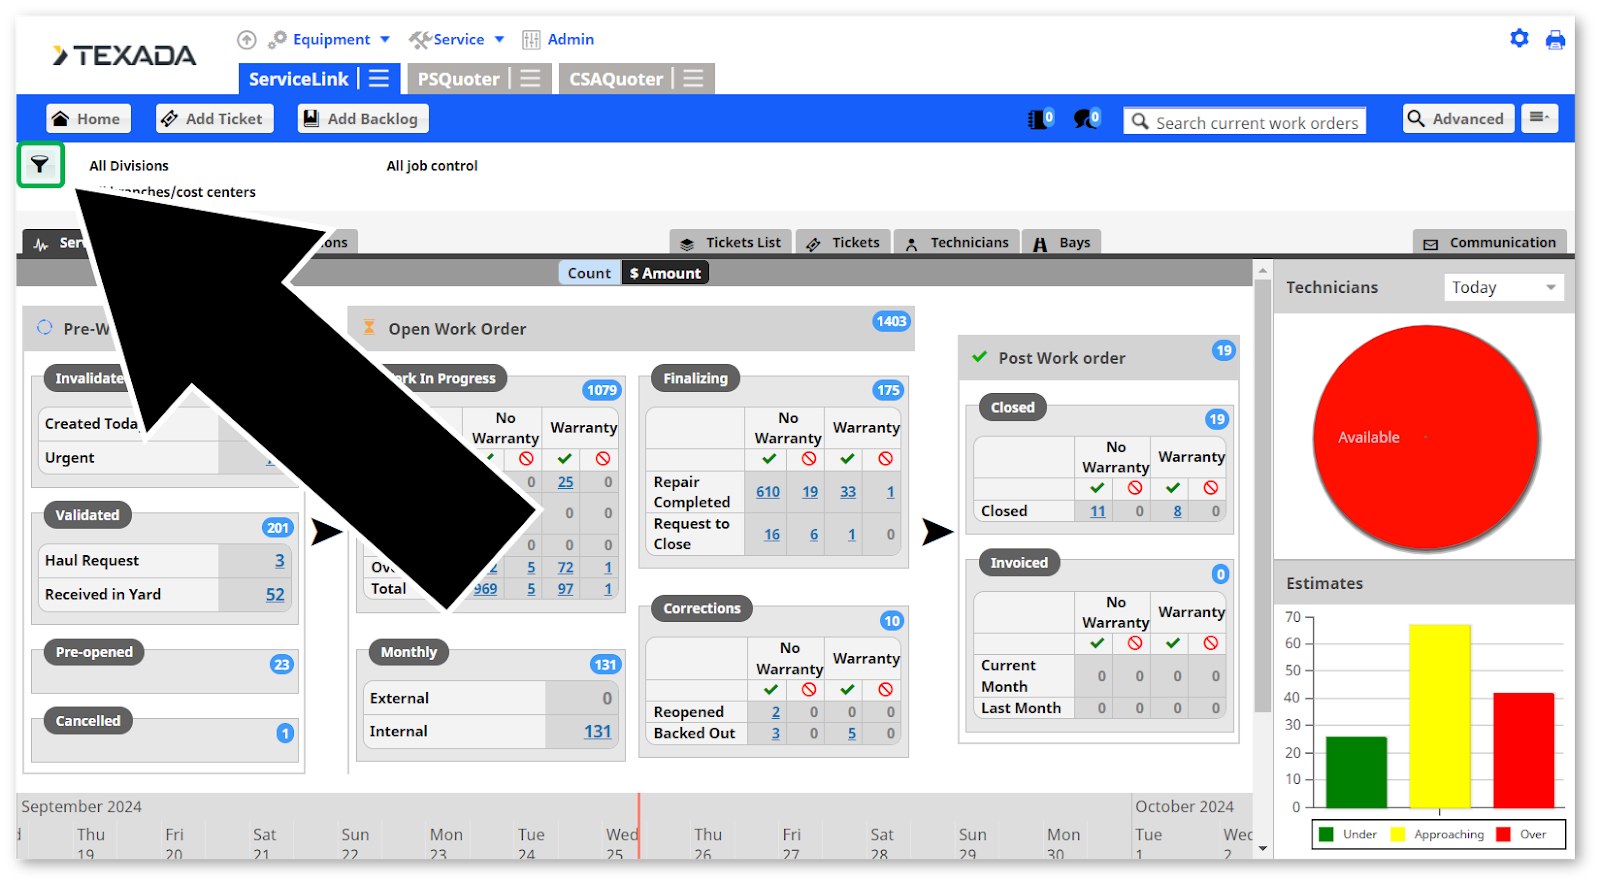
Job Control Filter
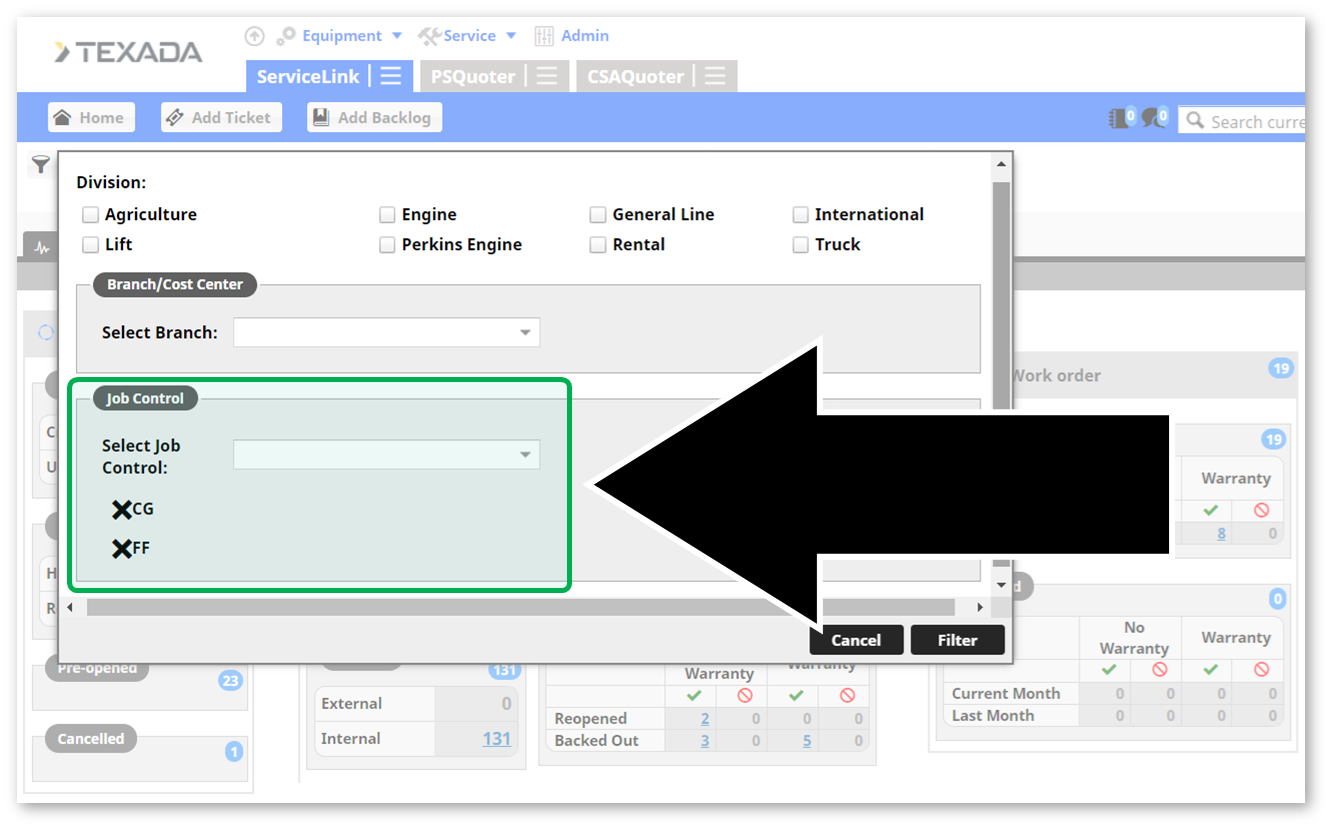
It’s now possible to filter the Service Pipeline page by Job Control! This feature makes the Service Pipeline page even more powerful than before, allowing you to view work order numbers and financials by job control.
To use this feature, click the filter icon in the top-left corner of the screen, then select one or more options from the “Select Job Control” drop-down. This drop-down is automatically populated with all of the Job Control options currently present in the system.
Configuration
This feature’s visibility is determined by the Hide Job Control Filter (EL.FilterBar.HideJobControl) configuration key in CloudLink Console.
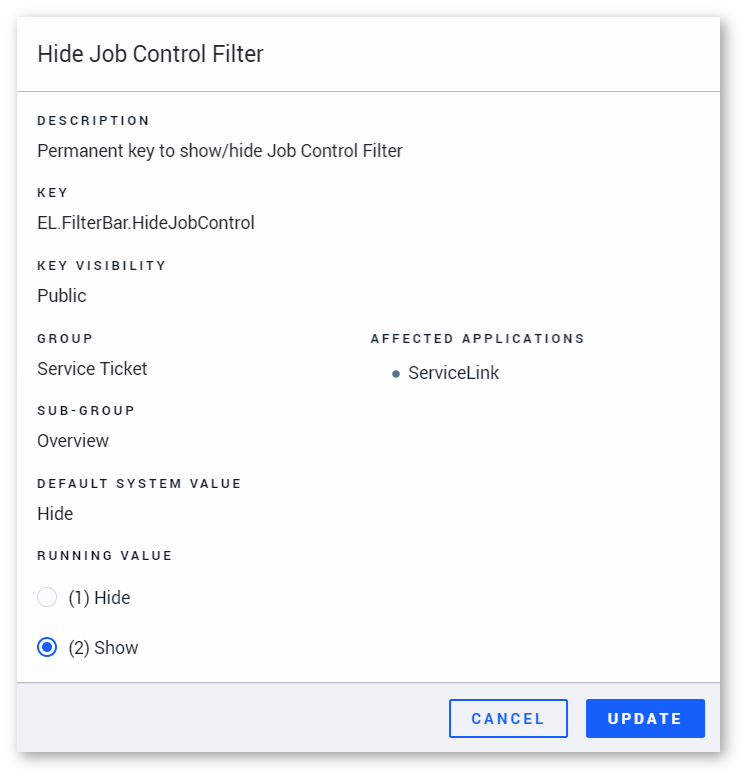
- (1) Hide: The job control filter will be hidden.
- (2) Show: The job control filter will be shown.
Operation-Level Financials
Work Order financial details are now available at the operation level! This feature gives you even greater control over your Work Order financials, opening the door for informed decision making and improved financial planning.
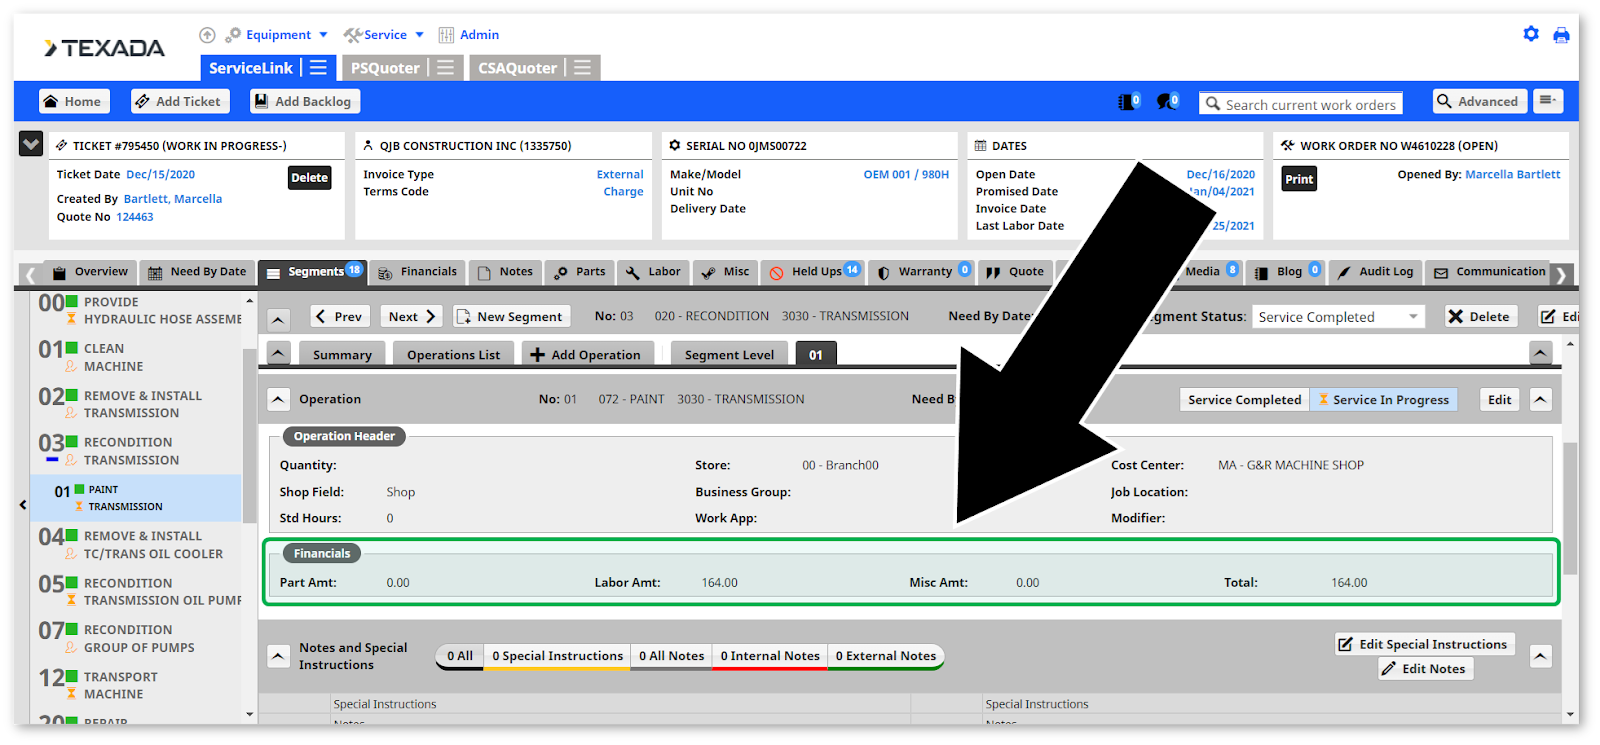
Operation-level financials look and feel the same as segment-level financials. To view the financials for a Work Order operation, open a Work Order in ServiceLink, then drill down to one of its operations. The new “Financials” tab will appear directly below the “Operation Header” tab.
Configuration
Operation-level financials can be switched on or off by Texada. If you would like to enable or disable this feature, please contact Texada support. We recommended testing this feature in your Sandbox environment before enabling it in Production.
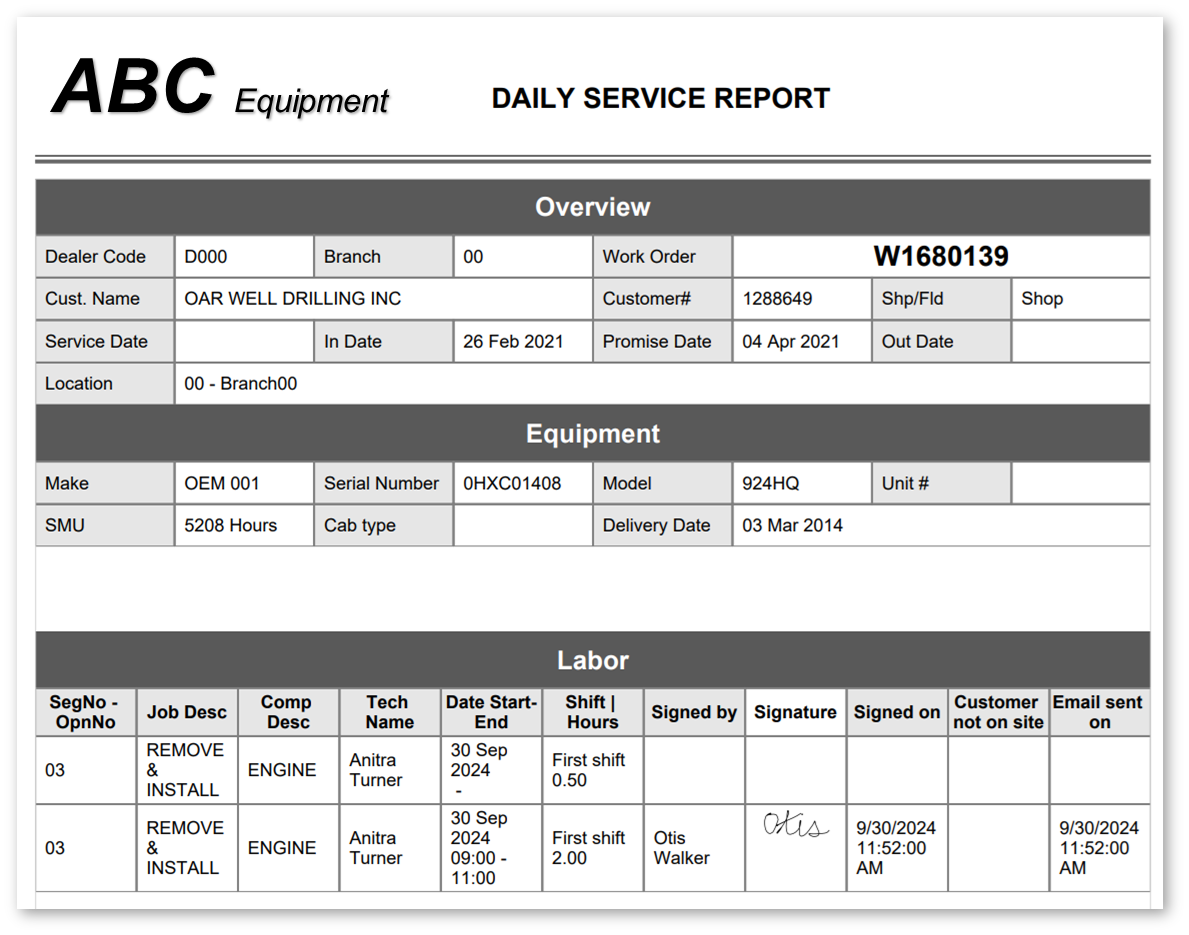
Customer Service Report Creation and Sign on Glass
Give your customers visibility into the work being performed by your technicians by creating and sharing daily customer service reports for your Work Orders. This feature is also available in ServiceLink Flex, allowing you to capture customer signatures and email reports directly from your mobile device!
In ServiceLink
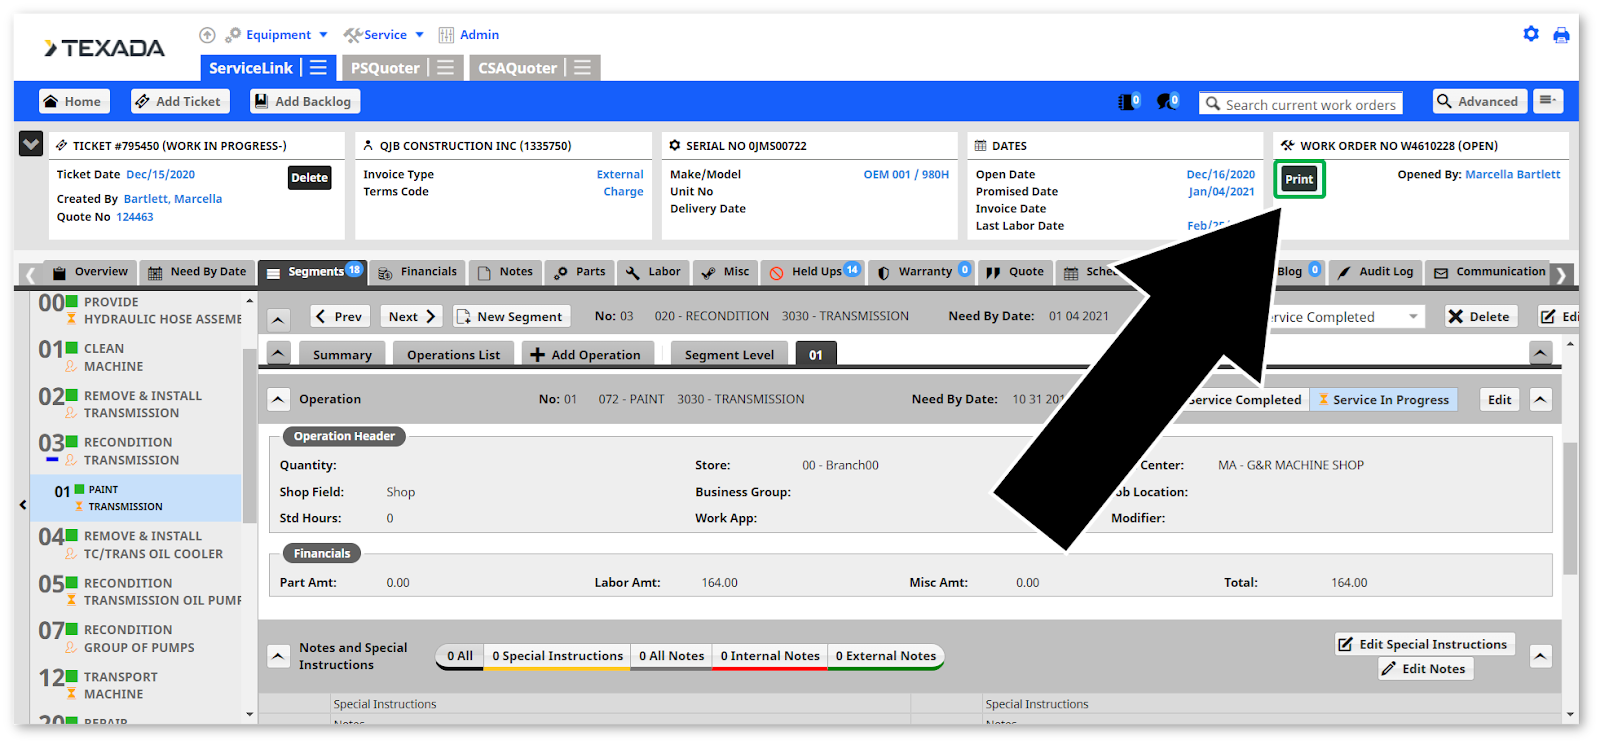
- Open a Work Order and click the “Print” button
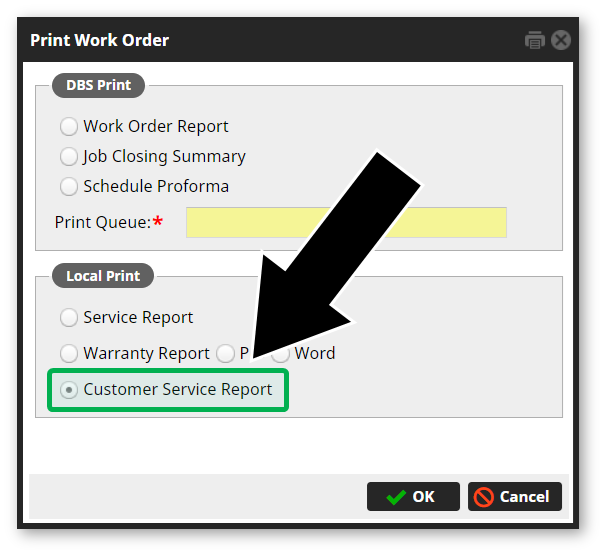
in the top-right corner of the screen to open the Print Work Order window. Select the new “Customer Service Report” option, then click “OK”.
- Select your preferred options, including using the “Technician” drop-down to select the technicians whose labor should appear in the report. Once you’re ready, click “Print Report” to generate your Customer Service Report.
- The system will now generate a PDF Customer Service Report for the technicians and time period you selected. Depending on your browser’s settings, you may be prompted to select a download location, or the report may be automatically saved to your Downloads folder.

In ServiceLink Flex
As a technician using ServiceLink Flex, you can generate a daily service report to show the customer the work performed (including notes and labor hours), have them sign off on the completed work, and email the signed report directly to their inbox. This feature even works offline, making it possible to generate service reports and collect customer signatures when working in remote areas such as mining sites!
Open a Work Order in ServiceLink Flex, then scroll down and tap “Daily Service Report” to see a breakdown of work for the current day. Tap the dates at the top of the screen to view the daily report for a different date.
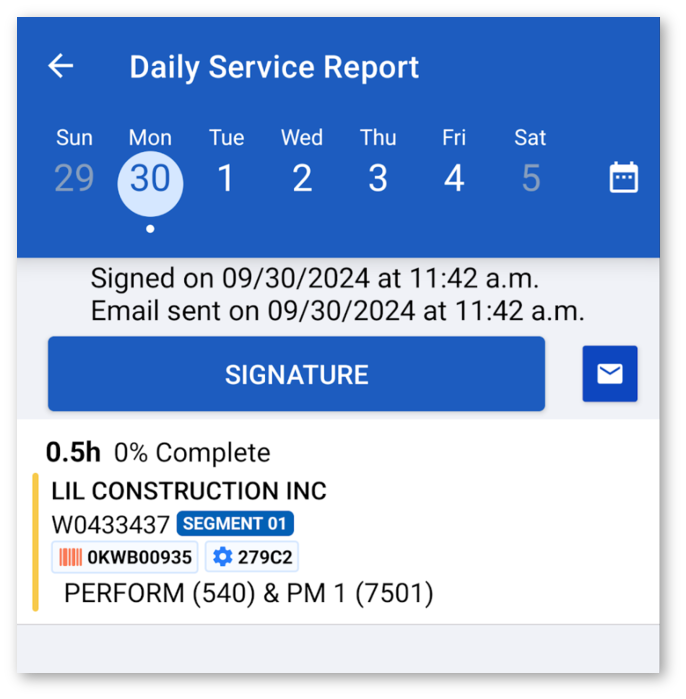
From this screen, tap the “Signature” button to collect the customer’s signature. You will be able to enter the customer’s name and email address and indicate whether or not they are on site. You can then pass your mobile device to the customer to get their signature on glass.
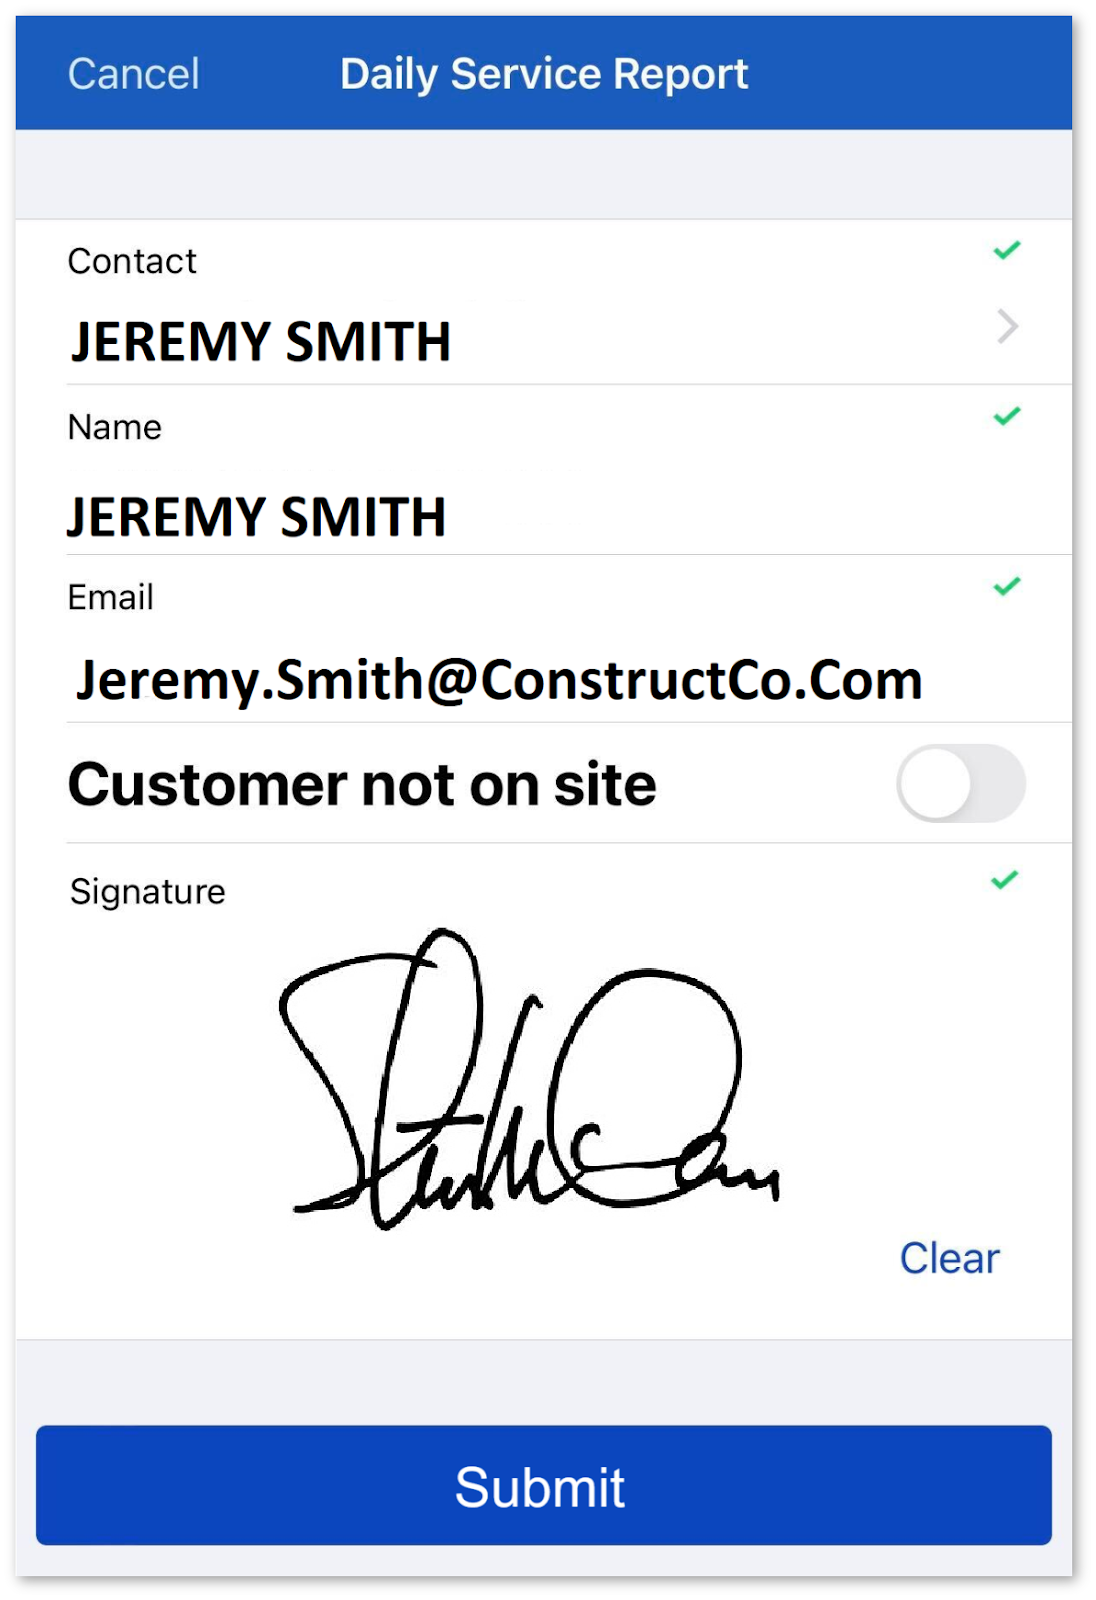
Once you have collected the customer’s signature, tap the email button on the Daily Service Report screen to email them a copy of the report.
Configuration
The behavior of this feature is determined by the Customer Service Report (SVL.CustomerServiceReport.Enable) configuration key in CloudLink Console.
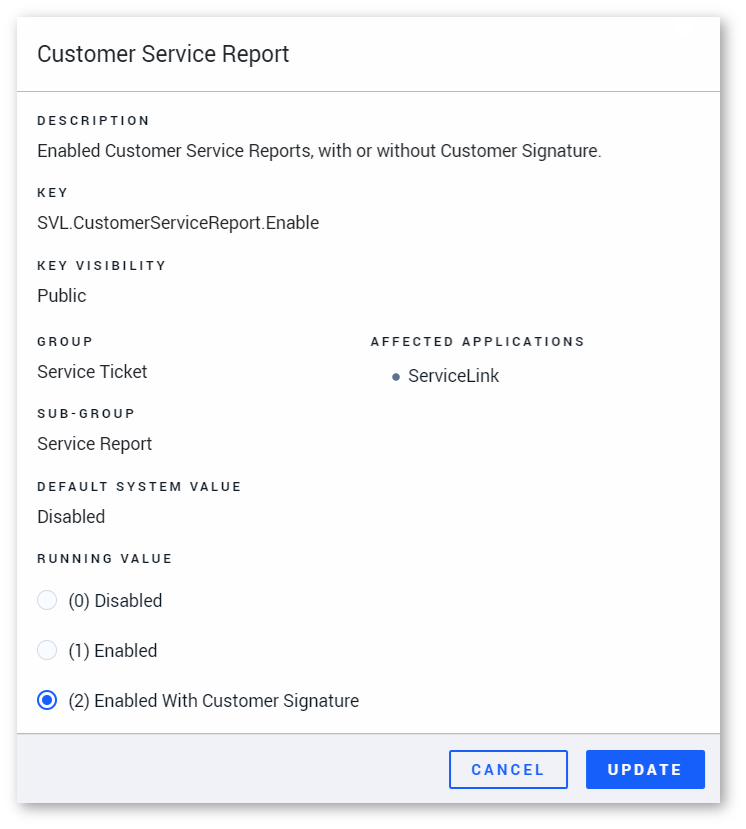
- (0) Disabled: The Customer Service Report is disabled.
- (1) Enabled: The Customer Service Report is enabled.
- (2) Enabled With Customer Signature: The Customer Service Report is enabled. When generating a report in ServiceLink Flex, the app will prompt for a customer signature.
Visibility of Unordered Parts in ServiceLink (RBOM)
A number of changes have been made to improve the flow of information between DBS, Parts & Service Quoter, and ServiceLink, giving visibility to unordered Parts. These changes include the following:
- When creating a Ticket from a DBS Work Order, unordered Parts in the Parts holding file in DBS are now automatically imported into ServiceLink as Pending Parts.
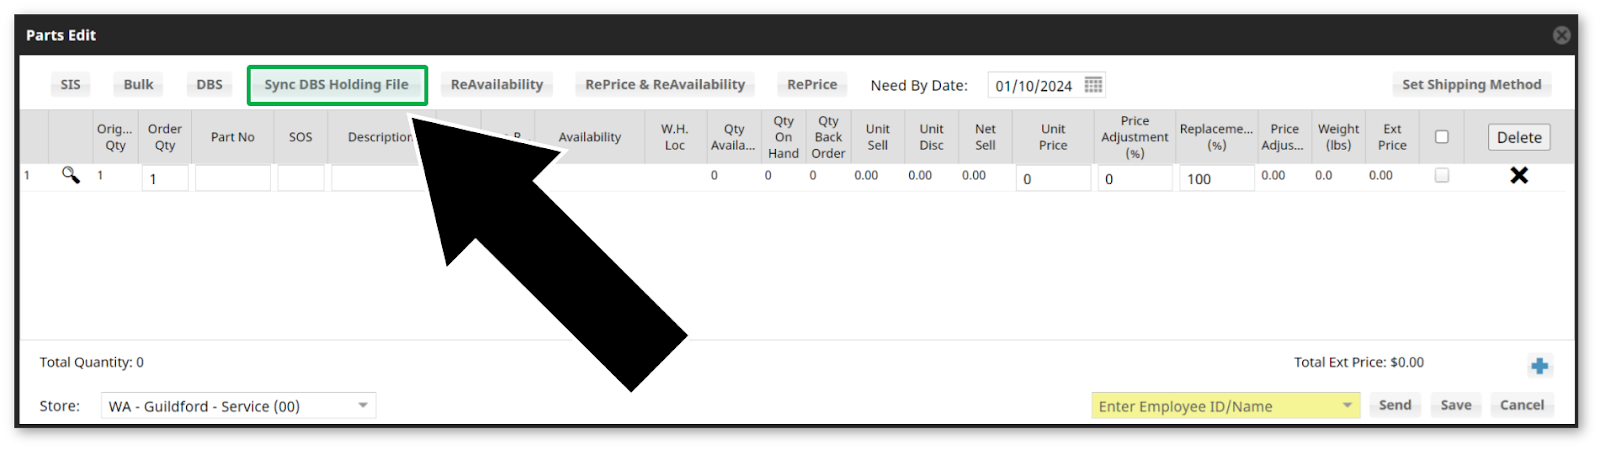
- You can now manually pull Parts from the Parts holding file in DBS into a ServiceLink ticket as Pending Parts. To do this, click the “Sync DBS Holding File” button at the top of the Parts Edit window:
Enhanced PSQ to ServiceLink Functionality
- Instead of pushing from PSQ to DBS, ServiceLink tickets can now be created directly from PSQ, in accordance with best practices.
- We have enhanced functionality to update ServiceLink Tickets from Quote Revisions in PSQ. Click the “Update” button on the Quote Summary screen in PSQ to push additional updates to ServiceLink Work Orders after they are created. If the scope of a Quote expands over time, use this feature to easily keep its associated ServiceLink Ticket/Work Order up-to-date.
Configuration
Importing of DBS Parts can be enabled or disabled via the Enable importing parts from the Parts Holding DBS file (SVL.Parts.Holding.Import.Enabled) configuration key in CloudLink Console.
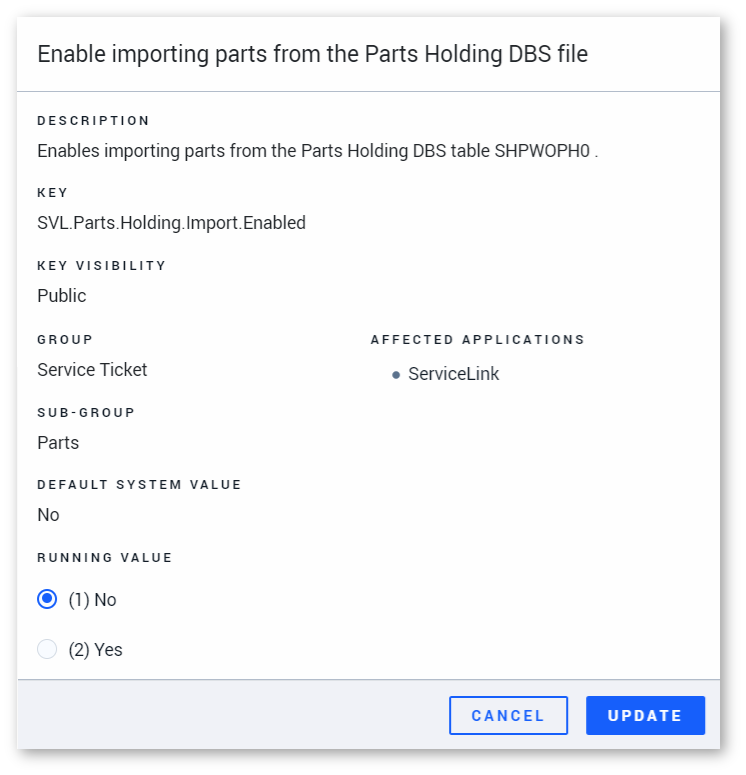
- (1) No: When creating a Ticket from a DBS Work Order, Parts will not be imported from the Parts Holding DBS table.
- (2) Yes: When creating a Ticket from a DBS Work Order, Parts will be imported from the Parts Holding DBS table.
Need by Date and Percent Complete
In ServiceLink
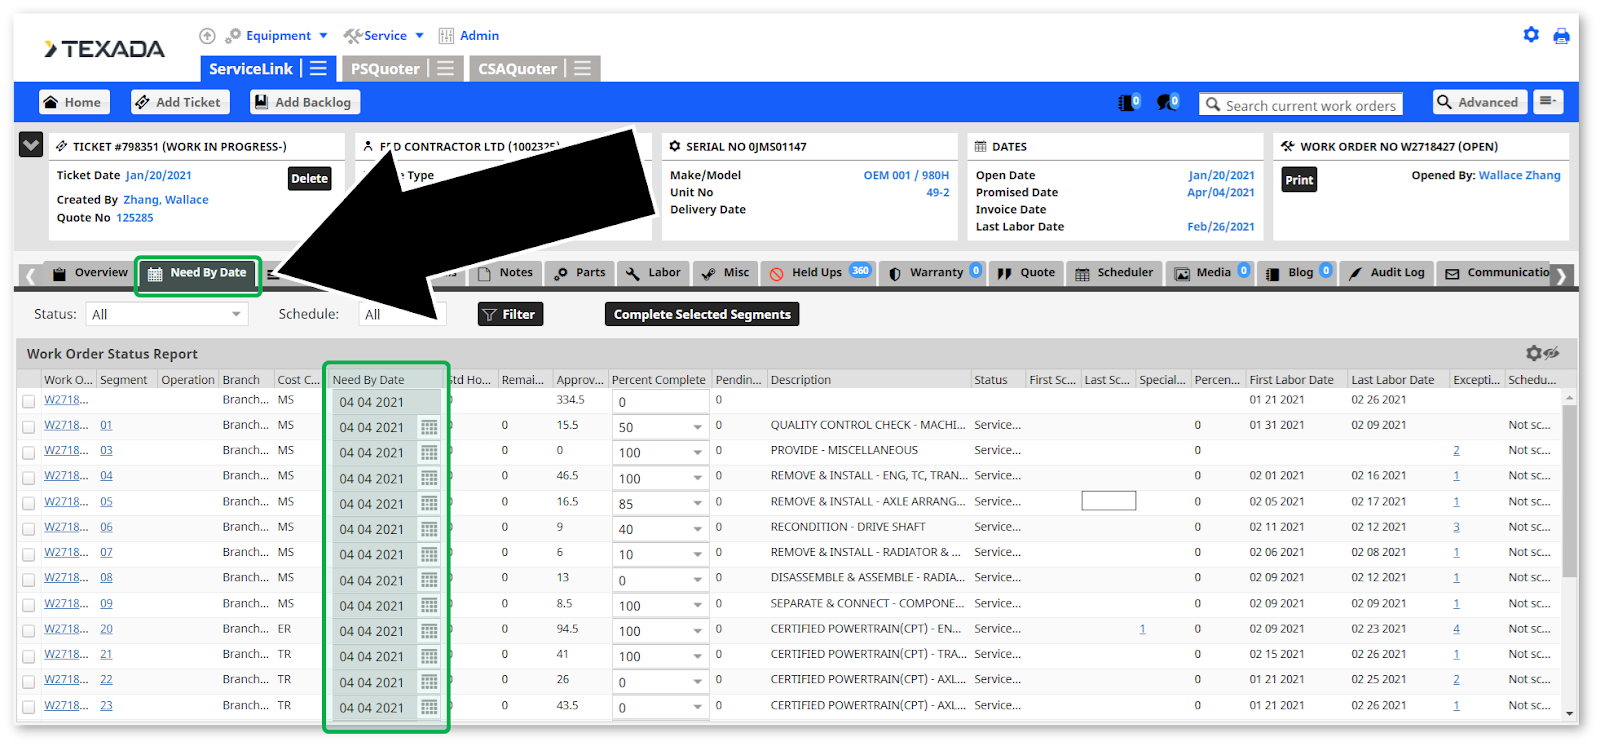
A new “Need By Date” tab has been added to the Work Order detail page in ServiceLink! This tab allows you to establish need by dates at the Segment and Operation level. Use these dates to communicate dependencies between Work Order Segments and ensure that work is being completed on schedule.
Open the Need By Date tab to view the list of Segments and Operations for the current Work Order. The “Need By Date” column shows the current need by date for each Segment and Operation. Click the calendar icon next to a date to change it; click the column header to sort Segments and Operations by their need by date.
When adding Labor at the Segment or Operation level, technicians can now enter a completion percentage for that task. These percentages are visible in the “Percent Complete” column of the Need By Date tab, making it easy for managers to track a Work Order’s progress over time. A Work Order’s overall completion percentage can be seen at the top of the Need by Date tab.
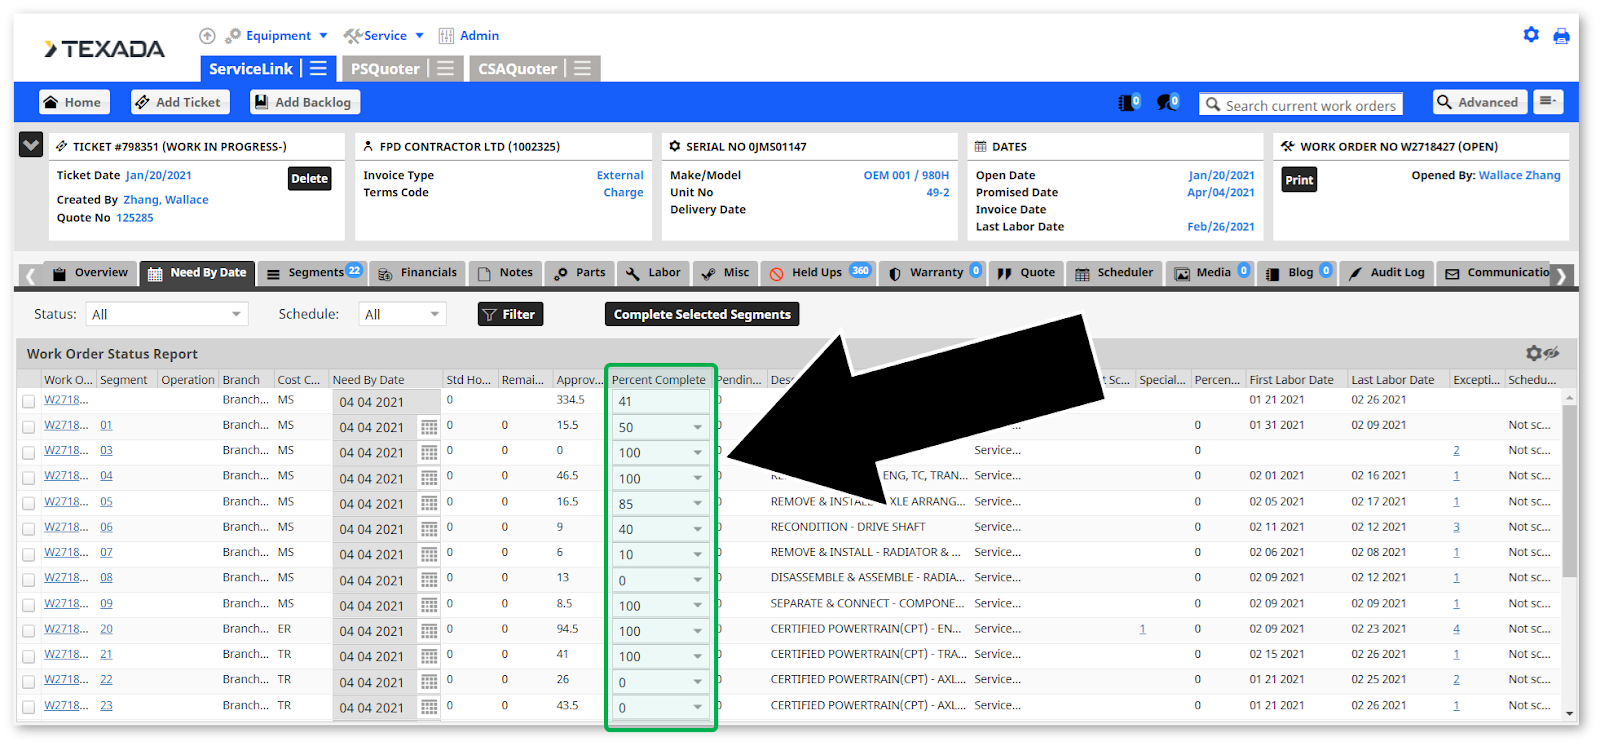
Use need by dates and completion percentages together to take control of Work Order scheduling like never before!
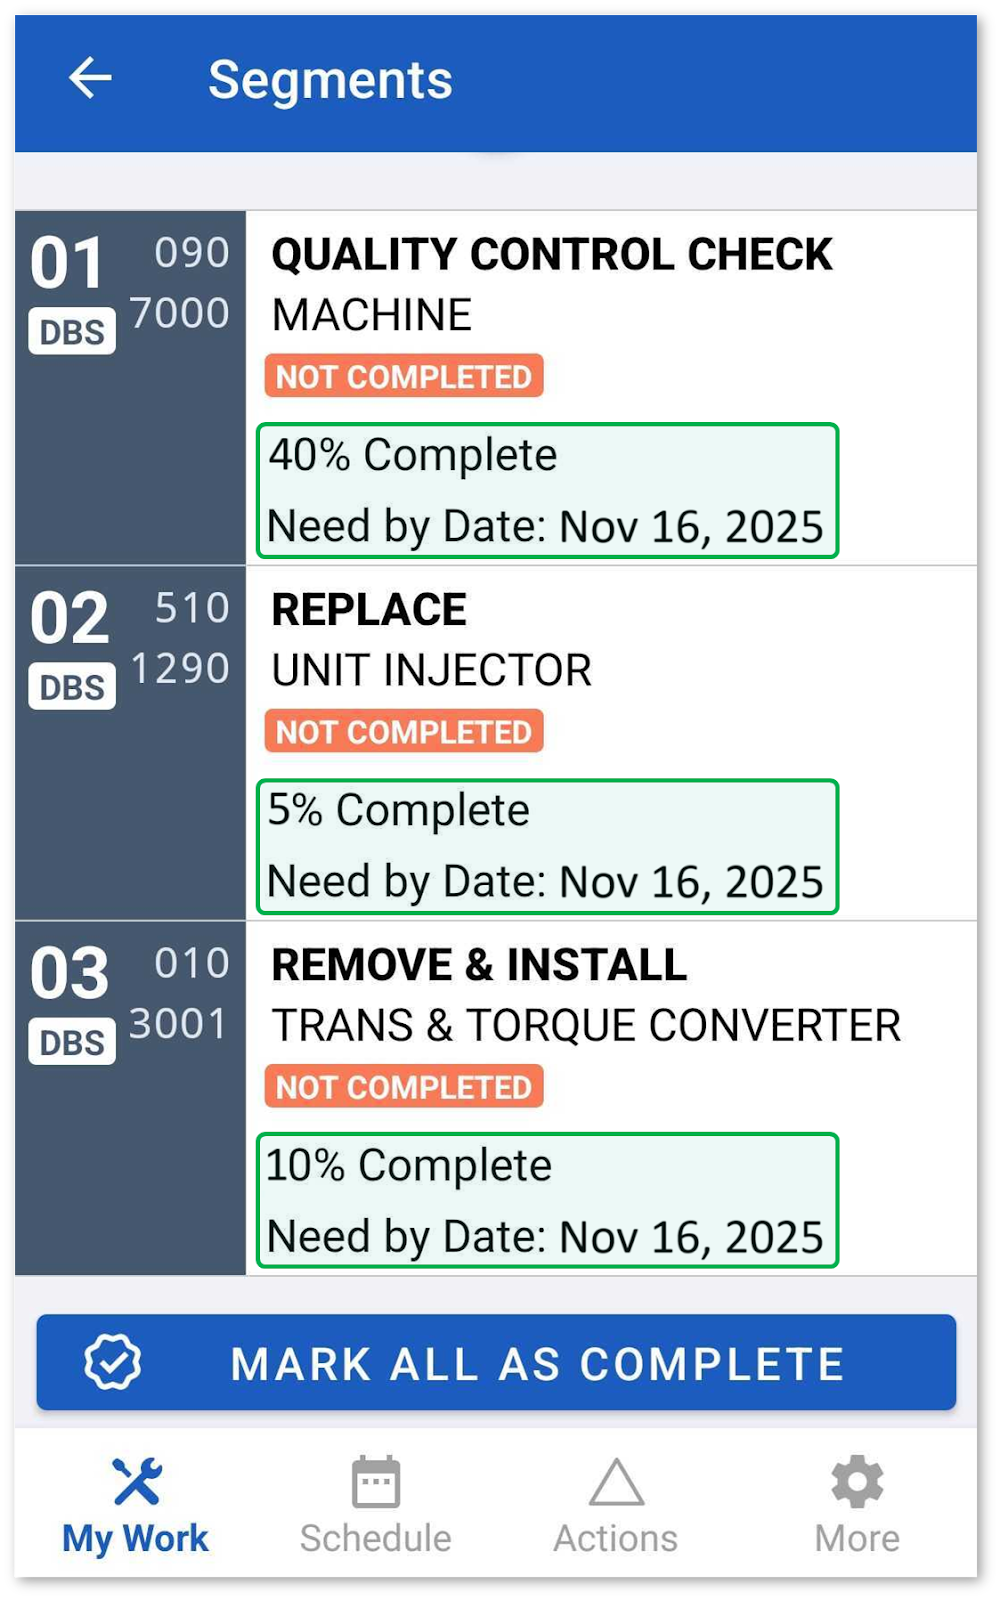
In ServiceLink Flex
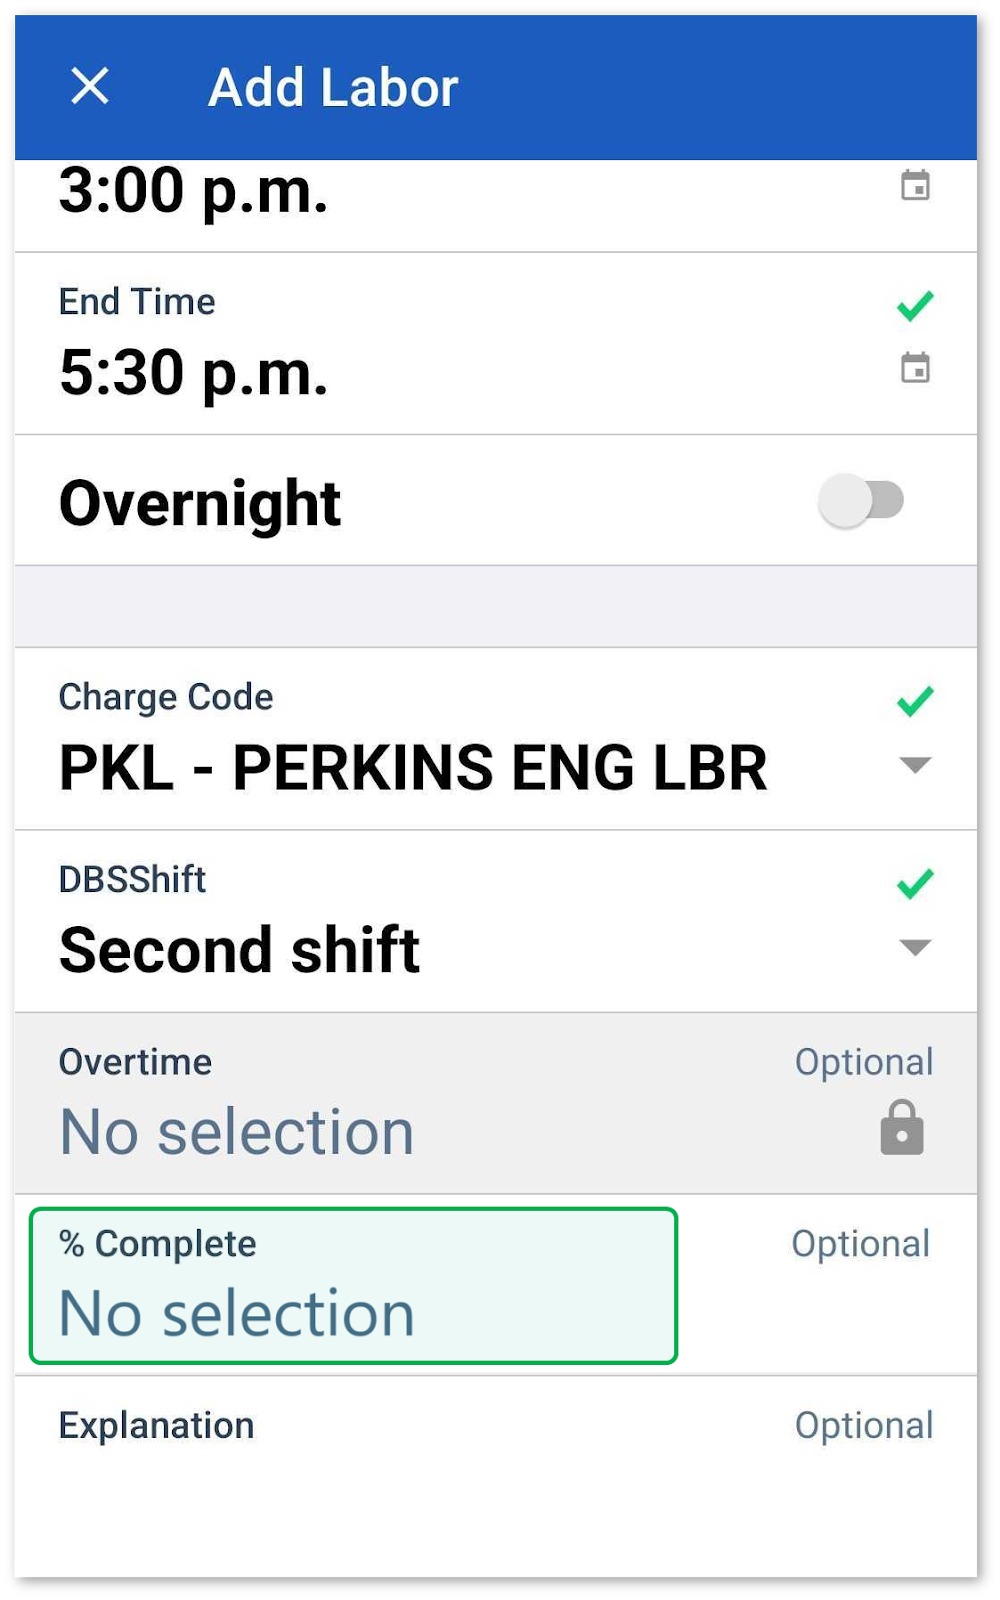
When viewing Work Order Segments in ServiceLink Flex, each Segment’s completion percentage and need by date will now be displayed below its status. You will have the option of updating a Segment’s completion status whenever you add a labor entry for that Segment.
Configuration
The need by date and percent complete features in ServiceLink and ServiceLink Flex can be switched on or off by Texada. Percent complete is for customers using Rosters only. If you would like to enable or disable these features, please contact Texada support.
And More
Even more ServiceLink updates are included in this release! Here are a few additional features and quality-of-life changes:
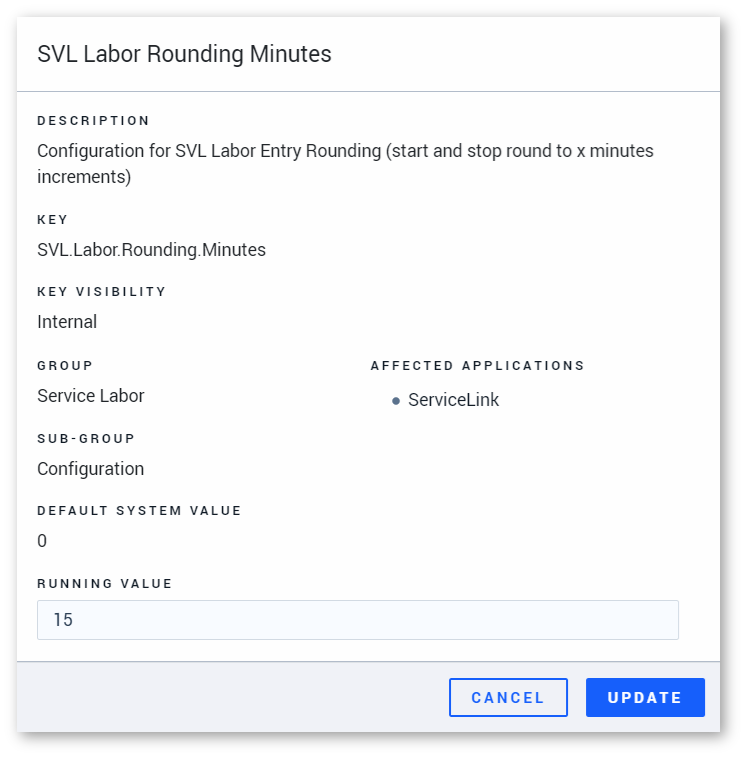
- Labor Entry Time Rounding
A new SVL Labor Rounding Minutes (SVL.Labor.Rounding.Minutes) configuration key has been added to CloudLink Console. This key allows you to round timestamps in ServiceLink labor entries to a set number of minutes for cleaner customer reports.
The running value of the SVL Labor Rounding Minutes configuration key is the increment to which timestamps will be rounded. For example, entering “5” will cause 1:38 to be rounded to 1:40, while entering “15” will cause 1:38 to be rounded to 1:45.
This feature is available for dealers using Rosters. - Third-Party HRIS Integration
ServiceLink and ServiceLink Flex now support third-party HRIS integration. You can now use a third-party HRIS (such as SAP) to define rosters, eliminating the need to manually create and assign individual rosters to each technician. New roster types allow you to send roster type information day-by-day as opposed to week-by-week or on a set schedule. Other integrations include managing employee pay and overtime, lunch breaks, and wage type allowance. Contact your Texada account representative for more information!
- Parts Price Locking
A new permission has been added to ServiceLink’s security matrix that allows you to prevent selected users from overriding the Unit Price of a Part.
- Lunch Break Labor Entries
A special “lunch break” labor entry type has been added, allowing technicians to explicitly capture lunch breaks when submitting Work Order labor. This feature is currently available for dealers using SAP and Rosters. Contact Texada support for more information.
- Bulk Change Note Classifications
A “Select All” checkbox has been added to the Notes Edit window, allowing you to bulk change Work Order notes from internal to external or vice versa. To access this window, open a Work Order Segment or Operation, scroll down to the Notes and Special Instructions panel, and click “Edit Notes”.
This feature is available in both ServiceLink and Parts & Service Quoter. It can be enabled or disabled using the following configuration keys:- ServiceLink: Ticket Segment Note DefaultAs (SVL.Segment.Note.DefaultAs)
- PSQ: psQuoter Quote Segment Note DefaultAs (psQuoter.Quote.Segment.Note.DefaultAs)