
In This Article
- Introduction
- How to Create a Reservation and Perform Asset Staging
- Rental Management (Classic)
- Rental Management (Next)
- Service and Rental Mobile
Introduction
The following article details how to manage Reservations and perform Asset staging in Rental Management (Classic, Next, and Mobile).
About Reservations
In Rental Management, a Reservation is a pre-Contract document that allows an equipment salesperson to estimate the cost of a potential Contract and reserve equipment. Once the client has provided their approval, a Reservation can be converted into a Contract.
Because it is not always possible to know which specific Product will be available when a Contract begins, Reservations are often created at the Group level. For example, a client might reserve a 2002-series air compressor for a Contract beginning in six months. Once the six months have passed and the Contract begins, a specific Product – for example, the air compressor with the Product number 2002-17 – will be sent to the client.
Reservations are created in Rental Management (Classic or Next), and can be reviewed and assigned to yard workers via the Reservation List page in Rental Management (Next).
About Asset Staging
Asset staging is the process of selecting which Assets will be sent out on Reservations once they are converted to Contracts, and inspecting said Assets to ensure they are in good condition before the rental period begins.
Asset staging allows yard workers to close the gap between Group-level Reservations and Product-level Contracts by physically inspecting available Products and selecting which one will be sent out.
Asset staging can be performed via the Staging tool in Service and Rental Mobile.
How to Create a Reservation and Perform Asset Staging

The complete process of creating a Reservation and performing Asset staging in Rental Management is as follows:
- Create Reservation (Classic or Next)
When a client first approaches you with the intent to rent equipment, your counter operator can capture the details of the Reservation in Rental Management (Classic or Next), including client information, the intended contract period, and the equipment to be sent out on the Contract (at the Group level).- In Rental Management Next: Create a Reservation.
-
- In Rental Management Classic: Use the Reservations utility.
- Assign Asset Staging to Yard Worker (Next)
Using the Reservation List page in Rental Management (Next), the counter operator can now assign the Reservation to a yard worker for Asset staging. - Perform Asset Staging (Mobile)
Having been assigned the Reservation, the yard worker can now use the Staging tool in Service and Rental Mobile to perform Asset staging. This involves selecting which specific Product will be sent out for each of the Group-level holds on the Reservation, and inspecting said Products to ensure they are ready to go out on Contract. - Monitor Asset Staging (Next)
As your yard workers perform Asset staging, counter operators can monitor their progress via the Reservation List page. This includes checking completed inspection forms and reviewing Products flagged as unfulfillable. - Convert Reservation to Contract (Classic or Next)
Once a Reservation has been finalized, it can be converted to a Contract.- In Rental Management Next: Convert a Reservation to a Contract.
-
- In Rental Management Classic: Use the Reservations utility.
The following sections provide more information on the tools referenced in the process above.
Rental Management (Classic)
Permissions
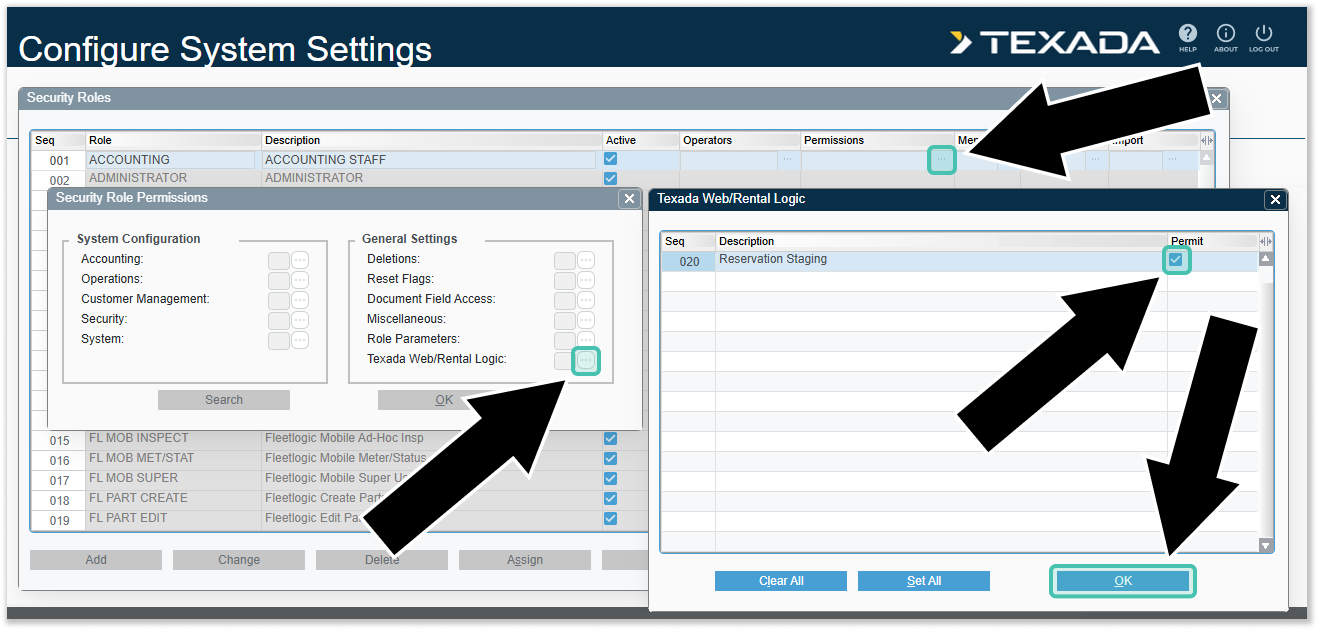
Access to the Asset Staging module is controlled via the Security Roles module in Rental Management (Classic). To enable or disable a role’s access to the Asset Staging module, follow the steps below.
- Log in to Rental Management (Classic) and navigate to System Maintenance → Configure System Settings → Security → Security Roles.
- Click the three horizontal dots
under “Permissions” for the security role you’d like to edit. This will open the Security Role Permissions window.
- Select “Texada Web/ Rental Logic”.
- Locate “Reservation Staging” in the list of permissions, then check or uncheck it as desired.
- Click “OK”, then “OK”, then “Accept” to save your changes.
Reservations
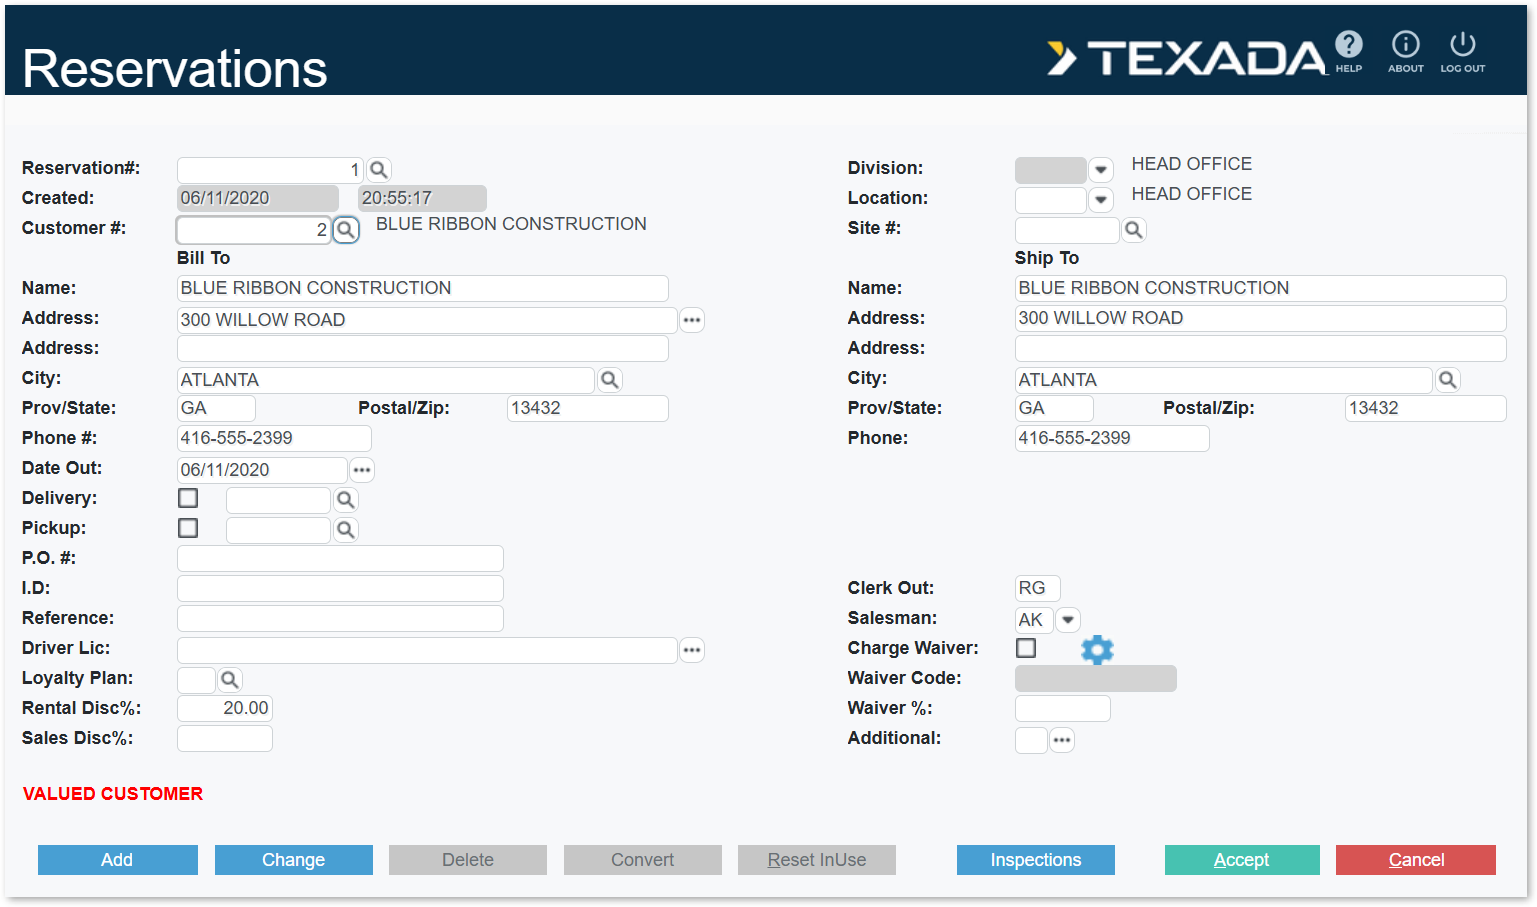
Reservations can be created, edited, and converted into Contracts using the Reservations utility in Rental Management (Classic), accessible at Counter → Reservations → Reservations.
Reservation Inspection Forms
Inspections are an important part of the Asset staging process, as they allow yard workers to confirm that the equipment they select is in suitable condition to go out on Contract.
Inspection Forms can be managed via the Maintain Inspection Forms utility in Rental Management (Classic), accessible at System Maintenance → Configure System Settings → Operations → Inspection Forms. Once created, inspection forms can be associated with Product Groups using the Equipment Groups utility.
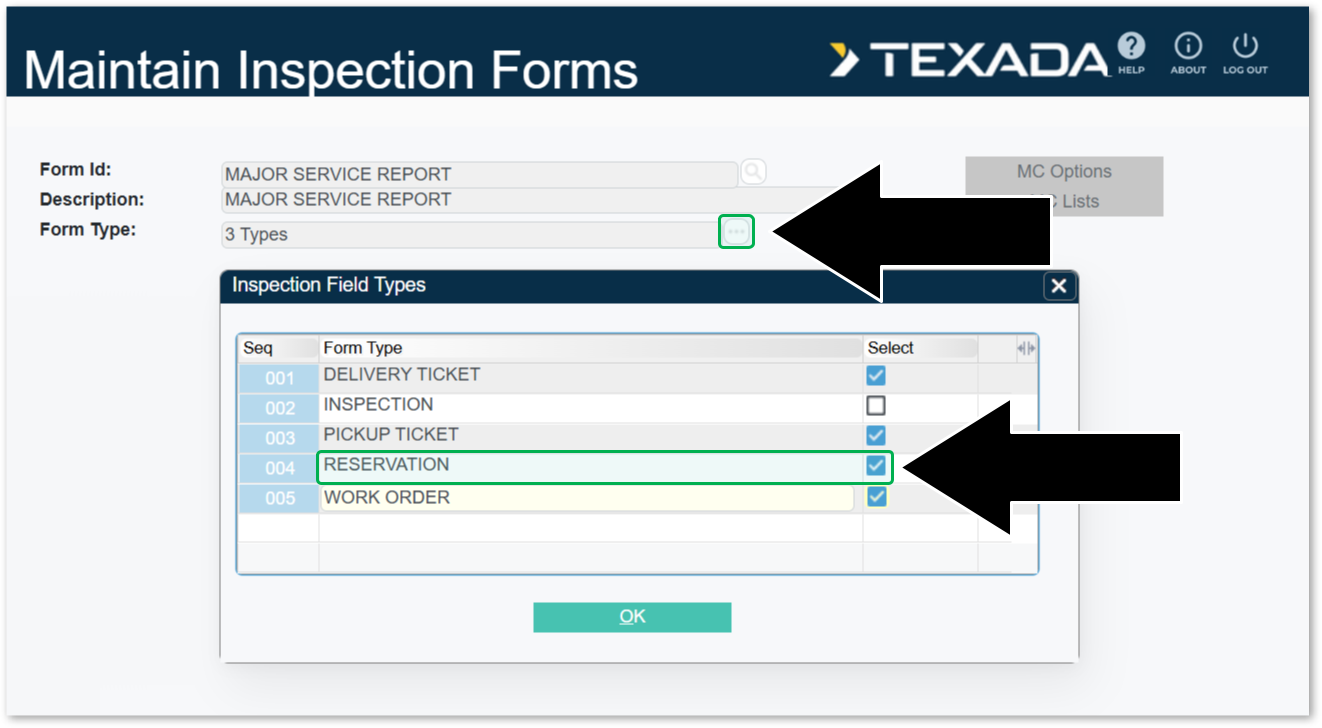
In order for an inspection form to appear during the Asset staging process, it must have a type of “RESERVATION”. To edit an inspection form’s type, follow the steps below.
- Log in to Rental Management (Classic) and access the Maintain Inspection Forms utility at System Maintenance → Configure System Settings → Operations → Inspection Forms.
- Enter the Form Id of the inspection form you’d like to edit and press Enter.
- Click the three dots
next to “Form Type” to open the Inspection Field Types window.
- Select “RESERVATION”. Other types can be selected as well.
- Click “OK”, then “Accept” to save the inspection form.
Rental Management (Next)
The Dashboard Calendar

The Dashboard Calendar in Rental Management (Next) can be used to track the status of Reservations. To access this page, select Dashboard → Calendar from the left navigation menu.
Reservations are colored green on the calendar, and will be filled in based on their current status:
- Outlined / No Fill: Unassigned or Assigned
- Striped Fill: In Progress
- Solid Fill: Staged
The Reservation List
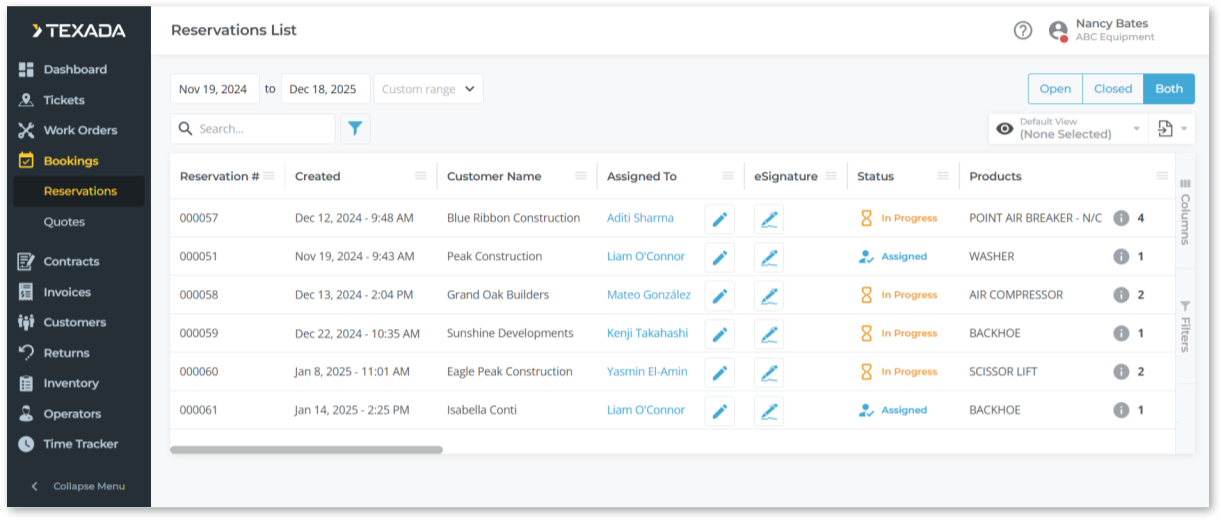
The Reservations List page in Rental Management (Next) lists the Reservations that currently exist in the system, and allows you to change the User assigned to each Reservation. To reach this page, log in to Rental Management (Next) and select Bookings → Reservations from the left navigation menu.
Service and Rental Mobile
The process of staging Assets in Service and Rental Mobile is outlined below. In order to see and perform Asset staging on a Reservation, you must first be assigned that Reservation via the Reservation List page in Rental Management (Next).
Step 1: The Staging Screen
To access the Staging tool in Service and Rental Mobile, log in to the application and tap the Staging icon at the bottom of the screen.
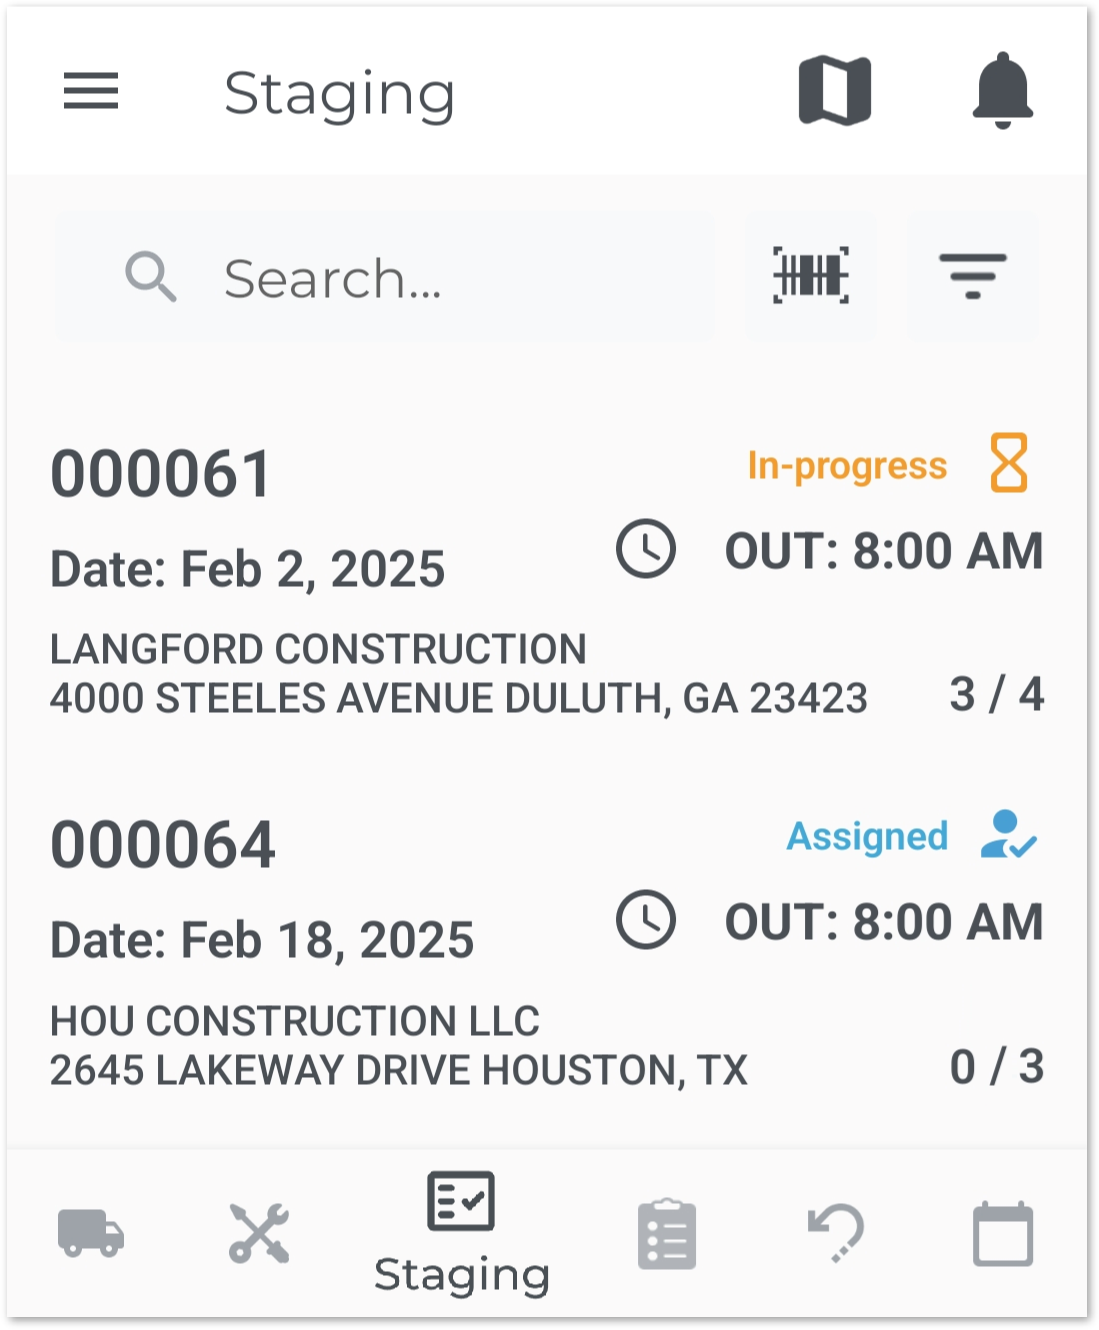
The Reservations to which you have been assigned will be listed in chronological order, with the next upcoming at the top. For this reason, it is recommended to resolve Reservations starting from the top of the list.
Use the search bar at the top of the screen to search the list of Reservations, or tap the filter icon to filter by Division. Tap on a Reservation to open its details and perform Asset staging.
Step 2: Reservation Details
From the Staging screen, tap on a Reservation to open its details and perform Asset staging.
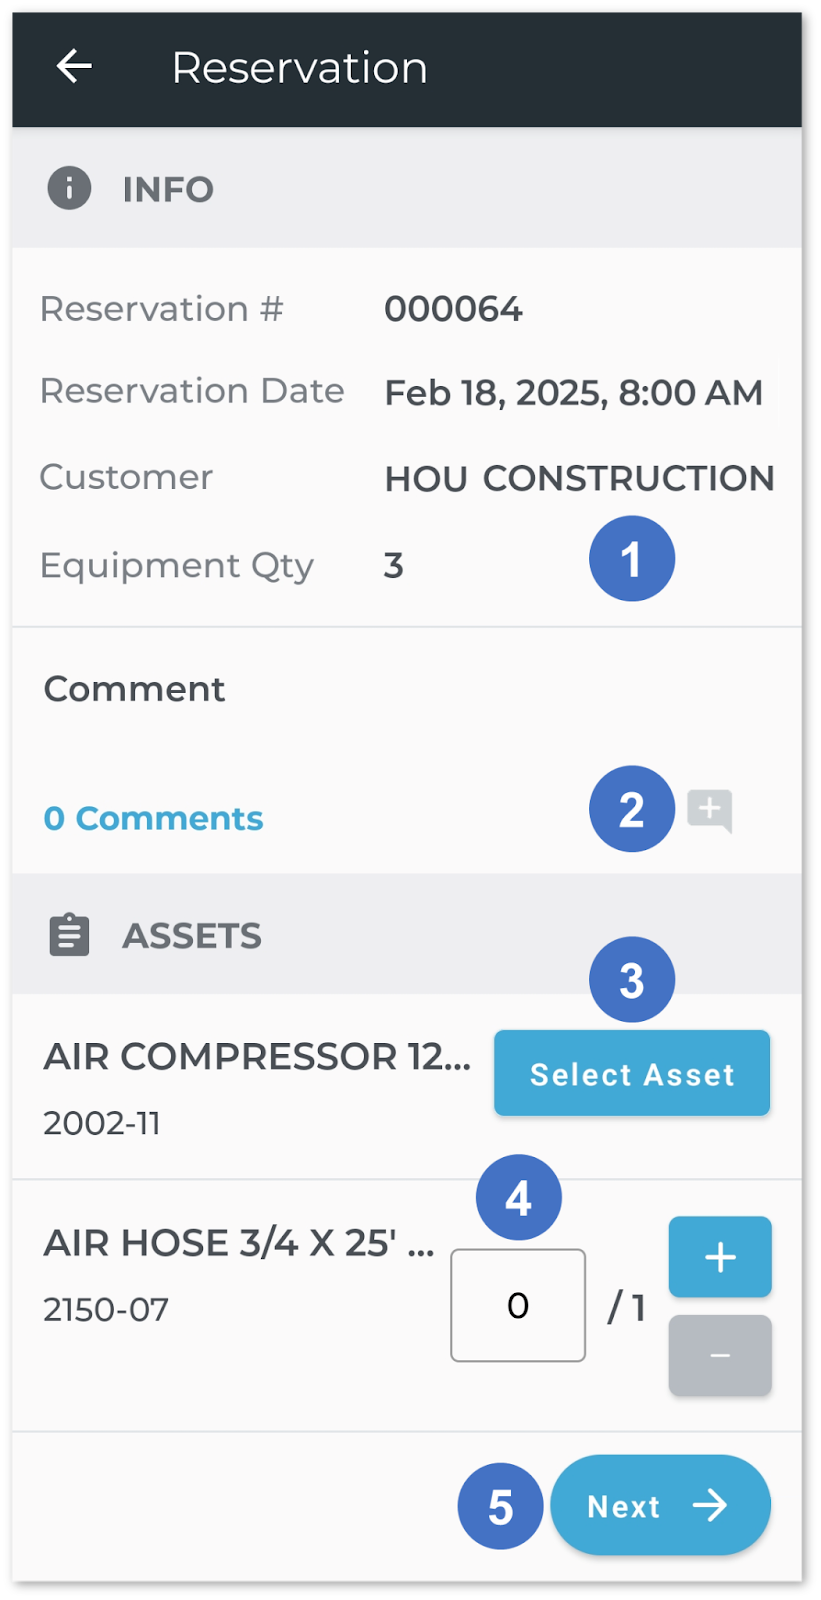
- Reservation Details
Basic details about the Reservation are listed here. - Comments
Any comments left on the Reservation are listed here. Tap the comment iconto leave a new comment. Each comment can be designated as either external (visible to the customer on printed documents) or internal (visible only to other Texada users).
- Select Asset Button
Click to perform staging for the selected Asset. See “Step 3: Select Asset” for more information. - Bulk Product Selection
Unlike rental Assets, bulk Products do not need to be staged individually. Instead, enter a number into the number field to indicate that the requisite number of Products has been set aside for the Contract. - Next Button
Once you are finished staging Assets, tap this button to continue. See “Step 5: Finalize” for more information.
Step 3: Select Asset
When viewing a Reservation, Tap the “Select Asset” button next to a non-bulk Asset to perform Asset staging. This will open the Select Asset screen, where you can choose which Asset will be sent out on the Contract.
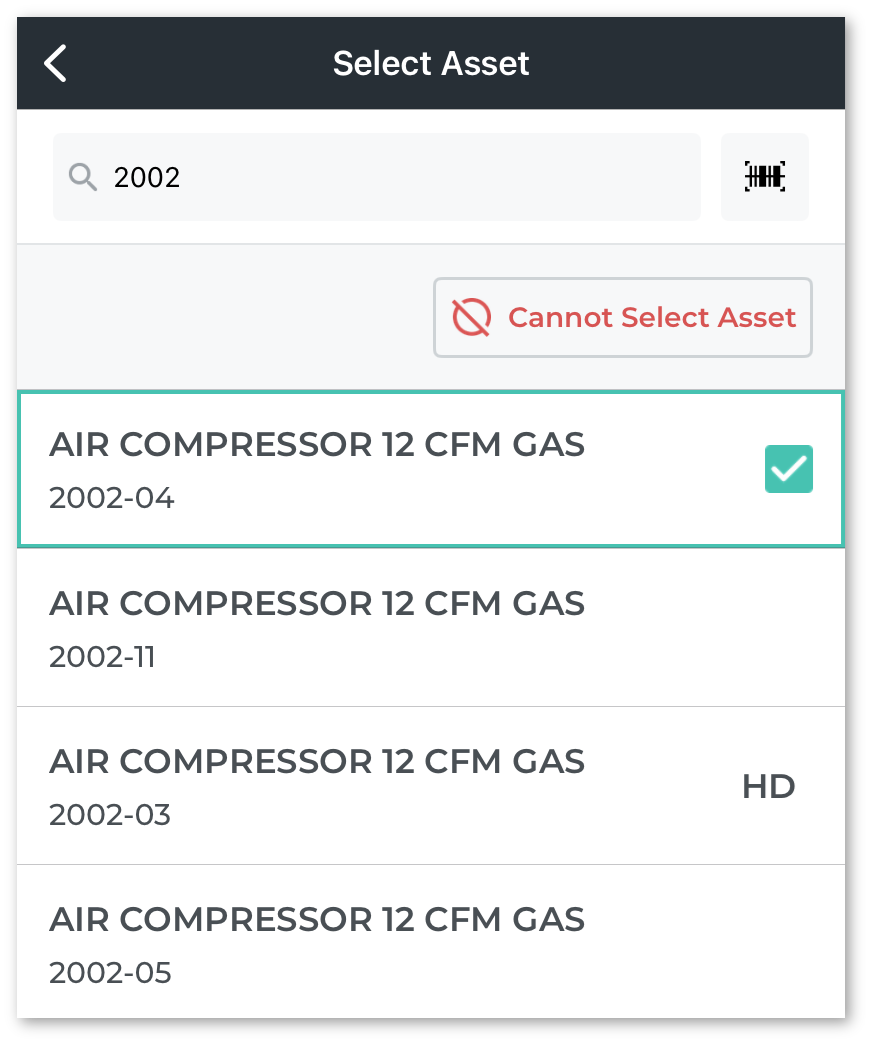
Available Assets will be shown in black text, while unavailable Assets will be shown in red text. Use the search bar at the top of the screen to filter the list of Assets, or tap the barcode icon to scan an Asset’s barcode. This feature is useful for when you have physically located the Asset you want to rent out. See “Scan a Product Barcode in Service and Rental Mobile” for more information.
There are 2 different ways to finalize Asset staging, based on whether or not you are able to locate a suitable Asset to send out on the Contract:
- Able to locate Asset
Tap on the Asset to select it and proceed to the Asset Inspection screen. - Unable to locate Asset
Tap the “Cannot Select Asset” buttonat the top of the screen. You will be prompted to select a reason why you were unable to select an Asset. The Asset will then be flagged on the Reservation List page in Rental Management (Next).
Step 4: Asset Inspection
After selecting an Asset, you will be taken to the Asset Inspection screen. This screen allows you to take photos of the Asset and complete any attached inspection forms.
The inspection forms that appear on the Asset Inspection screen can be managed in Rental Management (Classic). Specifically, any inspection forms with the type “Reservation” associated with the Asset’s Group will appear here. See “Reservation Inspection Forms" for more information.

Tap the “Add Photos” button to take photos of the Asset, then fill out any questions included under the “Inspections” header. Once you are finished, tap “Complete” to return to the Reservation details screen.
Step 5: Finalize
Once you have repeated steps 3 and 4 for each of the Assets on the Reservation, tap the “Next” button on the Reservation details screen. This will open a summary screen where you can review the results of the Asset staging before committing them.
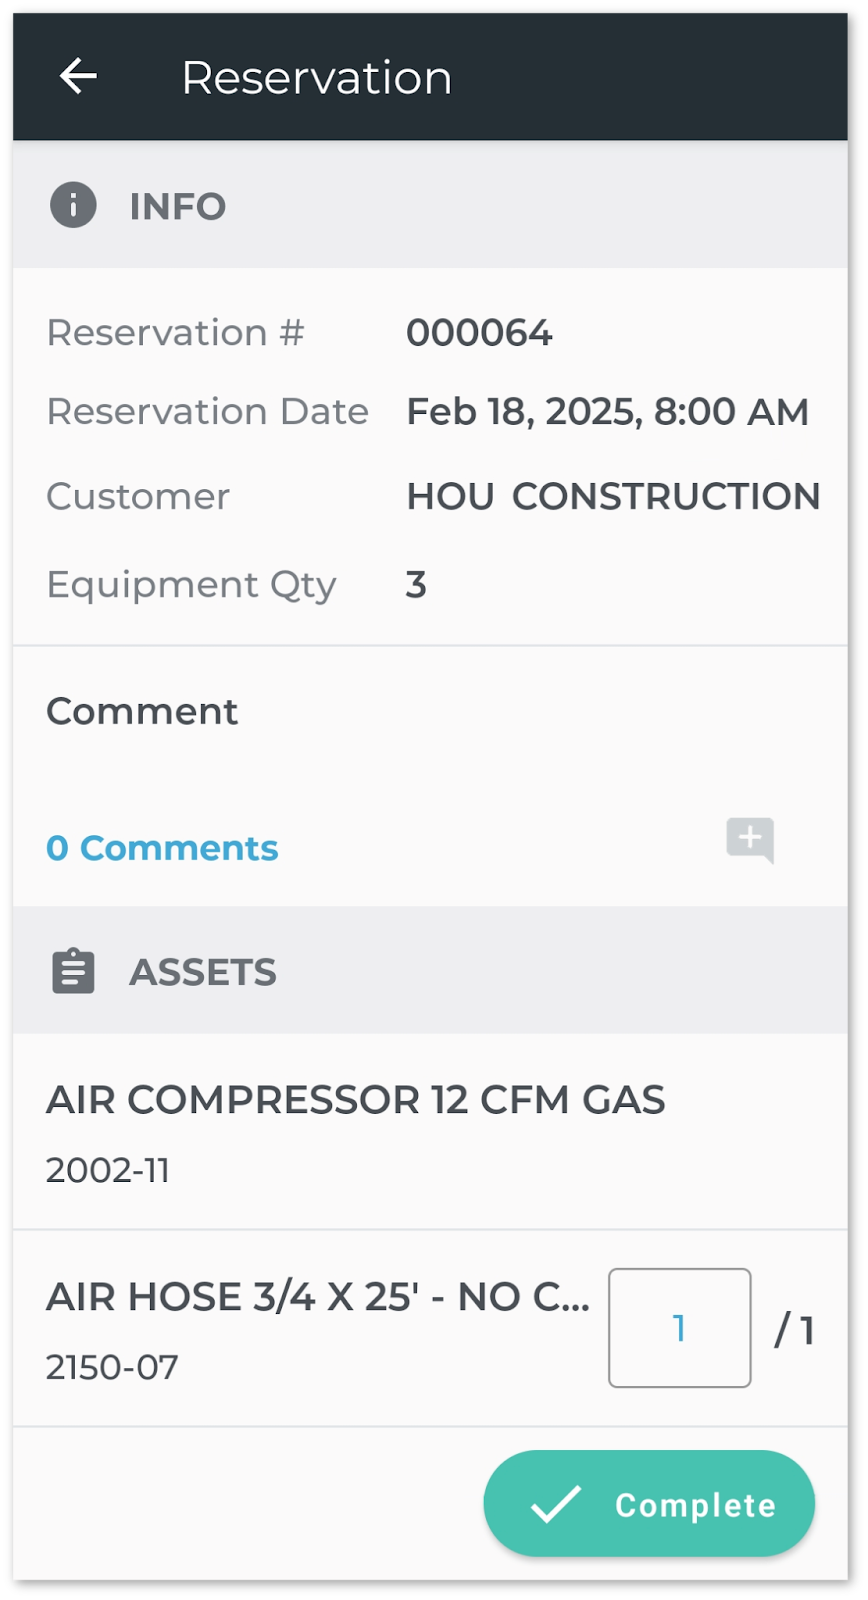
Once you are satisfied with the results, tap the “Complete” button to finalize Asset staging.
- If all Assets have been staged, the Reservation’s status will change to Staged.
- If one or more Assets have not yet been staged, the Reservation’s status will remain In Progress, and you can continue the staging process from the Staging screen at any time.