
In This Article
Introduction
Enable a Service, Rental, and Financials (Classic) user to access Service, Rental, and Financials (Next) and Mobile to take advantage of their functionality.
Note: This article covers the minimum required steps to create a user and grant them Service, Rental, and Financials (Next) and Mobile access. For more detailed coverage of creating a user, see “Create a User in Service, Rental, and Financials (Classic)”.
Divisions and Locations
The Division and Location to which the user is assigned during the process is vitally important. You can enable a user to view the information related to one, some, or all Divisions and Locations in Service, Rental, and Financials (Next) and Mobile. Setting this up for a user has a dramatic effect on the data they have access to. See “Add a Service, Rental, and Financials (Classic) User to Multiple Divisions” for more information on how to add a user to multiple Divisions.
In addition, when setting up a user for multiple Divisions, you have the ability to set different security roles for each Division, giving you full flexibility in terms of what your users can see and do in Service, Rental, and Financials (Next) and Mobile. For example, a user might have permission to edit a ticket in one Division, but only view tickets in another. See “About Permissions and Menu Access for Service, Rental, and Financials (Next) and Mobile” for more information on controlling what users can see and do.
Drivers and Technicians
When enabling a driver or technician user, there are additional steps required for each role that are not required for the other roles. These steps add the driver(s) or technician(s) to any driver or technician selection dropdowns in certain parts of Service, Rental, and Financials (Next) and Mobile, such as Work Orders or Tickets.
When enabling a Driver, you must first grant them Service, Rental, and Financials (Next) and Mobile access as you would any other user. The operator code from the user’s profile is then used to add the user to a separate list of drivers that adds the user to specific driver dropdowns throughout Service, Rental, and Financials (Next) and Mobile.
Note: See “Add a Mechanic in Service, Rental, and Financials (Classic)” for more information on how to enable a technician/mechanic user.
Steps
To provide a Service, Rental, and Financials (Classic) access to Service, Rental, and Financials (Next) and Mobile as a Driver, do the following:
- Log in to Service, Rental, and Financials (Classic) and navigate to System Maintenance → Configure System Settings → Security → General Settings.
- Next to Operators, click more options
 to open the Operators popup.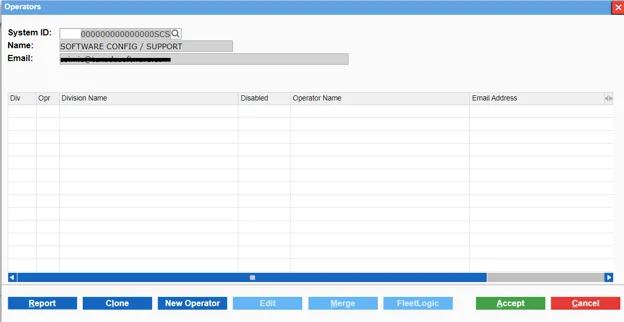
- Double click the user profile for which you want to enable access to Service, Rental, and Financials (Next) and Mobile. This will open the Operator detail window.
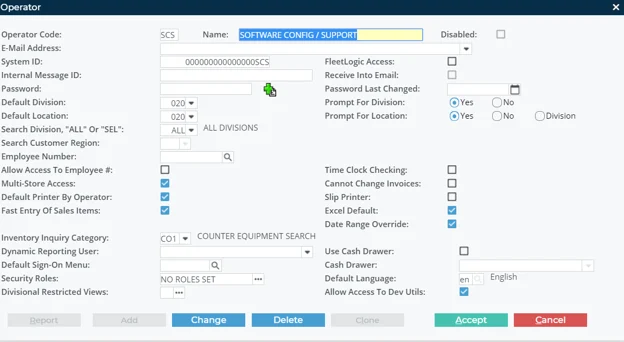
- Check the Texada Web/Texada Mobile Access checkbox.
- Use the Default Division dropdown to do one of the following:
- Select the Division the user can access if the user can only access a single Division.
- Select nothing if the user can access the Head Office only.
- Do one of the following next to Prompt for Division:
- Click Yes if the user can access all Divisions.
- Click No if the user can only access a single Division.
- Use the Default Location dropdown to do one of the following:
- Select the Location the user can access if the user can only access a single Location.
- Select nothing if the user can access the head office only.
- Do one of the following next to Prompt for Location:
- Click Yes if the user can access all Locations.
- Click No if the user can only access a single Location.
- Click Division if the Location should always be the same as the Division.
- Next to Security Roles, click more options to select a security role for this user profile. Check any security role(s) that apply to this user profile for this Division/Location(s).
Note: You must select a minimum of one security role in order for the user to be able to log in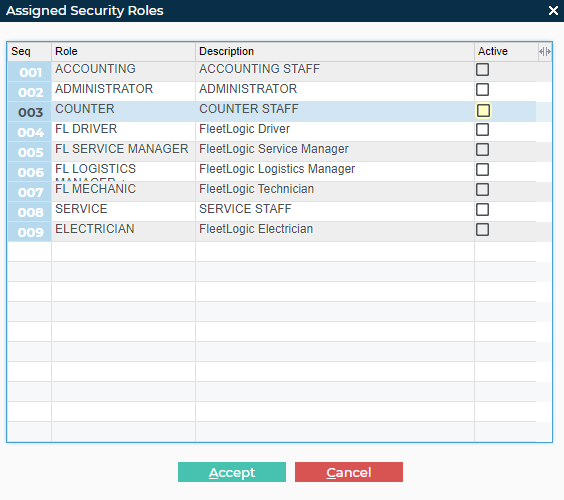
- Click Accept. The security role permission(s) and menu access will be applied to this user role for the selected Division/Location(s). See “Assign Permissions to a Security Role in Service, Rental, and Financials (Classic)” for more information on what permissions and menu access apply to the driver role.
- Click Accept.
- Navigate to System Maintenance → System Configuration Settings → Operations tab → General Settings.
- Next to Drivers, click more options to open the Drivers window.
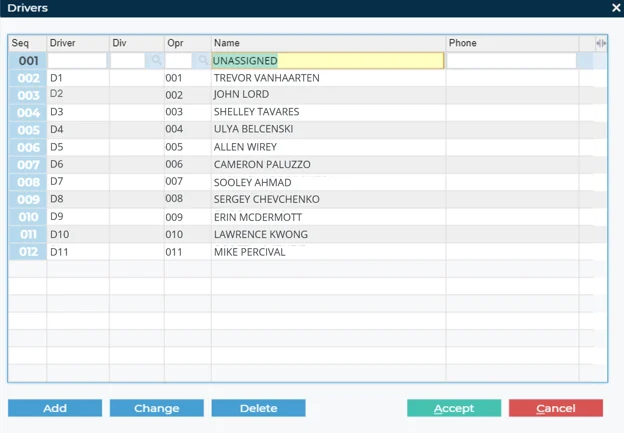
- Click Add to insert a new line to the end of the list.
- Type a unique driver identifier in the Driver field. This should be a short combination of numbers and/or letters that makes it easy to identify the driver.
- Optional: Use the Div field to select the Division with which the driver is associated.
If Operators by Division is unchecked in your company profile, all drivers in the list are listed under the head office Division and their access is set to the default Division and Location. See “Company Information” for more information on the Operators by Division setting. - Use the Opr field to select the operator number for this driver. This must match the number in step 3.
- Type the name of the operator in the Name field.
- Optional: Type a phone number for the operator in the Phone field.
- Click Accept to add the user to the list of drivers. They can now log in to Service, Rental, and Financials (Next) and Mobile.
- See “Log In and Out of Service, Rental, and Financials (Next)” or “Log In and Out of Service & Rental Mobile” for more information on how to get started in Service, Rental, and Financials.
- You may receive a message notifying you that there are more users set up than you are currently licensed for. If this occurs, you can disable some of the users to free up licenses or contact sales@texadasoftware.com to arrange for more licenses.