In This Article
Introduction
Daily routes organize planned customer visits into structured itineraries, helping field sales representatives minimize travel time and maximize daily productivity.
The following article explains how to create, optimize, and save daily routes and route templates in Field Sales Tracker for web and mobile.
Web
Create a Daily Route
- From the Map
Select Map → Accounts from the left navigation menu, then click the “Daily Route” button in the top-right corner of the screen.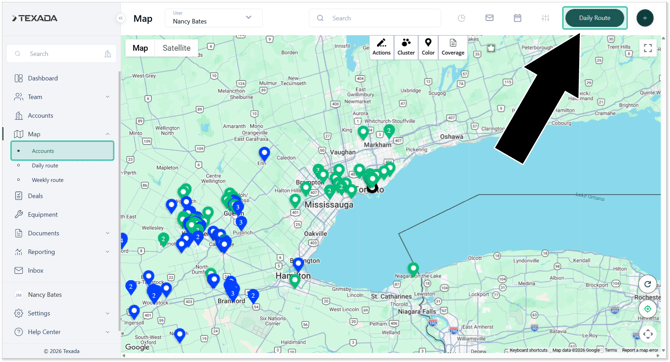
From the Dashboard
Select Dashboard from the left navigation menu. Click the plus icon in the top-right corner of the screen, then select “Create daily route”.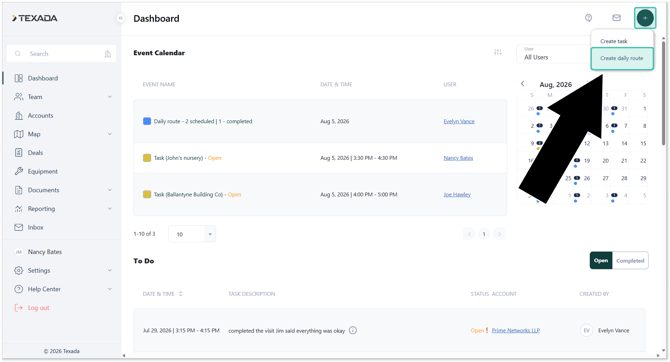
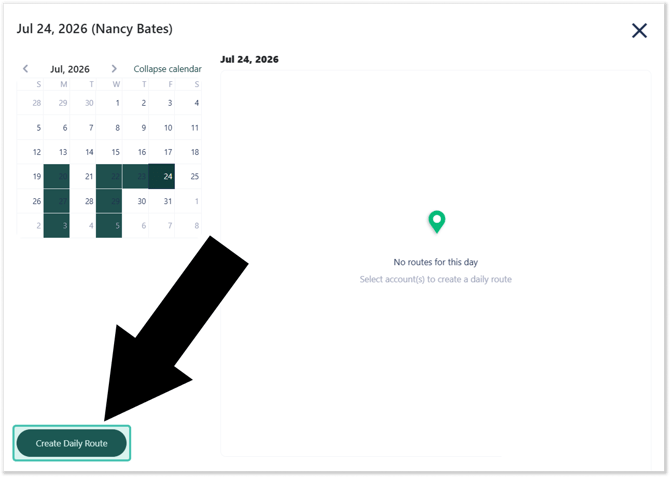
- Click “Create Daily Route”.
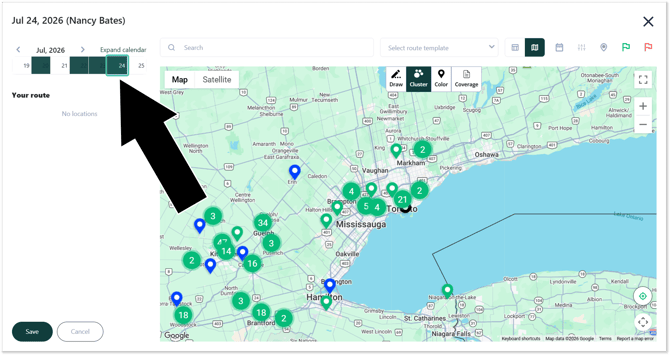
- Select the date for which you want to create a daily route.
- Click the green flag icon
 to select a starting location for your daily route. Begin typing into the “Search Start Location” field to search for and select a starting location, then enter a name for the location into the “Start Location Name” field. Once you are finished, click “Save”. Your starting location will be added to the “Your route” panel on the left side of the window.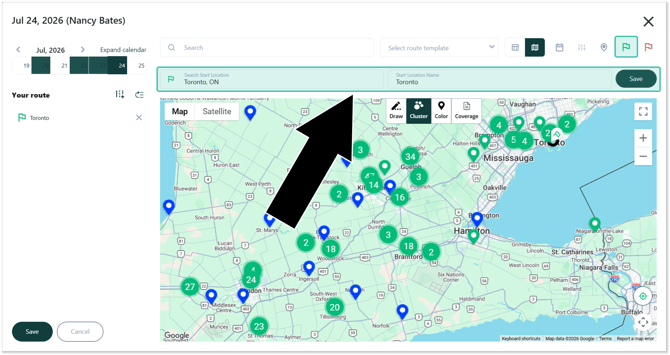
- Click the red flag icon
 and repeat the process from step 4 to add an end location. Once you have selected both locations, a route between them will appear on the map.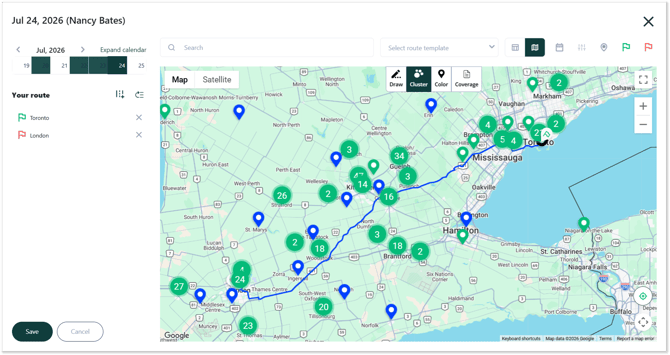
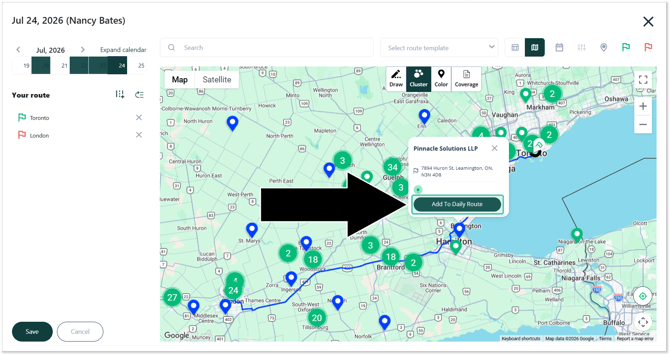
- You can now add Customers and Prospects to your route by clicking on their pin on the map and selecting “Add to Daily Route”. Each stop you add will appear under “Your route” on the left side of the window.
- Click and drag stops under “Your route” to rearrange them. Once you have added at least two stops, you can also click the Optimize button
 to automatically create the most efficient route between them.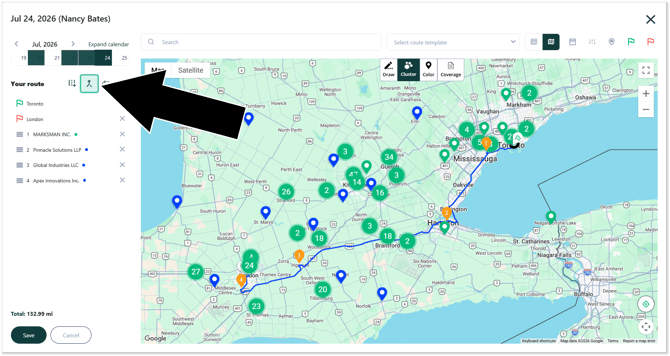
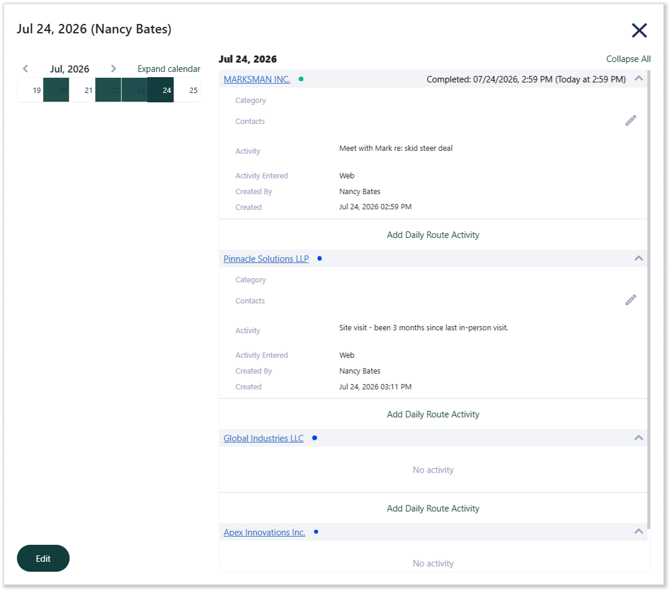
- Once you are finished, click the “Save” button to save your route. You will be redirected to the Add Daily Route Activity window, where you can create sales Activities for each of the stops included in your route.
Create a Route Template
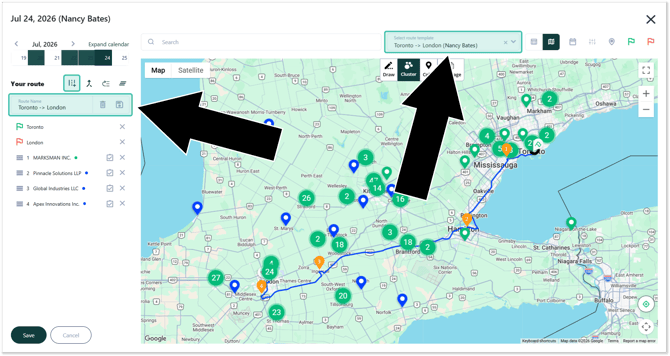
To save your completed route as a Route Template, click the “Save As” icon  in the left side panel, then enter a unique name for your route and click the “Save” button
  . Doing this will make your route available from the “Select route template” drop-down when creating new daily routes in the future.
Mobile
Create a Daily Route by Adding Accounts
- Open the Field Sales Tracker mobile application and navigate to Home → Map.
- Select the Account or Prospect you want to add to your daily route and tap Add to Daily Route (left).
Once the calendar appears (right), select the date to whose daily route you want to add the Account, then tap Save.
Repeat this step for each Account you want to include in your daily route.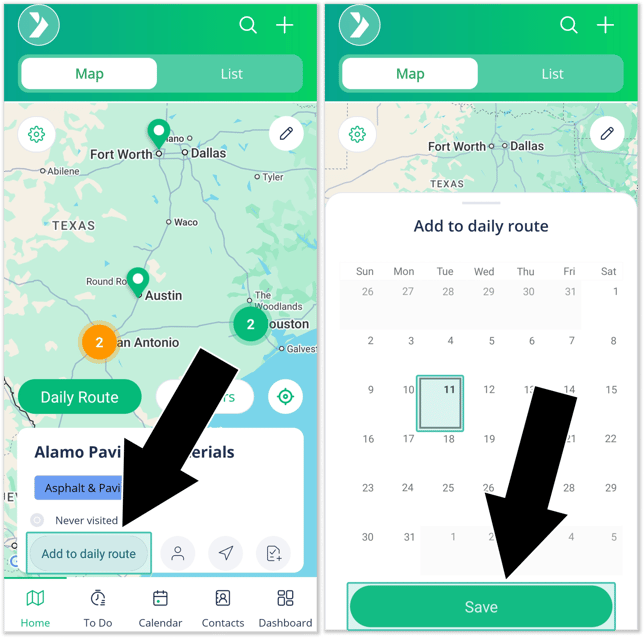
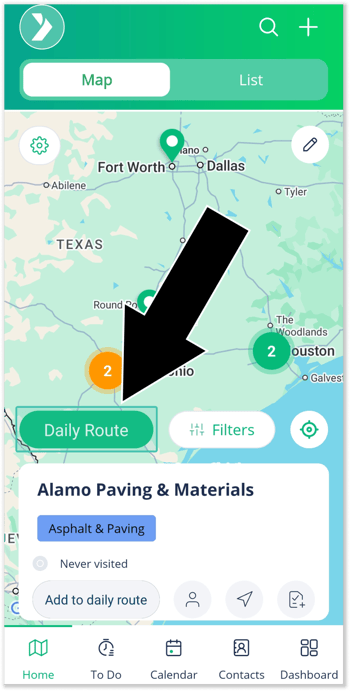
- Once you are finished adding Accounts, tap the green Daily Route button (left).
You can now finalize your daily route (right). To rearrange your stops, tap and drag an Account into a new location using the six dots on the left side of the screen. Or, tap Optimize
  to reorganize all stops to create the most time-effective route.
Once you are finished, tap Go to start navigating!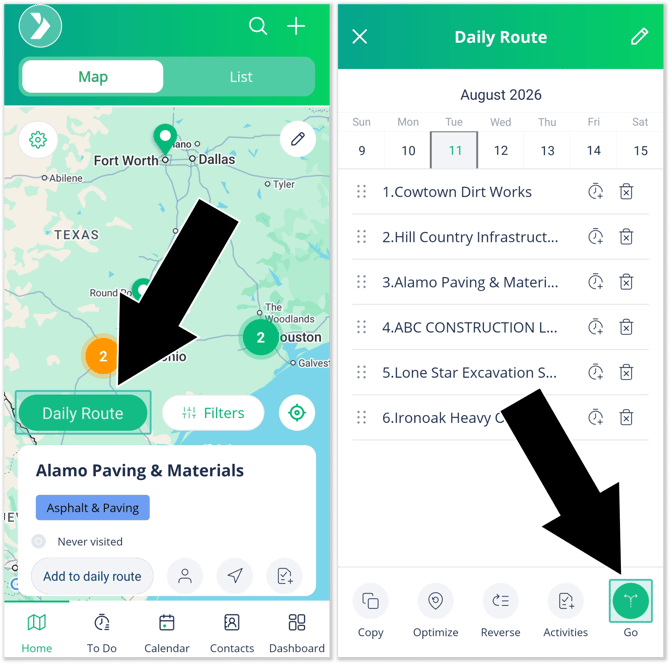
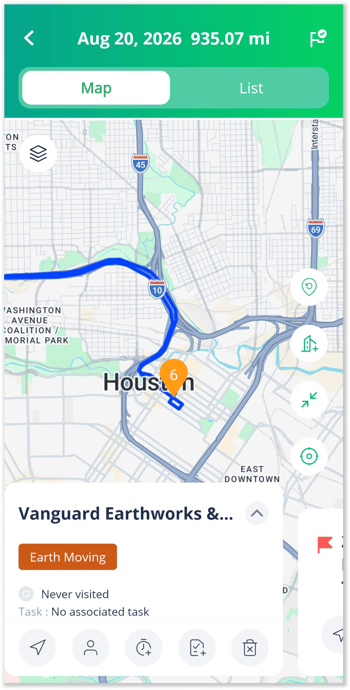
- The application will now start navigating you to the first stop on your daily route. Once you are finished with a particular stop, swipe its card to the right to proceed to the next stop. Use the action buttons at the bottom of the screen to take actions relating to the current stop:
- Navigate
 : Open the current stop in Google Maps or Waze.
 - Add Contact
 : Create a new Contact for the Account.
 - Create Task
 : Create a new Task for the Account.
 - Add Activity
 : Log a new Activity for the Account.
 - Delete / Reschedule
 : Remove or reschedule the current stop.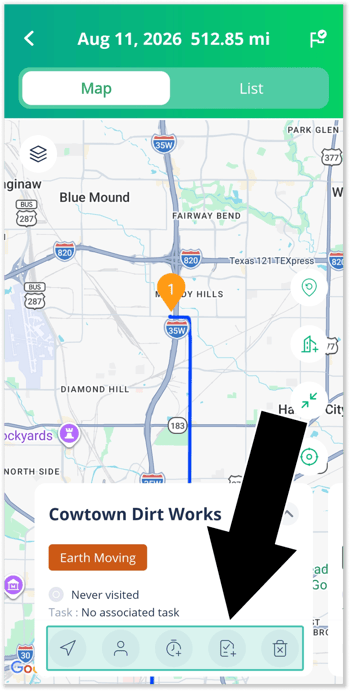
Create a Daily Route from Scratch
- Open the Field Sales Tracker mobile application and navigate to Home → Map.
- Tap the green Daily Route button (left).
Provided you have not yet added any stops for the current day, you will see a message that reads “No routes for this day. Select accounts to create a daily route”. Tap “Create Daily Route” to start adding stops (right).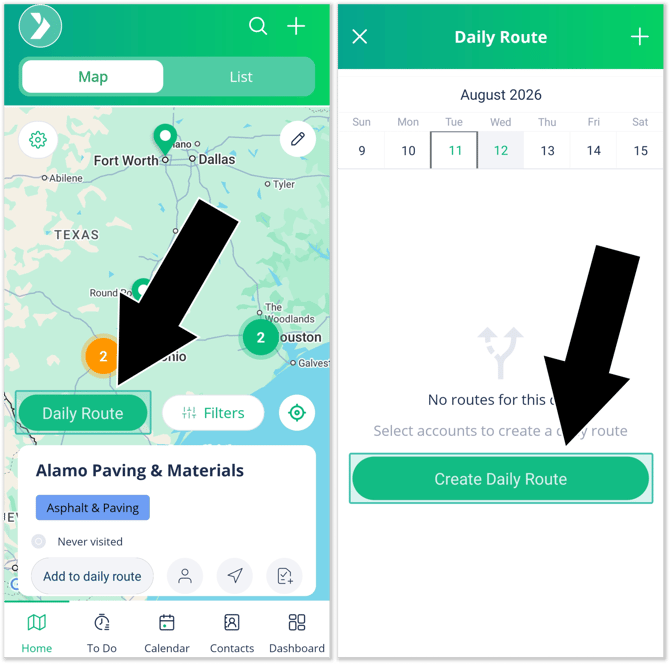
- You can now start building your daily route (left). Tap the checkbox next to each Account to add it as a stop.
To add a start location or end location to your route (indicated by a green and red flag, respectively), tap the Create Start Location or Create End Location buttons at the top of the screen. This will open the map (right). Tap on the map to drop a pin, then tap “Save Location” to register this location as your start or end location.
Once you are finished, tap the white check mark in the top-right corner of the screen to proceed (left).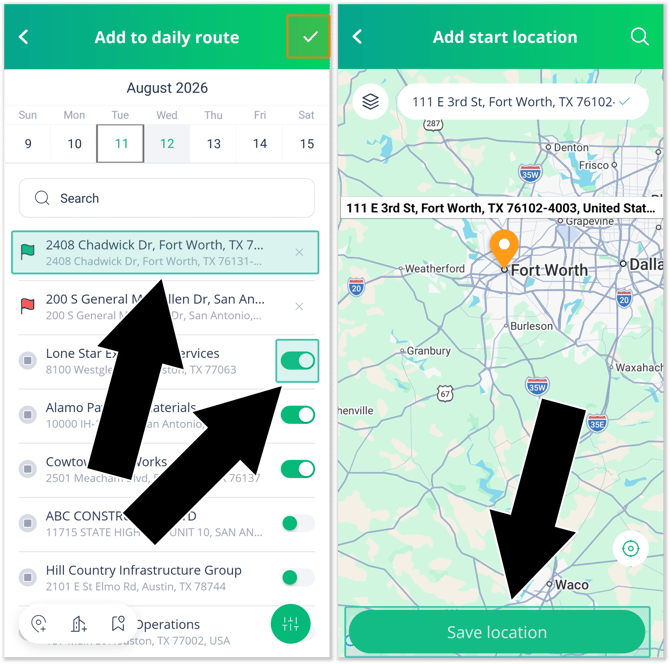
- You can now finalize your daily route (left). To rearrange your stops, tap and drag an Account into a new location using the six dots on the left side of the screen. Or, tap Optimize to reorganize all stops to create the most time-effective route. Once you are finished, tap Go to start navigating!
The application will now start navigating you from your start location to the first stop on your daily route (right). Tap Start my day to proceed to your first stop.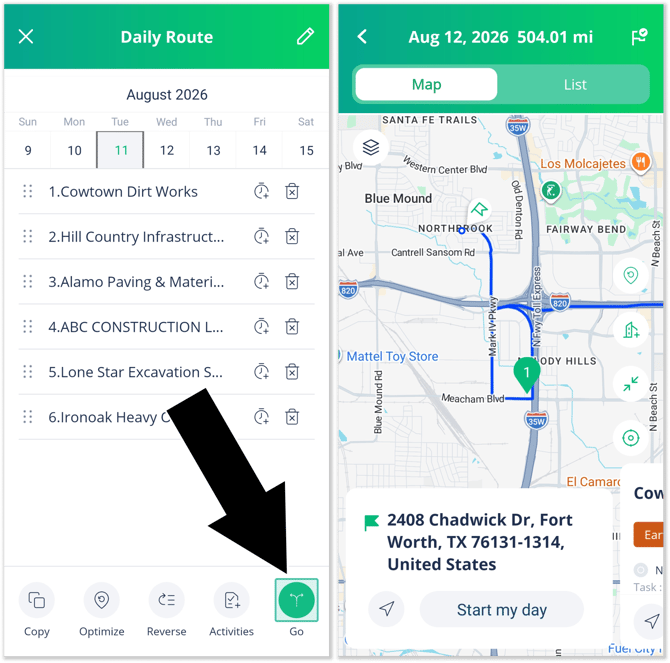
- Once you are finished with a particular stop, swipe its card to the right to proceed to the next stop. Use the action buttons at the bottom of the screen to take actions relating to the current stop:
- Navigate : Open the current stop in Google Maps or Waze.
- Add Contact : Create a new Contact for the Account.
- Create Task : Create a new Task for the Account.
- Add Activity : Log a new Activity for the Account.
- Delete / Reschedule : Remove or reschedule the current stop.
Create a Route Template
To save a daily route as a Route Template in the Field Sales Tracker mobile application, follow the steps below.
- Log in to the Field Sales Tracker mobile application and navigate to Home → Map → Daily Route.
- Open the daily route you’d like to save as a template by tapping its date at the top of the screen (left). Tap the Copy button
 , then select Save as template (right).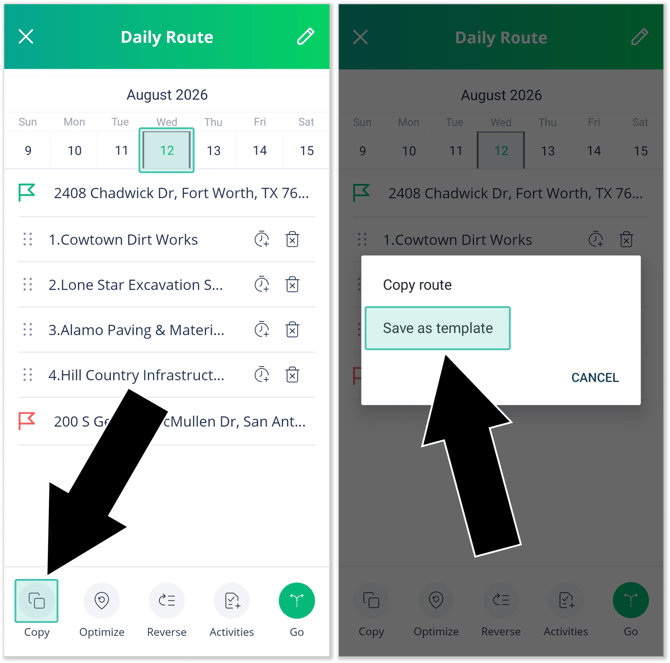
- Enter a name for your route into the search bar (left), then tap the blue plus icon
 to register it as a Route Template. You can now edit the route as desired (right), or tap Draw
  to start navigating.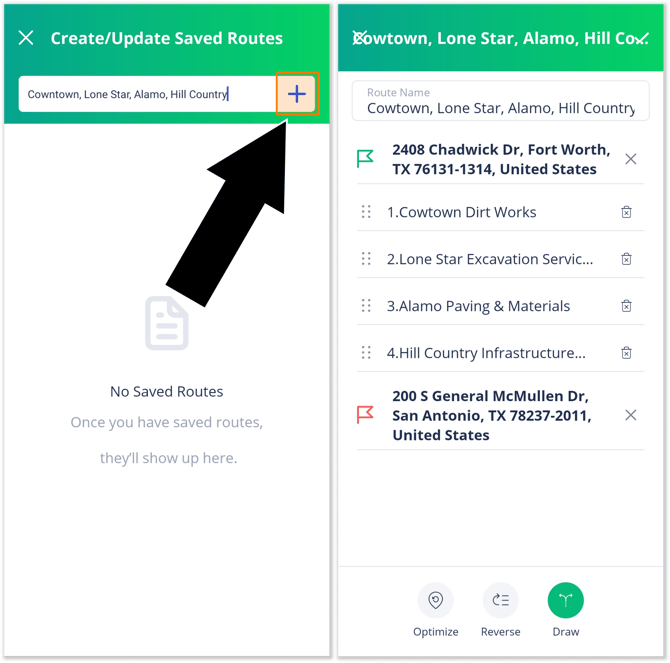
Use a Route Template
To use a previously created Route Template in the Field Sales Tracker mobile application, follow the steps below.
- Open the Field Sales Tracker mobile application and navigate to Home → Map → Daily Route (left). Select any future date, then tap Create Daily Route (right).
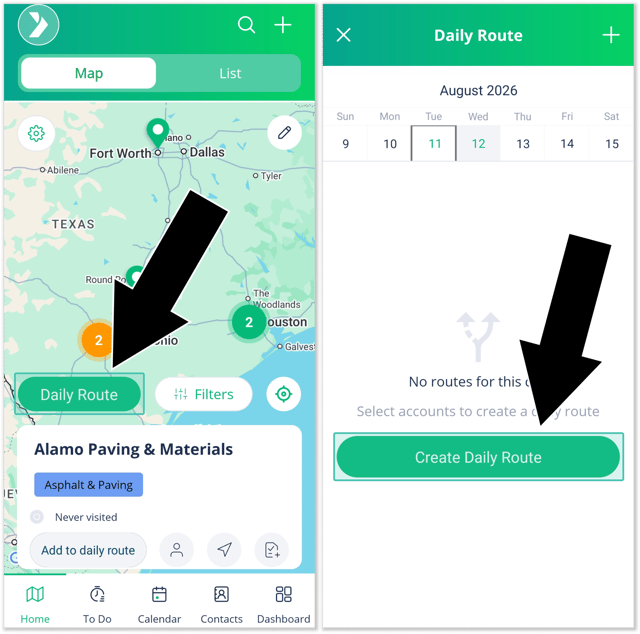
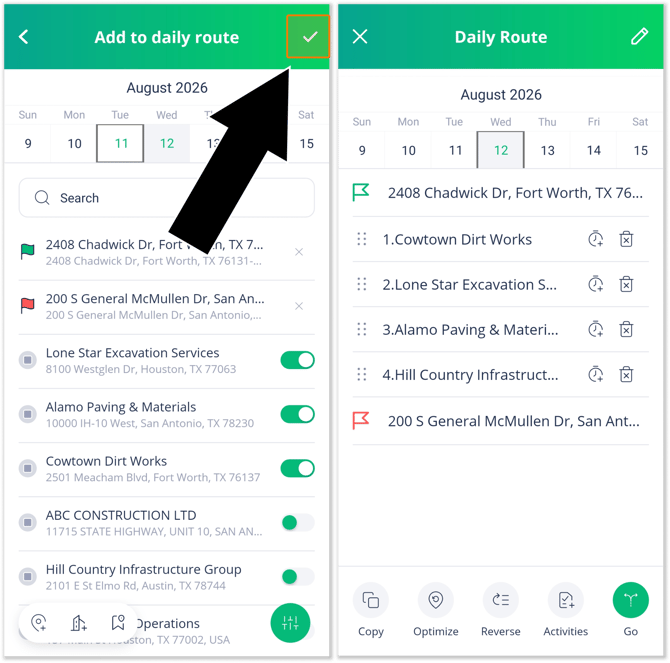
- On the Add to daily route screen (left), tap the Saved Routes icon
 . This will open the list of previously created Route Templates (right). Locate the Route Template you would like to load into the current day and tap on it.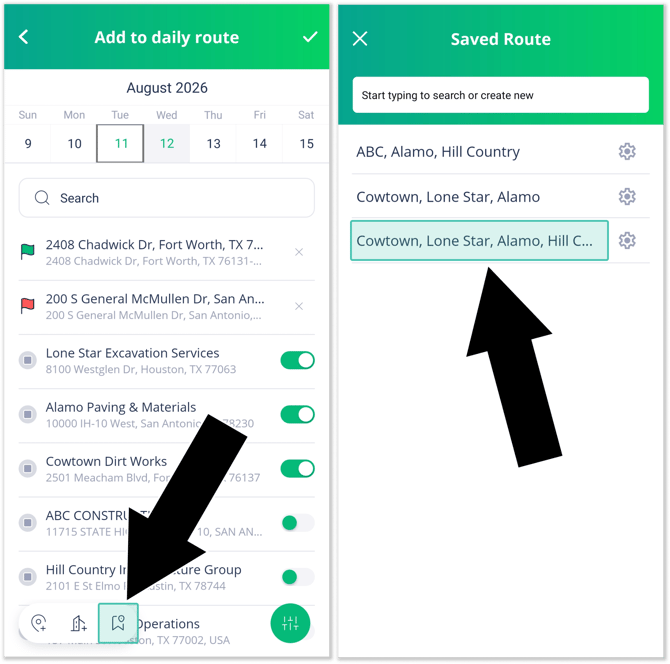
- Adjust the route as desired (left), then tap the white checkmark in the top-right corner of the screen to save your changes. You will be returned to the Daily Route screen (right) with the details of your route loaded in. You can now tap Go to start navigating.
Manage Saved Routes
The Manage Saved Routes screen in the Field Sales Tracker mobile application allows you to view, edit, and load previously saved Route Templates for an Account.
- Open the Field Sales Tracker mobile application and navigate to Home → List (left). Locate the Account for which you’d like to view saved routes and tap it to open its details.
From the Account details screen (right), tap the graph button to switch to the Actions tab, then scroll down and tap Saved routes to open the Manage Saved Routes screen.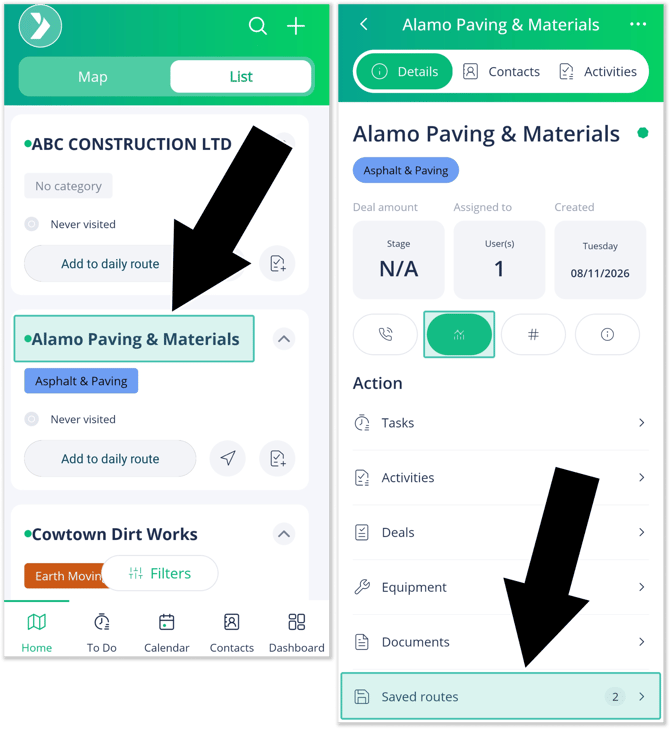
- On the Manage Saved Routes screen (left), you can view saved daily routes that include the current Account. Begin typing into the search bar to filter the list of routes. Uncheck the checkbox to the left of a route to remove the Account from that route.
Click the gear icon to the right of a saved route to view it (right). To rearrange your stops, tap and drag an Account into a new location using the six dots
  on the left side of the screen. Or, tap Optimize
  to reorganize all stops to create the most time-effective route.
Once you are finished, tap Draw to start navigating!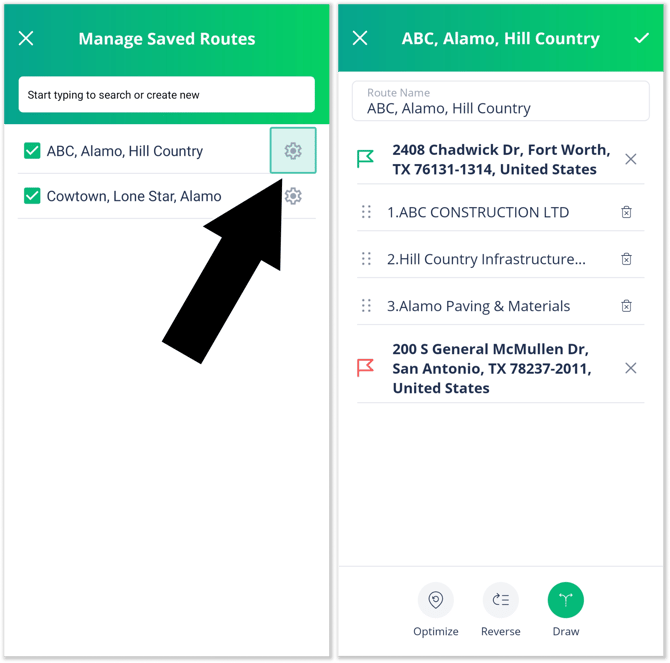
Add a new Account to a Daily Route
While navigating a daily route, it is possible to create a new customer Account and immediately add them to the route. To do this, follow the steps below.
- While navigating a daily route (left), tap the Add Account button
 . This will open the Create Account screen (right).
Fill out all the information for the new Account, including a name, category, deal and contact information, and address. If you want to include the new Account in your daily route, make sure the Add to today’s route checkbox is checked. Once you are finished, tap Save.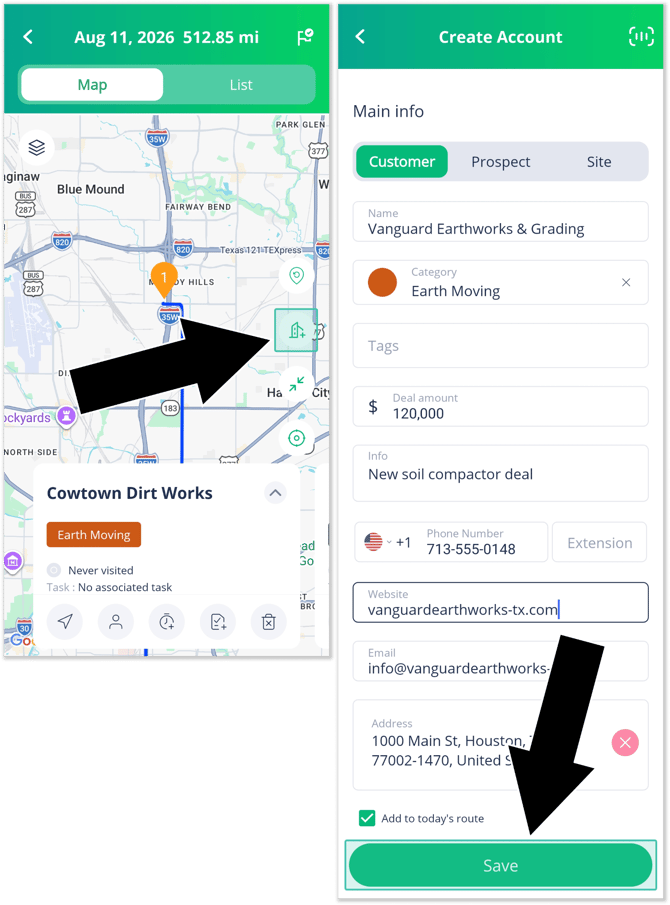
- You will be returned to your daily route. If Add to today’s route was checked, your new Account will be added as a stop. We recommend tapping Optimize to optimize your route around the new addition.