Quick-Create a Customer in Texada Web
How to create and edit Customers, Customer Sites, and Customer Contacts while creating or editing a Contract in Texada Web.
Quick Reference
- A Customer is a company or individual – often a construction company – who rents or purchases equipment from a rental company. While creating or editing a Contract in Texada Web, it is possible to quickly create a Customer, Customer Sites, and/or Customer Contacts directly from the Create / Edit Contract screen.
- To quick-create a Customer in Texada Web:
- Click the blue plus button
 in the top-right corner of the Customer panel on the Create / Edit Contract screen.
 - Fill out the details of the new Customer record, including at minimum a name, phone number, email address, and street address.
- Click “Confirm” to save your changes.
- Click the blue plus button
- To quick-create a Customer Site in Texada Web:
- While quick-creating a Customer, click the “Add Site” button in the bottom-left corner of the window. You can also add a new Site to an existing Customer record by clicking the “Add New” button under “Site” on the Create / Edit Contract screen.
- Fill out the details of the new Site, including at minimum a name, street address, and phone number.
- Click “Save” to save your changes. Note that if you are creating a new Customer record, you will still need to click “Confirm” on the Quick-Create Customer window in order for your changes to be saved.
- To quick-create a Customer Contact in Texada Web:
- While quick-creating a Customer, click the “Add Contact” button in the bottom-left corner of the window.
- Fill out the details of the new Contact, including at minimum a first and last name, email address, phone number, and street address.
- Click “Save” to save your changes. Note that if you are creating a new Customer record, you will still need to click “Confirm” on the Quick-Create Customer window in order for your changes to be saved.
Introduction
A Customer is a company or individual – often a construction company – who rents or purchases equipment from a rental company. While creating or editing a Contract in Texada Web, it is possible to quickly create a Customer, Customer Sites, and/or Customer Contacts directly from the Create / Edit Contract screen. This feature allows you to create Customer records without leaving the Contracts module.
The following article will describe the process of quick-creating Customers, Customer Sites, and Customer Contacts in Texada Web.
Quick-Create a Customer
To quick-create a Customer in Texada Web, click the blue plus button ![]() in the top-right corner of the Customer panel on the Create / Edit Contract screen:
in the top-right corner of the Customer panel on the Create / Edit Contract screen:
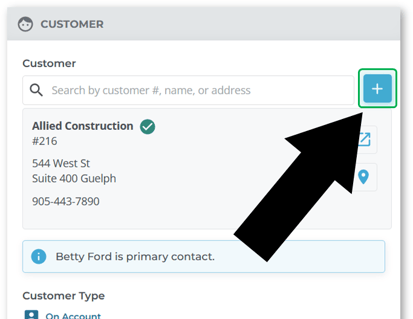
This will open the Quick-Create Customer window, allowing you to fill out the details of the new Customer. Once you are finished, click “Confirm” to save the new Customer record and apply it to the Contract.
A detailed breakdown of the fields present in this window can be found below. Required fields are marked with a red asterisk ![]() .
.
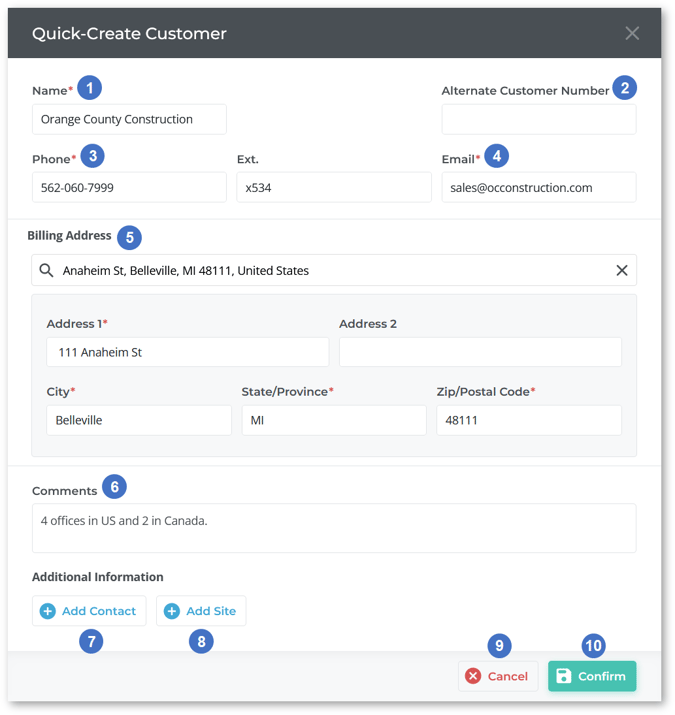
- Customer Name
The name of the new Customer. - Alternate Customer Number
An alternative Customer number that can be used to identify the Customer. This is useful for cross-referencing another CRM system with Texada. - Phone / Extension
The Customer’s primary phone number and extension. - Email
The Customer’s primary email address. This is used for a number of automatic communications sent from the Texada system. - Billing Address
The Customer’s billing (primary) address. Begin typing into the search bar to search the list of valid addresses, then select an address to automatically fill the fields below the search bar. These fields can also be manually entered. - Comments
Any miscellaneous comments or notes on the Customer can be left here. - Add Contact Button
Click to add a new Contact to the Customer record. See “Create or Edit a Customer Contact” for more information. - Add Site Button
Click to add a new Site to the Customer record. See “Create or Edit a Customer Site” for more information. - Cancel Button
Click to cancel Customer creation without saving your changes. - Confirm Button
Click to save the new Customer record and assign them to the Contract. If you have created new Site and/or Contact records for the Customer, these records will also be saved at this time.
Create or Edit a Customer Site
Click the “Add Site” button ![]() in the bottom-left corner of the Quick-Create Customer window to add a Site to the new Customer record. You can also add a new Site to an existing Customer record by clicking the “Add New” button under “Site” on the Create / Edit Contract screen:
in the bottom-left corner of the Quick-Create Customer window to add a Site to the new Customer record. You can also add a new Site to an existing Customer record by clicking the “Add New” button under “Site” on the Create / Edit Contract screen:
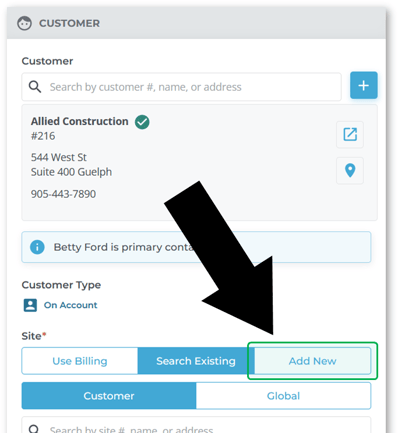
If you are creating a Site for a new Customer record, the Site’s information will NOT be saved until the parent Customer is saved! Make sure to click “Confirm” on the Quick-Create Customer window after creating your new Site to ensure that Site information is saved.
Required fields are marked with a red asterisk ![]() .
.
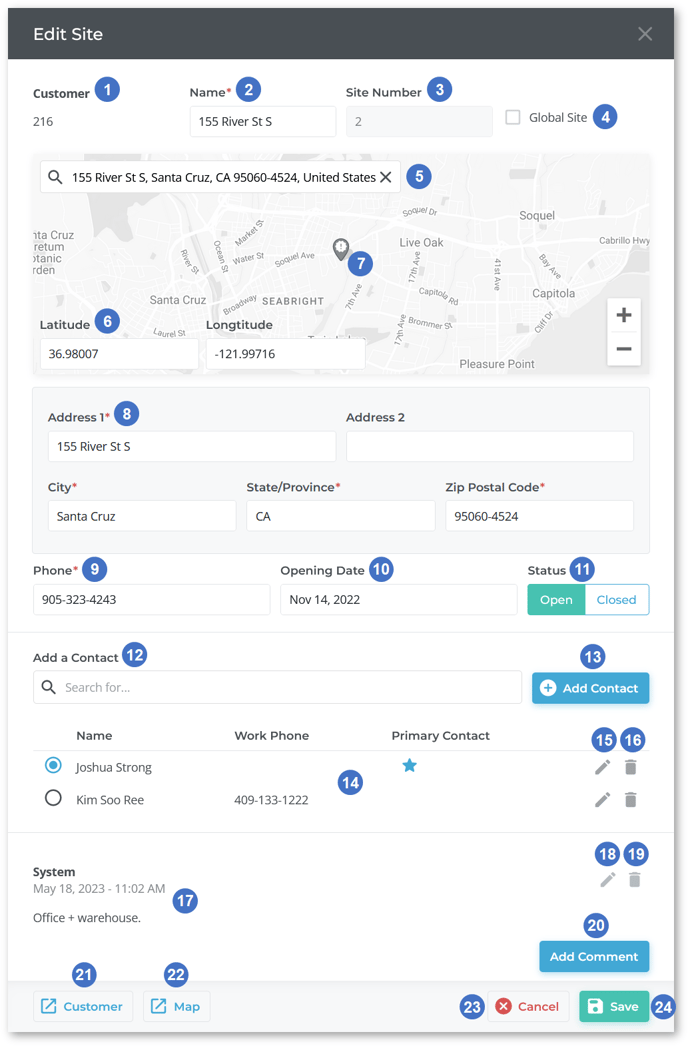
- Customer Number
The number of the Customer to which the Site belongs. This value is for reference only and cannot be changed. - Site Name
The Site’s name. - Site Number
The Site’s number. This value is automatically assigned and cannot be changed. - Global Site Checkbox
Enable this checkbox to mark the Site as a global Site. Global Sites are shared among all Customers and can be selected for any Contract. - Site Address Search
Begin typing into the search bar to search the list of valid addresses, then select an address to view it on the map and automatically fill the fields below the map. - Latitude / Longitude
The Site’s latitude and longitude, based on the location of its pin on the map. - Site Pin
The location of the Site. Click and drag a Site’s pin to update its latitude and longitude. Click and drag the map to pan it, and use ctrl+mouse wheel to zoom in and out. - Site Address
The Site’s address. These fields are automatically populated when an address is selected from the search bar. They can also be manually entered. - Phone
The Site’s phone number. - Opening Date
The Site’s opening date. - Status
Indicates whether the Site is currently open (in use) or closed. - Contact Search Bar
Begin typing into the search bar to search the Customer’s list of Contacts, then select a Contact to assign them to this Site. A single Contact can be assigned to multiple SItes. - Add Contact Button
Click to add a new Contact record to the Customer and assign them to this Site. See “Create or Edit a Customer Contact” for more information. - Site Contacts
The Contacts that have been assigned to this Site. Click the radio button to the left of a Contact to mark them as the primary contact for the Site. - Edit Contact
Click the pencil icon next to a Contact to edit them. See “Create or Edit a Customer Contact” for more information.
 - Remove Contact
Click the bin icon next to a Contact to remove them from the Site. This will not delete their Contact record.
 - Comments
Any comments that have been left on the Site record. - Edit Comment
Click the pencil icon next to a comment to edit it.
 - Remove Comment
Click the bin icon next to a comment to delete it.
 - Add Comment Button
Click to add a new comment to the Site’s record. - View Customer Button
Click to open the Site’s parent Customer in a new browser tab. See “View and Edit a Customer in Texada Web” for more information. - View Site on Map
Click to open the Site’s address on a map in a new browser tab. - Cancel Button
Click to cancel Site creation / editing without saving your changes. - Save Button
Click to save your changes to the Site and add it to the Customer record. Note that if you are creating a new Customer record, you will still need to click “Confirm” on the Quick-Create Customer window in order for your changes to be saved.
Create or Edit a Customer Contact
Click the “Add Contact” button ![]() in the bottom-left corner of the Quick-Create Customer window to add a Contact to the new Customer record.
in the bottom-left corner of the Quick-Create Customer window to add a Contact to the new Customer record.
If you are creating a Contact for a new Customer record, the Contact’s information will NOT be saved until the parent Customer is saved! Make sure to click “Confirm” on the Quick-Create Customer window after creating your new Contact to ensure that Contact information is saved.
Required fields are marked with a red asterisk ![]() .
.
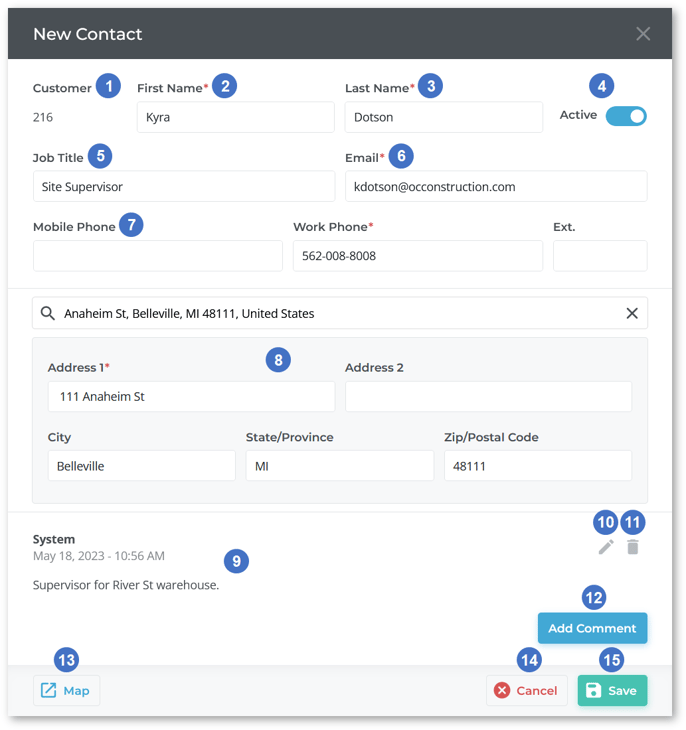
- Customer Number
The number of the Customer to which the Contact belongs. This value is for reference only and cannot be changed. - First Name
The Contact’s first name. - Last Name
The Contact’s last name. - Active Toggle
Indicates whether the Contact record is active or inactive. - Job Title
The Contact’s title. - Email Address
The Contact’s primary email address. This is used for a number of automatic communications sent from the Texada system. - Mobile Phone / Work Phone / Extension
The Contact’s mobile phone number, work phone number, and work phone extension. - Contact Address
The Contact’s personal address. Begin typing into the search bar to search the list of valid addresses, then select an address to automatically fill the fields below the search bar. These fields can also be manually entered. - Comments
Any comments that have been left on the Contact record. - Edit Comment
Click the pencil icon next to a comment to edit it.
 - Remove Comment
Click the bin icon next to a comment to delete it.
 - Add Comment Button
Click to add a new comment to the Contact record. - View on Map
Click to open the Contact’s personal address on a map in a new browser tab. - Cancel Button
Click to cancel Contact creation / editing without saving your changes. - Save Button
Click to save your changes to the Contact and add them to the Customer record. Note that if you are creating a new Customer record, you will still need to click “Confirm” on the Quick-Create Customer window in order for your changes to be saved.
.png?width=365&height=50&name=Texada%20Logo%20(Black).png)