
Tabs
Each quote has a workflow for Product Configuration, Payment Terms, Quote Editor, and Agreement Editor, each with its own options that allow a sales rep to develop the Quote and Sales Agreement for printing and submission to the customer.

Clicking on the Quote link ![]() opens a Microsoft Word version of the quote containing all of the components that have been entered or selected to that point. Click on the two buttons to the right of the Agreement button and iQuote opens either a letter
opens a Microsoft Word version of the quote containing all of the components that have been entered or selected to that point. Click on the two buttons to the right of the Agreement button and iQuote opens either a letter ![]() or legal-size
or legal-size ![]() PDF of the agreement.
PDF of the agreement.
The Configuration tab is where Pricing, GP%, equipment consist, attachments, extra details specific to this quote or standard on every quote, claim programs, warranty options, trade-ins, or CSA are modified for the purposes of developing the price that will appear on the quote. Prior to changing the configuration, you must change the status of the configuration to In Progress.
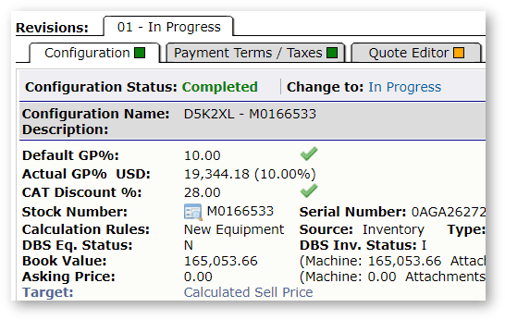
Once the configuration has been changed to In Progress, a Pencil icon ![]() will appear in every section of the page. Click on it to modify one of the sections.
will appear in every section of the page. Click on it to modify one of the sections.
Change the Equipment Source
If you need to change the equipment that is being quoted but the customer information can stay the same, click the Pencil icon ![]() beside the source field to choose a different piece of equipment from other sources.
beside the source field to choose a different piece of equipment from other sources.
Change the Overall Pricing, GP $ and %
Click on the Pencil icon ![]() in the top right corner of the Package section. The General Information page will display.
in the top right corner of the Package section. The General Information page will display.
- Configuration Name: Created by the Quote Administrator when the package is created. You can modify it or the Description of the package, but neither will appear on the quote.
- Shipping To: A list where the choice is made as to which branch this piece of equipment will be shipped to for the purposes of determining if there will be freight charges added to the price.
- Target: A section where the choice will be made as to how the price that will be quoted to the customer is calculated.
- Calculated Sell Price (the default): Allows the bottom line price and any additions or discounts applied in the remaining sections of the configuration to be calculated based on the model system default GP% (set by the package administrator), or if the model doesn’t exist it will be based on the model default GP% (also set by the iQuote administrator) and any additions or discounts applied in the remaining sections of the configuration.
- GP%: Will override the model default and recalculate the price based on the selection. Subsequent changes to the configuration in the lower sections will all be priced at this GP%.
- Sell Price: Will not allow the bottom line price of the quote to change regardless of additions or discounts applied in the remaining sections of the configuration. For example, if the target sell price of the deal is set at $110,000, the Actual GP% changes to 19.2%. Any changes to the configuration to add or remove cost will leave the sell price at $110,000 but will move the GP% on the deal higher or lower as each change is made.
Package Currency, FX Rate, and Credit Claim FX Rate
These items apply to Canadian dealers only.
Price List Increase Adjustment %
This option is usually applied to a quote being delivered to a customer in the month preceding a change in CAT List price for machines that will not deliver until after the price list change has taken effect. If you wish to change this, click in the box next to System Defined and type a number, such as 1.0. This will adjust the price by that percentage.
Cat Discount %
This number is set by the iQuote administrator and can be changed in the Model Config.
System Current or Non-Current
This legend indicates on a line-by-line basis whether the feature or price is current as of the morning of the date the quote is prepared. This will also be the case when opening a quote that was created some months prior to the current date.
Any change to override pricing on a feature or price is changed to show that item is User Defined, meaning it was overwritten by the person developing the quote. If any pricing is marked as Unconfirmed, it means a change was made on the CAT price list last night but the iQuote administrator has not approved its introduction to the package. Before using this price, always check with your Sales Coordinator.
Capability to Override Zero from CAT Price List
If the quote is from a Price List and the List value is $0, the user has the option to update this value by clicking the Pencil icon ![]() next to the CAT Consist.
next to the CAT Consist.
This will only work this way if the CAT Price list is $0. All other amounts coming from the Price List won’t be available for changing.
Change the Consist Details
Click on the Pencil icon ![]() at the far right of the Consist line to display the other consist options available on the CAT price list. If you make a selection by clicking in the check box to the right of the package you will be asked if you wish to use the Target GP% or one that you set.
at the far right of the Consist line to display the other consist options available on the CAT price list. If you make a selection by clicking in the check box to the right of the package you will be asked if you wish to use the Target GP% or one that you set.
When completed, click [Add] and then click [Remove]. The choice will replace the consist package in the quote configuration.
This is not usually necessary as the package is always prepared by the iQuote Administrator and should only be used when developing a Custom Quote for a package not pre-built prior to your quote.
Change the Cat Components (Attachments)
Click on the Pencil icon ![]() at the far right of the Cat Components line to display the components that are included in the package.
at the far right of the Cat Components line to display the components that are included in the package.
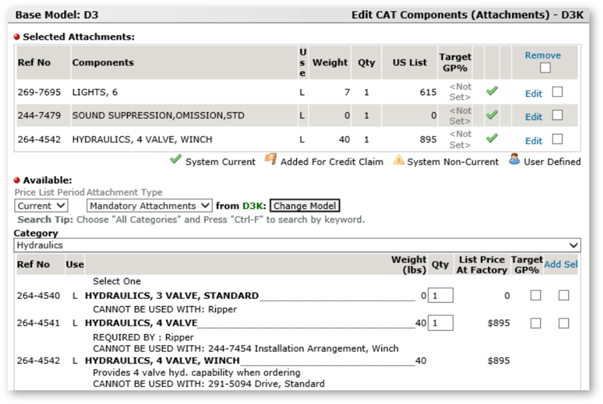
The list of attachments is sorted by Reference # and shows the description of the item, whether it is a Line Installed or Pin-on item, the weight, quantity, list price, target GP%, and a column to edit the details or remove the item from the package.
Removing an Item marked with an L or Line Item may be modifying the package in a way that cannot be ordered using MA pricing, so always consult with a Sales Coordinator before making this choice.
To remove an item from the package:
- Click in the check box at the right side of the Item line.
- Click [Remove] at the top of the window.
To add an item to the list:
- Scroll all the way down to the bottom of the window to the drop-down list. The default attachment type is mandatory.
- From the drop-down list on the right of the Attachment Type box, select Optional Attachments. The window will refresh and reappear.
- From the drop-down list at the far right of the Category line, select the category of the attachment that you’re looking for.
- Select a quantity, target GP% (if you wish to change it), and then click in the check box on the right side.
- Click [Add Sel] at the top of the window.
Please review the requirements underneath the attachment to see if some other component such as a lines group or couplers is required as well.
Add an Inventory Attachment
In the Configuration Details area there is a section for DBS Inventory Attachments, which allows users to add in stock attachments to any quote from Inventory, Price List, and DBS Configuration.
Click on the Pencil icon ![]() at the far right of DBS Inventory Attachments. Here you can add attachments from inventory or add them manually.
at the far right of DBS Inventory Attachments. Here you can add attachments from inventory or add them manually.
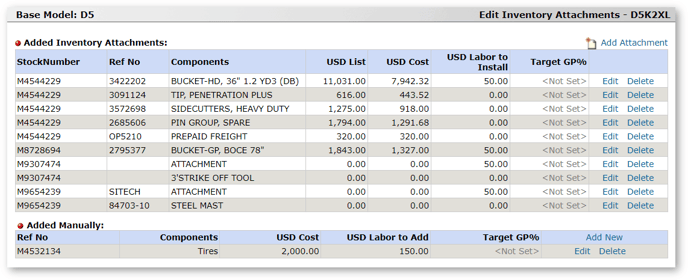
Click [Add Attachment]. iQuote will search the DBS inventory for attachments for the model of equipment that you are quoting.
If the item you wish to add to the quote is displayed, select it by clicking the check box to the left of the cost. Click [Add Sel].
Manually Add Consists as per DBS Components
Click on the Pencil icon ![]() at the far right of CAT Components (Attachments).
at the far right of CAT Components (Attachments).
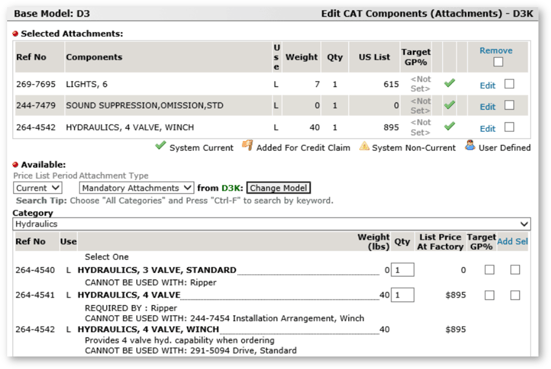
Selected Attachments are already a part of the configuration on the quote. You can edit each attachment to change the quantity, target GP%, or add notes.
In the Available section, you can add items from a list of mandatory or optional attachments for the model being quoted from the current or previous price lists. If there is an attachment from another model you want to add, [Change Model] to search.
Pay close attention to the CANNOT BE USED WITH section of the attachment. iQuote does not prevent an attachment from being added.
Adding Other Components
There may be quotes where you want to add an item that is not on the CAT price list, such as a locally-manufactured specialty item. To add that item, click on the Pencil icon ![]() at the far right of the Other Component line.
at the far right of the Other Component line.
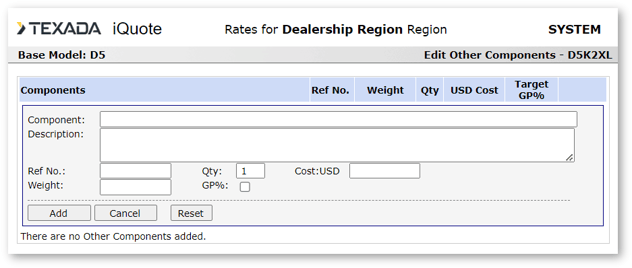
Enter all information into the fields, then click the [Add] button. Enter as many components as needed.
Extras
Extras are typically items entered by the iQuote Administrator that attach a cost to the deal, and are a preset for every package quoted on that model, i.e. PDI cost, manuals, etc.
To add or remove items to the list, click on the Pencil icon ![]() at the top right corner of the Extras list.
at the top right corner of the Extras list.
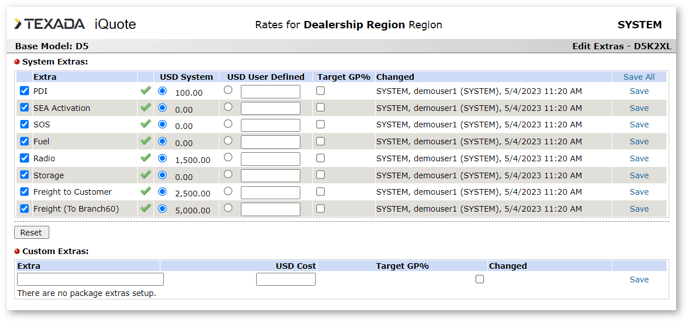
To remove an item, uncheck the box to the left of the item and then click the [Update] button.
To add an item, click in the area below the Extra heading and type the description of the extra, then choose the currency it will be quoted in from the drop-down list under the Cost heading. Type in a dollar amount without dollar signs or commas. Set a Target GP% if necessary, then click [Save].
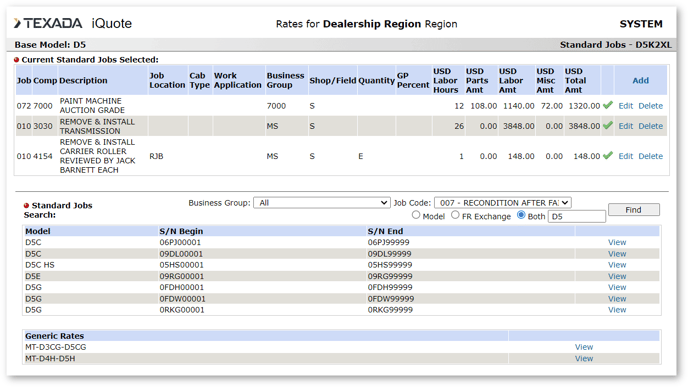
Standard Jobs
Some dealers use DBS Standard Jobs for processes like PDI or to ensure standardized quoting for the same process regardless of the branch providing the service.
To add or remove items on the list, click on the Pencil icon ![]() at the top right of the Standard Jobs list.
at the top right of the Standard Jobs list.
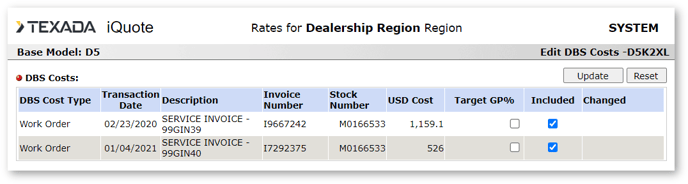
DBS Costs
When quoting new inventory equipment, iQuote can provide visibility to Transaction Register costs against this equipment. It can be configured to pull costs of certain transaction codes into quotes.
To add or remove items on the list, click on the Pencil icon ![]() at the top right of the DBS Costs list.
at the top right of the DBS Costs list.
Add a Post-Sale Credit Claim
Post-Sale credit claims are used to take advantage of model-specific or application-specific program funding from Caterpillar programs. There is a table in iQuote that has all of the CAT claim programs listed and the rules for the application of that program for each model.
To add a Post-Sale Credit Claim, click on the Pencil icon ![]() to the right of the Post-Sale Credit Claim line.
to the right of the Post-Sale Credit Claim line.
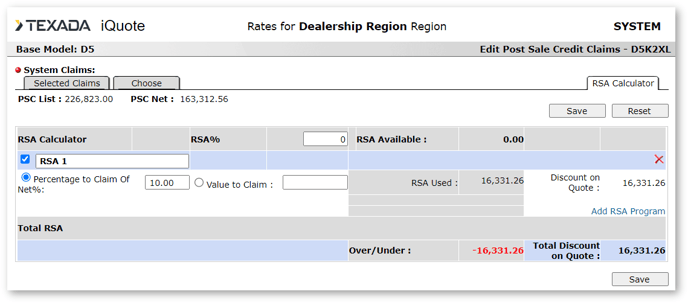
To apply the program to the deal, click on the button on the right side of the program that you want to use.
For each item that you wish to add, select it by clicking on the arrow at the right and then enter either the % of list, % of net, or $ amount that you wish to apply from the AIM dollars available to the deal. If you do not enter a Target GP% on the line, the item will be marked up by the deal GP%. When all entries are completed, click the [Update] button.
Please refer to the finance program administrator at your dealership as the application of the inflow and outflow $ to the deal in iQuote may be configured differently for your dealership.
Add or Change a Warranty
The iQuote Administrator will have attached the default new machine warranty to the package, but there is also a warranty table attached to iQuote that allows for optional warranties to be quoted to the customer.
All the warranties for all models are shown from the quote base model. When selected, the description of the warranty is formatted as model - months/hours + coverage type.
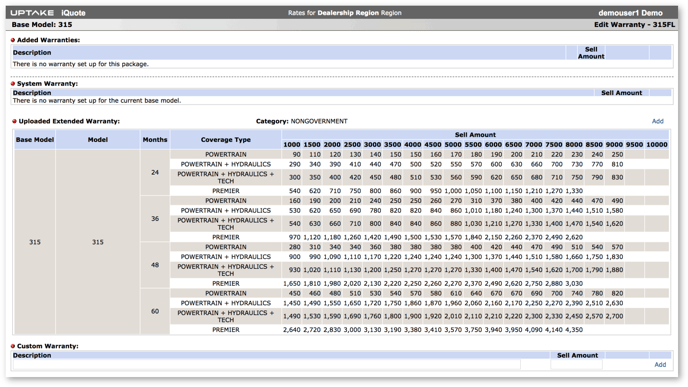
System Warranty
The list of warranties was added manually in the Model Administration application. If you want to add a System Warranty, select the warranty from this list and click [Add].
Uploaded Extended Warranty
The list of warranties was imported from a CAT Excel file on the Model Administration application. To add an Extended Warranty from CAT, select the warranty amount from the Extended Warranty list and [Add].
Custom Warranty
In order to win new business or enhance PINS, a dealer may choose to offer a custom warranty funded by the dealership instead of Caterpillar. This section allows the user to input a warranty for the quote. To add a Custom Warranty, enter the description of the warranty, the Cost Amount, and then click [Add].
Add a CSA
To add a CSA, click on the Pencil icon ![]() to the right of the CSA line.
to the right of the CSA line.
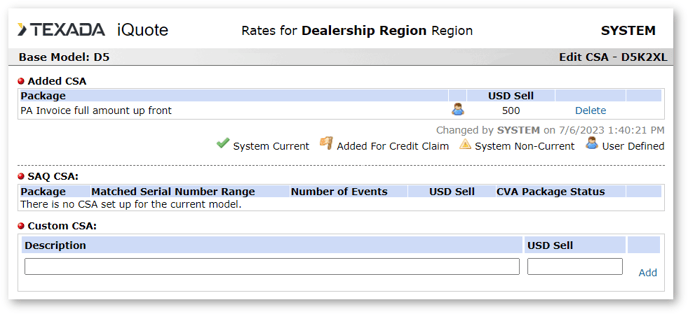
Enter a description, select a sell type from the drop-down list, then enter a dollar amount without dollar signs or commas in the box to the right. Click the [Add] button.
For Dealers using the Service Agreement Quoter application, the CVA packages and total amounts can be pulled as configured in SAQ. This is via configuration key
Introduce a Trade-in to the Quote
Trade-in are added to quotes to account for how the trade-in will affect the GP% on the deal, or in situations where the dealer chooses to pay more for a machine in trade than it is worth (over-allowance) to win a deal. To add a trade-in to the quote, click on the Pencil icon ![]() to the right of the Trade-ins line.
to the right of the Trade-ins line.
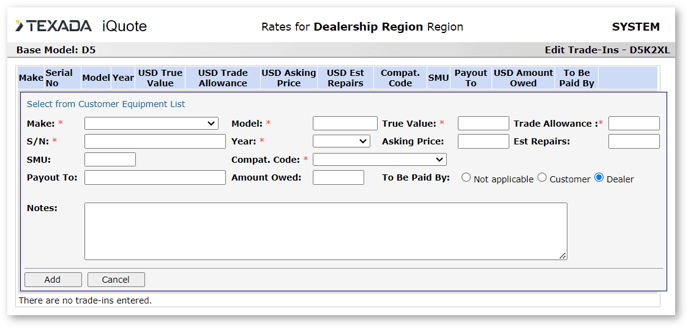
Enter all required information into the form fields. Once entered, the information will populate the quote and the Sales Agreement fields. Click the [Add] button.
Options & Bundles
Options & Bundles are a set of configurations that you can add but won’t affect the quote configuration.
Difference between Options and Bundles:
- Options: Can be added/removed from the quote individually. Only one list of Options will be available on the quote.
- Bundle: A group of options. You cannot add only one item from the bundle to the quote and you cannot delete only one item from a bundle after it’s been added to the quote.
Add an Option
Select the checkbox next to the option and click [Add to Quote]. The item(s) will be added to the configuration section of the quote.
Each option item can only be used once on the quote configuration.
Remove an Option
To remove an option from the quote, click the [Edit] button and then delete/change the option.
Remove an Option from the Option List
To remove an option from the option list, click the [Edit] button and then remove/change it. If the option is being used on the quote, it won’t be available to remove/change.
Add a bundle on the Quote Configuration
A bundle can only be added once on the quote, but you can create multiple bundles. Click [Add to Quote] to add the bundle to the quote.
The bundle(s) will be added to the configuration section of the quote and the bundle icon ![]() will appear before the bundle description to indicate that it is an item from a bundle. The number in brackets indicates the bundle number that was added.
will appear before the bundle description to indicate that it is an item from a bundle. The number in brackets indicates the bundle number that was added.
Each bundle item can only be used once on the quote configuration.
Remove/Change an Option from a Bundle List
To remove/change an option from a bundle, click [Edit] and then remove/change it. If the bundle is being used on the quote configuration you can only change the Description and the GP%.
Remove a Bundle from the Quote Configuration
To remove a bundle from the quote, click [Remove from Quote]. You can also click the [Edit] button, select [Remove Bundle from Quote Configuration], then click [Update].
A bundle item on the quote configuration won’t be available for removing/changing.