
In This Article
- Introduction
- Add an Activity
- Create an Opportunity from an Activity
- Overdue Activities
- Not Contacted
- Customer Suggestions
- Activity History
- Activities by Purpose
- Last Customer Activities
- Customer Coverage
Introduction
Activities are an indicator of how sales reps are engaging with customers and of how much time they’re spending with them.
Daily activities are automatically displayed on the Home page after logging in, and can also be accessed by clicking the Calendar link under ON THE GO in the top navigation bar. For more information see the Home section.
Add an Activity
To add a new activity:
- From the Home page, click the [Add New] button at the bottom right corner of the day you want to schedule the activity in the calendar. From the top navigation bar, click the [Add New Activity] button under the Plus icon.
- Enter all required information into the Add New Activity form.
- Click the [Save Activity] button at the top right or bottom right of the page.
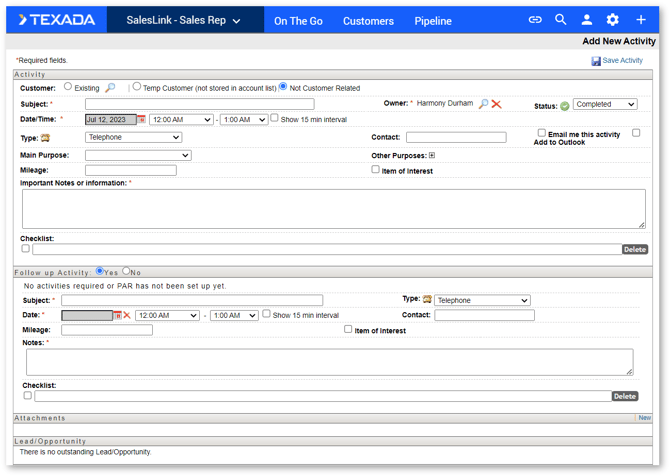
Once saved, the activity will appear in its Owner’s calendar.
Status
|
|
Outstanding |
The activity has been scheduled but has not occurred yet. |
|
|
Completed |
The activity has been completed, and a follow-up activity can now be scheduled. |
|
|
Cancelled |
A planned activity has been cancelled for any reason. |
|
|
Overdue |
Visible on calendar and reports only. If an activity has a scheduled date before the current date, the status will automatically change. |
Whether an activity is considered Outstanding or Completed is determined by its Date/Time values. Activities whose Date/Time is in the future are considered Outstanding, while activities whose Date/Time is in the past are considered Completed.
Type
|
|
|
Suggest: attaching the email in the activity in the attachment section. |
|
|
Fax |
Suggest: indicating fax information in notes (i.e. subject, date, time, etc.) |
|
|
Letter |
If a soft copy is available, suggest attaching it in the attachment section. |
|
|
Meeting |
Keep notes of what was discussed in the notes section and create a follow-up activity with any outstanding items. |
|
|
Message |
If the message was left with someone other than the contact’s voicemail, suggest indicating who the message was left with. |
|
|
Special Event |
Examples would be a trade show or open house. |
|
|
Telephone |
Detail the information from the conversation. |
Follow-up Activity
This option will only appear if the Status of the opportunity is set to Completed. If Follow-up Activity is checked Yes, the same fields as entering a new activity will appear. It will also suggest when to make the next activity based on the customer’s PAR. If the activity is not customer related or if it’s for a new customer, it will assume the PAR is 0.
Create an Opportunity from an Activity
To create an Opportunity from an existing Activity, follow the steps below.
- Add an Activity and click “Save”.

- Click “Add Opportunity” to open the Add New Opportunity window.

- Enter the details of your Opportunity, including at minimum a Type, Source, and update Stage.

- If applicable, fill out the information under the Product section at the bottom of the screen for Caterpillar PSE matching.
Once you’re finished, click “Save” to create the Opportunity.
Overdue Activities
Overdue activities are activities entered into the system with an activity date prior to the current date. Click the Overdue Activities link to the left of the calendar on the Home page, or under the ON THE GO tab in the top navigation bar.
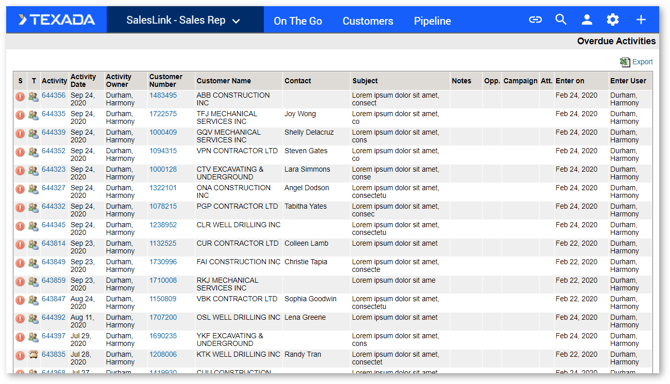
This page displays a list of all your currently overdue activities. Sort the table by clicking on a column header to sort the column in ascending or descending order.
Export the table into an Excel spreadsheet by clicking the [Export] button at the top right of the page.
Click on the Activity Number to view the activity’s details, the Customer Number to view the associated customer details, or the Opportunity Number to view the associated opportunity details (if available).
Not Contacted
Click the Customers Not Contacted link to the left of the calendar on the Home page, or click the Not Contacted link under ON THE GO in the top navigation bar. A list of all your customers that have not been contacted yet displays in a table.
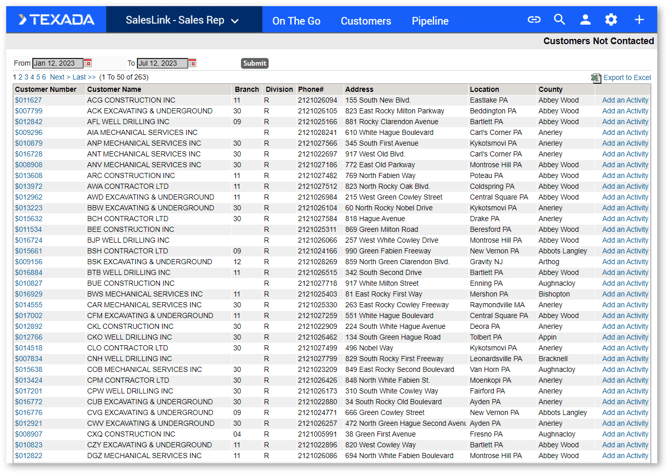
Click on the Customer Number to view details regarding that customer.
Click the [Add an Activity] button to add an activity for that customer. For more information see the Add an Activity section.
To filter the table:
- Select a date range to filter by.
- Click the [Submit] button. The table will display all customers not contacted within your selected date range.
Export the table into an Excel spreadsheet by clicking the [Export to Excel] button at the top right of the page.
Customer Suggestions
Click the Customer Suggestions link under ON THE GO in the top navigation bar. A list of all your current customer suggestions that have not been viewed is displayed.
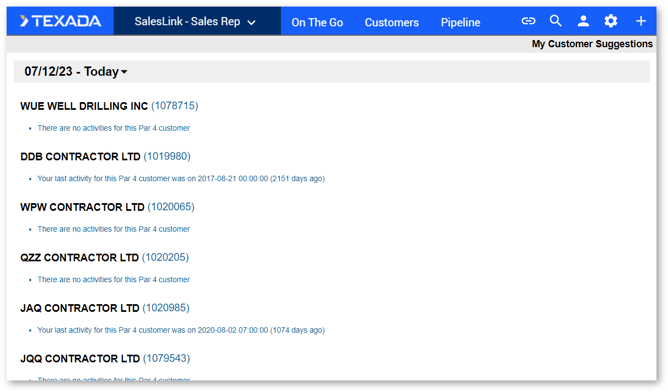
The list is organized by date and customer, with all outstanding suggestions for the current day displayed first. Click the arrow next to the current date to collapse the day’s suggestions and view previous days.
Click on a customer suggestion to view the suggestion details.
Click on a Customer Number to view details regarding that customer.
Activity History
Click the Activity History link under CUSTOMERS in the top navigation bar. A complete list of all activities you’ve logged displays.
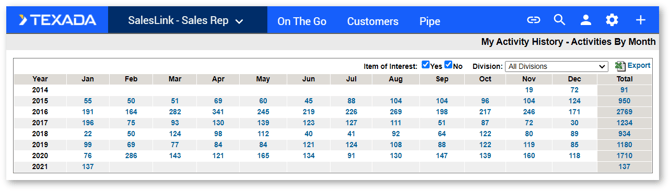
The table is organized by the year and month that the activities occurred. You can filter the table by Item of Interest and/or Division.
Click on one of the activity numbers to view details regarding all of your activities during that specific month or year.
Export the table into an Excel spreadsheet by clicking the [Export] button at the top right of the page.
Activities by Purpose
Click the Activities by Purpose link under CUSTOMERS in the top navigation bar. A list of all your activities displays organized by their purpose.
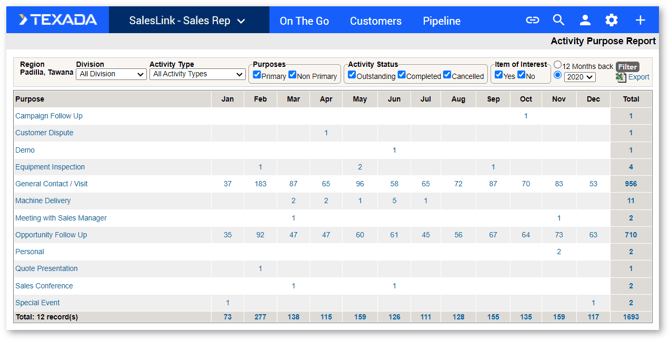
Click on a Purpose to view all activities with that associated purpose. You can also click on a number in a month column to view all activities with that associated purpose that occurred during that specific month.
To filter the table:
- Select which fields you want to filter by.
- Select how far back in time you want to filter.
- Click the [Filter] button.
Export the table into an Excel spreadsheet by clicking the [Export] button at the top right of the page.
Last Customer Activities
Click on the Last Customer Activities link under CUSTOMERS in the top navigation bar. A list of the last customer activities displays, organized alphabetically by customer.
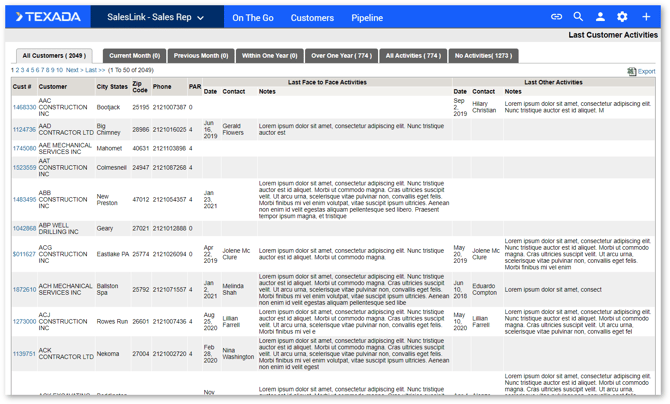
The table displays details regarding the last activities performed for each of your customers. Filter the table by selecting one of the tabs at the top.
Click on a Customer Number to view details regarding that customer.
Export the table into an Excel spreadsheet by clicking the [Export] button at the top right of the page.
Customer Coverage
Click on the Customer Coverage link under CUSTOMERS in the top navigation bar. The report that displays represents all your completed activities and whether that coverage is in line with the PAR of the Customer.
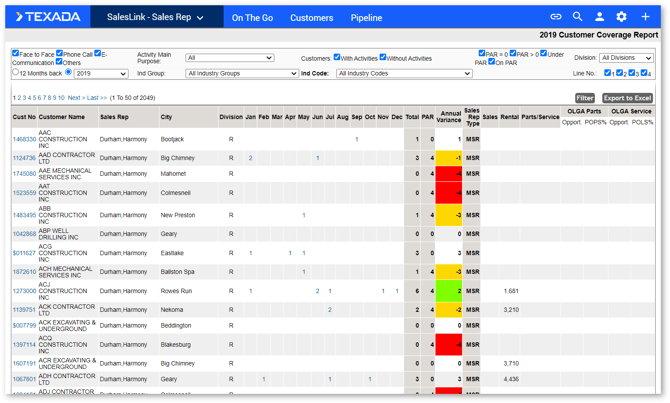
The table is displayed alphabetically by customer name. Click on a table header to sort that column in ascending or descending order.
Click on a Customer Number to view details regarding that customer.
Click on a number in a month column to view all activities completed for that customer during that month.
To filter the table:
- Select the fields you want to filter by.
- Select how far back in time you want to filter.
- Click the [Filter] button.
Export the table into an Excel spreadsheet by clicking the [Export] button at the top right of the table.