.png?width=365&height=50&name=Texada%20Logo%20(Black).png)
Add New Campaign
To add a new campaign:
- Click the Plus icon at the far right of the top navigation bar.
- Click the [Add New Campaign] button.
- Enter all required information into the Campaign Details form.
- Click [Save Campaign]. The campaign will be added to the Current Campaigns page.
Campaigns
Click the Campaigns link under PIPELINE in the top navigation bar. The Current Campaigns page displays.

This page displays a detailed table of your current sales campaigns. Use the drop-down menu at the top left of the page to switch between History Campaigns, Current Campaigns, and Future Campaigns.
Export the table into an Excel spreadsheet by clicking the [Export] button at the top right of the page.
Campaign Details
Click the [View] button next to a campaign to view its Campaign Details page.

You can edit any of the fields in the Campaign Details section. Use the Campaign Effectiveness links to the right to update the status of any accounts associated with the campaign.
Click the [New] button to add an attachment to the campaign.
Use the buttons in the Target Accounts section to Add Batch Activities, Add Batch Leads, Import Customers, Import Prospects, Search Existing Accounts, Remove All, or Export to Excel.
OLGA Alerts – By Region
Click the OLGA Alerts – By Region link under PIPELINE in the top navigation bar. The OLGA Alerts – By Region page displays.
This page displays a table of current, past, and future alerts that are automatically generated by OLGA, organized by Region. You can also use the tabs at the top of the page to organize the alerts by Customer, Family, Industry, or Commodity.
Click on an alert to view its details.
To filter the table:
- Select the fields to filter by at the top of the page.
- Select a date range for when the alert was received.
- Click the [Filter] button.
- Click the [Save as Default] button to save your filters as the default setting for the table.
Export the table into an Excel spreadsheet by clicking the [Export] button at the top right of the page.
OLGA Alerts/Leads – By Assigned PSSR
Click the OLGA Alerts/Leads – By Assigned PSSR link under PIPELINE in the top navigation bar. The OLGA Alerts/Leads – By PSSR page displays.

This page displays a detailed table of your current OLGA alerts and leads, organized by Assigned PSSR. You can also use the tabs at the top of the page to organize the alerts and leads by Component, Component Code, Received Month, and Target Month.
Click on an alert or lead to view its details.
To filter the table:
- Select the fields to filter by at the top of the page.
- Select a date range for when the alert or lead was received.
- Select a date range for the estimated target.
- Click the [Filter] button.
- Click the [Save as Default] button to save your filters as the default setting for the table.
Export the table into an Excel spreadsheet by clicking the [Export] button at the top left of the page.
OLGA Summary
Click the OLGA Summary link under PIPELINE in the top navigation bar. The OLGA Summary – PSSR page displays.

This page displays a detailed summary of your OLGA alerts, organized by PSSR and Company Average. Use the drop-down menus at the top of the page to filter the table. The table will automatically update as each filter is applied.
Export the table into an Excel spreadsheet by clicking the [Export] button at the top left of the page.
Expiring Warranties
Click the Expiring Warranties link under PIPELINE in the top navigation bar. The Expiring Warranties page displays.
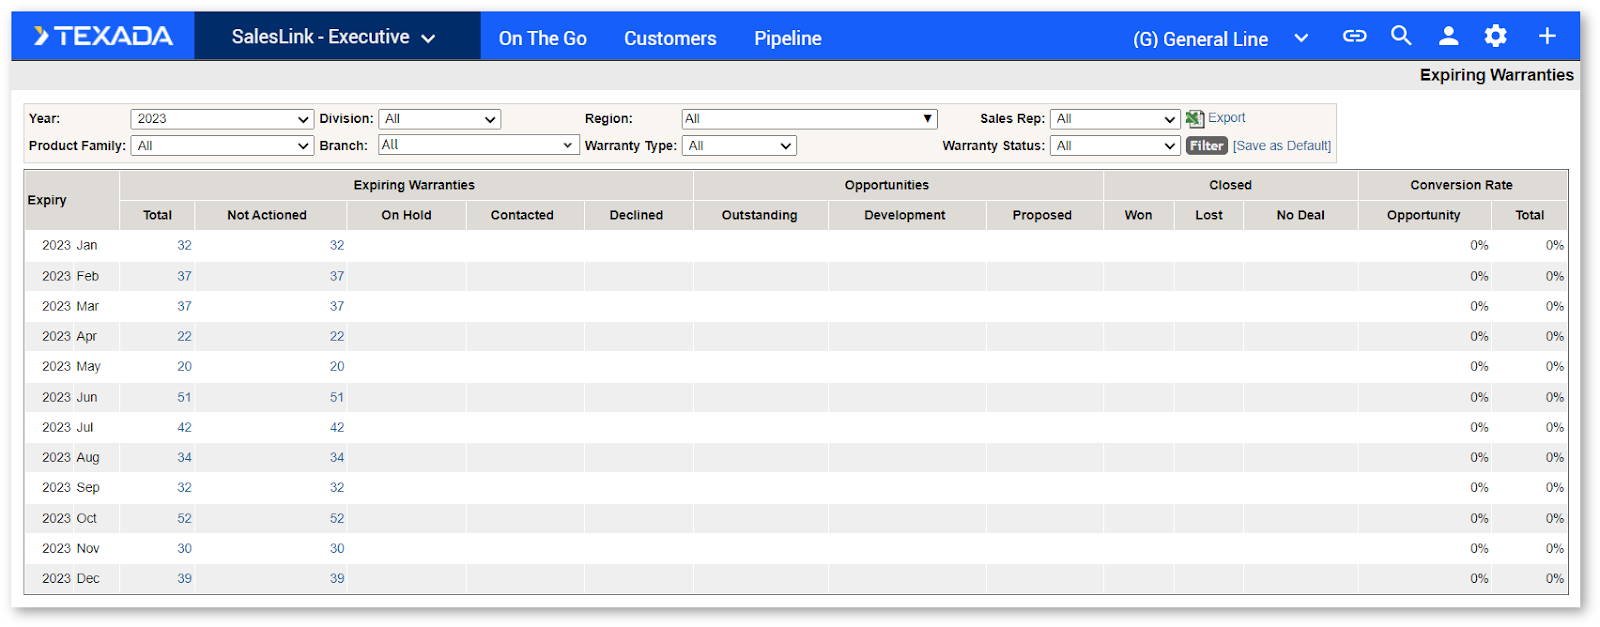
This page displays a detailed table of all expiring warranties in your accounts, organized by the month they’re set to expire.
To filter the table:
- Select the fields to filter by at the top of the page.
- Click the [Filter] button.
- Click the [Set as Default] button to set this filter configuration as the default whenever you visit this page.
Export the table into an Excel spreadsheet by clicking the [Export] button at the top right of the page.
Click on a number in the table to view details regarding those specific expiring warranties.

This page displays details regarding individual expiring warranties.
To filter the table:
- Select the fields to filter by at the top of the page.
- Click the [Filter] button.
- Click the [Set as Default] button to set this filter configuration as the default whenever you visit this page.
Export the table into an Excel spreadsheet by clicking the [Export] button at the top right of the page.
To change the status of an individual warranty:
On Hold
- Click the [On Hold] button.
- Add any comments.
- Click [Save].
Declined
- Click the [Declined] button.
- Select a Reason from the drop-down menu.
- Add any comments.
- Click [Save].
Activity
- Click the [Activity] button.
- Enter all required information into the Add New Activity form.
- Click [Save Activity].
Opportunity
- Click the [Opportunity] button.
- Enter all required information into the Add New Opportunity form.
- Click [Save Opportunity].