
Gatekeeper
Log in to CloudLink with your Username and Password, then click the [ENTER] button under Gatekeeper. You will be taken to the Gatekeeper Home page, which is the Latest New Requests page.
Navigation Bar
At the top of the screen is a navigation bar that can be accessed from anywhere in the application.
Requests
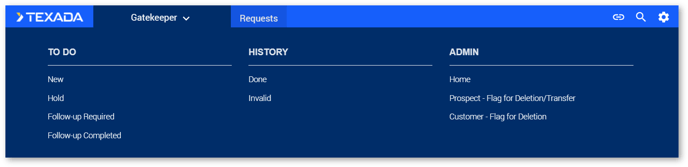
Hover over the REQUESTS tab to access request pages To Do, History, and Admin.
Search

Click on the Search icon and use the filters to find specific information within Gatekeeper.
Advanced Search
Click the Search icon in the top navigation bar and then click [Adv. Search]. The Advanced Search – New Query page displays.
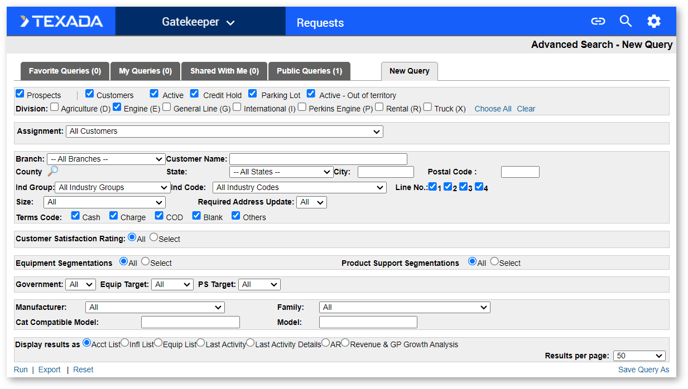
To run a new query:
- Select all parameters you want to search by in the New Query form.
- Select how you want to display your results.
- Click the [Run] button at the bottom left of the page. Your results will display in the manner you selected.
- Click the [Reset] button if you want to return all search parameters to their default settings.
Click the [Export] button to export your results into an Excel spreadsheet.
To save a query:
- Click the [Save Query As] button at the bottom right of the page.
- Enter a name for your query.
- If you want to share your query, click the [Change] button and select users to share with from the list.
- Click [Save].
Click the tabs at the top of the page to view Favorite Queries, My Queries, Shared With Me, and Public Queries. Click the [Run] button to run one of these queries, or [Export] to export the results of a query to an Excel spreadsheet.
Settings

Click on the Gear icon to view/edit your current Gatekeeper settings.
Home
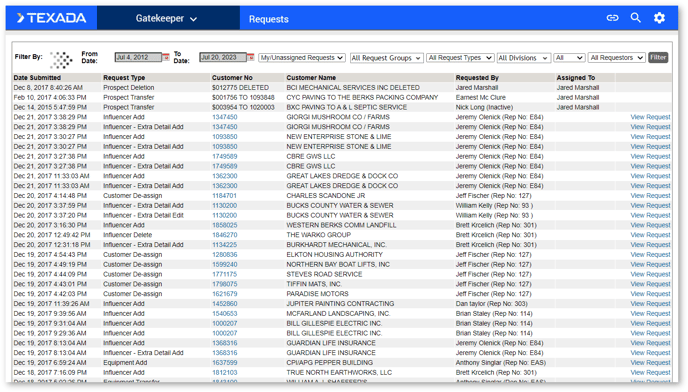
The Home page for Gatekeeper is the Latest New Requests page. You can also access this page by clicking the Home link under REQUESTS in the top navigation bar.
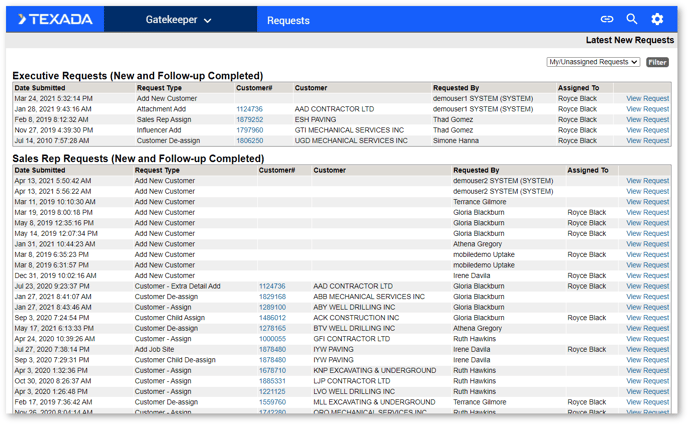
This page displays an overview of all new Executive Requests, Sales Rep Requests, Customer Search Requests, iMacs Requests, Prospect – Flagged for Deletion, and Prospect – Flagged for Transfer.
To filter the table:
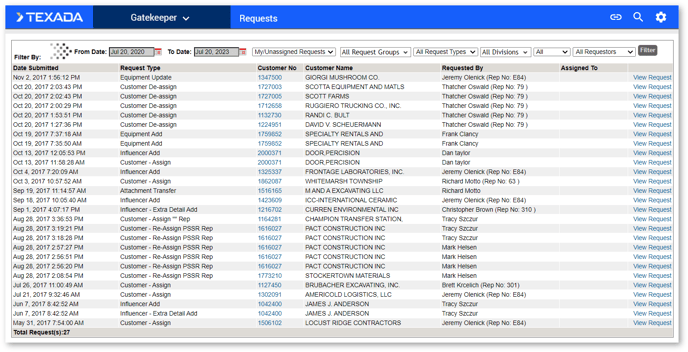
- Use the drop-down menu at the top of the page to select My/Unassigned Requests, My Requests, Unassigned Requests, or Requests Assigned To.
- Click the [Filter] button.
View Request:
- Click the [View Request] button next to the request you want to view. A smaller window will pop up displaying the Request Details.
- Make any changes necessary to the request.
- Click [Update] to update the request.
- You can also click the [De-Assign] button to remove yourself from assignment, or the [Close] button to close the request.
In the Prospect – Flagged for Deletion and Prospect – Flagged for Transfer sections you can take 3 actions:
- Click [Delete Req] to delete the request.
- Click [Delete Cust] to delete the customer.
- Click [Transfer] to transfer the prospect customer to a DBS customer.
Click on a Customer Number in the table to view details regarding that specific customer.
Admin
Prospect – Flag for Deletion / Transfer
Click the Prospect – Flag for Deletion / Transfer link under REQUESTS in the top navigation bar. The Prospect – Flag for Deletion / Transfer page displays.
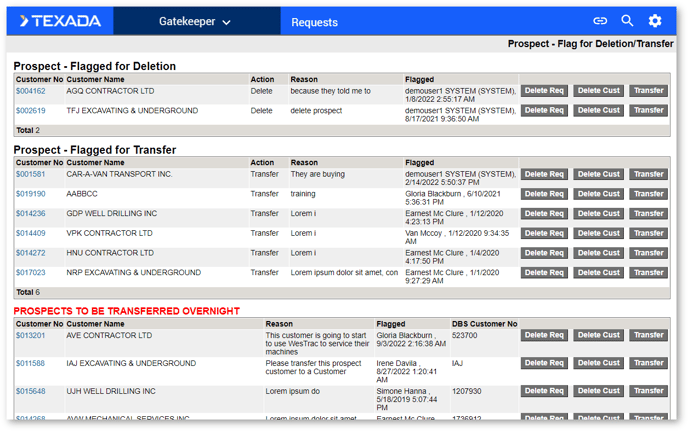
The table on this page displays all prospects that have been flagged for deletion or transfer. In each section you can take 3 actions:
- Click [Delete Req] to delete the request.
- Click [Delete Cust] to delete the customer.
- Click [Transfer] to transfer the prospect customer to a DBS customer.
Click on a Customer Number in the table to view details regarding that specific customer.
The Prospects to be Transferred Overnight section is a table of prospects that have been transferred to DBS customers, but are still waiting for the DBS night run to update.
Customer – Flag for Deletion
Click the Customer – Flag for Deletion link under REQUESTS in the top navigation bar. The Customer – Flag for Deletion page displays.
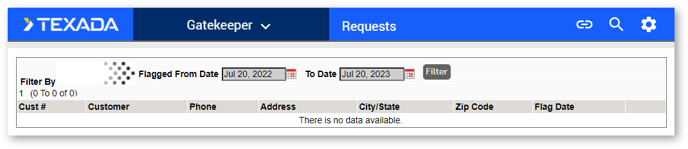
The table on this page displays customers that have been flagged for deletion. Click on a Customer Number in the table to view details regarding that specific customer.
To filter the table:
- Select a date range for when the customer was flagged using the calendar filters at the top of the page.
- Click [Filter].
View Request:
- Click the [View Request] button next to the request you want to view. A smaller window will pop up displaying the Request Details.
- Make any changes necessary to the request.
- Click [Update] to update the request.
- You can also click the [De-Assign] button to remove yourself from assignment, or the [Close] button to close the request.
To Do
Hold
Click the Hold link under REQUESTS in the top navigation bar. The Hold Executive Requests page displays.

This page displays a detailed table of information regarding requests that have been put on hold by an administrator. Click on a Customer Number in the table to view details regarding that specific customer.
To filter the table:
- Select a date range using the calendar filters at the top of the page.
- Select fields to filter by using the drop-down menus at the top of the page.
- Click [Filter].
View Request:
- Click the [View Request] button next to the request you want to view. A smaller window will pop up displaying the Request Details.
- Make any changes necessary to the request.
- Click [Update] to update the request.
- You can also click the [De-Assign] button to remove yourself from assignment, or the [Close] button to close the request.
Follow-up Required
Click the Follow-up Required link under REQUESTS in the top navigation bar. The Follow-up Required Executive Requests page displays.

The table on this page displays requests that require more information or a follow-up. Click on a Customer Number in the table to view details regarding that specific customer.
To filter the table:
- Select a date range using the calendar filters at the top of the page.
- Select fields to filter by using the drop-down menus at the top of the page.
- Click [Filter].
View Request:
- Click the [View Request] button next to the request you want to view. A smaller window will pop up displaying the Request Details.
- Make any changes necessary to the request.
- Click [Update] to update the request.
- You can also click the [De-Assign] button to remove yourself from assignment, or the [Close] button to close the request.
Follow-up Completed
Click the Follow-up Completed link under REQUESTS in the top navigation bar. The Follow-up Completed Executive Requests page displays.

The table on this page displays requests with completed follow-ups. Click on a Customer Number in the table to view details regarding that specific customer.
To filter the table:
- Select a date range using the calendar filters at the top of the page.
- Select fields to filter by using the drop-down menus at the top of the page.
- Click [Filter].
View Request:
- Click the [View Request] button next to the request you want to view. A smaller window will pop up displaying the Request Details.
- Make any changes necessary to the request.
- Click [Update] to update the request.
- You can also click the [De-Assign] button to remove yourself from assignment, or the [Close] button to close the request.
History
Done
Click the Done link under REQUESTS in the top navigation bar. The Done Executive Requests page displays.
The table on this page displays requests that have been processed and marked as complete. Click [View Request] to view a specific request’s Request Details.
To filter the table:
- Select a date range using the calendar filters at the top of the page.
- Select fields to filter by using the drop-down menus at the top of the page.
- Click [Filter].
Once a request has been marked complete, no further changes can be made to it.
Click on a Customer Number in the table to view details regarding that specific customer.
Invalid
Click the Invalid link under REQUESTS in the top navigation bar. The Invalid Sales Reps Requests page displays.
The table on this page displays requests that have been marked invalid and will not be completed.
To filter the table:
- Select a date range using the calendar filters at the top of the page.
- Select fields to filter by using the drop-down menus at the top of the page.
- Click [Filter].
View Request:
- Click the [View Request] button next to the request you want to view. A smaller window will pop up displaying the Request Details.
- Make any changes necessary to the request.
- Click [Update] to update the request.
- You can also click the [De-Assign] button to remove yourself from assignment, or the [Close] button to close the request.
Click on a Customer Number in the table to view details regarding that specific customer.
Done and Copy
Click the Done and Copy link under REQUESTS in the top navigation bar. The Executive Requests page displays.

This page displays a detailed table of information regarding requests that were marked as complete, but the customer information was copied into a new request. Click [View Request] to view a specific request’s Request Details.
To filter the table:
- Select a date range using the calendar filters at the top of the page.
- Select fields to filter by using the drop-down menus at the top of the page.
- Click [Filter].
Once a request has been marked complete, no further changes can be made to it.
Click on a Customer Number in the table to view details regarding that specific customer.