.png?width=365&height=50&name=Texada%20Logo%20(Black).png)
Heldups/Exceptions
To access the Heldups/Exceptions page, click the hamburger icon next to ServiceLink in the top navigation bar, then click Heldups/Exceptions under Management. You can also click the Heldups/Exceptions tab
on the Home page.

The Heldups/Exceptions page displays an overview of all current Hold Ups and Exceptions, organized by what stage their respective work order is in. A work order may be held up for a number of different reasons, ranging from outstanding parts documents to waiting on a customer to make a decision regarding the repair.
There are two types of Hold Ups:
- Manual: Placed on a work order by a user in order to show that the work order has been delayed for a specific reason, such as having to wait for a goodwill authorization code or a scheduled test of the machine to ensure the repair was completed correctly.
- System Generated: A function of the application, such as having an outstanding core return or an SMU reading that is less than the last known reading. In addition, some of the Hold Up reasons are hard stops and others are soft stops. A hard stop is one that will keep the work order from being closed, whereas a soft stop is a notification that a condition exists but will not hinder closing.
From the Heldups/Exceptions page, click on the number next to a hold up type to view the list of work orders with that specific hold up or exception.
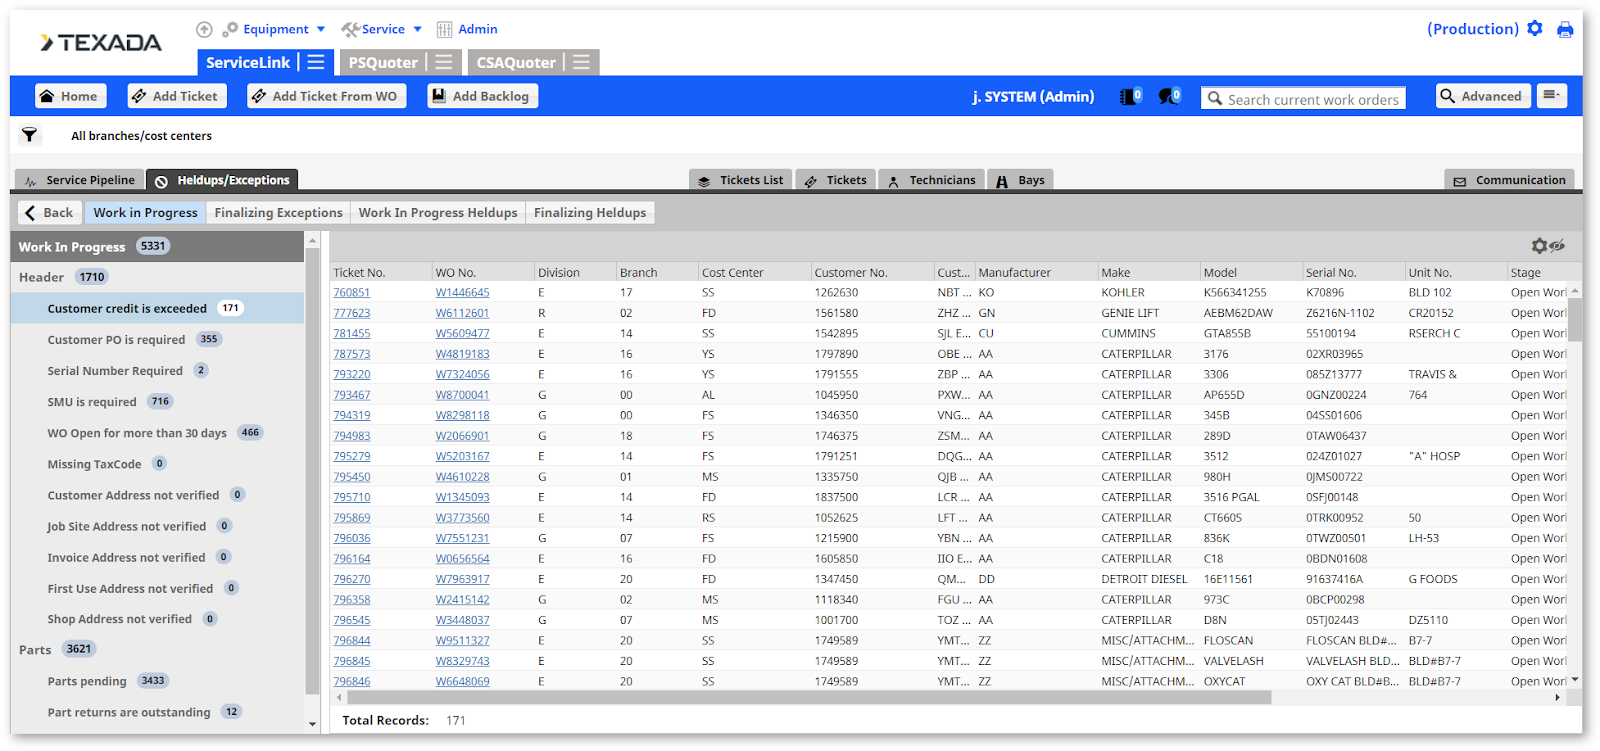
Select an option from the left navigation menu to view work orders for a different hold up type. Click on an individual work order to display its Held Ups tab.

This tab displays detailed information regarding all hold ups and exceptions for an individual work order, along with recommended actions. Filter the page using the header tabs.
Click the [Add] button at the top right of the page to manually add a new hold up. Enter all required information into the form and then click [Save].
A work order cannot be closed until all the hard stop hold-up reasons have been resolved.
Templates
Click the Templates link under the ServiceLink menu in the top navigation bar. You will be taken to the Templates page.

This page displays a list of all ticket templates that you’ve created. Click on a template number to view the template’s details, edit or delete the template, or add a new segment to the template.
Click the [Create Ticket] button to begin creating a new ticket using a template.
To create a new template:
- Click the [Add Template] button at the top right of the page.
- Enter all required information into the New Template form.
- Click [Save]. You will be taken to the template’s details page where you can edit, delete, or add new segments to your template.
Labor Approval
Click the Labor Approval link under the ServiceLink menu in the top navigation bar. You will be taken to the Labor Approval page.
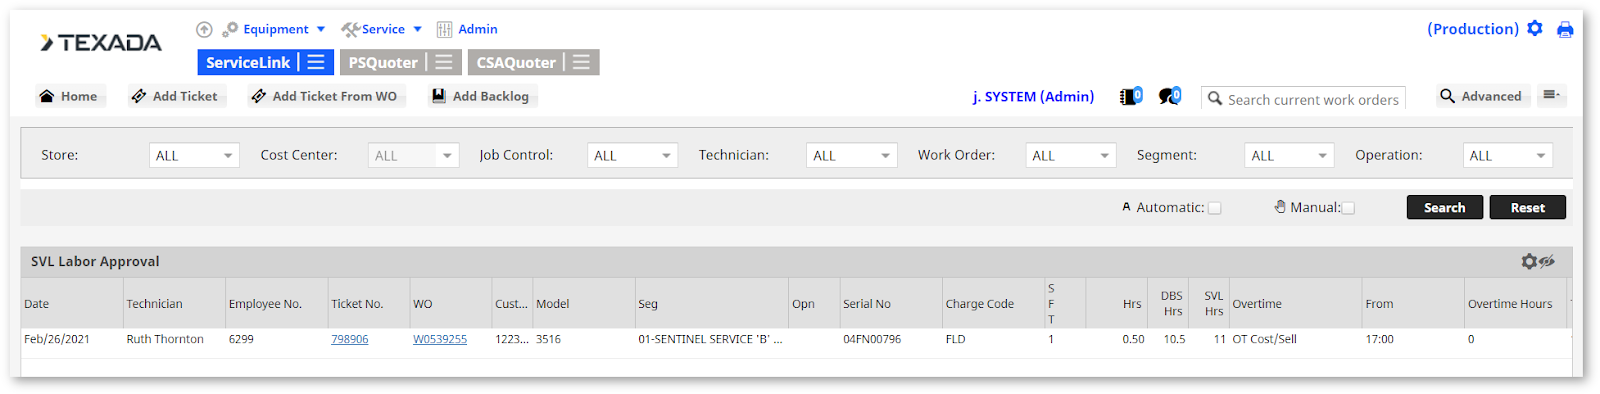
This page displays a detailed list of all labor currently awaiting approval. To filter the list, select your desired filters from the drop-down menus at the top of the page and then click [Search]. Click [Reset] to remove the filters.
Approving/Rejecting Labor:
- If all submitted labor in the list is correct, check the box in the header row at the top to select all labor in the list. Then click [Approve] to approve all labor.
- You can also approve labor individually by checking individual boxes and clicking [Approve] for each one.
- To reject labor, check the box next to the labor you want to reject and click [Reject]. A popup window will appear where you can enter a rejection reason.
Labor Summary
Click the Labor Summary link under the ServiceLink menu in the top navigation bar. The Labor Weekly Summary page displays.

This page displays information regarding each worker’s scheduled labor hours, the hours they actually worked, their approved work hours, and the variance between their scheduled and worked hours.
Use the left and right arrows or click the calendar icon to display a different week in the table. Click the Gear icon next to the calendar to select which fields should be visible and what order they should be displayed.
Customer Communication
Click the Customer Communication link under the ServiceLink menu in the top navigation bar, or click the Communication tab on the Home page. The Communication page displays.

This page displays details regarding customer communications for a selected date. Use the calendar at the top left of the page to change the date. Filter the table by selecting from the drop-down menus at the top of the page and then clicking the Search icon.
Communications can be cancelled by checking the box next to the communication and clicking the [Cancel Selected] button. All communications for a selected date can be cancelled at once by checking the box in the header of the table and clicking the [Cancel Selected] button.
Click the [Process] button to open the communication processing window, where you can edit the text and details of a communication.
You can also perform the same functions within an individual work order’s Communication tab, which will display communications for that specific work order.
Backlog
Click the Backlog link under the ServiceLink menu in the top navigation bar. The Backlog page displays.

Search for backlog tickets using the Backlog Search fields at the top of the page. Once your search parameters are entered, click the [Search] button. Your results will be displayed in the table below. Click the [Reset] button to clear your search.
Click on a Backlog Number to view details regarding that specific backlog ticket.
Add Backlog
To create a new backlog ticket:
- Click the [Add Backlog] button in the top navigation bar.
- Follow the same steps as you would to create a new ticket. For more information, see the Add Ticket section.