
Machine Information
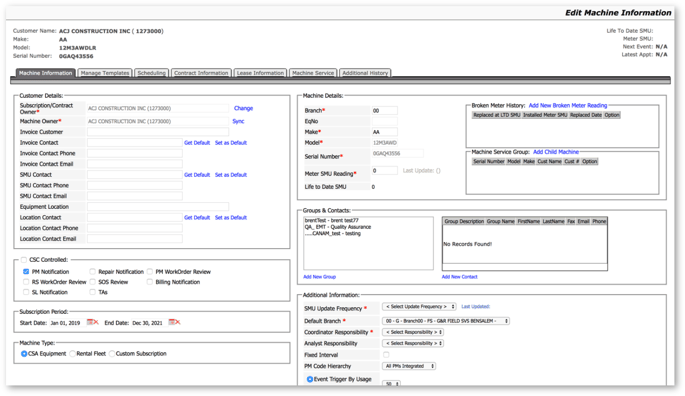
The Machine Information tab gives you the ability to configure attributes that are needed by EMT:
- Define contact information for
- Invoice contacts
- SMU contacts
- Location contacts
- Machine Details
- The processes that EMT will monitor
- PM notification
- Repair Notification
- PM work order review
- RS work order review
- SOS™ review
- Billing Notification
- Subscription Period
- Type of machine
- Group contacts
- Broken hour meter entries
- Parent/child relationships
- How often EMT is expecting SMU updates
- Default branch that is responsible for the service
- Fixed or sliding interval
- Event triggers
Customer Details
The Customer Details section stores various types of contact information that will be used throughout the life of the contract:
- Contacts for Invoice questions
- Contacts for SMU questions
- Contacts for the equipment location
- This information is used when creating appointments to populate the contact information.
The owner of the equipment and the owner of the contract are also displayed. If these are different, EMT will allow the user to sync the data from DBS.
CSC Controlled
This section controls which processes EMT will monitor for the equipment. In order for EMT to monitor the processes, the CSC Controlled checkbox has to be checked as well. The processes are:
- PM Notification
- Display upcoming PM events in Box 2.
- PM events are defined in the Manage Template page and applied to the machine in the Scheduling page.
- Repair Notification
- Display upcoming repair services in Box 2.
- These events are normally tied to a TM&R or Marc contract and imported from a Calculator file.
- PM Work Order Review
- Allows you to review work orders that have been closed and are linked to PM events that originated from EMT. This is done in Box 3.
- RS Work Order Review
- Allows you to review work orders that are linked to the serial number but are not linked to PM Events that originated from EMT. This is done in Box 3.
- SOS™ Review
- Allows you to review SOS™ results in Box 3.
- Billing Notification
- Allows you to track when billing is due for the serial number.
- The billing periods and amounts are set up in the Contract Information page.
- The billing notifications are displayed in the Shortcuts on the EMT dashboard.
Subscription Period
The subscription period is used to define the start and end date that EMT will monitor the equipment.
Machine Type
EMT has the ability to also manage other types of machines that don’t have a CSA Contract.
- CSA Equipment
- Equipment has a CSA contract.
- Rental Fleet
- The equipment is rental.
- Custom Subscription
- Equipment that does not have a CSA contract.
- This can be used when you want to use EMT to notify Billing, Work Order to review, and SOS™ results to review.
- Equipment that does not have a CSA contract.
Machine Details
Most of this information is brought in from DBS, except for the Meter SMU Reading. The SMU reading is automatically set if the equipment is configured with a Product Link unit. You can also enter the SMU reading manually.
Broken Meter History
EMT has the ability to track when SMU meters are replaced. This allows a meter to be replaced on the equipment while EMT continues to schedule appointments according to the life to date SMU reading on the equipment.
Machine Service Group
The Machine Service Group allows you to link equipment together for scheduling events. This feature is meant to be used for power systems; if a site has several generators that are on the same event schedule, event templates can be assigned to the parent machine. Then as events are scheduled the child machines are scheduled at the same time.
Groups & Contacts
Select the appropriate group from the list and then click the [Update] button at the bottom right of the screen.
Add New Group
To add a new group of contacts:
- Click [Add New Group]. You will be taken to the Manage Group page.
- Click [Add New Group], then enter all necessary information.
- Click [Update]. If the new group is a child of another group of contacts, choose the parent group from the drop-down menu.
Add New Contact
To add a contact:
- Click [Add New Contact]. You will be taken to the Manage Contacts page.
- Enter the new contact information into the form at the right of the page.
- Click [Update].
Contacts can only be associated with one parent group.
Additional Information
The Additional Information section allows you to define attributes that are used in EMT to manage the various events.
- SMU Update Frequency: Indicates how often the SMU should be updated for the machine. It will be indicated by Day (D plus num), Week (W plus num) or Month (M plus num).
- Default Branch: The default cost center that will manage the service for this machine. When it is scheduled for service in the Service Schedule, it will use this as the cost center.
- Responsibility Indicator: Used as an indicator to show which person in the CSC group is responsible for the equipment.
- PM Code Hierarchy: EMT has the ability to define multiple PM Code hierarchies.
- Fixed/Sliding Interval: When configuring a machine you can choose between fixed or sliding interval scheduling services.
- Fixed Interval: Services are scheduled based on the original template targets. If a new machine is set up to do services at the following SMU 250, 500, 750, 1000 etc., but the 250-hour service was actually done at 300 hours, EMT will trigger the next event at 500 hours.
- Sliding Interval: Services are scheduled based on the original template intervals. If a new machine is set up to do services at the following SMU 250, 500, 750, 100 etc., but the 250-hour service was actually done at 300 hours, EMT will trigger the next event at 550 hours, 250 hours after the prior service.
- Event Trigger by Usage: Setting the event trigger by usage controls how many hours before a service is due it’s displayed in the Box 2 Active New Events. If a service is due at 1250 hours and the event trigger is set to 50, the event will not be displayed until the equipment has 1200 hours or more.
- Event Trigger by Days: Setting the event trigger by days controls how many days before an event EMT will display it in Box 2 Active New Events. Event trigger by days can be used on equipment that schedules events either by hours or days.
Manage Templates
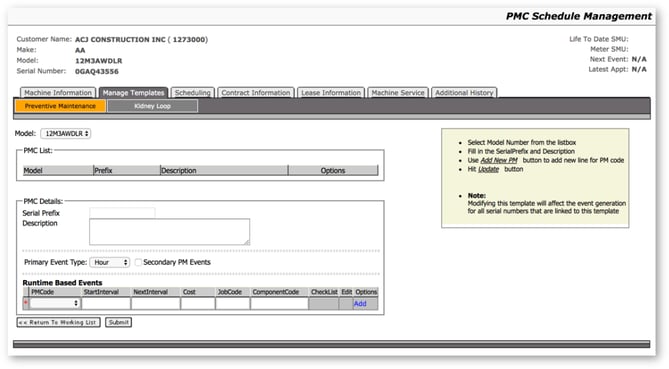
Preventive Maintenance
PM templates are associated with an equipment model. Each model can have one or more templates defined.
- Primary Event Type: Event types can be Hours, Days, Weeks, Months, or Years.
- Secondary Events: Option to add additional events to the template. Secondary events are free text events that can be scheduled by Hours, Days, Weeks, Months, or Years. It does not matter what the Primary Event Type is set to.
- Secondary events can be associated to a primary event. This means the secondary event will only be scheduled when the primary event is due.
- Runtime Based Events: The PM Code is associated with a start and next interval. You can also define the cost, job code, component code, and attach a checklist.
Kidney Loop
Kidney looping is the process of recycling fluids to be reused in machines. Kidney loop templates are associated with an equipment model. Each model can have one or more kidney loop templates.
Kidney loop templates allow you to choose which compartments to include in the kidney loop events, the intervals to perform them, and when to do the oil change event. Kidney loop events can also be associated to a PM event.
Scheduling
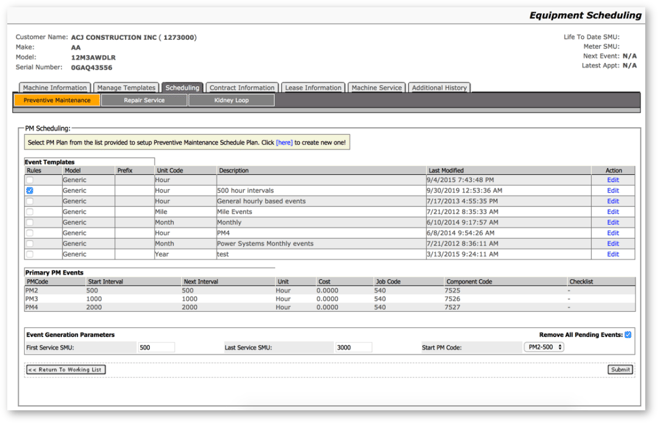
Preventive Maintenance
Once a PM plan is selected from the Manage Templates tab, event generation parameters will automatically be added based on days and primary and secondary PM events intervals.
Latest events are ones that are already completed and can include work orders. They are used as a guideline when creating a new contract. If there were completed events, you may want to start the contract on a different date based on what was already completed.
Click [Edit] to edit the template. This will apply to all models associated with that template.
Repair Service
Repair Services can be imported into EMT in several ways:
- Import data from CAT’s Calculator.
- Import data from an Excel file.
- Import from generic templates.
- Copy events from a different serial number.
The import methods shown on this page are configurable.
Kidney Loop
This page gives you the ability to schedule kidney looping services for the machine.
Contract Information
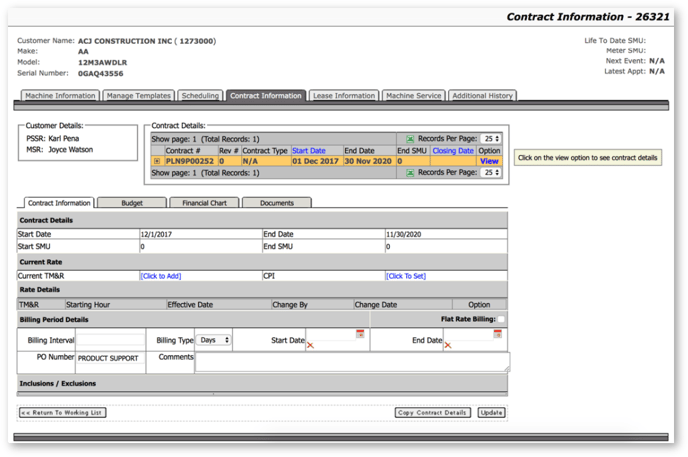
The Contract Information page shows a list of all current and past contracts that have been assigned to the current serial number.
For each contract the following details can be viewed:
- Contract Terms
For each contract the following details can be managed:
- Contract rates for the entire contract
- Billing period details
- Contract Inclusions
- Contract Exclusions
- Scanned images of the registration, contract and builder file
Contract Details
This section displays the contract start and end terms.
Current Rate
This section displays the current rate of the contract. EMT has the ability to track the rate over the life of the contract.
You can also set the month and date when rate of the contract can be adjusted. When the contract rate is due for an increase, the user will be alerted on the EMT dashboard. EMT will trigger an alert for a rate increase when the CPI month and day have passed and no new rate has been entered.
Rate Details
This section displays all the rates that are associated with this contract.
Billing Period Details
The billing period tracks when billing is due for this contract. This functionality is meant to notify the dealer when billing is due to prevent invoices that are either missed or sent out late. Edit the information in the Billing Period Details fields as needed.
When a contract is due for billing you will be notified on the EMT dashboard.
Once the billing period details have been entered the Billing Notification has to be enabled on the Machine Information page.
This functionality does not issue the actual invoice.
Inclusions / Exclusions
This section defines what is and is not included in the contract.
Budget
The budget page allows you to enter the budgeted revenue and expenses. The data can be entered manually or populated based on the import of Calculator files.
Budgets can be broken into different periods:
- Divide the contract length into a set number of periods.
- Divide the budget into periods based on a number of hours.
- Divide the budget into periods based on a number of months.
The data entered into the budget is displayed in various places throughout EMT, including the contract health charts that appear in the Contract Information page and the Create Appointment page.
Financial Chart
The financial chart page displays the current budget and actual revenue and expenses for the serial number. This provides you with a quick summary of the performance of the contract.
Documents
The documents page allows you to upload documents to the contract. This keeps the details of the contract stored in one location.
Lease Information
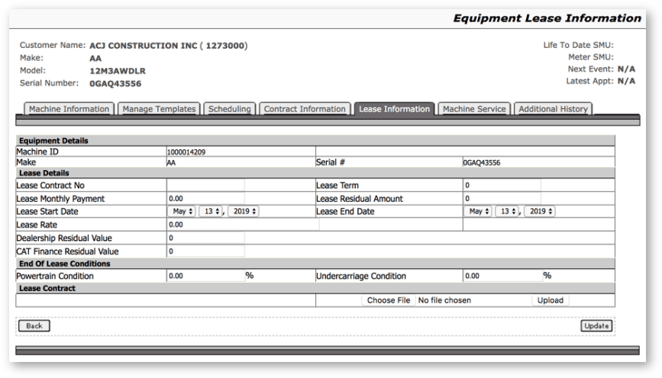
If the equipment is leased, the lease information is manually entered into this tab.
Equipment Details
- Make – two-digit DBS code.
- Serial # – serial number of unit.
Lease Details
- Lease Contract No
- Lease Term
- Lease Monthly Payment
- Lease Residual Amount
- Lease Start Date
- Lease End Date
- Lease Rate
- Dealership Residual Value
- CAT Finance Residual Value
End of Lease Conditions
- Powertrain Condition – Percent of usage remaining when equipment is returned.
- Undercarriage Condition – Percent of usage remaining when equipment is returned.
Lease Contract
You can upload files to support the contract, such as a scanned copy of the signed lease agreement.
Machine Service
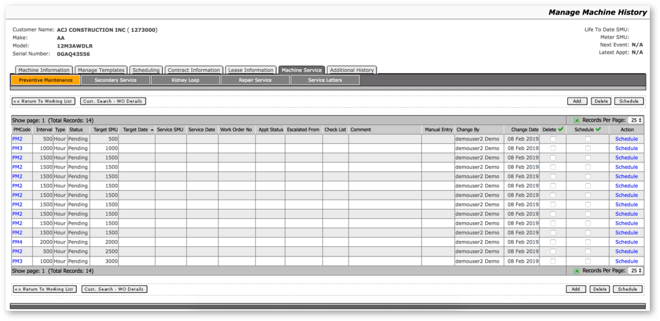
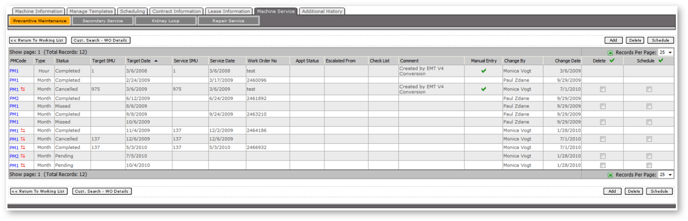
Preventive Maintenance
This section details a list of services that are part of the recommended Preventive Maintenance routine. An icon will indicate if a service was escalated ![]() or is pending a SMU sync
or is pending a SMU sync ![]() with Service Scheduler and/or related Work Orders.
with Service Scheduler and/or related Work Orders.
Selecting the PM code in the first column allows you to edit the service record:
Event Details
- Event: Using the drop-down menu, choose the code that the event represents.
- Event Type: Hours, days, weeks, or months and is based on the template created for the event.
- Status: Select the status of this particular event.
- Checklist: Populated with checklists created for the specific model.
- Comment: Any additional comments about the event.
Target Details
- Target Meter: Enter the life-to-date SMU which this service should be done by.
- Target Date: Enter the date SMU which this service should be done by.
Appointment Details (completed in service scheduler and syncs with EMT)
- Service Meter: The SMU reading when the service is completed.
- Service Date: Date of the service.
- Work Order No: Work order that was created from the service.
- Segment No: Enter segment number if a particular segment of the work order applies.
Current Meter Reading: Pulled in through Product Link or manually entered when SMU is updated.
Add – The [Add] button provides the same fields as when you edit an existing service type.
Delete – The [Delete] button gives you the option to delete any or all of the scheduled services.
Schedule – To bulk schedule one or more items, click the Schedule checkbox and then click [Schedule]. This will send all the selected items to the Service Scheduler.
Secondary Service
The Secondary Service page displays a list of secondary events that have been generated for the serial number. This list will display both events that have been completed and events that are still pending.
Secondary events can be deleted by clicking the Delete checkbox and then clicking the [Delete] button.
Secondary events can be modified by clicking on the Description link.
Kidney Loop
The Kidney Loop page displays a list of kidney loops associated with the asset serial number.
Kidney loops can be deleted by clicking the Delete checkbox and then clicking the [Delete] button.
Kidney loops can be modified by clicking on the Compartment link.
Repair Service
The Repair Service page displays a list of repair service events that have been generated for the serial number. This list will display both events that have been completed and events that are still pending.
Repair service events can be deleted by clicking the Delete checkbox and then clicking the [Delete] button.
Repair Service events can be modified by clicking on the Job Code Description link.
To schedule an event, click the Schedule checkbox and then click [Schedule].
Service Letters
The Service Letters page displays a list of service letters associated with the serial number.
Click on the PIPNo link to edit the service record.
To schedule a service event, click the Schedule checkbox and then click [Schedule].
Additional History
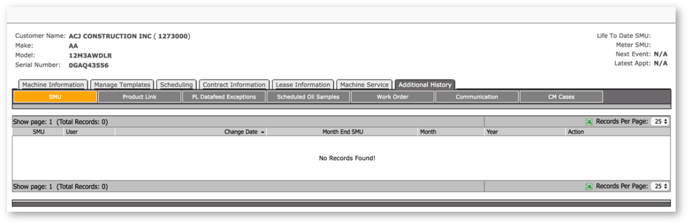
This section displays important information regarding the machine’s history. History can play an important part in determining when and if a machine requires a particular service, product parts, etc.
SMU
SMU is entered manually or through Product Link. The histories of the entries are listed here.
To set the SMU reading, click the box below Month End SMU and then click [Set].
To delete the reading, click [Delete].
Product Link
The Product Link section provides a history of the fault codes sent by the equipment and displays the following information:
- Module: Module the fault was detected on.
- Level: Severity level.
- Occurrence: How many times this fault code has occurred.
- Event: The PL event that is recorded.
- Component: The component on the equipment that the event occurred.
- Event Date: The date the event happened.
- 30/60/90: How many times the event has happened in the last 30, 60, or 90 days.
- Resolved: Through the review process in Box 3 of the dashboard.
Scheduled Oil Samples
A list of submitted oil samples and their results are displayed here.
Evaluation levels are related to the severity of the SOS™ review. 1 is Red, requires attention. 2 is Yellow, monitor compartment. 3 is Green, no action required.
The list indicates if the SOS™ sample has been reviewed in the SOS™ Review list on the dashboard.
SOS™ samples are displayed on this page whether or not Review SOS™ Samples has been selected on the Machine Information page.
Work Order
This page displayed a history of work orders associated with the equipment. You can view the work order history in Segment View or Invoice View. Click on a work order to view its details.
Communication
The communication page displays a list of communications that are linked to the serial number. Communication items are created in the following events:
- Create Appointment
- Closure Analysis
- Contract Review
- Contract Expiry
- Down Time Report
- Overdue PM Event
- Overdue RS Event
- Product Link Fault Codes
- SOS™ Sample Review
The information that is sent in an email or written in a comment is stored with the communication item.