
Manage Branch Managers
In sections of EMT where there is an email function, the email will default to the branch manager that is assigned unless it is overwritten.
Click [Assign] to assign a default branch manager.
Manage Users
Users are granted access based on what they need to do within EMT:
- EMT admin: Access to everything except Manage Deleted Equipment.
- Read Only: Access to view everything only.
- Report View: Access to forecasted financial (box 4) only.
- Service Scheduler: Access to machine service tab and contract tab in Machine Information, which allows Service Scheduler users to view contract related details in EMT.
- Superuser: Access to everything.
- User Admin: Has the ability to add other users.
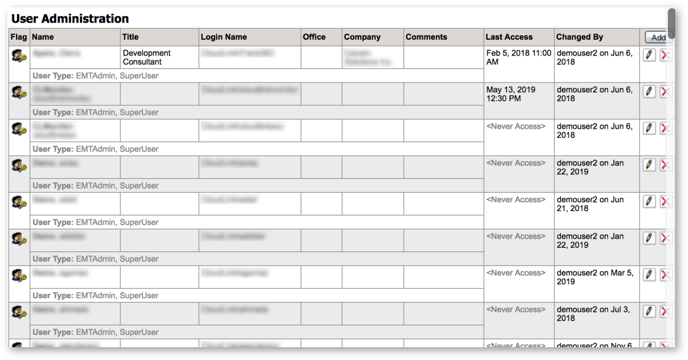
To add a new user to the system:
- Click the [Add] button.
- Search for the user by their last name, (note that at least three characters are required).
- Select the user type. Enter any comments if needed.
- Click [Add].
To edit any user’s access or comments, select the Pencil icon ![]() located in the user’s row.
located in the user’s row.
To remove a user’s access, select the red X icon ![]() located in the user’s row.
located in the user’s row.
Manage User Division / Branch Access

This page allows you to assign access to particular divisions and branches for each user.
- Click the [Edit] button.
- Choose the appropriate division(s) and branch(s) for the user.
- Click [Save]. If the security is created by division then the user will have access to all branches that belong to that division.
Manage Dormant Equipment
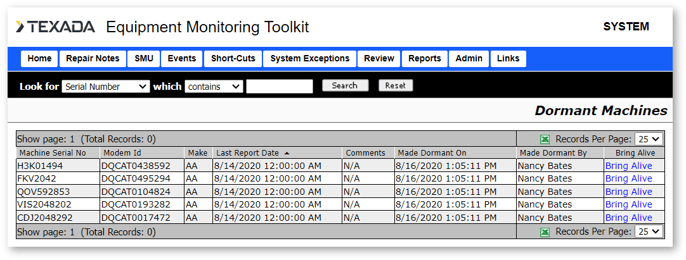
When the Product Link installed on the equipment is no longer reporting, it places the equipment on this list. Click [Bring Alive] to remove the machine from the Dormant Machines list.
Manage Deleted Equipment
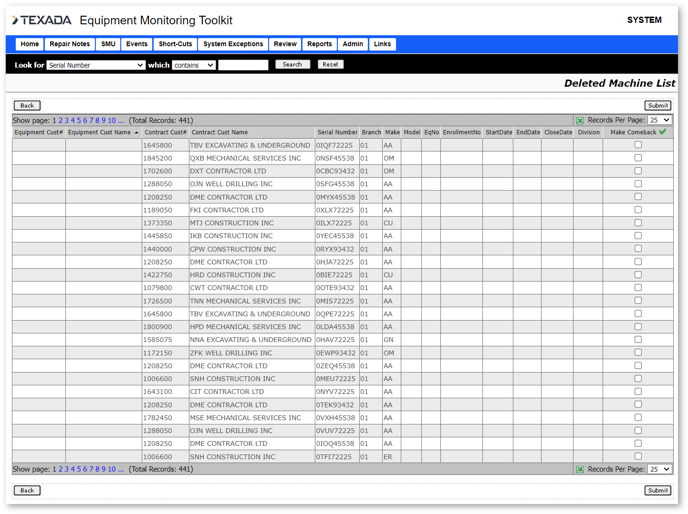
This page displays a list of equipment that was manually deleted by users. To reinstate the equipment(s), click the Make Comeback checkbox and then click [Submit].
Manage Checklists
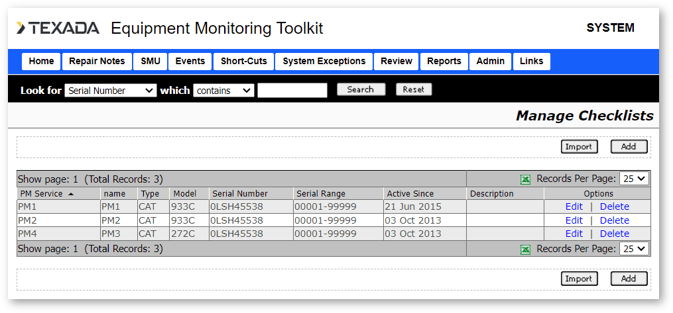
There are two methods to add checklists to the system:
Import
- Click [Import].
- Click [Choose File] and select your .mbd file. These types of files are usually provided by CAT.
- Click [Load].
Add
- Click [Add].
- Enter the checklist details into the form fields.
- Click [Add] to search for particular checklist items to add.
- Click [Copy] to add all items from a chosen checklist.
- Once all items are added, click [Submit].
To edit an existing checklist:
- Click [Edit].
- Edit any information in the form fields.
- Click [View Parts] to add, edit, or delete any parts.
- Click [Submit].
View Communication History
The communication page displays a list of communications details. Communication items can be filtered by a date range at the top of the page.
Communication items are created in the following events:
- Create Appointment
- Closure Analysis
- Contract Review
- Contract Expiry
- Down Time Report
- Overdue PM Event
- Overdue RS Event
- Product Link Fault Codes
- SOS™ Sample Review
The information that is sent in an email or written in a comment is stored with the communication item. Any files that were attached to the communication are also saved and can be viewed here.