
Quick Reference
- The Manage Configuration Keys screen in CloudLink Console gives CloudLink administrators the ability to view and modify hundreds of configuration keys which determine the behavior of your Texada system. To access this screen, log in to CloudLink Console and select Configuration → Config Keys from the left navigation menu.
- The Manage Configuration Keys screen has two main views: Change, which allows you to view and modify configuration keys, and History, which allows you to view keys’ change histories. Switch between these views using the tabs at the top of the screen.
- In Change view:
- Search for a configuration key using the filters at the top of the screen.
- Click on a key’s name in the list to open its details.
- The ‘Running Value’ field is what determines a key’s behavior. Different keys have different types of running values. After modifying a key, click “Update” to save your changes.
- In History view:
- Configuration key change records are displayed in a table. Each row represents one change to a configuration key’s running value.
- Use the filters at the top of the screen to filter the list of configuration key change records. Click the “Filter” button to apply your filters.
- Each change record includes the key’s details, its previous running value, it’s new running value, the date and time on which the change was made, and the name of the user who made the change.
Introduction
The Manage Configuration Keys screen in CloudLink Console is an essential part of the CloudLink administrator’s toolkit. This screen allows you to manage hundreds of configuration keys which determine the behavior of Texada’s Sales and Service products, including Equipment CRM (SalesLink), ServiceLink, Parts & Service Quoter, COTI, iMACS, and more.
These configuration keys give you the ability to customize your Texada system to suit your organization’s needs. Many optional features can also be switched on or off using configuration keys.
To access the Manage Configuration Keys screen, log in to CloudLink Console and select Configuration → Config Keys from the left navigation menu.
Manage Configuration Keys - Change
The Manage Configuration Keys page has two main views: Change mode and History mode. The default view, pictured below, is Change mode. See “Manage Configuration Keys - History” for information on History mode.
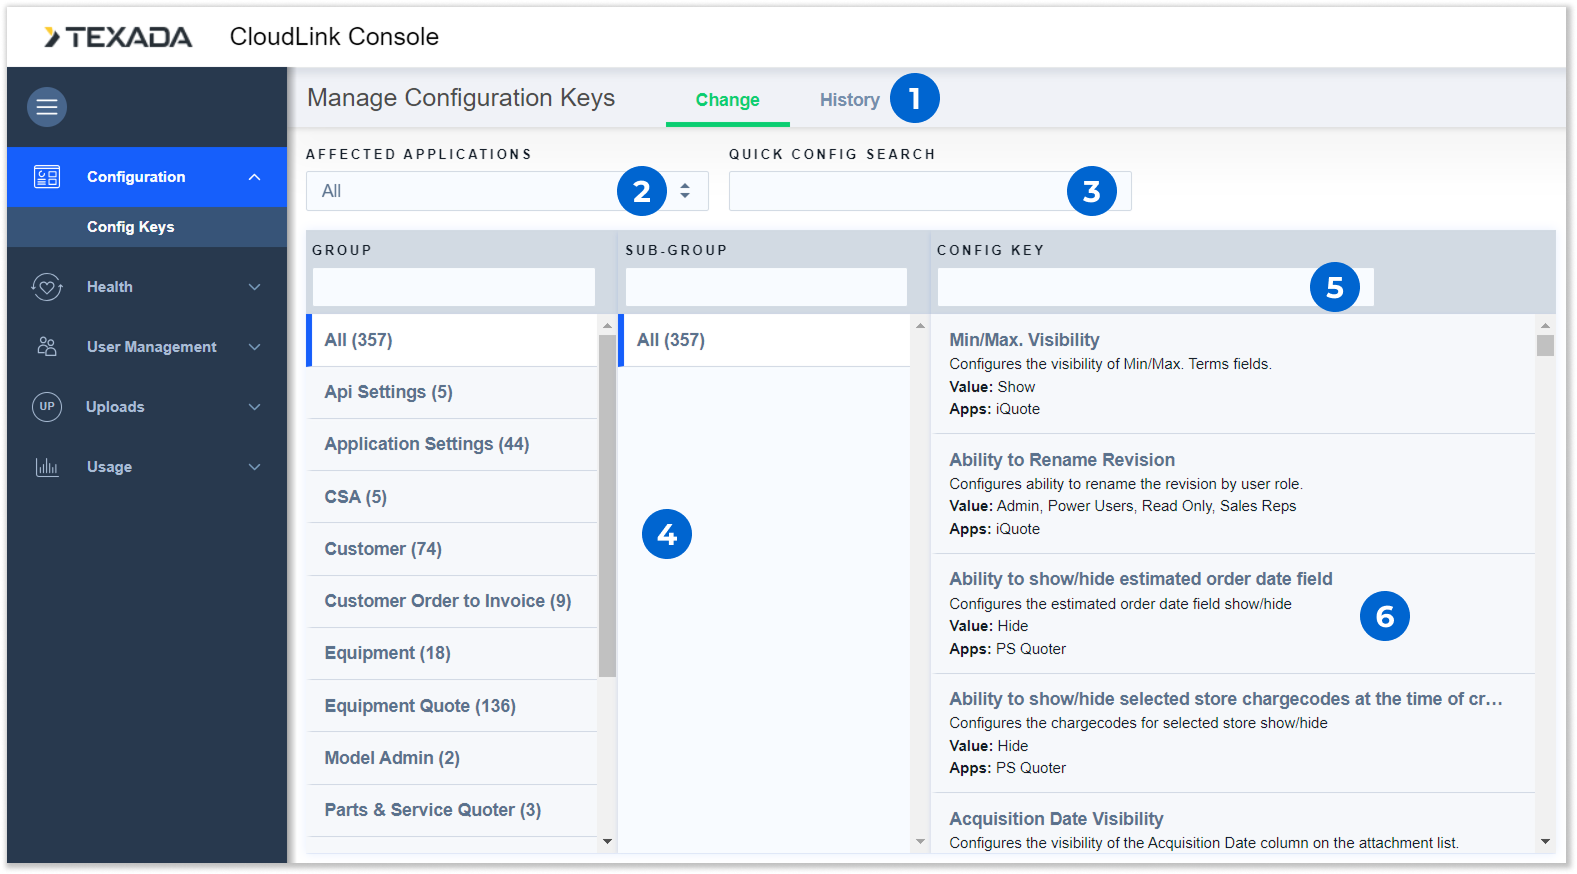
- Change / History Toggle
Use these buttons to toggle between Change view and History view.- Change View: The default view. Allows you to view and modify configuration keys.
- History View: Allows you to view the change history of your configuration keys for troubleshooting purposes.
- Affected Applications Selector
Select an application from the drop-down to only view configuration keys for that application. - Quick Config Search Bar
Begin typing into the search bar to filter the Group, Sub-Group, and Config Key lists by the text entered. - Groups and Sub-Groups
Configuration keys are categorized into groups, which generally align with the applications to which they apply. Each group may contain one or more sub-groups.- Click on a group’s name in the list to view its associated sub-groups and configuration keys.
- Click on a sub-group’s name in the list to view its associated configuration keys.
- Use the search bars at the top of the groups and sub-groups lists to filter them by the text entered.
- Config Key Search
Begin typing into the search bar to filter the list of configuration keys by the text entered. This will search by the key’s name, description, and key. - Configuration Key
Configuration keys matching the current filters are listed here. Click on a key to view and modify it. See “Edit Configuration Key” for more information.
Search for a Configuration Key
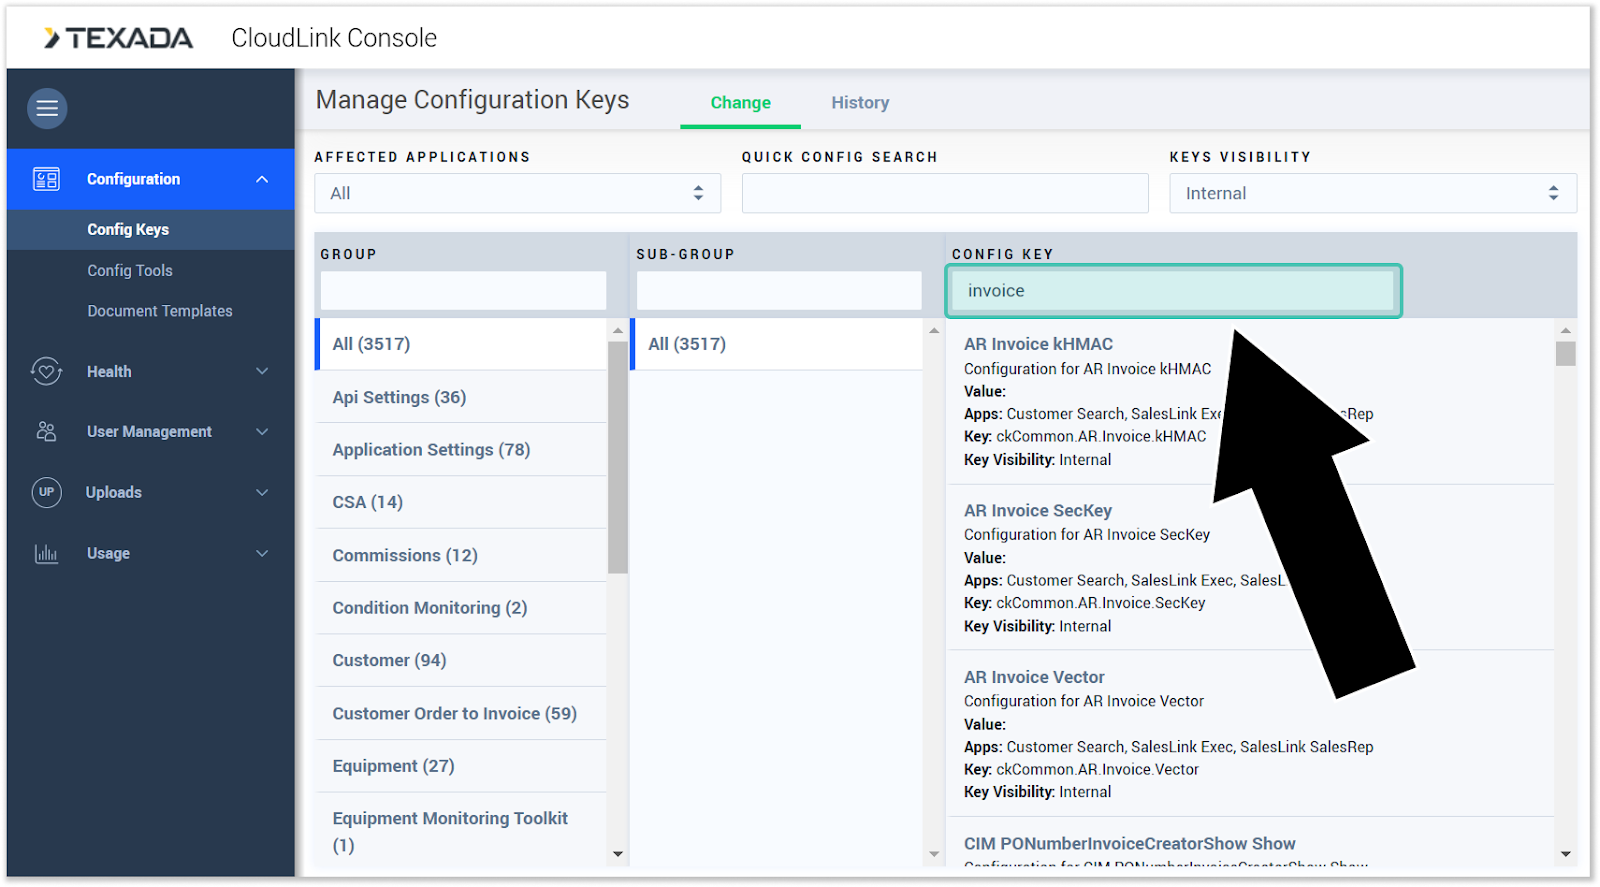
The fastest way to locate a specific configuration key is to search for it using the Config Key search bar, pictured below. You can do this if you know the key’s name, for example “Enable CAT PSE Marketing Leads”, or its unique key, for example “ckCommon.CAT.PSE.MarketingLeads.Enable”.
If you do not know the exact key you are looking for, you can also search for partial keywords such as ‘invoice’ or contract’.
Edit Configuration Key
Click on a configuration key in the list to open its details in a pop-up window.
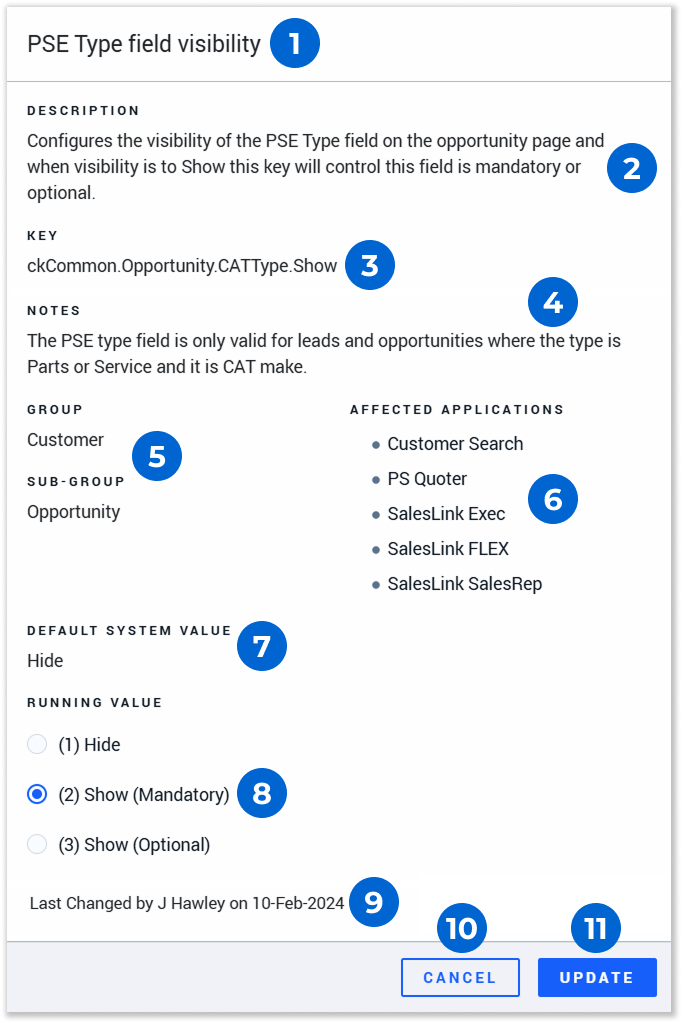
- Name
The key’s plain language name. - Description
A description of the key’s purpose and effects. - Key
The key’s literal name, usually simply referred to as the ‘key’. Each key is unique, making this an effective and unambiguous way of referring to a particular configuration key. - Notes
Any additional notes or clarifications about the key’s behavior. - Group and Sub-Group
The group and sub-group to which the key belongs. - Affected Applications
The applications affected by the configuration key. A single key may affect multiple applications. - Default System Value
The key’s default running value. - Running Value
The key’s current value.
Editing a key’s running value will change its behavior. Different keys have different kinds of running values; for example, some keys can simply be switched on or off, while other keys might have multiple options or might require a text input. If you are unsure what a key’s running values signify, refer back to its description or notes.
As editing configuration keys can have a significant impact on your system’s behavior, it is highly recommended not to edit a key’s running value unless you are certain what the impact of the change will be. It is recommended to consider both the key’s default value and its current value before changing it.
The History tab can be used to review the change history of your configuration keys. This can be helpful if you want to revert a key to a previous running value. - Last Changed Information
The date on which this key’s running value was last updated, and the name of the user who made the change. - Cancel Button
Click to close the window without saving your changes. - Update Button
Click to save your changes and close the window. If you have made changes to the key’s running value, they will be applied now. Upon a successful save, an “Updated Successfully” message will appear in the bottom-right corner of the screen.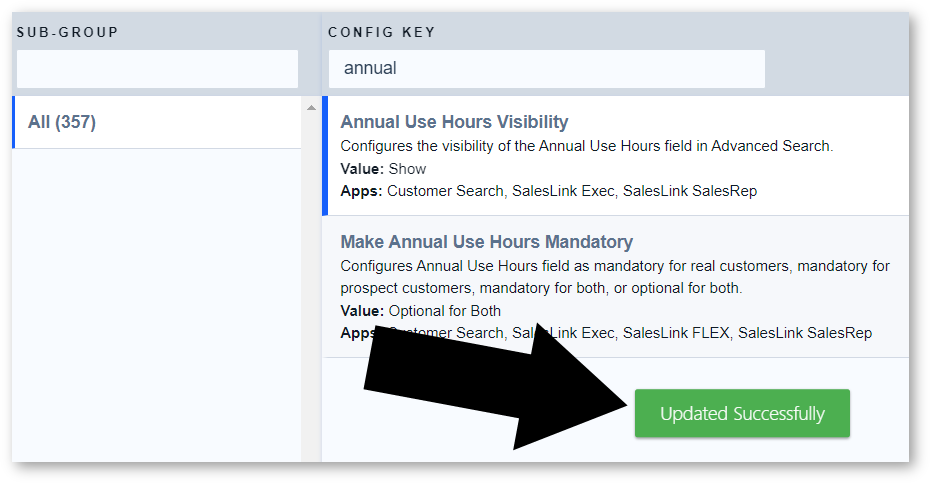
Manage Configuration Keys - History
Click on the “History” tab at the top of the Manage Configuration Keys page to switch to History view. This view lists the change history of all your configuration keys, allowing you to look up keys’ previous values and troubleshoot your system’s behavior.

- Filtering Options
Use these options to filter the history table.- Groups
Filter keys by group. - Sub-Groups
Filter keys by sub-group. - Affected Applications
Filter keys by their affected applications. - Config Key Like
Enter a keyword such as “invoice” or “contract” into this search bar to filter keys by the text entered. This will filter the table by the Config Name and Config Key columns. - Select Date
Enter a start and end date to display configuration key changes made between those dates. Click the calendar icon to select dates from a calendar.
 - Filter Button
Click to apply the currently-selected filters.
- Groups
- History Table
Configuration key change records that match the currently-selected filters are listed here. Each row in the history table corresponds to one change to a configuration key’s value. This means that the same key might appear in the table multiple times.
The history table comprises the following columns:- Config Name
The configuration key’s name. Click to view the key’s details - see “Edit Configuration Key” for more information. Please note that you cannot modify a key’s running value from this screen. - Config Key
The configuration key’s literal name. - Group
The group to which the key belongs. - Sub-Group
The sub-group to which the key belongs. - Old Value
The key’s running value before the change. - New Value
The key’s running value after the change. - Date
The date and time on which the change was made. - User
The name of the user who made the change.
- Config Name