
An overview of the Notifications page in Service Agreement Quoting.
The feature discussed in this article is only available to SAQ administrators.
Quick Reference
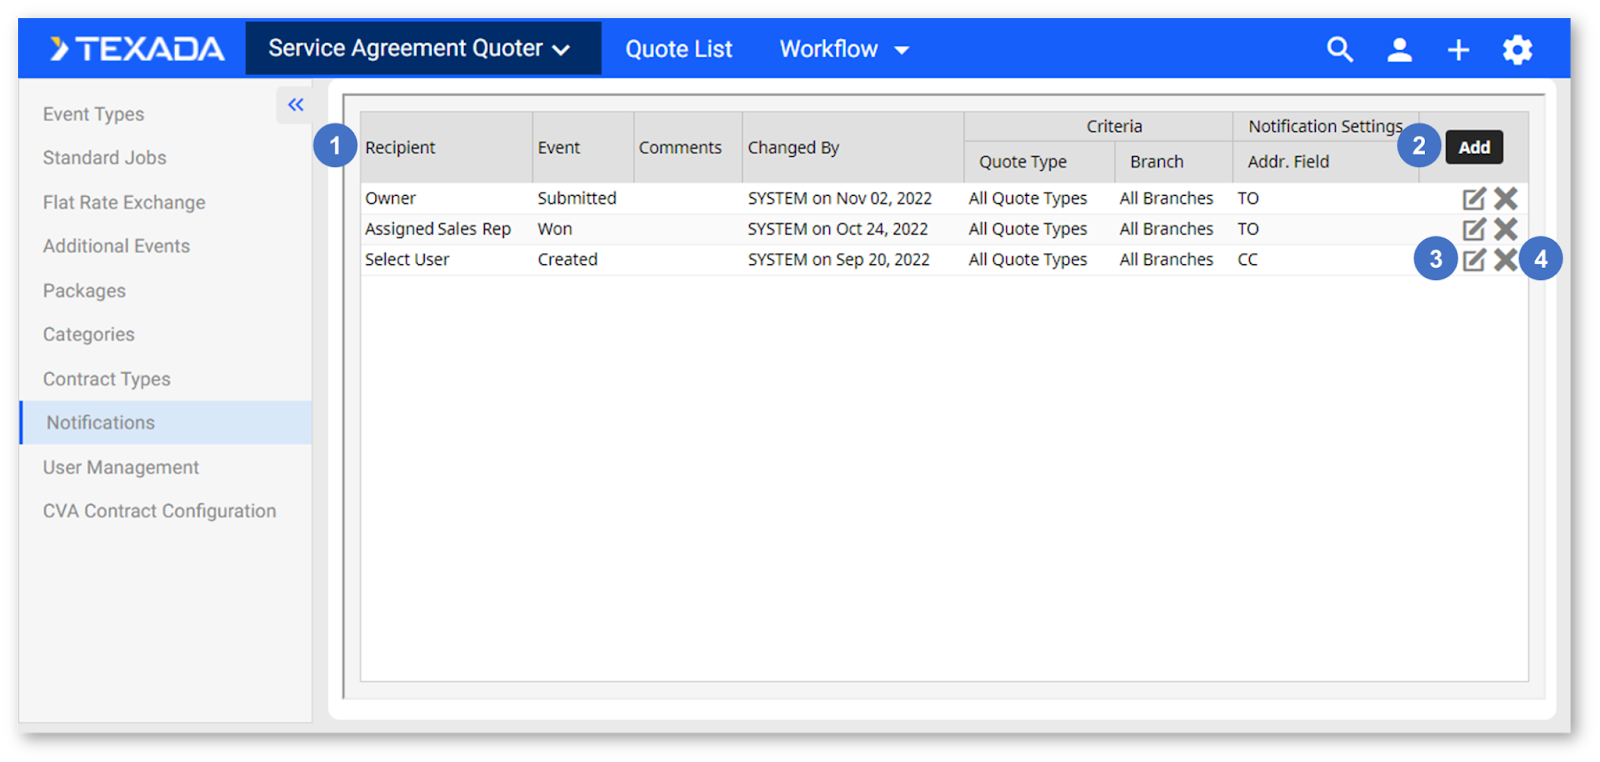
- The Notifications page allows you to manage notifications. To access this page, navigate to the Admin section of SAQ (click the gear icon
in the top-right corner of the screen), then select “Notifications” from the left navigation menu.
- Click the “Add” button
in the top-right corner of the Notifications screen to create a new notification.
- Click the Edit button
to the right of an existing notification to edit it. Click the X icon
to delete it.
Introduction
The Notifications page allows you to manage notifications. Notifications are email communications that are automatically sent out when certain conditions are met.
To access the Notifications page, navigate to the Admin section of SAQ (click the gear icon in the top-right corner of the screen), then select “Notifications” from the left navigation menu.
Notifications
- Notifications Table
This table contains a list of notifications. Click on a column header to sort the table by that column. Click and drag the column headers to change the order of columns. Click and drag the vertical bars between the columns to resize the columns. - Add Button
Click to create a new notification. See “Add / Edit Notification” for more information. - Edit Button
Click to edit a notification. See “Add / Edit Notification” for more information. - Delete Button
Click to delete a notification.
Notifications Table - Columns
The notifications table comprises the following columns:
- Recipient: The role of the User who will receive the notification.
- Event: The event that triggers the notification to be sent.
- Comments: Any comments left on the notification.
- Changed By: The name of the User who last modified the notification and the date on which that modification was made.
- Criteria - Quote Type: The type(s) of Quote to which the notification applies.
- Criteria - Branch: The branch(es) to which the notification applies.
- Notification Settings - Addr. Field: Indicates whether the notification will use the “TO:” field or the “CC:” field when emailed to the recipient.
Add / Edit Notification
Click the “Add” button in the top-right corner of the Notifications screen to create a new notification. Click the Edit button
to the right of an existing notification to edit it.
Required fields are marked with a red asterisk .

- Recipient
Click the drop-down to select a recipient for the notification. The recipient can be one of the following:- Owner: The owner of the Quote.
- Originator: The Quote’s creator.
- Assigned Rep Sales Manager: The sales manager assigned to the Quote.
- Assigned Manager: The manager assigned to the Quote.
- Email Distribution List: An email distribution list. Selecting this option will reveal the “Email List” field (2).
- Select User: A specific User. Selecting this option will reveal the “User” field (3).
- Email List
This field will only be visible if “Email Distribution List” is chosen as the notification’s Recipient (1). Enter a list of email addresses to receive the notification. - User
This field will only be visible if “Select User” is chosen as the notification’s Recipient (1). Click the magnifying glass iconto search the list of Users in the system and select a User to receive the notification. Click the X icon
after selecting a User to remove them.
- Event
Select the event that will trigger the notification to be sent:- Created: The notification will be sent when the Quote is first created.
- Deleted: The notification will be sent if the Quote is deleted.
- Submitted for Approval: The notification will be sent when the Quote is sent for approval.
- Won: The notification will be sent when the Quote is won.
- Comment
Enter a brief comment about the notification. - Addr. Field
Select whether the notification will use the “TO:” field or the “CC:” field when emailed to the recipient(s). - Branch
The branch(es) to which this notification applies. Click to open a list of all the branches in the system, then click on one or more branches to select them. - Save Button
Click to save your changes. - Cancel Button
Click to close the Add / Edit Notification window without saving your changes.