.png?width=365&height=50&name=Texada%20Logo%20(Black).png)
The feature discussed in this article is only available to SAQ administrators.
Quick Reference
- The User Management page allows you to manage the Users in your system. To access this page, navigate to the Admin section of SAQ (click the gear icon
 in the top-right corner of the screen), then select “User Management” from the left navigation menu.
 - Click the Options button
 in the top-right corner of the screen to access options for viewing and exporting the User list. Click the Show / Hide Columns button
  to show and hide the columns in the Users table.
 - Click the “Add New User” button
 in the top-right corner of the screen to create a new User.
 - Click the Edit button
 to the right of an existing User to edit it. Click the Delete button
 to delete it.
Introduction
The User Management page allows you to manage the Users in your system.
To access this page, navigate to the Admin section of SAQ (click the gear icon ![]() in the top-right corner of the screen), then select “User Management” from the left navigation menu.
in the top-right corner of the screen), then select “User Management” from the left navigation menu.
User Management

- Options Button
Click to access options for viewing and exporting the User list:Reload
Click to refresh the list of Users.Export to Excel
Click to export the list of Users to a Microsoft Excel (.xlsx) file. Depending on your browser’s settings, you may be prompted to select a download location, or the file may be automatically downloaded to your Downloads folder. Save Configuration
Click to save the current view as the default view. This will save column widths as well as columns hidden via the Show/Hide Columns button (2). The next time the User navigates to this page, the default view will be used. Reset Configuration
Click to reset the current view to the system default view. This will resize all columns to their default widths and re-show any columns hidden via the Show/Hide Columns button (2). This will cancel out any custom views saved via the Save Configuration button (1c).
- Show/Hide Columns Button
Click to open a list of columns, then click on a column to show or hide it on the page. - Add New User Button
Click to add a new User. See “User Admin” for more information. - Search Users Bar
Begin typing into the search bar to filter the list of Users by User Name. - Users Table
This table contains a list of Users in your system. Click on a column header to sort the table by that column. Click and drag the column headers to change the order of columns. Click and drag the vertical bars between the columns to resize the columns. - Edit Button
Click to edit a User. See “User Admin” for more information. - Delete Button
Click to delete a User.
Users Table - Columns
The Users table comprises the following columns:
- User Name: The User’s name.
- Login Name: The User’s login username.
- Title: The User’s job title.
- Office: The office out of which the User works.
- Company: The company to which the User belongs.
- Active: Indicates whether the User is currently active.
- Email: The User’s email address.
- Access: A summary of the User’s access levels for various CloudLink modules.
- Comments: Any comments left on the User.
- Last Access: The date on which the User last logged in.
- Actions: Contains the Edit and Delete buttons.
User Admin
Click the “Add New User” button ![]() in the top-right corner of the User Management screen to create a new User. Click the Edit button
in the top-right corner of the User Management screen to create a new User. Click the Edit button ![]() to the right of an existing User to edit it.
to the right of an existing User to edit it.
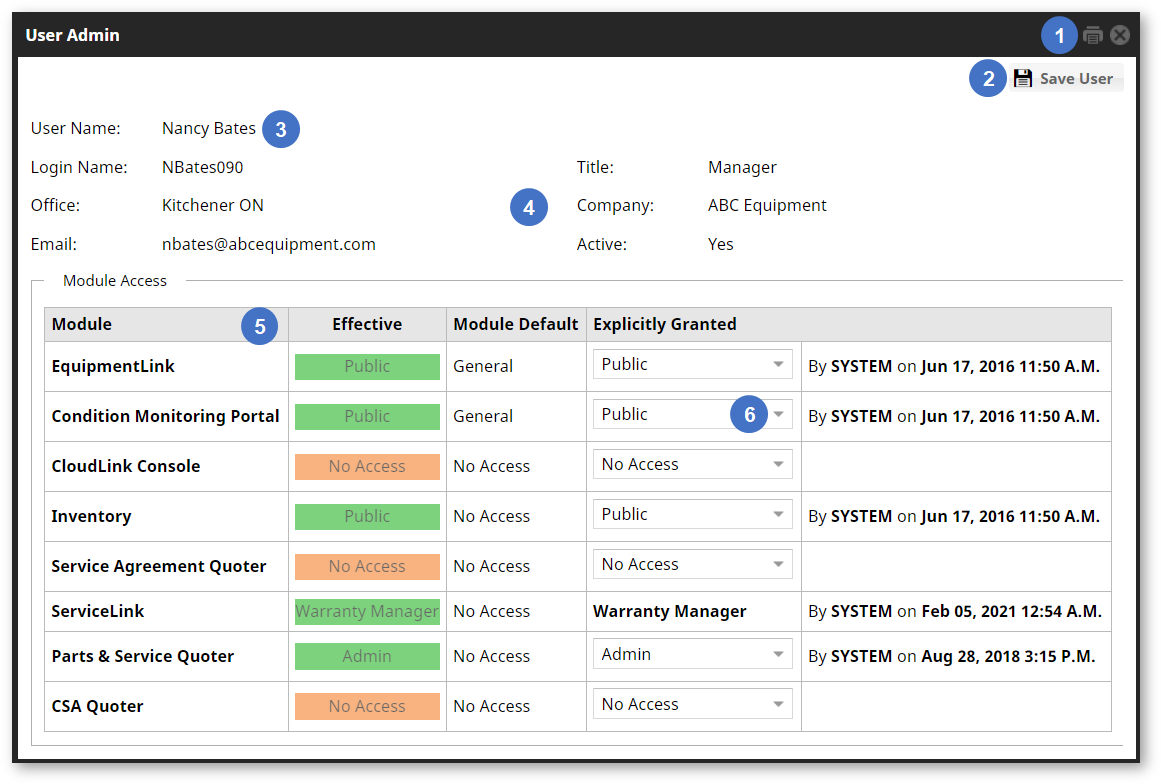
- Print Button
Click to download the contents of the User Management window as a .pdf file. Depending on your browser’s settings, you may be prompted to select a download location, or the file may be automatically downloaded to your Downloads folder. - Save User Button
Click to save your changes. - User Name
The name of the User being managed. If adding a new User, click the Search buttonto search for and select a User to add. Once a User has been selected, it can no longer be changed.
- User Info
Basic information on the User being managed, including their login username, title, office and company, and email address. This information is read-only and cannot be edited from Service Agreement Quoting. - Module Access Table
This table contains information on the User’s access levels for various CloudLink modules. It comprises the following columns:- Module: The module’s name.
- Effective: The User’s effective permissions for the CloudLink module.
- Module Default: The default permissions for the CloudLink module. This is the permission level that will be granted to the User if “Not Set” is selected from the Module Permissions drop-down (6).
- Explicitly Granted - Module Permissions: Contains the Module Permissions drop-down (6).
- Explicitly Granted - By: Contains the name of the User who last edited this permission, as well as the date and time on which the edit was made.
- Module Permissions Drop-Down
Use to select the User’s permissions for the given module. Click on the drop-down to open a list of permission levels, then click on a permission level to select it. Different modules have different levels of permissions available. Select “Not Set” to use the default permissions for the module (5c).