.png?width=365&height=50&name=Texada%20Logo%20(Black).png)
Quick Reference
- The first screen the User will encounter when initializing a new Quote in Service Agreement Quoting is the Create Quote screen. This screen allows you to input all the basic information about the Quote, including its date, Contract type, CPI settings, owner, customer and Contact information, and equipment defaults.
- To access the Create Quote screen, click the plus icon
in the top-right corner of any screen in Service Agreement Quoting.
- To create your Quote and advance to the Quote Details screen, click the “Save” button
in the top-right corner of the screen.
Introduction
The primary function of Service Agreement Quoting is to build out Quotes for equipment servicing, and to track their status through initial creation to approval to CVA Contract creation. For more information on Quote creation, see “Create a Quote in Service Agreement Quoting”.
The first screen the User will encounter when initializing a new Quote is the Create Quote screen. This screen allows you to input all the basic information about the Quote, including its date, Contract type, CPI settings, owner, customer and Contact information, and equipment defaults.
To access the Create Quote screen, click the plus icon in the top-right corner of any screen in Service Agreement Quoting.
Create Quote Screen
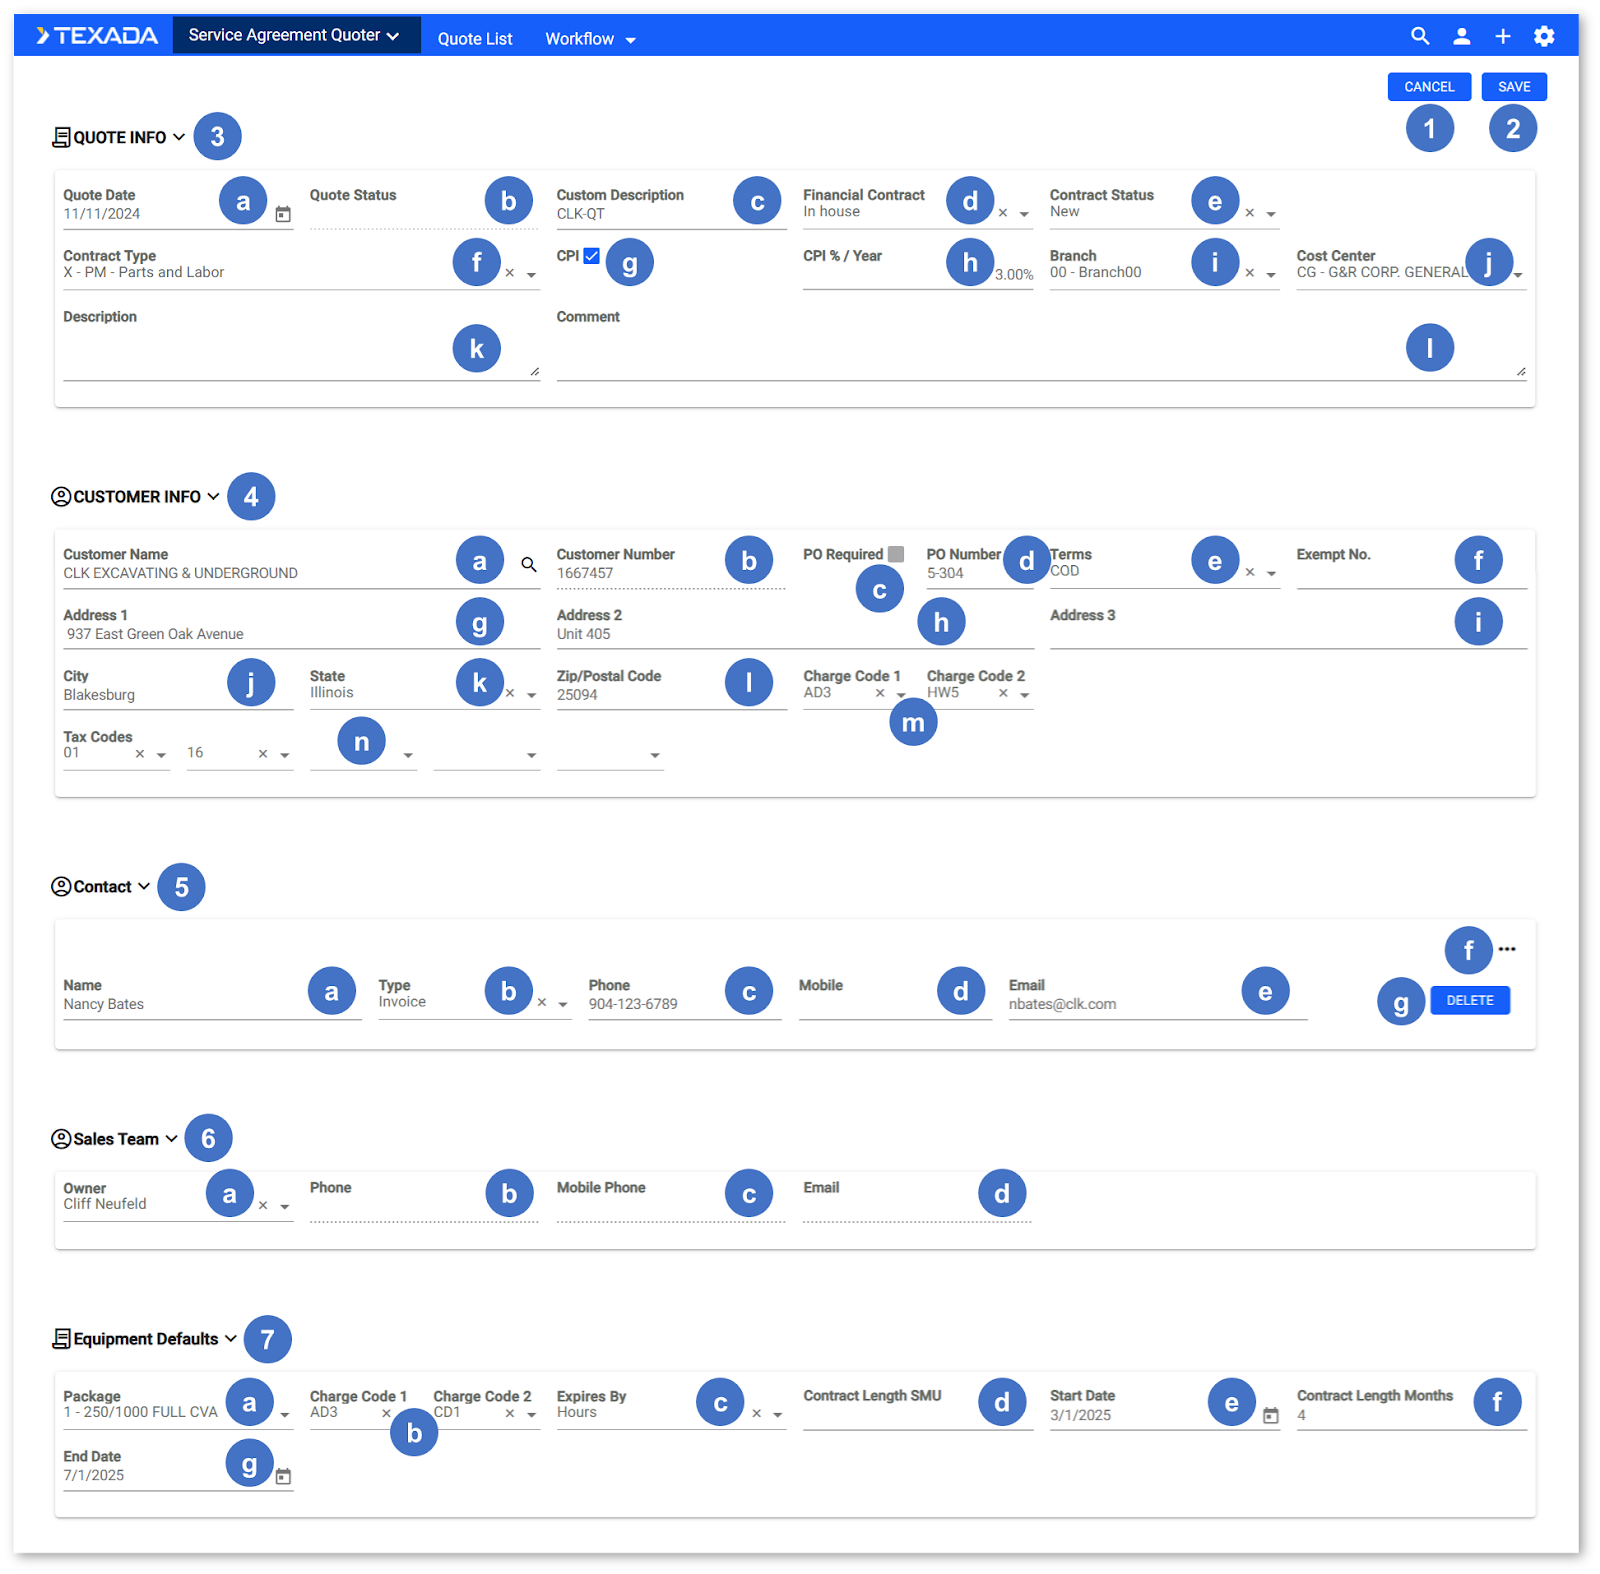
- Cancel Button
Click to cancel Quote creation and return to the Quote List page. - Save Button
Click to create the Quote and advance to the Quote Details screen. This button will be disabled if any required fields have not been filled out. - Quote Info Panel
This panel contains basic information about the Quote. Click on the panel header to expand or collapse it.- Quote Date
The date of the Quote’s creation. This defaults to the current date but can be manually overwritten. - Quote Status
The Quote’s current status. This will always be blank at the time of the Quote’s creation. - Custom Description
A brief custom description for the Quote. - Financial Contract
The Quote’s financial contract type. - Contract Status
Indicates whether the Quote’s financial contract is a new contract or a renewal. - Contract Type
The Quote’s Contract type. Contract types are managed via the Contract Types page. - CPI Checkbox
Check to subject the Contract to year-over-year price escalation based on the Consumer Price Index (CPI). Uncheck to opt out of price escalation. - CPI % / Year
The yearly CPI price increase of the Contract, expressed as a percentage of the Contract amount. Accepts a value from 0% to 100% with up to two decimal places. If the CPI checkbox (3d) is enabled, the price of the Contract will automatically increase by the CPI % each year. - Branch
The branch to which the Quote belongs. Branches are managed via the Branches and Cost Centers screen in Texada ServiceLink. - Cost Center
The cost center to which the Quote belongs. Cost Centers are managed via the Branches and Cost Centers screen in Texada ServiceLink. - Description
A description of the Quote. - Comment
Any additional comments.
- Quote Date
- Customer Info Panel
This panel contains information on the Quote’s Customer. Click on the panel header to expand or collapse it.- Customer Name
The name of the Customer for whom the Quote is being built. Click on this field to open the Customer Search window and select a Customer. - Customer Number
The Customer’s number. This number is pulled from the Customer’s profile and cannot be edited. - PO Required Checkbox
Indicates whether a PO number is required for the selected Customer. This value is pulled from the Customer’s profile and cannot be edited from this screen. - PO Number
The PO number of the purchase order associated with this Quote. - Terms
The Customer’s payment terms (charge, COD, etc.) - Exempt No.
The Customer’s tax exemption number. - Address 1
The first line of the Customer’s street address. - Address 2
The second line of the Customer’s street address. - Address 3
The third line of the Customer’s street address. - City
The Customer’s city. - State
The Customer’s province or state. - Zip/Postal Code
The Customer’s zip or postal code. - Charge Codes
The Customer’s charge codes. Up to two charge codes can be selected. - Tax Codes
The Customer’s tax codes. Up to five tax codes can be selected.
- Customer Name
- Contact Panel
The panel contains information on the Customer Contacts associated with the Quote. Click on the panel header to expand or collapse it.- Name
The Contact’s name. - Type
The Contact’s type (SMU, Invoice, or Location). This value is used in the Customer Quote document and will later be pushed to Equipment Monitoring Toolkit (EMT). - Phone
The Contact’s phone number. - Mobile
The Contact’s mobile phone number. - Email
The Contact’s email address. - Add Contact
Click the three dots, then select “Add Contact” to add another Contact (Name, Type, Phone, Mobile, Email) to the Quote. - Delete Button
Click to remove a Contact from the Quote.
- Name
- Sales Team Panel
This panel contains information on the owner of the Quote.- Owner
The Quote’s owner. Click on the drop-down to open a list of Users, then select a User to make them the owner of the Quote. - Phone
The owner’s phone number. This number is pulled from the owner’s profile and cannot be edited from this screen. - Mobile Phone
The owner’s mobile number. This number is pulled from the owner’s profile and cannot be edited from this screen. - Email
The owner’s email address. This address is pulled from the owner’s profile and cannot be edited from this screen.
- Owner
- Equipment Defaults Panel
This panel contains a number of default settings that will be applied to the equipment added to the Quote. Click on the panel header to expand or collapse it.- Package
Click to select a Package that will be automatically applied to each eligible piece of equipment added to the Quote. Packages are managed via the Packages screen (administrators only). - Charge Codes
The equipment charge codes. Up to two charge codes can be selected. - Expires By
Select whether the Contract will expire by Service Meter Units (Hours), Date, or Both. If “Both” is selected, the Contract will expire by whichever comes first. - Contract Length SMU
The default Contract length in Service Meter Units (hours). - Start Date
The default Contract start date. - Contract Length Months
The default Contract length in months. - End Date
The default Contract end date.
- Package
Customer Search
Click on the Customer Name field in the Customer Information panel to open the Customer Search window. This window allows you to search for and select a Customer to assign to the Quote being created.
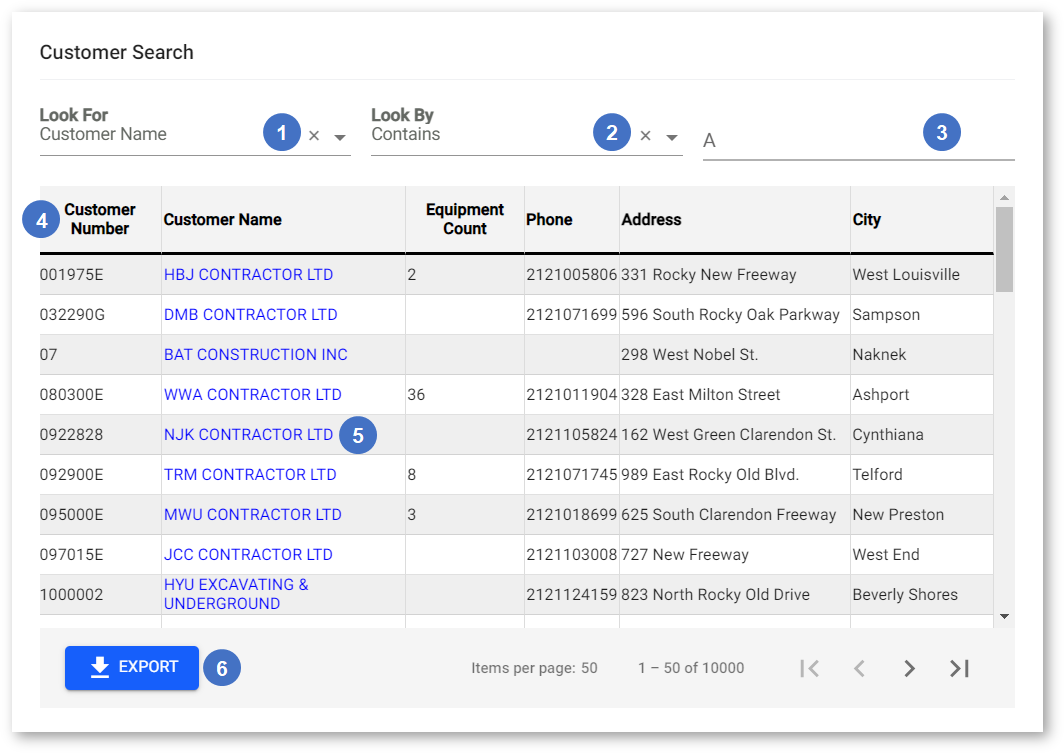
- Look For
Click to select a field to search by. You can search by Customer Name, Customer Number, or Serial Number. - Look By
Click to select one of the following search options:- Contains: When text is entered into the Search bar (3), all Customers whose “Look For” field (1) contains the entered text will be returned.
- Starts With: When text is entered into the Search bar (3), all Customers whose “Look For” field (1) starts with the entered text will be returned.
- Equals: When text is entered into the Search bar (3), all Customers whose “Look For” field (1) exactly matches the entered text will be returned.
- Search Bar
Begin typing into the Search bar to fetch a list of Customers based on the text entered. - Customer Table
This table contains a list of Customers that match the search criteria outlined in the Look For, Look By, and Search Bar fields. Click and drag the column headers to rearrange the columns. - Customer
Click on a Customer’s name to add that Customer to the Quote. - Export Button
Click to export the contents of the Customer Table as a comma-separated values (.csv) file. Depending on your browser’s settings, you may be prompted to select a download location, or the file may be automatically downloaded to your Downloads folder.