.png?width=365&height=50&name=Texada%20Logo%20(Black).png)
Quick Reference
- Once a Quote created in Service Agreement Quoting has been won, click the “Create Contract” button
in the top-right corner of the Quote Details screen to generate a CVA Contract based on the Quote. This will add a “CVA Contract” option to the left navigation menu of the Quote Details screen. Click on this option to view the CVA Contract page.
- The CVA Contract page allows you to manage the details of the Quote’s CVA Contract, as well as push this Contract to your ERP system. It consists of two panels:
- CVA Contract Header Information: Contains basic information about the Contract.
- Equipment List: Lists the equipment included in the Contract. Click the right / down arrow to the left of a piece of equipment’s row
to expand or collapse it. Click the “Send to ERP” button
to send the Contract to your ERP system.
The Quote Details Screen
This page is part of a series on the Quote Details Screen in Service Agreement Quoting. The structure of this screen and its subscreens is as follows:
- The Quote Details Screen
- Quote Header
- CVA Contract (you are here)
- Customer Details
- Revision Details
Introduction
Once a Quote created in Service Agreement Quoting has been won, the user can create a CVA Contract based on the Quote by clicking the “Create Contract” button in the top-right corner of the Quote Details screen:
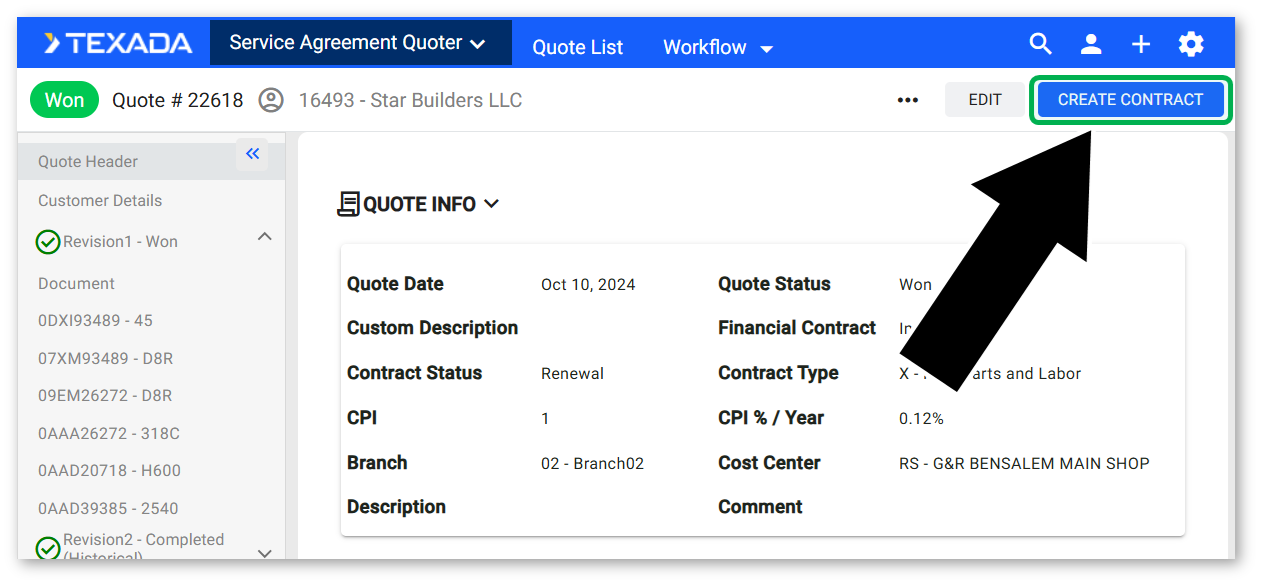
Once a CVA Contract has been created, a “CVA Contract” option will appear in the left navigation menu of the Quote Details page. Click on this option to navigate to the CVA Contract subscreen, where you can view and manage the details of the CVA Contract based on the Quote, as well as push this Contract to your ERP system.
CVA Contract
Default values for a number of fields on this screen can be configured via the CVA Contract Configuration - Global Defaults screen.
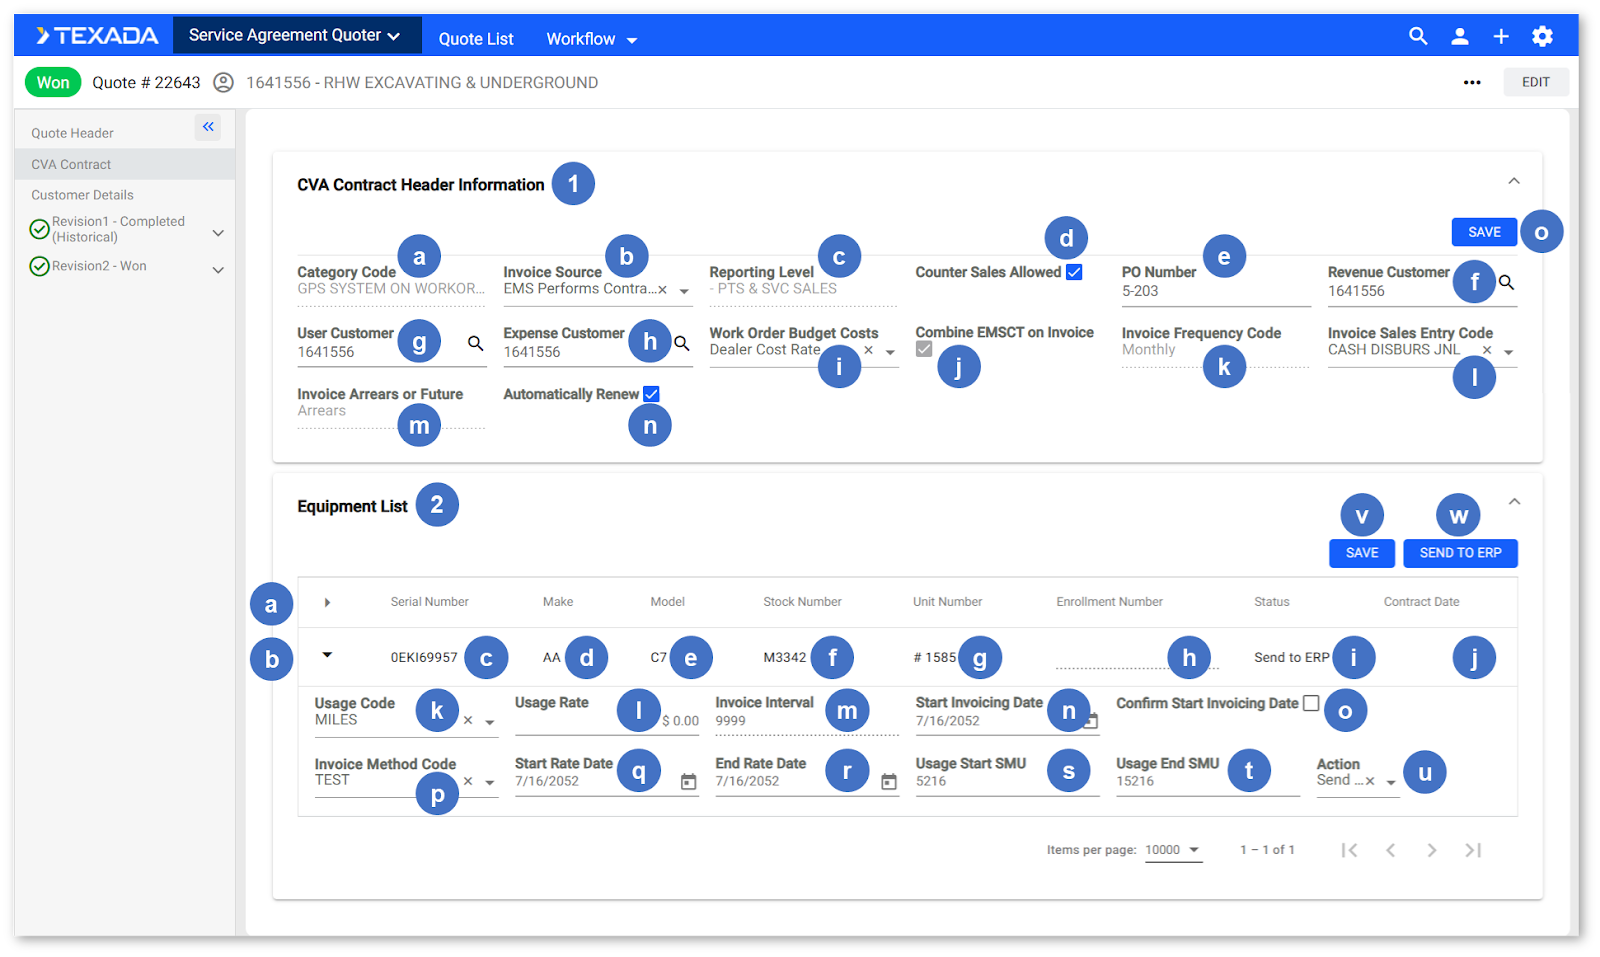
- CVA Contract Header Information Panel
This panel contains basic information about the CVA Contract. Click on the panel’s header to expand or collapse it.- Category Code
The Contract’s category. - Invoice Source
The Contract’s invoice source.- EMS Combination Invoicing
- EMS Performs Contract Invoicing
- Work Order Performs Contract Invoicing
- Reporting Level
The Contract’s two-character reporting level code. This captures the Contract’s differential pricing, accounting, or taxing treatment within a single charge code. - Counter Sales Allowed Checkbox
Check to allow Parts to be applied to the Contract. - PO Number
The PO number of the purchase order associated with the Contract. - Revenue Customer
The revenue Customer associated with the Contract. Click on this field to open the Customer Search window and select a different Customer. - User Customer
The user Customer associated with the Contract. Click on this field to open the Customer Search window and select a different Customer. - Expense Customer
The expense Customer associated with the Contract. Click on this field to open the Customer Search window and select a different Customer. - Work Order Budget Costs
Controls the costs posting to IAS and the costs analysis from CT.- Dealer Cost Rate
- Dealer Sell Rate
- Dealer Invoiced Price
- Combine EMSCT on Invoice Checkbox
Check to combine Equipment Maintenance and Service (EMS) and Contract Tracking costs on invoices generated from this Contract. - Invoice Frequency Code
The frequency at which invoices for this Contract will be generated. - Invoice Sales Entry Code
The entry code used when sending sale dollars to GLII. - Invoice Arrears or Future
Determines whether the billing is produced for a past time period or usage, or whether the billing is produced for the coming time period or usage. - Automatically Renew Checkbox
Check to allow automatic renewal of the Contract. - Save Button
Click to save your changes.
- Category Code
- Equipment List Panel
This panel contains the list of equipment included in the Contract. Click on the panel’s header to expand or collapse it.- Equipment List
Lists the pieces of equipment included in the Contract. Click on a column header to sort the table by the contents of that column. Click and drag the column headers to reorder the columns. Click the right / down arrow in the top-left corner of the table - Equipment
A piece of equipment included in the Contract. Click the right / down arrow to the left of the equipment’s row - Serial Number
The equipment’s serial number. - Make
The equipment’s make. - Model
The equipment’s model. - Stock Number
The equipment’s stock number. - Unit Number
The equipment’s unit number. - Enrollment Number
The equipment’s enrollment number. The behavior of this field is determined by two factors: the SAQ.CVA.Contract.Generate.Enrollment.Number.FromDBS.Enabled configuration key and the “Enrollment Number Pattern” field on the CVA Contract Configuration - Global Defaults screen.
If the configuration key is enabled, enrollment numbers will be generated by DBS. If the configuration key is disabled, enrollment numbers may either be manually entered or automatically generated by SAQ, based on the option selected for the “Enrollment Number Pattern” field. - Status
The equipment’s current status. If there are any issues with the information entered for the piece of equipment, a warning message will be displayed here. - Contract Date
The equipment’s Contract date. - Usage Code
The equipment’s usage code. - Usage Rate
The per-interval usage rate of the piece of equipment, in dollars. The interval to which this rate applies is established via the “Usage Rate Calculation” field on the CVA Contract Configuration - Global Defaults screen. - Invoice Interval
Determines when to invoice the Contract. - Start Invoicing Date
The date on which the Contract should begin invoicing. - Confirm Start Invoicing Date
Check to confirm the Start Invoicing Date (2n). - Invoice Method Code
The type of invoicing to be used for this piece of equipment. - Start Rate Date
The equipment’s start rate date. - End Rate Date
The equipment’s end rate date. - Usage Start SMU
The Service Meter Unit (SMU) value at which usage should start for this piece of equipment. - Usage End SMU
The Service Meter Unit (SMU) value at which usage should end for this piece of equipment. - Action
The action to take with this piece of equipment when the “Send to ERP” button (2w) is clicked.- Send to ERP
- Link to ERP
- Save Button
Click to save your changes. - Send to ERP Button
Click to send the Contract to your ERP system. This button will be disabled if any issues exist with the information included for the equipment on the Contract. See the Status column (2i) for more information.
- Equipment List