.png?width=365&height=50&name=Texada%20Logo%20(Black).png)
Quick Reference
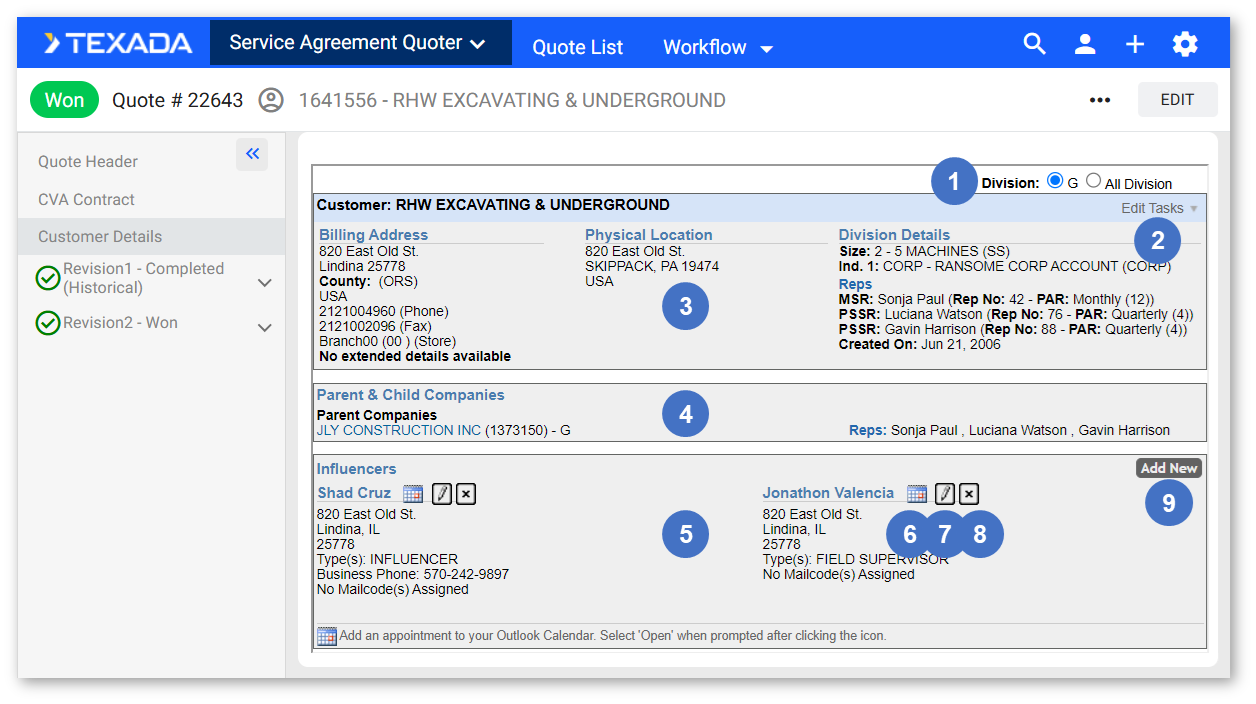
- The Customer Details subscreen of the Quote Details screen provides a window into Customer’s profile in Customer Search. Customer information can be viewed and edited from this screen. To access this screen, access the Quote Details screen of the Quote you’d like to edit, then select “Customer Details” in the left navigation menu.
- Use the Division toggle in the top-right corner of the subscreen to toggle between viewing and editing Customer details for a single Division or all Divisions.
- Use the “Edit Tasks” menu in the top-right corner of the subscreen to edit the Customer’s information.
- Click the calendar icon
 next to an influencer’s name to download an appointment file for that influencer. Click the pencil icon
  to edit their record. Click the X icon
 to delete it.
- Click the “Add New” button
in the top-right corner of the Influencers panel to add a new influencer record.
The Quote Details Screen
This page is part of a series on the Quote Details Screen in Service Agreement Quoting. The structure of this screen and its subscreens is as follows:
- The Quote Details Screen
- Quote Header
- CVA Contract
- Customer Details (you are here)
- Revision Details
Introduction
The Quote Details screen in Service Agreement Quoting contains all of the information about an existing Quote. It comprises a number of subscreens, one of which is the Customer Details screen.
The Customer Details screen provides a window into Customer’s profile in Customer Search. Customer information can be viewed and edited from this screen. To access this screen, access the Quote Details screen of the Quote you’d like to edit, then select “Customer Details” in the left navigation menu.
Customer Details
- Division Selector
Click the radio buttons to toggle between viewing and editing Customer details for a single Division or all Divisions. - Edit Tasks Menu
Click to access a number of options for editing the Customer record. Selecting one of these options will open an edit window powered by Customer Search:- Edit Name and Billing Address: Edit the Customer’s account type (Cash / Charge / COD), name, billing address, and contact information.
- Edit the Physical Location: Edit the Customer’s account type and physical address.
- Delete this customer: Delete the Customer.
- Add Division: Add a new Division record to the Customer.
- Edit Division Information: Edit the information of the currently-selected Division (1).
- Assign to This Customer: Click to assign this Quote to the Customer.
- Customer Information
Contains the Customer’s billing address and physical address, as well as the details of the currently-selected Division (1). - Parent & Child Companies Information
Contains information on the Customer’s parent and child companies, if any. Click on a company’s name to view their information in Customer Search. - Influencers
Contains information on the Customer’s influencer contacts. - Create Calendar Appointment Button
Click the calendar icon next to an influencer’s name to create and download an “appt.ics” file that can be opened in the calendar software of your choice to schedule an appointment with that influencer. The file will contain a summary of the Customer’s account as of the current day, including a breakdown of their accounts receivable, their currently-rented equipment, their last customer call, their open work orders, and their current reservations.
Depending on your browser’s settings, the appt.ics file may be downloaded directly to your Downloads folder, or you may be prompted to select a download location. Open the file to select the calendar software with which it should be opened.
For more information on .ics files, see the following article at fileinfo.com: “.ICS File Extension”. - Edit Influencer Button
Click the pencil icon next to an influencer’s name to edit their record. - Delete Influencer Button
Click the X icon - Add New Button
Click to add a new influencer record.