.png?width=365&height=50&name=Texada%20Logo%20(Black).png)
Quick Reference
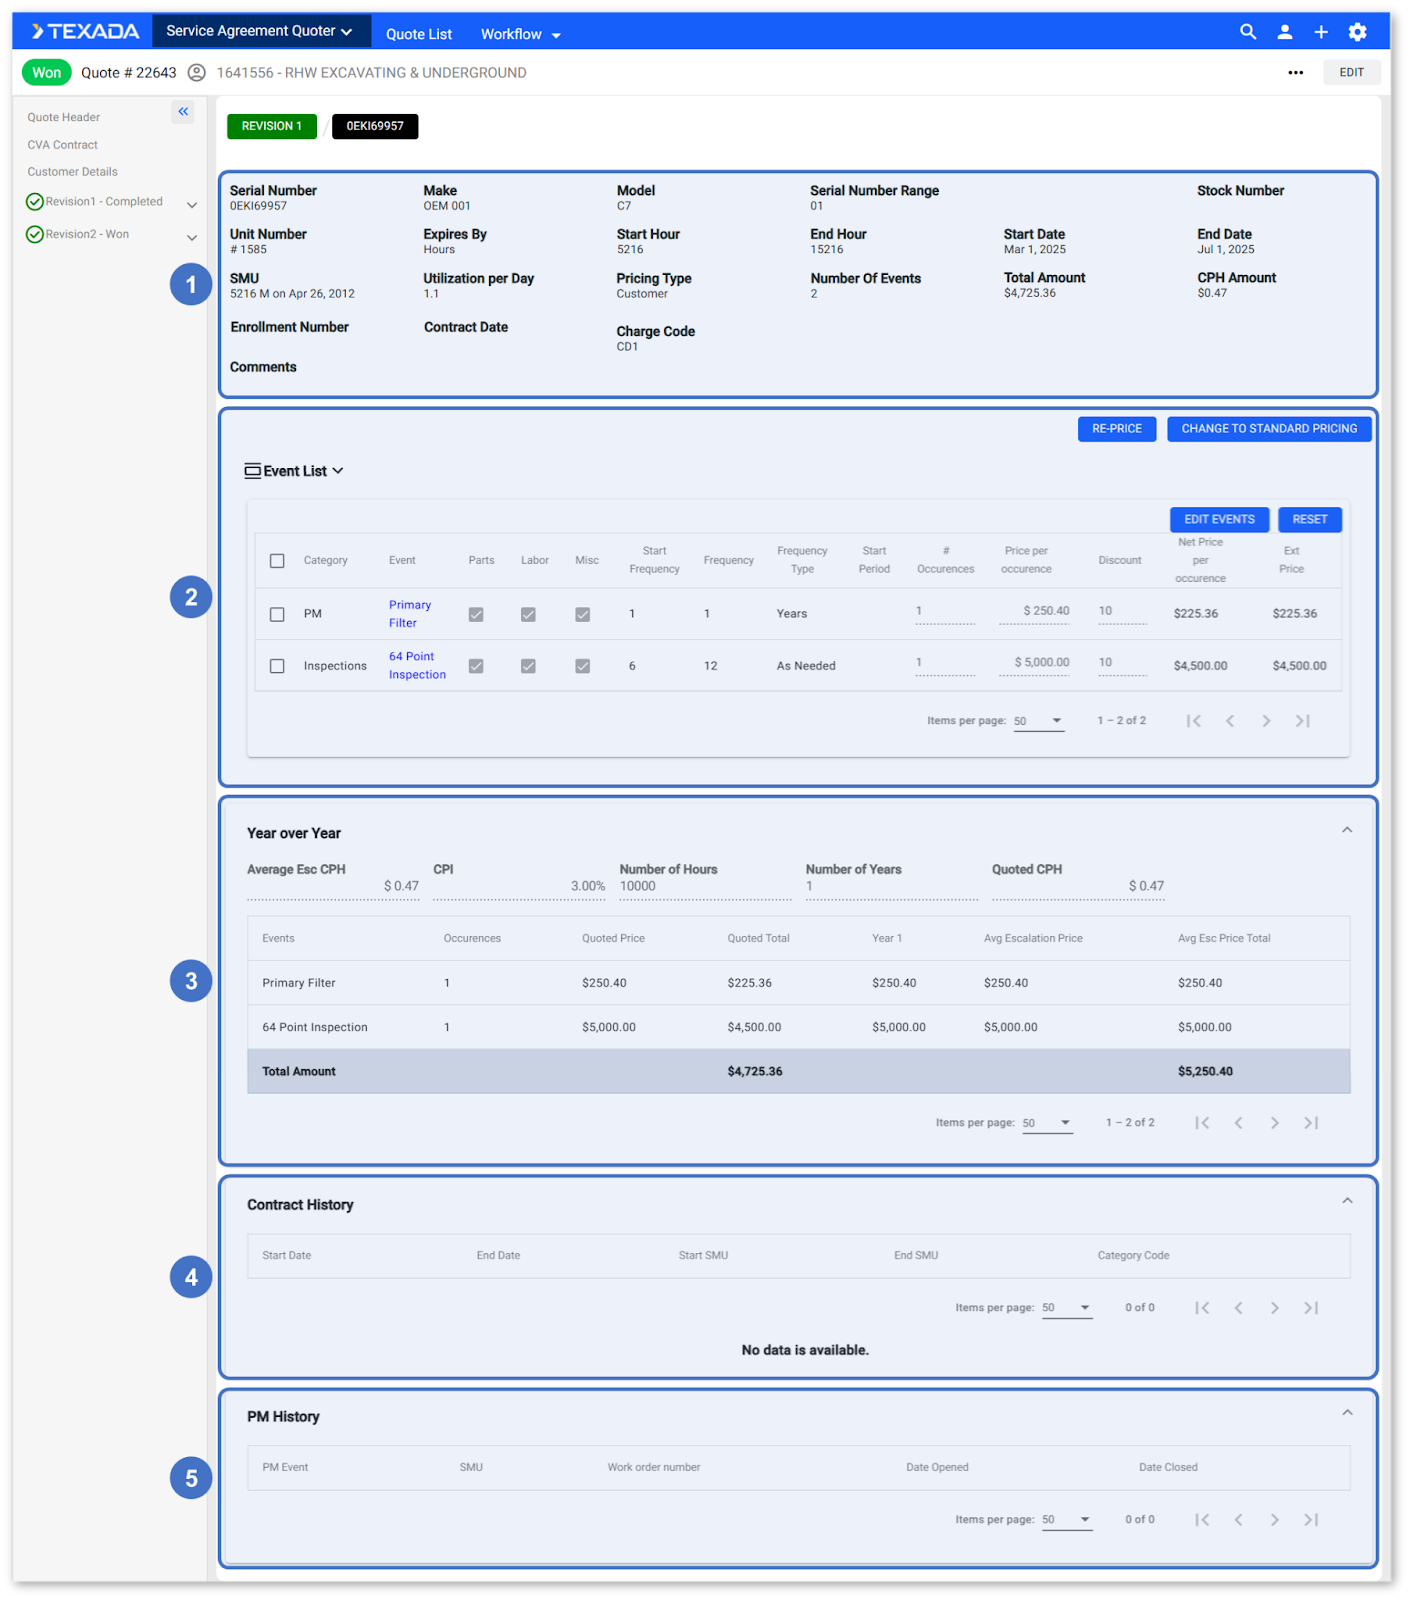
- When building out a Quote in SAQ, it is possible to create multiple Revisions (versions) of the same Quote and edit each Revision independently. Each piece of equipment added to a Revision can likewise be managed via its own Equipment Details screen. To access this screen, click on the equipment’s serial number in the left navigation menu under the Revision to which it belongs.
- The Equipment Details Screen comprises five panels:
- Overview Panel: Contains read-only information about the piece of equipment.
-
- Event List Panel: Contains the list of Events available to be completed for this piece of equipment under the current Revision.
- Click the “Edit Events” button
to edit the Events included in the Revision for this piece of equipment.
- Click the “Change Pricing” button
to toggle between standard pricing and Customer pricing.
- If using Customer pricing, click the “Re-Price” button
to reset the pricing of the Events selected for the piece of equipment.
- Click the “Reset” button
to reset all Parts, Labor, and Misc changes for all Events included for the current piece of equipment to the defaults for that package.
- Click the “Edit Events” button
- Year over Year Panel: Contains a breakdown of future maintenance planned for the piece of equipment.
- Contract History Panel: Contains a list of previous Contracts for the piece of equipment.
- PM History Panel: Contains a list of previous PM Events for the piece of equipment.
- Event List Panel: Contains the list of Events available to be completed for this piece of equipment under the current Revision.
- Click the “Edit Events” button
- Click the “Add Manual Event” button
to add a custom Event to the piece of equipment.
- Select one or more Events in the Add Events panel, then click “Add Selected Events” to add them to the equipment.
- Click the “Add Manual Event” button
The Quote Details Screen
This page is part of a series on the Quote Details Screen in Service Agreement Quoting. The structure of this screen and its subscreens is as follows:
- The Quote Details Screen
- Quote Header
- CVA Contract
- Customer Details
- Revision Details
- Revision Documents
- Equipment Details (you are here)
Introduction
When building out a Quote in SAQ, it is possible to create multiple Revisions (versions) of the same Quote and edit each Revision independently. As each Revision is created, it will appear in the left navigation menu of the Quote Details screen.
Each piece of equipment added to a Revision can likewise be managed via its own Equipment Details screen. To access this screen, click on the equipment’s serial number in the left navigation menu under the Revision to which it belongs.
Equipment Details Screen
- Overview Panel
Contains basic information about the piece of equipment. - Event List Panel
Contains the list of Events to be completed for the piece of equipment under the current Revision. - Year over Year Panel
Contains a breakdown of future maintenance planned for the piece of equipment. - Contract History Panel
Contains a list of previous Contracts for the piece of equipment. - PM History Panel
Contains a list of previous PM Events for the piece of equipment.
Overview Panel
This panel contains basic information about the piece of equipment being viewed. This information is read-only.
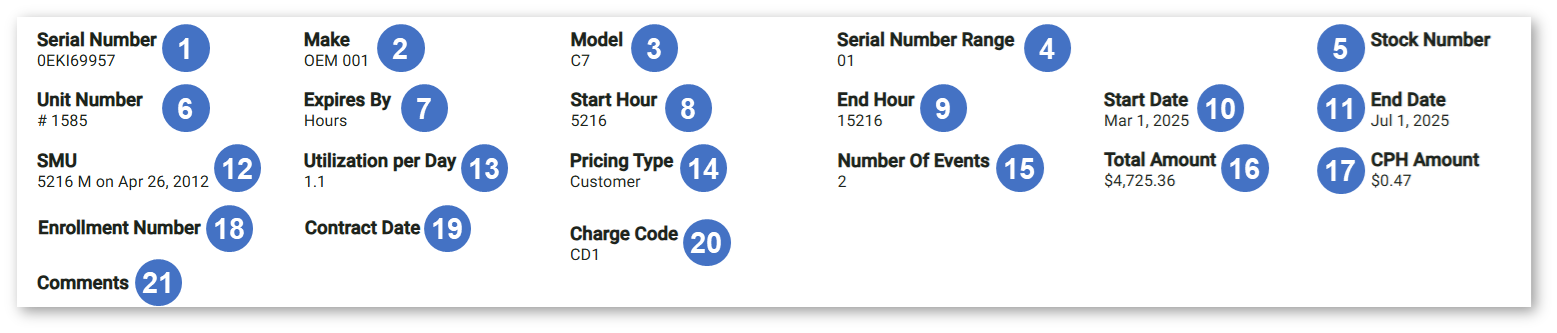
- Serial Number
The equipment’s serial number. - Make
The equipment’s make. - Model
The equipment’s model number. - Serial Number Range
The serial number range to which the equipment belongs. - Stock Number
The equipment’s stock number. - Unit Number
The equipment’s unit number. - Expires By
Whether Contracts for this piece of equipment will expire by Service Meter Units (Hours), Date, or Both. If “Both” is selected, Contracts will expire by whichever comes first. - Start Hour
The starting hour of the Contract for this piece of equipment. - End Hour
The ending hour of the Contract for this piece of equipment. - Start Date
The start date of the Contract for this piece of equipment. - End Date
The end date of the Contract for this piece of equipment. - SMU
The equipment’s current Service Meter Units (SMU). - Utilization Per Day
The equipment’s daily utilization, measured in Service Meter Units (hours). - Pricing Type
The equipment’s pricing type (Standard or Customer).- Standard: The default pricing model. The pricing for each Event will be based on that Event’s Standard Job and cannot be modified.
- Customer: Customer-based pricing. The pricing for each Event will be based on the Customer’s class. Additional pricing options will be available from the Event Details screen, including the ability to add Labor and Misc charges.
- Number of Events
The total number of Events that will be completed for this piece of equipment under the current Revision. - Total Amount
The total cost of all the Events that will be completed for this piece of equipment under the current Revision. - CPH Amount
The total cost per hour (CPH) of all the Events that will be completed for this piece of equipment under the current Revision. - Enrollment Number
The equipment’s enrollment number. - Contract Date
The equipment’s Contract date. - Charge Code
The equipment’s charge code. - Comments
Any additional comments.
Event List Panel
This panel contains the list of Events to be completed for this piece of equipment under the current Revision.
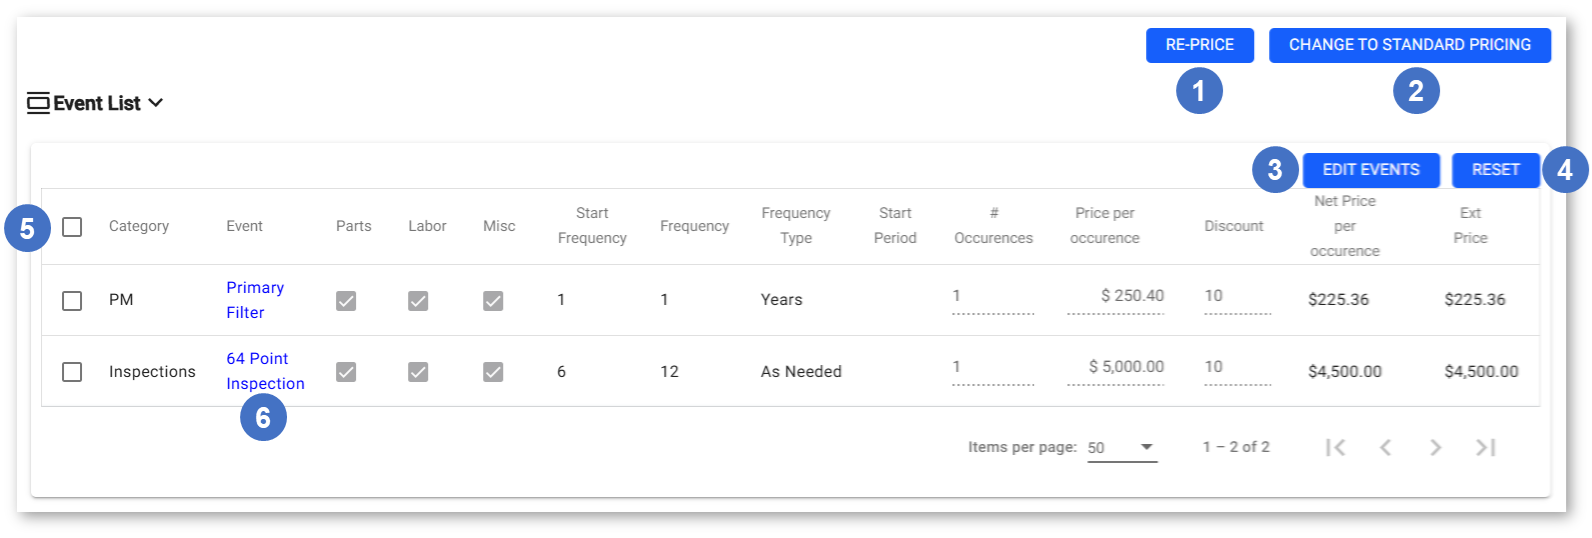
- Re-Price Button
This button will only be visible when the current pricing type is “Customer” (2). Click to recalculate the pricing for the Events included for the current piece of equipment based on the Customer’s class. - Change Pricing Button
Click to toggle the equipment’s pricing type. If the current pricing type is Standard, the button will read “Change to Customer Pricing”. If the current pricing type is Customer, the button will read “Change to Standard Pricing”. Changing the equipment’s pricing type will reset its Events’ pricing as well as the Parts, Labor, and Misc columns.- Standard: The default pricing model. The pricing for each Event will be based on that Event’s Standard Job and cannot be modified.
- Customer: Customer-based pricing. The pricing for each Event will be based on the Customer’s class. Additional pricing options will be available from the Event Details screen, including the ability to add Labor and Misc charges.
- Edit Events Button
Click to edit the Events included for this piece of equipment. See Edit Events for more information. - Reset Button
Click to reset all Events and undo all changes to Parts, Labor and Misc for all Events included in this Quote. Click this button once to open a confirmation pop-up, then select “Yes” to perform the reset. - Event List
The list of Events available to be completed for this piece of equipment under the current Revision. - Event
Click on an Event to open its details page. See “The Quote Details Screen - Event Details” for more information.
Edit Events
Click the “Edit Events” button in the top-right corner of the Event List panel to edit the Events included for the current piece of equipment. This will reveal the Add Events panel, where you can select Events to be added to the piece of equipment. It will also change the action buttons in the top-right corner of the Event List.
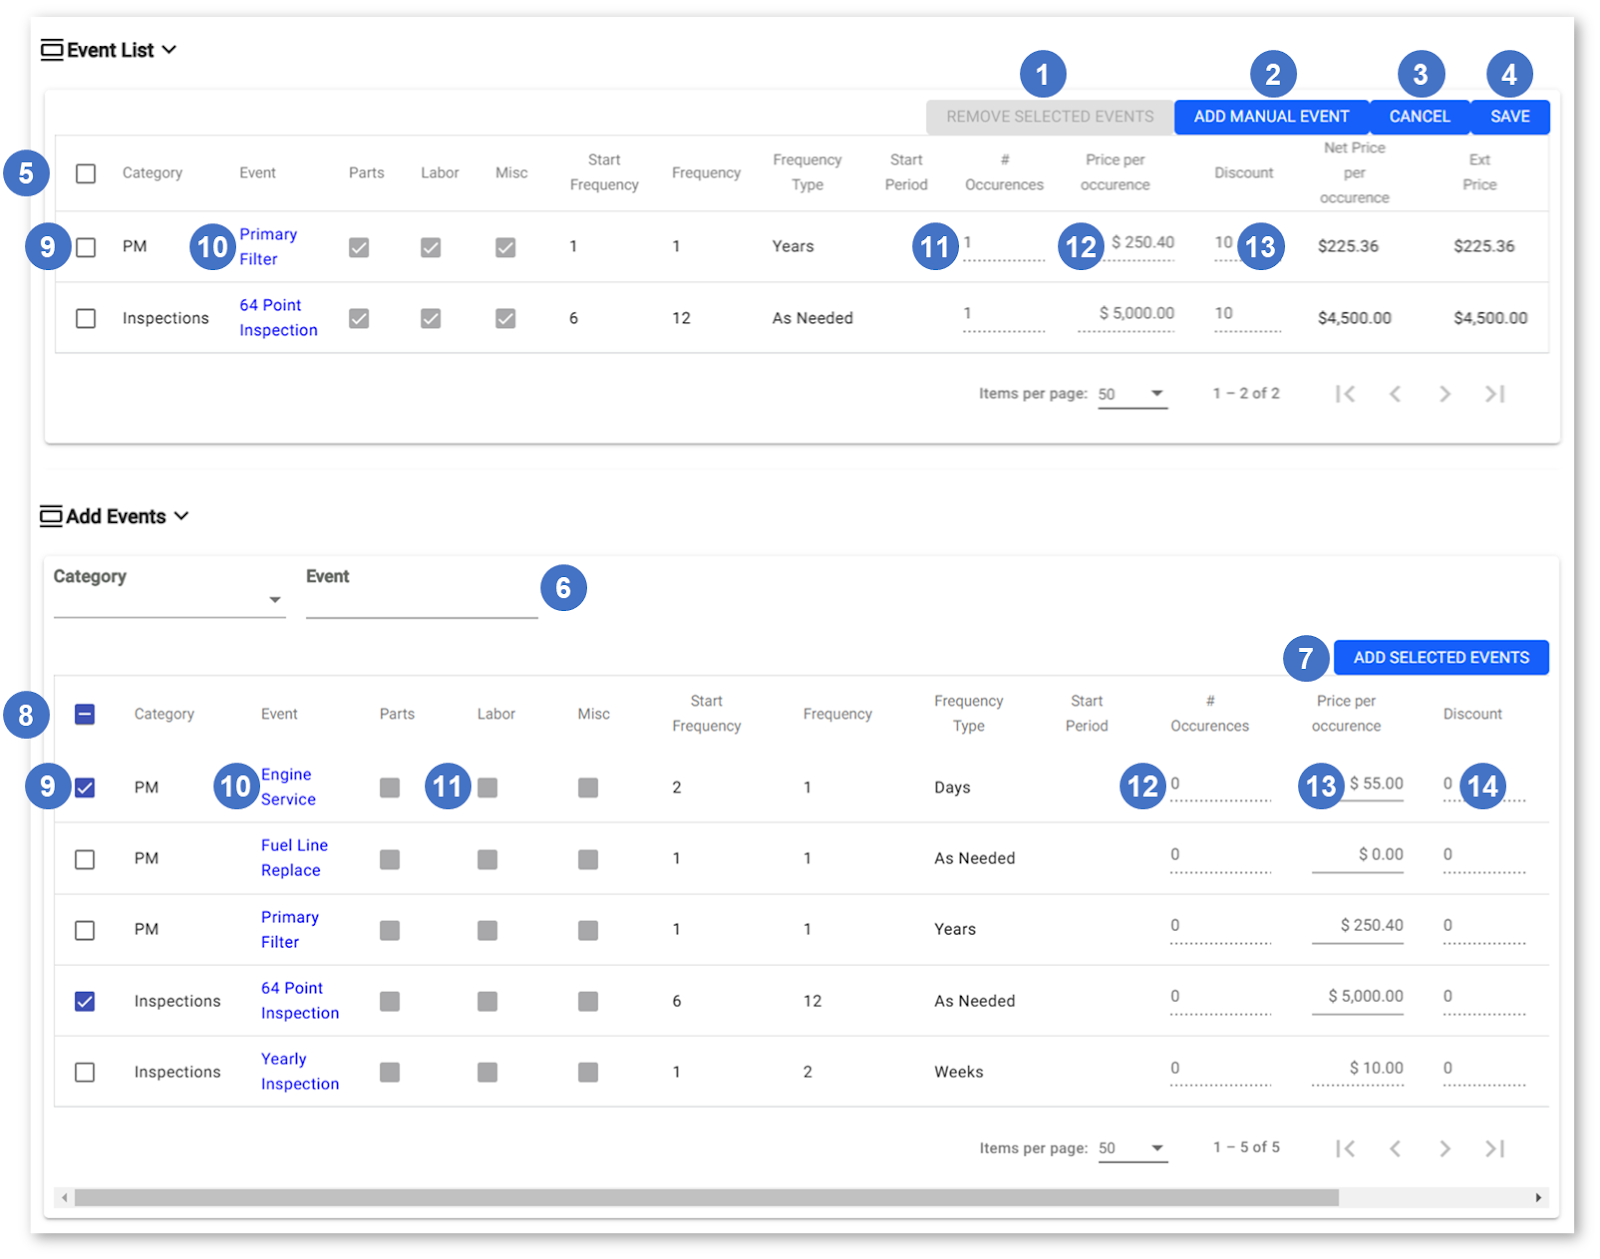
- Remove Selected Events Button
Click to remove any Events selected in the Event List (5) from the piece of equipment. - Add Manual Event Button
Click to add a custom Event to the Event List. This will open the “Add Manual Event” window, where you can fill out all of the information for your event. At minimum, you will need to input an Event Name, Category, Job Code, Price, number of Occurrences, Start Frequency, Frequency, Frequency Type, and Start Period. - Cancel Button
Click to stop editing Events without saving your changes. - Save Button
Click to save your changes and stop editing Events. - Event List (Current)
Lists all of the Events currently included for this piece of equipment. - Category / Event Filters
Select an Event category from the drop-down or begin typing the name of an Event into the search bar to filter the Add Event panel (8) by the selected options. - Add Selected Events Button
Click to add events selected in the Add Event panel (8) to this piece of equipment. - Event List (Add)
Contains a list of all the Events that can be added to the Revision for this piece of equipment. - Select Event Checkbox
Check this checkbox to select an Event. Select one or more Events in the current Event List (5), then click “Remove Selected Events” (1) to remove them from the equipment. Select one or more Events in the Add Events panel (8), then click “Add Selected Events” (7) to add them to the equipment. - Event
Click on an Event’s name to view its details. See “The Quote Details Screen - Event Details” for more information. - Parts / Labor / Misc
The checkboxes in the Parts / Labor / Misc columns indicate whether each Event includes a Parts, Labor, and/or Misc component. If manual override is enabled for that Event Type, these checkboxes can be toggled on and off. - # Occurrences
The number of occurrences of the Event included in the Revision. Enter a whole number into this field to add occurrences of the Event to the Revision. The “Net Price per Occurrence” and “Ext Price” columns will automatically be updated as the number of occurrences is changed. - Price Per Occurrence
The per-occurrence price of the Event. - Discount
The percentage discount applied to this Event. Enter a number between 0 and 100 (with up to four decimal places) to discount the Net Price per Occurrence of the Event by the percentage entered. This discount is applied on top of any other discounts applied at the Customer level.
Year over Year Panel
This panel contains a breakdown of future maintenance work scheduled for this piece of equipment, according to the Events included in the current Revision.
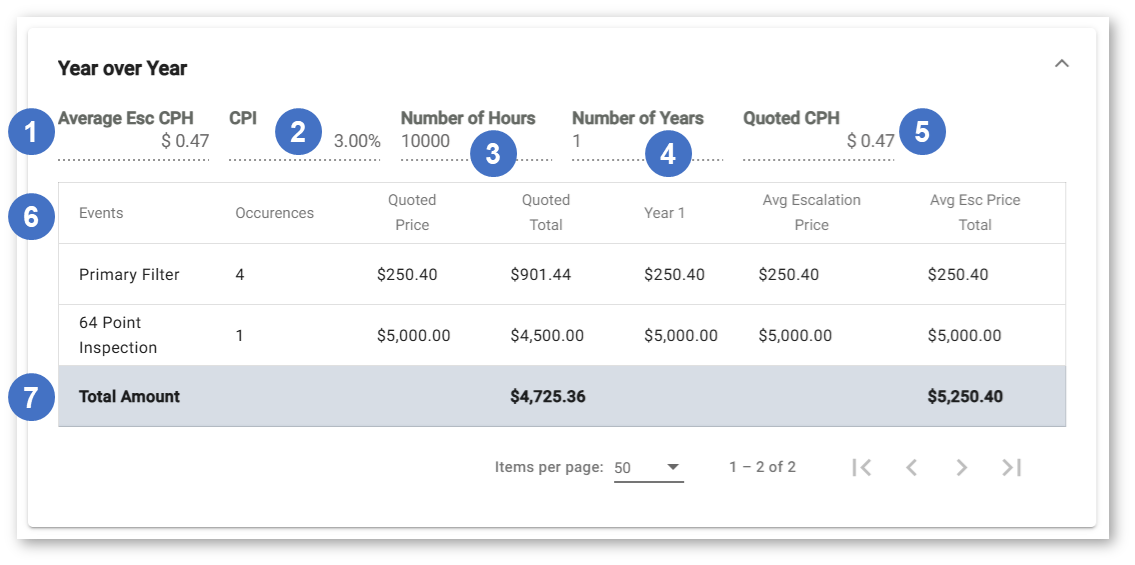
- Average Esc CPH
The average escalation cost per hour (CPH) of all the work scheduled for the piece of equipment. This number represents the overall CPH of all future work for the equipment, after taking yearly CPI price escalation into account. - CPI
The yearly Consumer Price Index (CPI) price increase of the work scheduled for the piece of equipment, expressed as a percentage of the total. - Number of Hours
The total number of work hours scheduled for this piece of equipment. - Number of Years
The number of years for which maintenance will be performed on the piece of equipment, based on the future occurrences of the Events currently included in the Revision. - Quoted CPH
The quoted cost per hour (CPH) of the work included for this piece of equipment under the current Revision. If CPI price escalation is enabled and the scheduled work spans multiple years, it is expected that this number will be lower than the “Average Esc CPH” (1). - Events Table
Contains a breakdown of future Events scheduled for the piece of equipment. - Totals
The bottom row of the Events table summarizes the total cost of all future Events.