.png?width=365&height=50&name=Texada%20Logo%20(Black).png)
Quick Reference
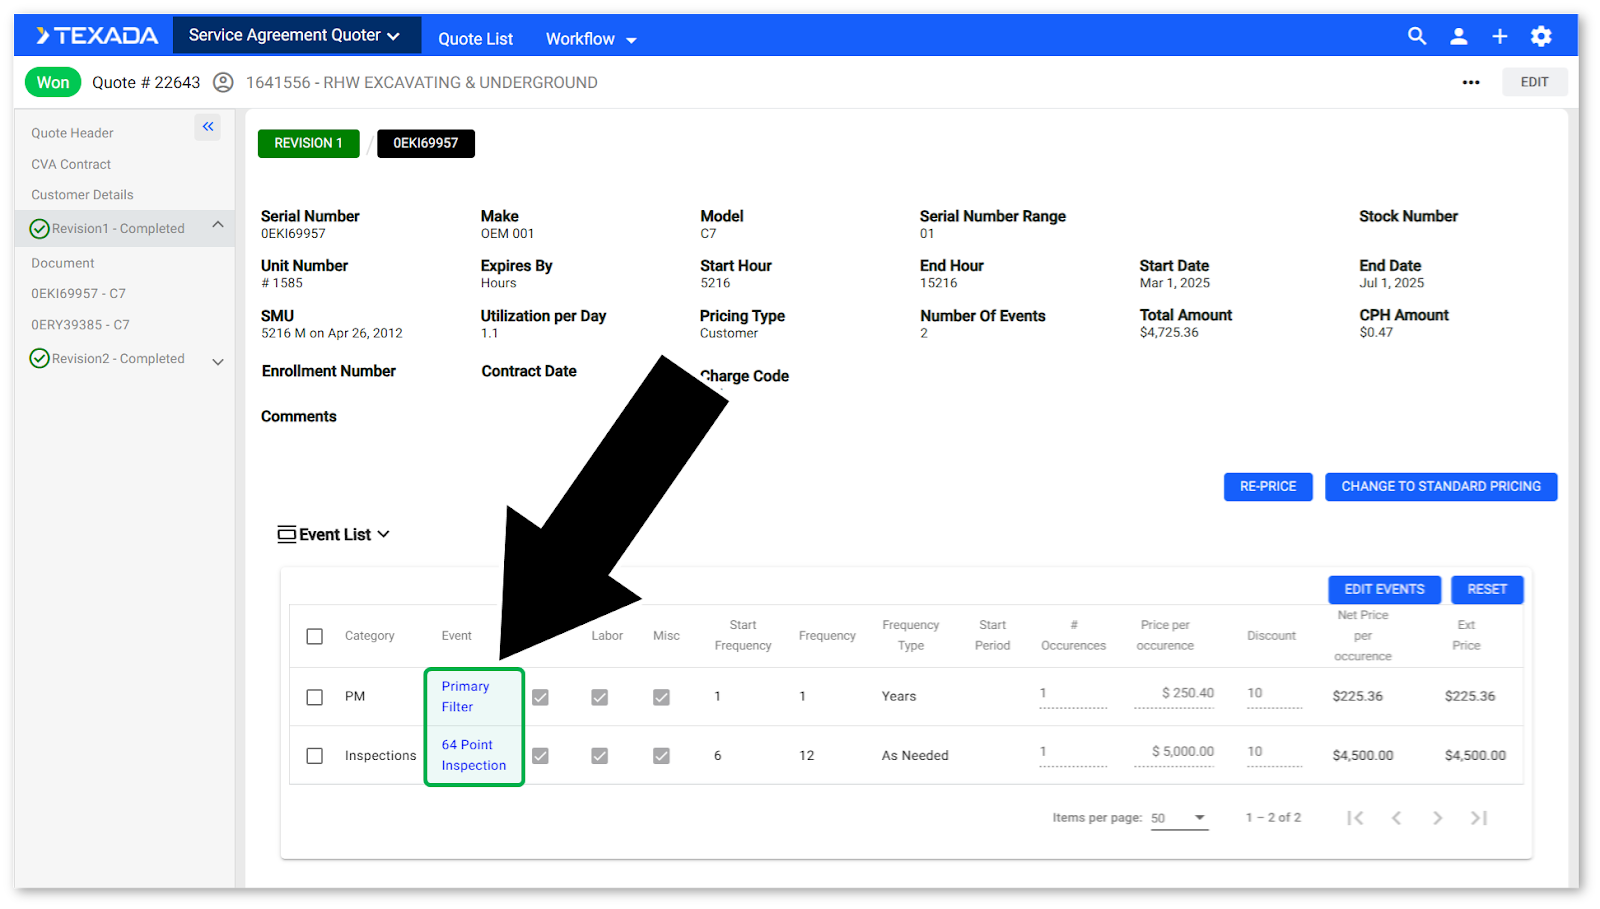
- Clicking on an Event in the Event List panel of the Equipment Details screen will open the Event Details screen. This screen allows you to view and manage the details of a specific Event.
- The Event Details screen comprises eight different panels:
- Event Header Panel: Contains basic information about the Event.
- Financials Panel: Contains a breakdown of the Parts, Labor, and Misc costs of the Event.
- Segment Header Panel: Allows you to set default values for the Event’s segments.
- Detail List Panel: Contains a list of the segments included with this Event. Click on a segment to open its Operation Header.
- Notes & Special Instructions Panel: Allows you to enter notes and special instructions for the technician completing the Event.
- Parts Panel: Contains a breakdown of the Parts included in this Event.
- Click the Add Parts button
to open the Parts Search window and add Parts to the Event.
- Click the SIS button
to open the Import SIS Parts window and import Parts from Caterpillar’s Service Information System (SIS).
- Click the DBS button
to open the DBS Parts Document Import window and import Parts from DBS documents.
- Click the Add Parts button
- Labor Panel: Contains a breakdown of the Labor items included in this Event.
- Click the Add Labor button
to add Labor to the Event.
- Click the Add Labor button
- Misc Panel: Contains a breakdown of the Misc items included in this Event.
- Click the Add Miscellaneous button
to add a Miscellaneous item to the Event.
- Click the Add Miscellaneous button
The Quote Details Screen
This page is part of a series on the Quote Details Screen in Service Agreement Quoting. The structure of this screen and its subscreens is as follows:
- The Quote Details Screen
- Quote Header
- CVA Contract
- Customer Details
- Revision Details
- Revision Documents
- Equipment Details
- Event Details (you are here)
Introduction
When building out a Quote in SAQ, it is possible to create multiple Revisions (versions) of the same Quote and edit each Revision independently. As each Revision is created, it will appear in the left navigation menu of the Quote Details screen. Each piece of equipment added to a Revision will likewise be added to the left navigation menu, and can be managed via its own Equipment Details screen.
Clicking on an Event in the Event List panel of the Equipment Details screen will open the Event Details screen. This screen allows you to view and manage the details of a specific Event.
Event Details Screen
The Event Details screen consists of eight distinct panels. Click on a panel’s header to expand or collapse it.
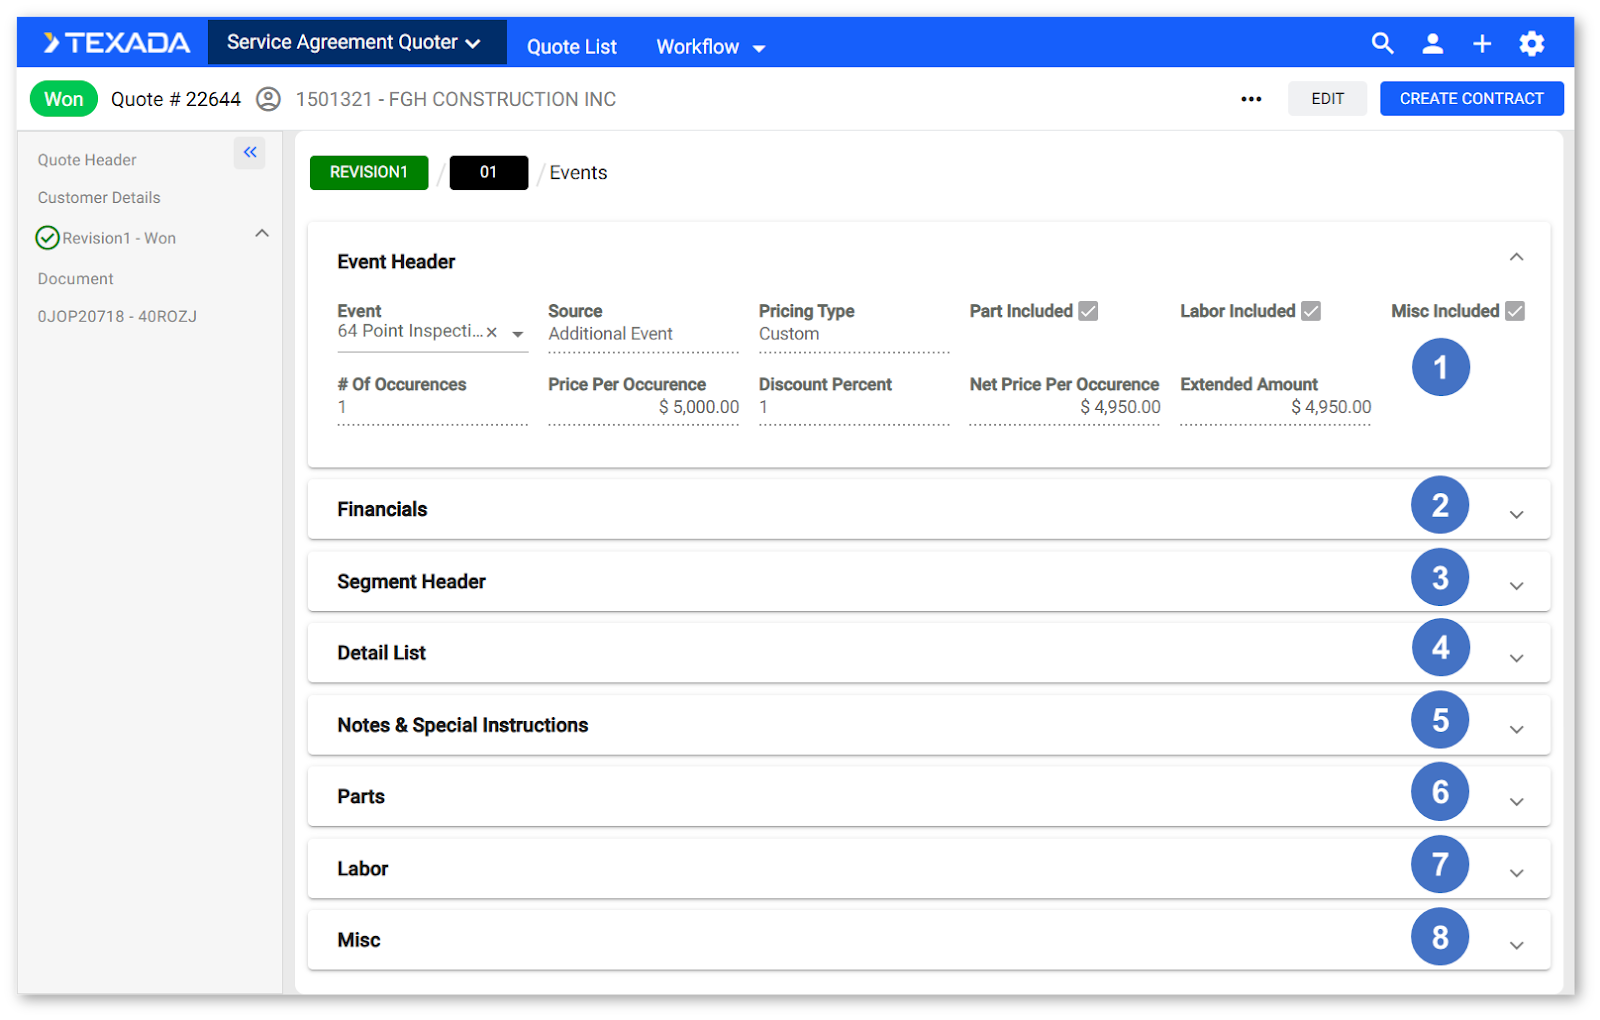
- Event Header Panel
Contains basic information about the Event. - Financials Panel
Contains a breakdown of the Parts, Labor, and Misc costs of the Event. These costs can be edited if the piece of equipment to which this Event applies is using Customer pricing. - Segment Header Panel
Contains default values for the Event’s segments. - Detail List Panel
Contains a list of the segments included with this Event. Click on a segment to open its Operation Header panel. - Notes & Special Instructions Panel
Allows you to enter notes and special instructions for the technician completing the Event. - Parts Panel
Contains a breakdown of the Parts included in this Event. - Labor Panel
Contains a breakdown of the Labor items included in this Event. These items can be edited if the piece of equipment to which this Event applies is using Customer pricing. - Misc Panel
Contains a breakdown of the Misc items included in this Event. These items can be edited if the piece of equipment to which this Event applies is using Customer pricing.
Event Header
This panel contains basic information about the Event, including its source, pricing type, Parts, Labor, and Misc inclusions, and number and price of occurrences.
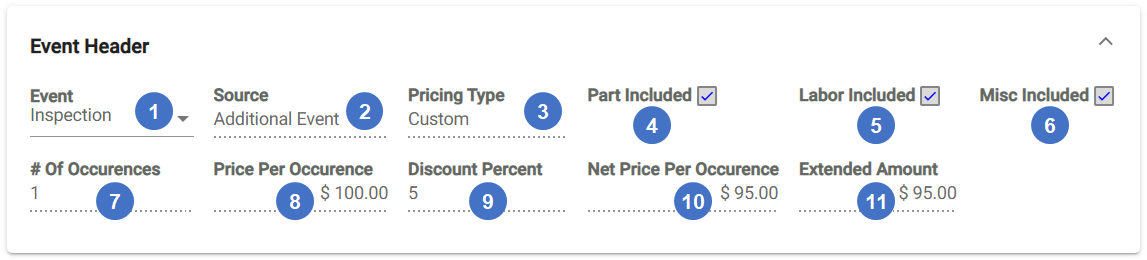
- Event
The Event’s name. - Source
The Event’s origin - Standard Job, Additional Event, or Flat Rate Exchange. - Pricing Type
The Event’s pricing type - Standard or Customer. This can be changed using the “Change Pricing” button on the Equipment Details screen. Events using Customer pricing can have their financials edited via the Financials panel. - Part Included
Indicates whether this Event includes a Parts component. - Labor Included
Indicates whether this Event includes a Labor component. - Misc Included
Indicates whether this Event includes a Misc component. - # Of Occurrences
The number of occurrences of this event included in the current Revision. - Price Per Occurrence
The base price per occurrence of this Event. - Discount Percent
The discount applied to this Event, expressed as a percentage of the total. - Net Price Per Occurrence
The price per occurrence of this Event taking discounts in account. Equal to Price Per Occurrence * (100-Discount Percent)%. - Extended Amount
The total cost of this Event. Equal to Net Price Per Occurrence * # Of Occurrences.
Financials
This panel contains a breakdown of the Parts, Labor, and Misc costs of the Event. If the Event is using Customer pricing, these costs can also be changed from this panel.
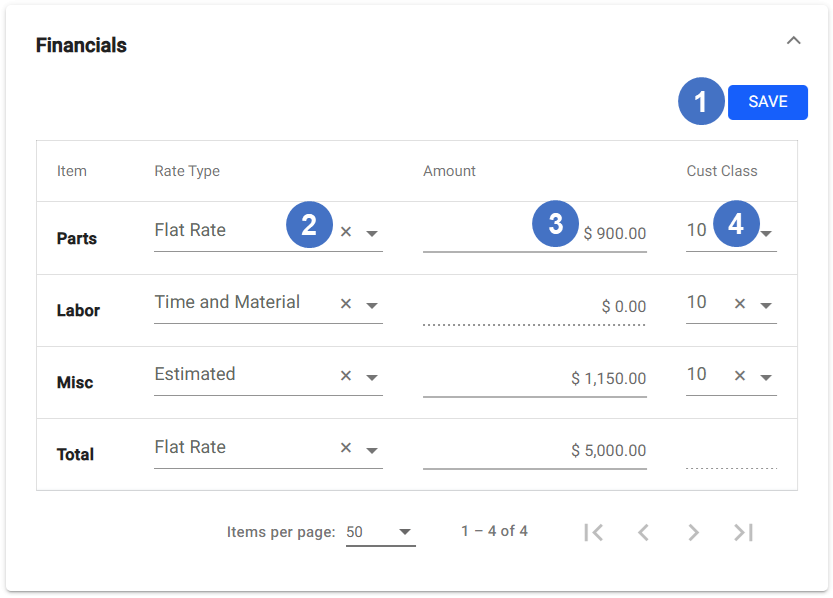
- Save Button
Click to save your changes. - Rate Type
The rate type for the component (Parts, Labor, Misc, or Total). If using Customer pricing, click on the drop-down to select a rate type.- Estimated: The cost of this component is an estimate and may change.
- Flat Rate: The cost of this component is a predetermined amount (flat rate).
- Time and Material: This cost of this component is based on the time and materials required to complete the work.
- Amount
The cost of the component (Parts, Labor, Misc, or Total). If using Customer pricing, this amount can be changed. - Cust Class
The Customer’s class. This can be set separately for each component and can affect the way that component’s costs are calculated.
Segment Header
This panel contains default values for the Event’s segments.

- Save Button
Click to save your changes. - Branch
The branch to which the Event’s segments belong. - Cost Center
The cost center to which the Event’s segments belong. - Std Job Ind
Standard Job Indicator. Indicates whether or not the Event is a Standard Job (Y or N). - Std Job Hrs
Standard Job Hours. - F/R Exchange
Flat Rate Exchange. - Job Code
The Event’s three-digit Job Code (Caterpillar SMCS code). - Component Code
The Event’s four-digit Component Code (Caterpillar SMCS code). - Modifier
The Event's modifier code (Caterpillar SMCS code). - Qty Code
The Event's quantity code (Caterpillar SMCS code). - Job Location
The Event's job location code (Caterpillar SMCS code). - Work Application
The Event's work application code (Caterpillar SMCS code). - Job Condition
The Event's job condition code. - Cab Type
The Event's cab type code (Caterpillar SMCS code). - Business Group
The Event's business group (Caterpillar SMCS code). - Shop/Field
Indicates whether the Event is a Shop (S) Event or Field (F) Event. - SIMS Req
Check to make SIMS required for the Event.
Detail List
This panel contains a list of the segments included with this Event. Click on a segment to open its Operation Header panel.
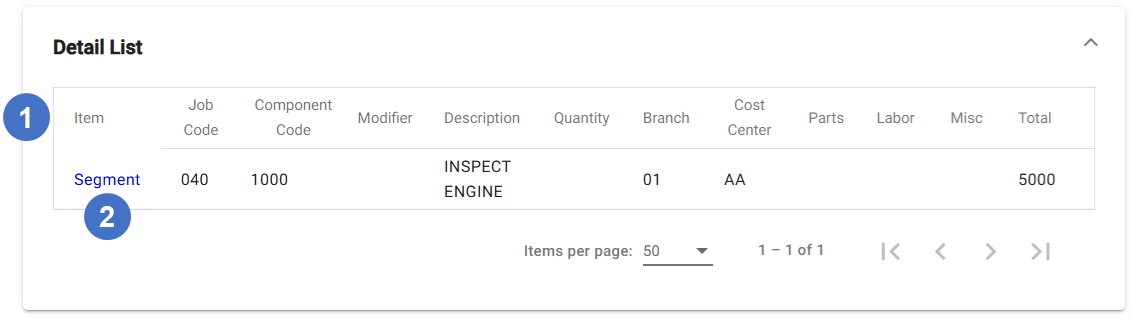
- Detail List
Lists the segments included with this Event. Click on a column header to sort the table by the contents of that column. Drag and drop the column headers to rearrange the columns. - Segment
Click on a segment’s name to open its Operation Header panel and see more information about that segment.
Operation Header
This panel will only be visible after clicking on a segment’s name in the Detail List panel directly above. It contains more detailed information about the selected segment, and allows you to overwrite the defaults established in the Segment Header panel.

- Save Button
Click to save your changes. - Operation No
The segment’s operation number. - Job Code
The segment’s three-digit Job Code (Caterpillar SMCS code). - Component Code
The segment’s four-digit Component Code (Caterpillar SMCS code). - Modifier
The segment’s modifier code (Caterpillar SMCS code). - Shop Field
Indicates whether the segment is a Shop (S) segment or Field (F) segment. - Business Group
The segment’s business group (Caterpillar SMCS code). - Qty
The segment’s quantity code (Caterpillar SMCS code). - Job Location
The segment’s job location code (Caterpillar SMCS code). - Work Application
The segment’s work application code (Caterpillar SMCS code). - Store No
The branch to which the segment belongs. - Cost Center
The cost center to which the segment belongs. - Std Job Hrs
Standard Job Hours.
Notes & Special Instructions
This panel allows you to enter notes and special instructions for the benefit of the technician who will be completing the work.
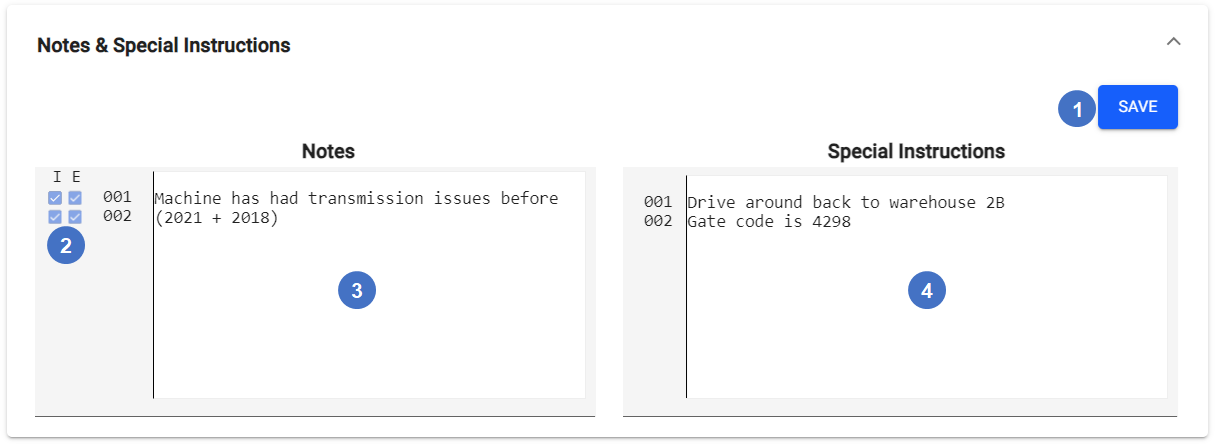
- Save Button
Click to save your changes. - Internal / External
These checkboxes allow you to set the visibility of each line of Notes. Checkboxes will continue to appear as more lines of Notes are added. Check the “I” checkbox to make that line of Notes visible internally. Check the “E” checkbox to make that line of Notes visible externally. - Notes
Use this field to enter notes for the segment. Each line of notes can be up to 49 characters in length, and a maximum of 999 lines can be entered. - Special Instructions
Use this field to enter special instructions for the segment. Each line of special instructions can be up to 49 characters in length, and a maximum of 999 lines can be entered.
Parts
This panel contains a breakdown of the Parts included in this Event.

- Refresh Button
Click to refresh the list of Parts. - SIS Button
Click to open the “Import SIS Parts” window. This allows you to import Parts from Caterpillar’s Service Information System (SIS). - DBS Button
Click to open the “DBS Parts Document Import” window. This allows you to import Parts from DBS documents. - Add Parts Button
Click to open the "Parts Search" window. This allows you to add Parts to the Event. - Save Parts Button
Click to save your changes. - Parts Table
Lists the Parts currently included in this Event. Click on a column header to sort the table by the contents of that column. Drag and drop the column headers to reorder the columns.
Import SIS Parts
Clicking the SIS button in the top-right corner of the Parts panel will open the Import SIS Parts window. This window allows you to import Parts from Caterpillar’s Service Information System (SIS) and add them to the Event.
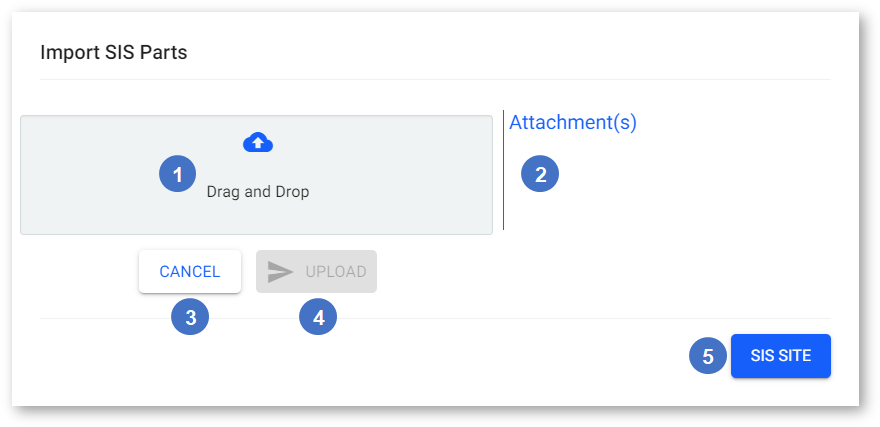
- Upload Area
Drag and drop a file into this area to upload Parts information to the Event. You can also click on this area to open your computer’s file manager and select a file. - Attachments
Uploaded files are listed here. Click the red Xnext to the name of the uploaded file to remove it and upload a different file.
- Cancel Button
Click to close the Import SIS Parts window without uploading a file. - Upload Button
Click to upload the selected file to the Event. - SIS Site Button
Click to open the Caterpillar sign-in page and access Cat SIS. You will need Caterpillar login credentials to proceed.
DBS Parts Document Import
Clicking the “DBS” button in the top-right corner of the Parts panel will open the DBS Parts Document Import window. This window allows you to import Parts from DBS documents and add them to the Event.
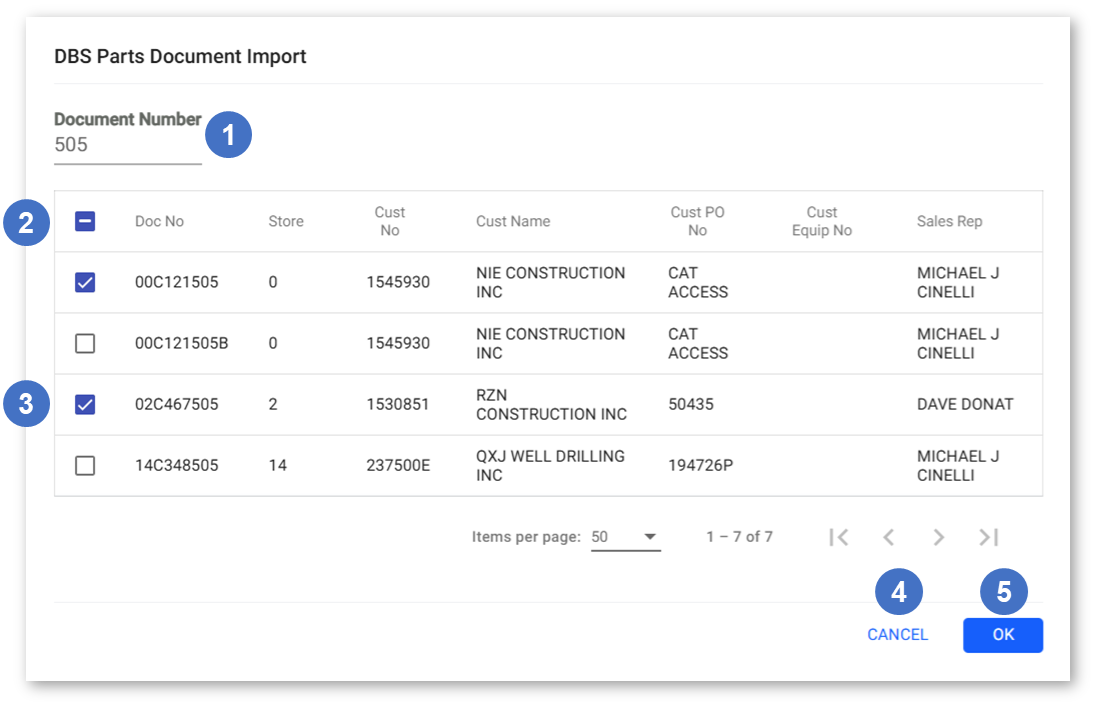
- Document Number
Enter a document number into the search bar to find DBS documents containing that number. - Document Table
Contains the list of DBS documents that match the current search terms. Click on a column header to sort the table by the contents of that column. Toggle the checkbox in the top-left corner of the table to select or deselect all documents. - Document Checkbox
Check the checkbox next to a DBS document to mark it for importing. Once you have selected all the documents whose Parts you want to add to the current Event, click the “OK” button (6). - Cancel Button
Click to close the DBS Parts Document Import window without importing Parts. - OK Button
Click to import Parts from all selected documents into the current Event.
Parts Search
Clicking the “Add Parts” button in the top-right corner of the Parts panel will open the Pearts Search window. This window allows you to search for Parts to add to the Event.
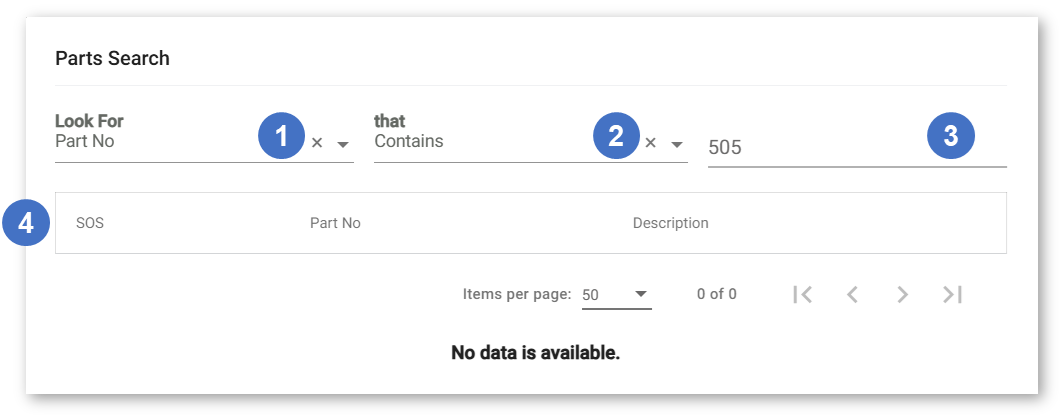
- Look For
Click on the drop-down to select whether to search for Parts by Part No or Part Description. - Search Condition
Select whether to search for Parts whose Part No or Description contains, begins with, or exactly matches the search terms. - Search Field
Begin typing into this field to search for Parts whose Part No or Description matches the terms entered. - Parts Table
Displays the list of Parts that match the current search terms. Click on a column header to sort the table by the contents of that column. Drag and drop the column headers to rearrange the columns.
Labor
This panel contains a breakdown of the Labor items included in this Event.
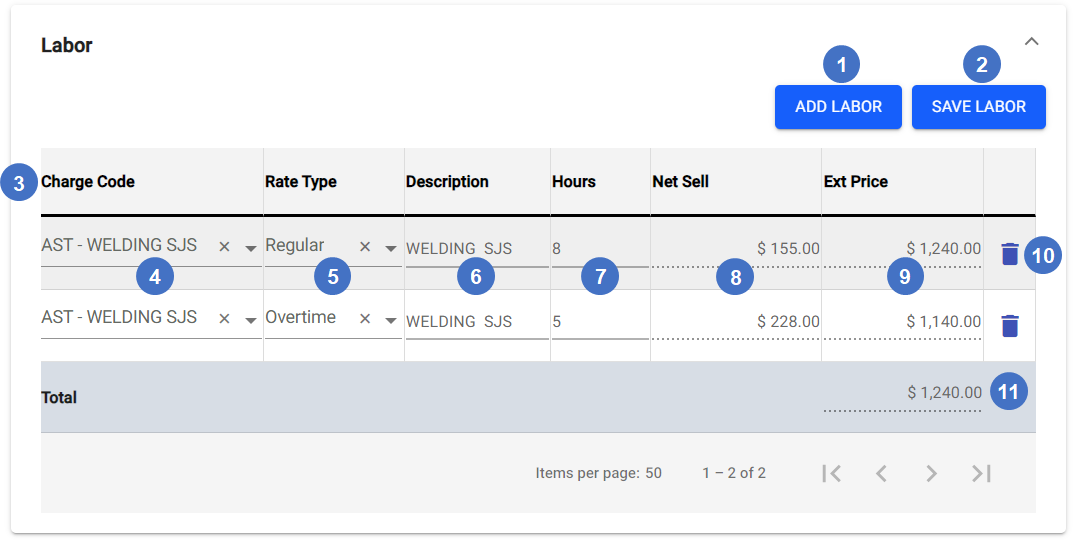
- Add Labor Button
Click to add a new empty row to the Labor table. - Save Labor Button
Click to save your changes. - Labor Table
Contains the list of all the Labor items included in this Event. Click on a column header to sort the table by the contents of that column. Drag and drop the column headers to rearrange the columns. - Charge Code
The Labor item’s charge code. - Rate Type
The Labor item’s rate type - Regular, Overtime, or Premium. - Description
The Labor item’s description. - Hours
The number of hours of work the Labor item represents. - Net Sell
The per-hour price of the Labor item. This is determined by the item’s charge code (4) and cannot be changed from this screen. - Ext Price
The total cost of this Labor item. Equal to Hours * Net Sell. - Remove Labor
Click the bin iconnext to a Labor item to remove it from the Event.
- Labor Total
The total cost of the Labor component of this event. Equal to the sum of the Ext Price of all Labor items.
Misc
This panel contains a breakdown of the Misc items included in this Event.
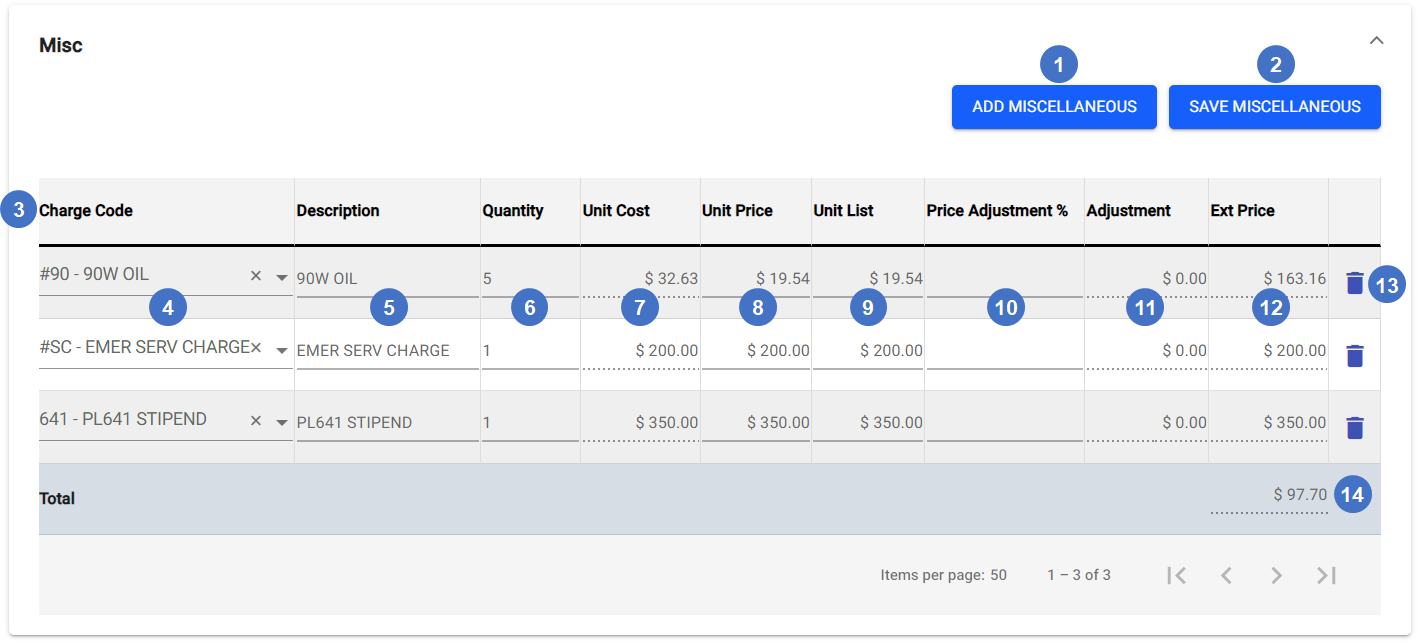
- Add Miscellaneous Button
Click to add a new empty row to the Miscellaneous table. - Save Miscellaneous Button
Click to save your changes. - Miscellaneous Table
Contains the list of all the Misc items included in this Event. Click on a column header to sort the table by the contents of that column. Drag and drop the column headers to rearrange the columns. - Charge Code
The Misc item’s charge code. - Description
The Misc item’s description. - Quantity
The quantity of the Misc item included in this Event. - Unit Cost
The post-adjustment per-unit selling price of the Misc item. Equal to Unit List * (100+Price Adjustment)%. - Unit Price
The per-unit purchasing cost of the Misc item. - Unit List
The pre-adjustment per-unit selling price of the Misc item. - Price Adjustment %
The percentage by which the item’s Unit List price should be increased to arrive at the Unit Cost. - Adjustment
The item’s price adjustment dollar amount. Equal to Unit List * Price Adjustment %. - Ext Price
The total selling price of the Misc item. Equal to Unit Cost * Quantity. - Remove Miscellaneous
Click the bin icon - Miscellaneous Total
The total cost of the Misc component of this event. Equal to the sum of the Ext Price of all Misc items.