An overview of the Settings Menu in Texada WorkFlow for iOS and Android.
Quick Reference
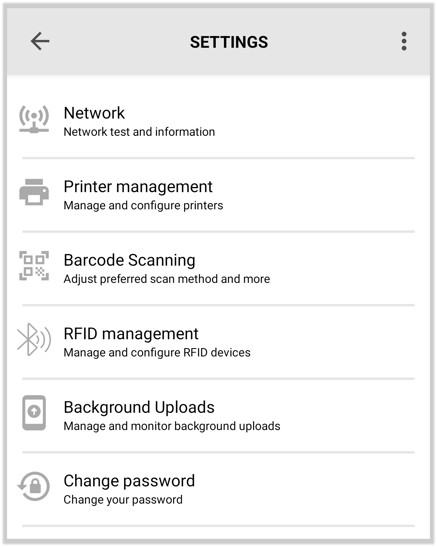
- The Settings menu in the Texada WorkFlow mobile application contains a number of options for configuring the way the application behaves. To access the Settings menu, tap the three vertical dots
 in the top-right corner of any screen in the app, then tap “Settings”.
 - The options available from the Settings menu include:
- Network: View network information and test your mobile device’s network connection.
- Printer Management: Connect Bluetooth printers to your device and print test pages.
- Barcode Scanning: Select whether to use your device’s camera or an external RFID device when scanning product barcodes.
- RFID Management: Connect RFID scanners to your device.
- Background Uploads: Review WorkFlow’s communication with Texada’s servers.
- Change Password: Change the password you use to login to Texada WorkFlow.
Introduction
The Settings menu in the Texada WorkFlow mobile application contains a number of options for configuring the way the application behaves. The following article provides an overview of the settings available from this page.
The Settings Menu
To access the Settings menu, tap the three vertical dots ![]() in the top-right corner of any screen in the app, then tap “Settings”.
in the top-right corner of any screen in the app, then tap “Settings”.
More information on the individual options within the Settings menu can be found below.
Network
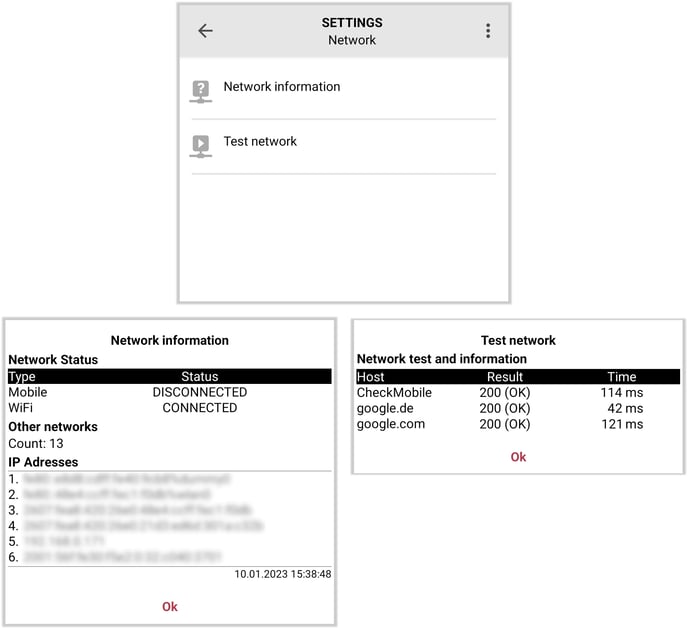
This option allows you to view network information and test your mobile device’s network connection. This feature is useful for troubleshooting purposes.
Tap “Network Information” to view information about your current network, including whether your device is connected via mobile data, WiFi, or both, your IP addresses, and the number of alternative networks your device is able to detect.
Tap “Test Network” to perform a connection test and confirm that your device is able to access the Internet. Your device will attempt to connect to Texada’s servers (CheckMobile) as well as google.de and google.com. A result of “200 (OK)” indicates a successful connection.
Printer Management
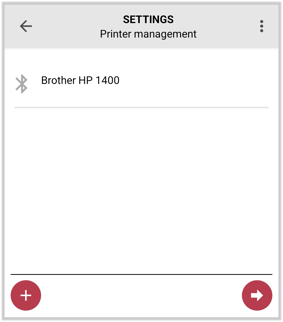
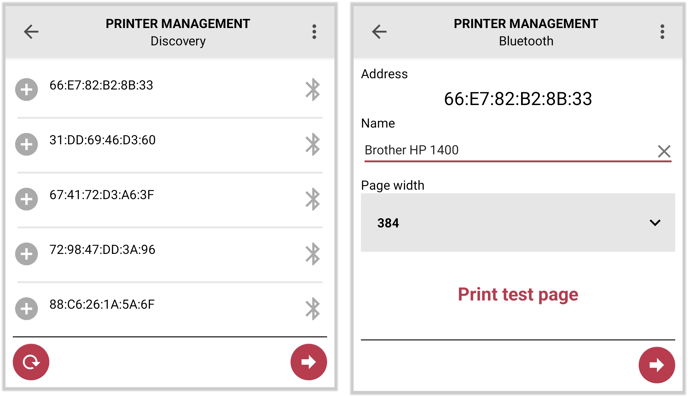
This option allows you to view printers connected to your device and to connect additional printers. Tap on a printer’s name to view its details.
Tap the red plus button ![]() to add a new printer. This will open the printer discovery screen (bottom-left), and your device will automatically start scanning for printers. Note that Bluetooth must be enabled on your mobile device in order to connect a printer. If you do not see the desired printer in the list, ensure that the printer is in Bluetooth pairing mode then tap the refresh button
to add a new printer. This will open the printer discovery screen (bottom-left), and your device will automatically start scanning for printers. Note that Bluetooth must be enabled on your mobile device in order to connect a printer. If you do not see the desired printer in the list, ensure that the printer is in Bluetooth pairing mode then tap the refresh button ![]() to search again.
to search again.
Once you have located the printer to which you wish to connect, tap its name in the list to open the printer details screen (bottom-right). Here you can enter a personalized name for the printer as well as print a test page. Once you are finished, tap the forward arrow ![]() to save the printer.
to save the printer.
Barcode Scanning
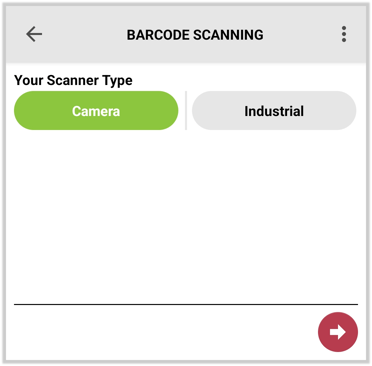
This option allows you to select the type of scanner used when performing inventory counts and other tasks to involve barcode scanning.
Select Camera to use your device’s camera as a barcode scanner.
Select Industrial to use an external RFID scanner as a barcode scanner. This will enable you to scan barcodes using one of the RFID devices connected to your mobile device via Bluetooth, as managed from the RFID Management screen.
RFID Management
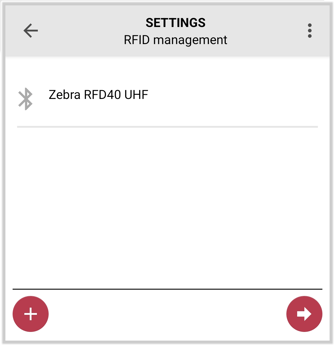
This option allows you to view RFID scanners connected to your device and to connect additional scanners. Tap on a scanner’s name to view its details.
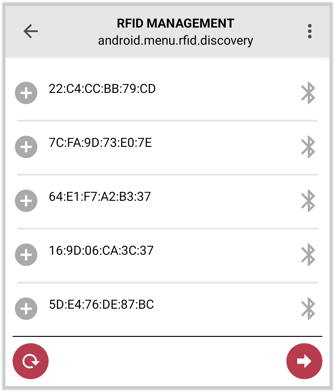
Tap the red plus button ![]() to add a new scanner. This will open the scanner discovery screen (right), and your device will automatically start searching for RFID devices. Note that Bluetooth must be enabled on your mobile device in order to connect a scanner. If you do not see the desired scanner in the list, ensure that the scanner is in Bluetooth pairing mode then tap the refresh button
to add a new scanner. This will open the scanner discovery screen (right), and your device will automatically start searching for RFID devices. Note that Bluetooth must be enabled on your mobile device in order to connect a scanner. If you do not see the desired scanner in the list, ensure that the scanner is in Bluetooth pairing mode then tap the refresh button ![]() to search again.
to search again.
Once you have located the scanner to which you wish to connect, tap its name in the list to view its details and enter a personalized name for the device. Once you are finished, tap the forward arrow ![]() to save the scanner.
to save the scanner.
To use an external RFID device to scan product barcodes when performing an inventory count, set your scanner type to “Industrial” on the Barcode Scanning screen.
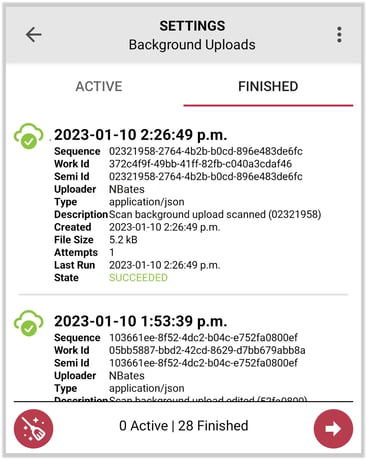
Background Uploads
This feature allows you to monitor the communication between the Texada WorkFlow mobile app and Texada’s servers. Whenever you take an action in the mobile app - such as scanning an item during an inventory count - a new background upload task is created and logged to this screen. Each upload includes the time it was created, the User who initiated it, and a brief description of the data being uploaded.
The “Active” tab shows background uploads that are currently underway. The “Finished” tab shows uploads that are either complete or have failed. Tap the broom button ![]() to clear the list of finished uploads.
to clear the list of finished uploads.
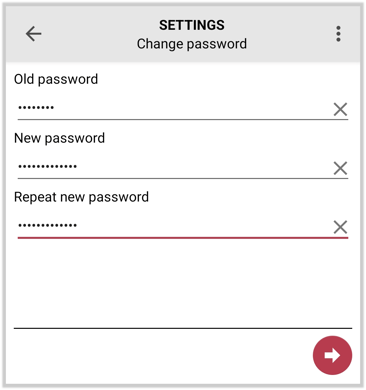
Change Password
This option allows you to change the password you use to login to Texada WorkFlow. Note that passwords are shared between the WorkFlow web application and the WorkFlow mobile application, and that changing your password here will also change your password for the web application.
To change your password, enter your current password into the “Old password” field and your new password into the “New password” and “Repeat new password” fields, then tap the forward arrow ![]() . On a successful change, you will receive the message “Password changed successfully” and will be redirected to the login screen.
. On a successful change, you will receive the message “Password changed successfully” and will be redirected to the login screen.