.png?width=365&height=50&name=Texada%20Logo%20(Black).png)
Quick Reference
- The Rental Board feature allows you to create a full-screen presentation of the Assets in your system, providing a quick visual overview of their current status.
- The Rental Board can be reached in two ways:
- By navigating to the Asset List page at Inventory → Assets, then clicking the “
 Present” button in the bottom-right corner of the page.
 - By navigating to the Dashboard Console at Dashboard → Console, then clicking the “ Launch Rental Board” button in the Rental Board panel.
- By navigating to the Asset List page at Inventory → Assets, then clicking the “
- Once you have started a Rental Board presentation, you can modify it in a number of ways:
- Using the drop-down in the top-left corner of the screen, you can swap between any custom views previously created using The View Manager.
- Click on a document or Asset status code in the left side menu to filter by Assets with that code.
- Use the “
 Settings” menu to modify tile size and presentation speed, and change which color is associated with each status code.
- Click on an Asset’s panel on the presentation screen to view details for that Asset. From the details screen, you can quickly jump to the Asset’s edit page or view its associated Contract.
Introduction
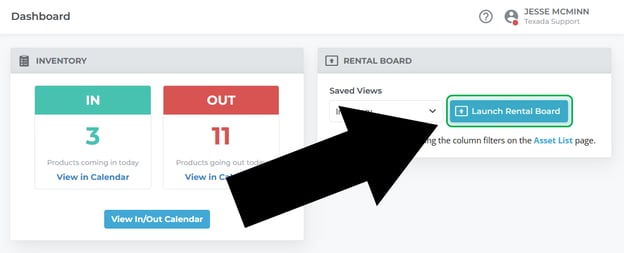
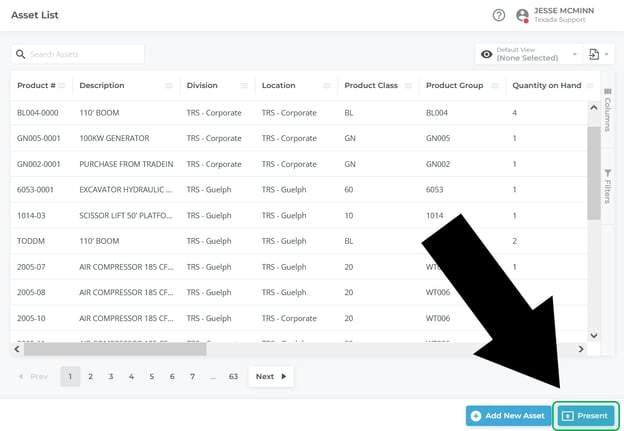 The Dashboard Console (above) and the Asset List page (below), showing the location of the Launch Rental Board / Present button.
The Rental Board feature is a tool that can be used to create full-screen presentations of the Assets in your system. These presentations allow you to see the status of your Assets at-a-glance, and can be customized to suit your particular needs.
The Rental Board can be reached in two ways:
- From the Dashboard Console: Navigate to Dashboard → Console in the left side menu, then click the “ Launch Rental Board” button in the Rental Board panel.
- From the Asset List page: Navigate to Inventory → Assets in the left side menu, then click the “ Present” button in the bottom-right corner of the page.
The Rental Board
When you launch the Rental Board from the Dashboard Console or the Asset List page, Texada Web will enter full-screen mode, and a presentation based on the selected view will begin.
Once the presentation has begun, press the Esc key to exit full-screen mode.
- View Selector
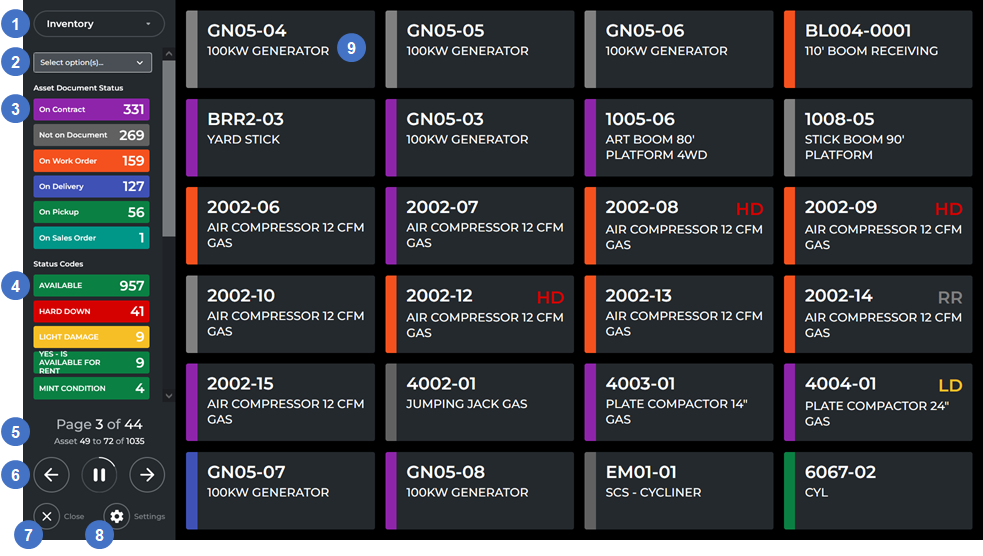
The information included in the Rental Board is based on the current view (when launching from the Asset List page) or the selected view (when launching from the Dashboard Console). Using this drop-down, you can change which view the presentation is based on. For more information on creating and managing custom views, see “The View Manager”. - Status / Document Status Selector
Use this drop-down to select which Assets to include in the presentation. The list of statuses in this drop-down will include all Asset status codes (Available, Hard Down, etc.) and document status codes (on Contract, on Delivery, on Work Order, etc.) in the system. Check the box next to a status code to include it in the presentation, or press “Clear Selection” to uncheck all boxes and display all Assets. - Asset Document Status Codes
All document status codes currently included in the presentation are listed here. The number next to each code indicates the number of Assets with that status; click on a status code to only display those Assets in the presentation. Each code can be assigned its own color via the Settings menu; see “Settings” for more information. - Status Codes
All Asset status codes currently included in the presentation are listed here. The number next to each code indicates the number of Assets with that status; click on a status code to only display those Assets in the presentation. Each code can be assigned its own color via the Settings menu; see “Settings” for more information. - Page and Asset Range Display
Information about the presentation is displayed here, including the current page, total number of pages, and the current range of Assets being shown compared to the total. - Presentation Navigation Tools
Use these tools to navigate the presentation.- Press the left arrow to return to the previous page.
- Press the right arrow to advance to the next page.
- While the presentation is running, press the pause button to stop the presentation from automatically advancing to the next page.
- While the presentation is paused, press the play button to resume auto-advancing.
- Close Presentation
Press this button to close the presentation and return to the Asset List page. - Settings
Press this button to adjust the presentation’s settings. See “Settings” for more information. - Asset Panel
Assets matching the current presentation settings are displayed as a grid of panels. The color of the thin strip down the left side of each panel indicates that Asset’s current status. The color associated with each status can be modified from the Settings menu; see “Settings” for more information. Click on an Asset’s panel to view its details; see “Asset Details” for more information.
Settings
Click the “![]() Settings” button near the bottom-left corner of the screen to open the settings menu. Here you can adjust a number of things about the presentation, including the size of the panels and the colors associated with the various status codes.
Settings” button near the bottom-left corner of the screen to open the settings menu. Here you can adjust a number of things about the presentation, including the size of the panels and the colors associated with the various status codes.

- Card Size
Use this option to change the size of the Asset cards that appear on the presentation screen. On higher-resolution screens, choosing a smaller card size will allow you to view more Assets at once. On lower-resolution screens, choosing a larger card size will ensure that Asset details are legible. - Pagination Auto-Advance
This option controls the speed at which the presentation automatically moves between pages. If “Off” is selected, the presentation will not automatically advance. - Asset Document Status / Status Code Color Selector
All of the document and Asset status codes in your system are listed here. Click on a status code to open the color picker, then click on a color to associate the status code with that color. - Cancel Button
Click this button to return to the presentation screen without saving any changes. - Save Button
Click this button to save all changes and return to the presentation screen.
Asset Details
From the presentation screen, click on an Asset’s panel to view more detailed information for that Asset.

- Asset Information
This panel contains detailed information about the Asset. - Close Button
Use this button to close the information panel. - Go to Asset Details Button
Use this button to open the Asset details page of the Asset in a new tab. See “View and Edit the Details of an Asset in Texada Web” for more information. - View Contract
Use this button to open the Contract associated with this Asset in a new tab. - Asset Navigation
Use the left and right arrows to navigate between Assets.