.png?width=365&height=50&name=Texada%20Logo%20(Black).png)
Quick Reference
- The Dashboard Calendar provides you with a bird’s-eye view of everything occurring at your branch during a given day or week. To reach the Dashboard Calendar, navigate to Dashboard → Calendar in the left side menu.
- The Calendar is populated using live data from throughout your system, automatically refreshing every 30 seconds and displaying action items from 6 different document types: Reservations, Pickup Tickets, Delivery Tickets, Task Tickets, Work Orders, and Contracts.
- Action items are color-coded based on type and filled in based on completion status: open items are not filled in, items in progress are filled in with diagonal stripes, and completed items are filled in with solid color.
- Use the controls at the top of the page to change which date(s) the Calendar is displaying, switch between daily and weekly views, and filter by Operator, Division, Location, type, or completion status.
- Click on an action item to expand it, then click “View” to open its details page in a new browser tab.
- Click the “Present” button in the bottom-right corner of the page to enter Presentation mode, opening the Calendar in full-screen and automatically scrolling through all of the action items for the day or week.
Introduction
The Dashboard Calendar is a powerful visualization tool unique to Texada Web that aggregates and displays information from a number of different modules: Reservations, Work Orders, Contracts, and Pickup, Delivery, and Task Tickets. Bringing all of these action items into one view makes the Dashboard Calendar the perfect place to get a sense of everything happening at your branch on a given day or week.
The Calendar is populated using live data from throughout your system, and automatically refreshes every 30 seconds. Action items are color-coded by type and completion status, providing you with a quick visual indication of which items need attention. The information displayed by the Calendar is highly customizable using the controls at the top of the page, and you can present the page in full-screen by clicking the “Present” button in the bottom-right corner.
To reach the Dashboard Calendar, navigate to Dashboard → Calendar in the left side menu. As of Texada Web version 2022.02, the Dashboard Calendar is the default landing page when logging in to Texada Web.
The Dashboard Calendar
- Date Selector
Click to select a date for the Calendar to display. If the Calendar is in Week mode, the week starting with the Monday prior to the selected date will be displayed. For example, if the selected date is Wednesday, November 23rd, 2022, the Calendar will display the week of Nov 21st - Nov 27th. - Navigation Buttons
Use to navigate one day (Day mode) or week (Week mode) backwards or forwards in time. - Today Button
Click to display the current date. If the Calendar is in Week mode, the week starting with the Monday prior to the current date will be displayed. - Day / Week Toggle
Use this to switch the Calendar between two display modes, Day and Week.- Day mode: All the action items for a single day will be displayed. The Calendar will be divided into six columns, each representing a different action item type.
- Week mode: All the action items for a 7-day week will be displayed. The Calendar will be divided into seven columns, each corresponding to a day of the week.
- Operator Filter
Select one or more Operators from the drop-down to only display action items associated with those Operators. - Division Filter
Select one or more Divisions from the drop-down to only display action items for those Divisions. - Location Filter
Select one or more Locations from the drop-down to only display action items for those Locations. - Status Filter
Use this to filter action items by status.- Open: Display open action items only.
- Closed: Display resolved action items only (Completed, Canceled, or Closed).
- Both: Display all items.
- Search Bar
Begin typing here to filter action items by the text entered. This will search by Customer name, Asset number, Asset name, Document number, and Site address. - Type Filter
Select one or more types of action item from the drop-down to only display action items of those types. - Calendar
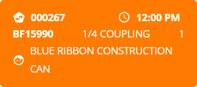
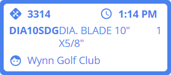
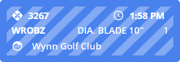
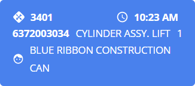
Each row in the Calendar corresponds to an hour of the day. If the Calendar is in Day mode, each column will correspond to a type of action item; if in Week mode, each column will correspond to a day of the week. - Action Item
Action items are displayed in the Calendar at the time they have been scheduled. Unscheduled Work Orders will appear in the Calendar at the time a Mechanic starts working on them.
Click on an action item to expand it and view its details. Once you have expanded an action item, click the “View” button in the bottom-right corner to open its details page in a new browser tab.
 - Present Button
Click to enter Presentation mode.
Presentation Mode
Click the Present button ![]() in the bottom-right corner of the screen to enter Presentation mode. This will open the Calendar as a full-screen presentation that automatically scrolls through all of the action items for the day or week.
in the bottom-right corner of the screen to enter Presentation mode. This will open the Calendar as a full-screen presentation that automatically scrolls through all of the action items for the day or week.
- Close Button
Click to exit Presentation mode and return to the Dashboard Calendar screen. - Navigation Buttons
Use the left and right arrows to scroll the Calendar up and down, respectively. - Pause / Play Button
Click to toggle whether or not the Calendar is auto-advancing.- If the Calendar is not currently auto-advancing, this button will show a play symbol
.png?width=20&height=29&name=Play%20Button%20(Calendar).png) . Clicking it will cause the Calendar to automatically scroll down to the next page of action items every 15 seconds. Once the bottom of the page has been reached, the Calendar will scroll back to the top.
. Clicking it will cause the Calendar to automatically scroll down to the next page of action items every 15 seconds. Once the bottom of the page has been reached, the Calendar will scroll back to the top. - If the Calendar is currently auto-advancing, this button will show a pause symbol
.png?width=20&height=23&name=Pause%20Button%20(Calendar).png) . Clicking it will stop the Calendar from auto-advancing.
. Clicking it will stop the Calendar from auto-advancing.
- If the Calendar is not currently auto-advancing, this button will show a play symbol
- Page Counter
Displays the current page and the total number of pages. Depending on the number of action items in the current day or week, the system will automatically divide the Calendar into an appropriate number of pages and scroll through them if auto-advancing is enabled. Once the last page (i.e. the bottom of the screen) has been reached, the Calendar will return to the first page (i.e. top of the screen).
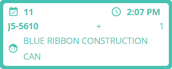
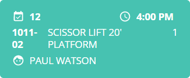
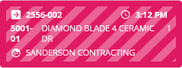
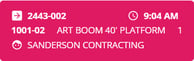
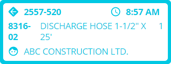
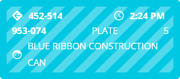
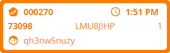
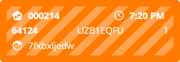
Action Items by Type and Status
Items in the Calendar are color-coded by document type and completion status. The table below provides a reference for the various document types and their appearance in different statuses.
|
Document Type |
Open |
In Progress |
Completed / Closed |
|
|
|
 |
|
|
|
|
|
|
|
|
|
|
|
|
|
|
|
|
|
|
|
|
|
|
|
|
|