
How to access, test and use Texada’s SRM APIs.
The following article contains information on features that require a subscription to Texada’s APIs to use. If you are interested in receiving an API license from Texada, please contact sales@texadasoftware.com.
Quick Reference
- Texada’s SRM currently supports APIs built on two different technologies: PROIV and Flask. Both types of APIs are documented using Swagger.
- Texada’s Swagger documentation can be accessed at the following URLs:
- Using the Swagger documentation, you will be able to browse and test out the various API methods:
- Click on a method to view its details, including its type, path, description, expected input, and possible responses.
- Click the “Try it out” button to input some data and receive a sample response.
- Use the “Example Value | Model” toggle to switch between two different ways of viewing the method’s output:
- Example Value: Displays a sample response.
- Model: Displays the generic format of the response, including variable names and types.
- Flask APIs:
- Texada’s Flask APIs can be accessed using any web browser, curl command, or HTTP client application at the following URL:
- https://{serveraddress}:{Port}/WebServices/rws/api/dev/{endpoint}
- Before you are able to use Texada’s Flask APIs, you will need an authorization token. This token can be obtained using the APIs themselves, by submitting a request via one of two authentication methods:
- /auth/login: Log in using an SRM Operator email address and password.
- /auth/web_api_key: Log in using a Web API Key.
- The Web API Keys used to authenticate via the /auth/web_api_key method are managed in Texada SRM, at System Maintenance → Configure System Settings → Security → Web Services API Keys. Note that this screen is not available to all SRM Operators.
- Texada’s Flask APIs can be accessed using any web browser, curl command, or HTTP client application at the following URL:
In This Article
Introduction
Like many software companies, Texada offers a number of APIs which subscribed clients can use to interact with SRM’s data. The following article will detail how to access and use Texada SRM’s APIs.
PROIV and Flask
Texada SRM currently supports APIs built on two different technologies: PROIV (pronounced pro-four) and Flask. The uses of these two APIs are complementary, and both are included in Texada’s SDK. If you are searching for a particular endpoint and cannot find it in one location, try searching for it in the other location.
- PROIV
PROIV endpoints tend to focus more on features that involve complex calculation, logic, or editing documents. - Flask
Flask endpoints tend to focus more on reading data and making minor updates.
Swagger Documentation
Introduction to Swagger
Swagger is an industry documentation standard that Texada uses to document its APIs. By accessing Texada’s Swagger documentation, you can view, interact, and experiment with Texada’s APIs (both PROIV and Flask). This documentation can be accessed from your web browser, and is an invaluable resource for understanding what Texada’s APIs are capable of and how to use them.
Accessing Texada’s Swagger Documentation
You can access Texada’s Swagger documentation at the URLs below. It is highly recommended to bookmark these links for future reference.
- PROIV: https://documentation.texadasoftware.com/
- Flask: https://naoc1.texadasoftware.com:8009/docs/#/
When you navigate to one of these addresses, you will be taken to a page similar to the one below.
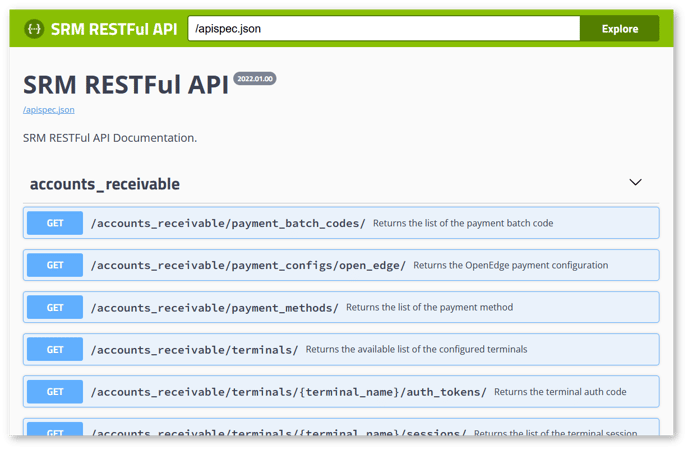 Fig.1. The home page of the Swagger documentation for Texada’s Flask APIs, showing the Explore bar and the accounts_receivable API group.
This page contains a list of all the methods that Texada has made available with this API. Methods are grouped together by module; for example, Fig. 2. below shows a sample of the methods within the “asset” module:
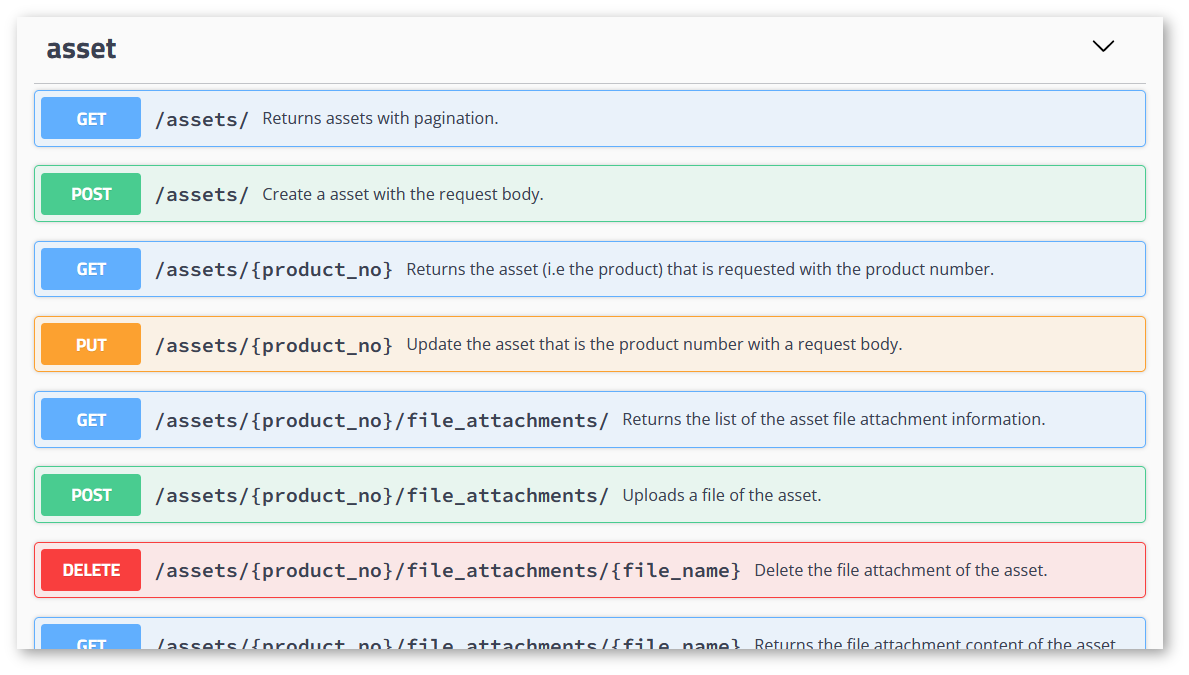
Modules can be expanded and collapsed by clicking anywhere on the title bar.
Each API method within a module (e.g. GET/assets/) can be expanded by clicking on it. Expanding a method will provide you with detailed information about that method.
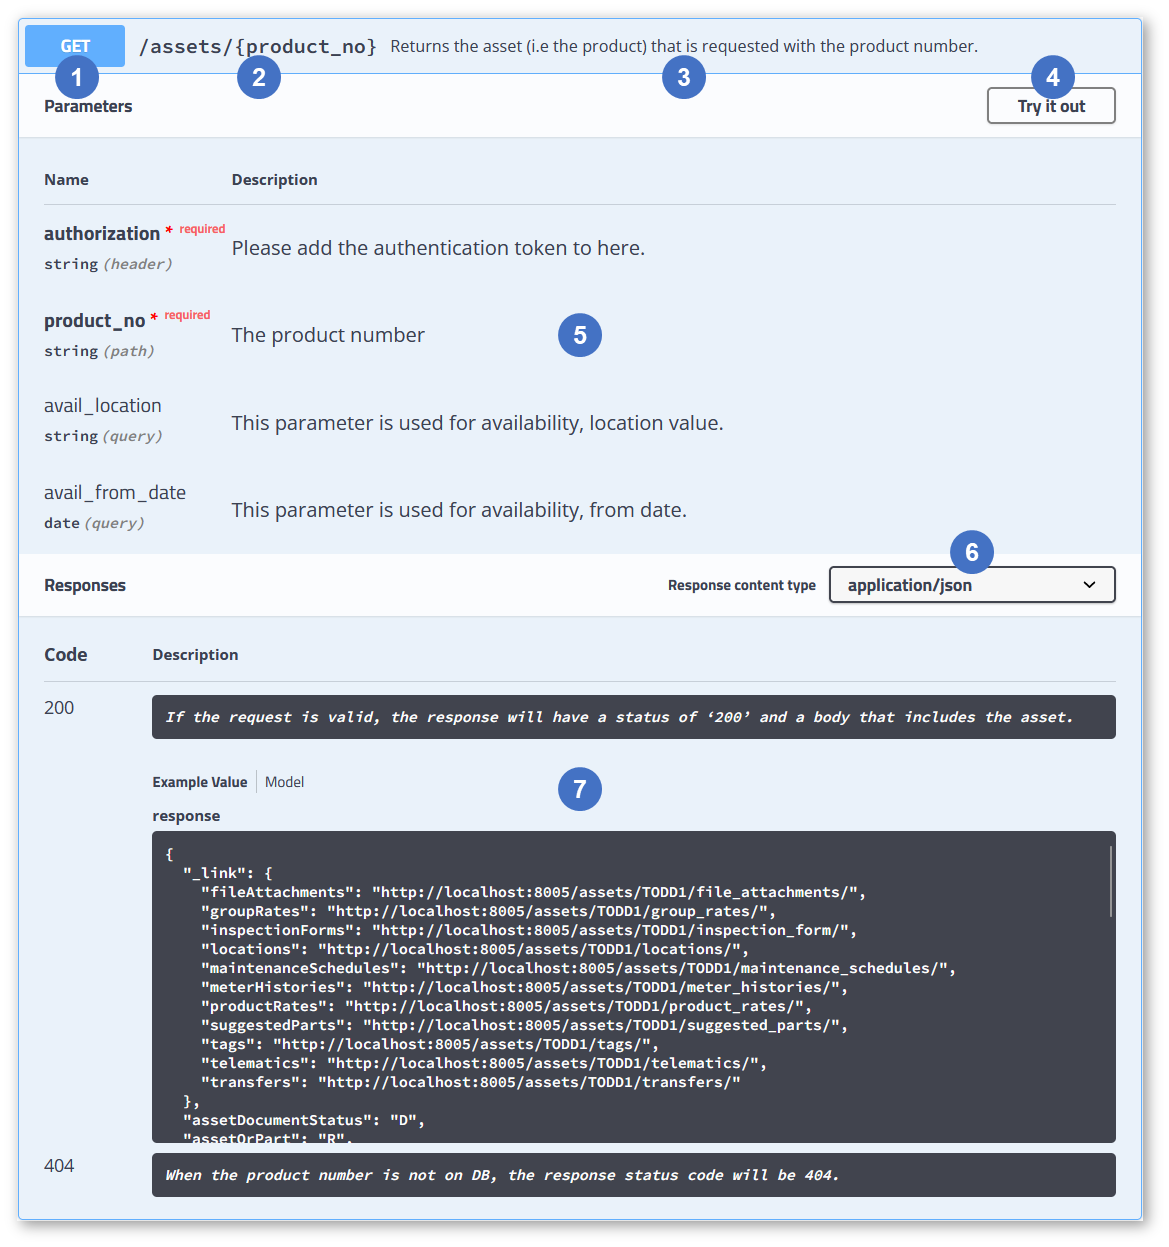
- Method Type
Indicates the method’s type. There are five types of methods used in Texada’s APIs:- GET: Retrieves information about a resource.
- POST: Creates a resource.
- PUT: Updates a resource.
- PATCH: Updates part of a resource.
- DELETE: Deletes a resource.
- Method Path
The method’s path. - Method Description
A brief description of what the method does. - Try it out Button
This button allows you to experiment with the method by entering your own parameters and submitting a ‘dummy’ request. See “Testing a Method” for more information. - Method Parameters
A list of the method’s input parameters. The following information is included for each parameter:- Name: The parameter’s name.
- Required: Indicates whether the parameter is required.
- Data Type: The parameter’s data type (string, date, integer, file, etc.)
- Type: The parameter’s type (header, path, query, body, etc.)
- Description: A brief description of the parameter.
- Response Content Type
Indicates the content type of the responses in the section below. Click the drop-down to switch between possible response content types. Currently, all Texada API methods use JSON as a response format. - Responses
A list of responses that can be returned by this method. This list will generally begin with a 200-series code (successful response), followed by one or more 400- or 500-series codes (client/server error responses). Note that not all possible responses are documented here. The following information is included for each possible response:- Code: The HTTP status code of the response.
- Description: A description of the response.
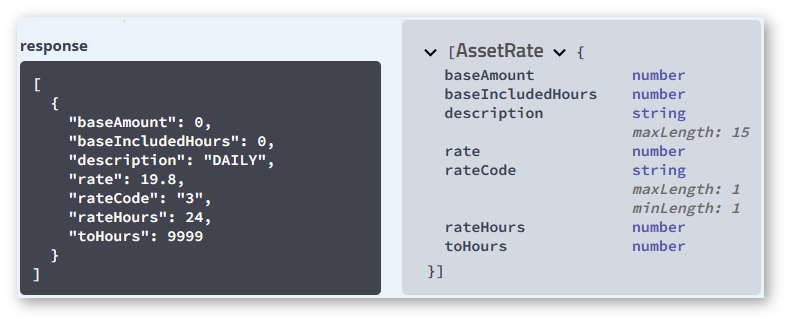
- Response: A sample response body. Use the “Example Value | Model” toggle to switch between two ways of viewing the response (Fig. 4.):
- Example Value: Displays a sample response.
- Model: Displays the generic format of the response, including variable names and types.
Testing a Method
Each API method can be tested directly from the Swagger documentation. This is a useful feature that allows you to experiment with different inputs and familiarize yourself with what each method will output based on the inputs you use.
To test a method:
- Locate the method you want to test in the Swagger documentation and click it to view its details.
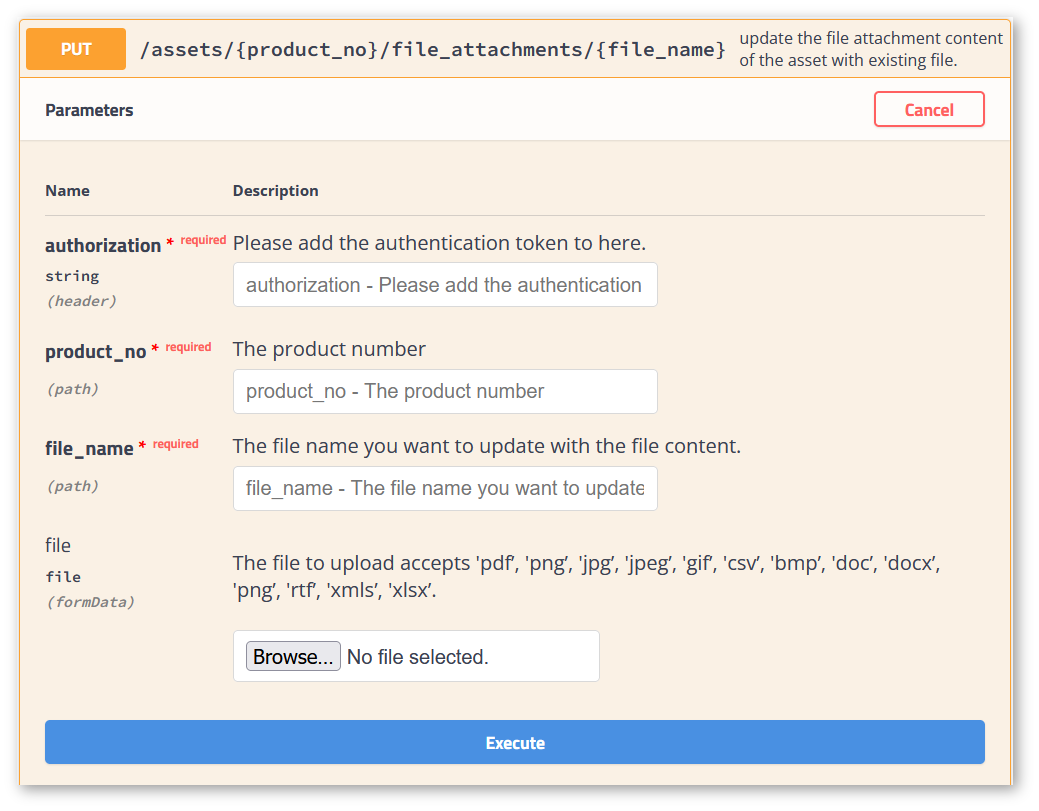
- Click the “Try it out” button found in the top-right corner of the details panel. This will cause input fields to appear next to each of the method’s parameters (Fig. 5).
- Fill out the input fields using the data you want to test. Fields marked with a red asterisk (
) are required.
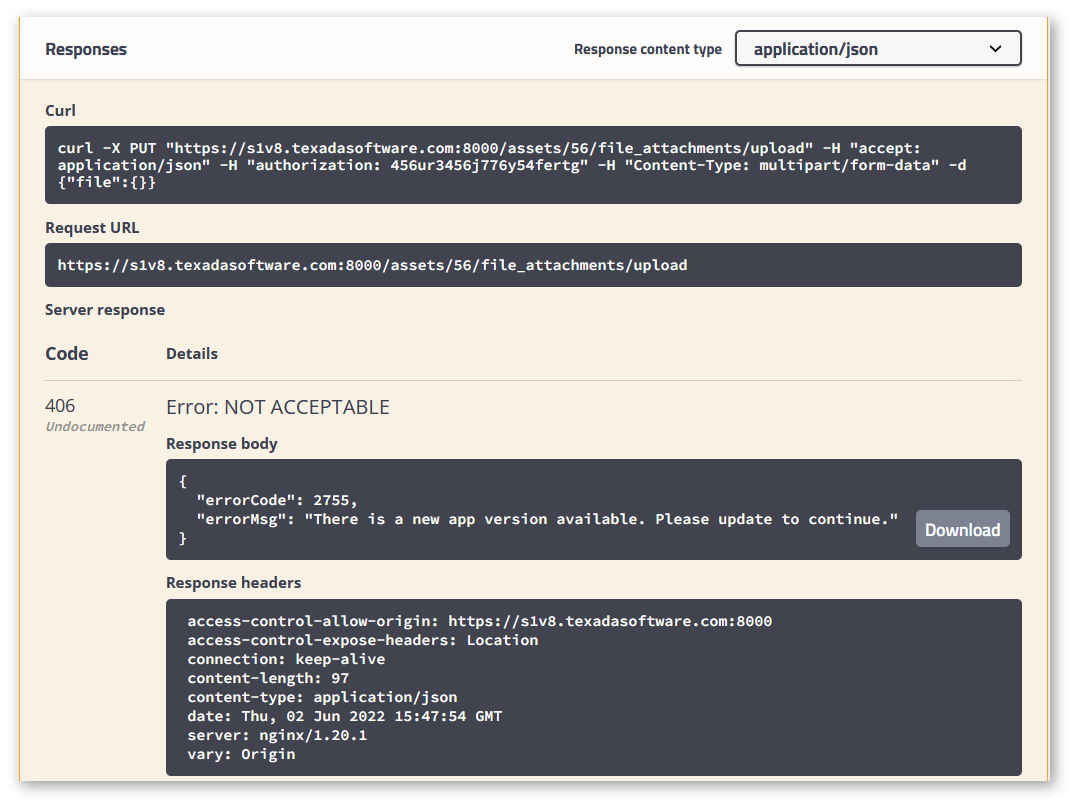
- Click “Execute” to submit your request.
- Scroll down to the Responses section of the details panel to see the results of your request (Fig. 6). You will see the HTTP response code, response body, and response headers generated by your request. Click “Download” next to the response body to download a copy of the response.
- Click “Clear” to clear the Responses section. Modify your inputs and click “Execute” to submit another request using the new inputs.
Flask APIs
Connecting to Texada’s Flask APIs
As of June 2024, the URL structure of Texada’s Flask APIs will change. The new URL format will be:
https://{serveraddress}:{port}/{s}a{XX}-live/rws/srmapi/{endpoint}
- {serveraddress} is the URL of your Texada SRM installation, for example naoc6.texadasoftware.com. To learn this address, open your OpenClient login page for Texada SRM, then right-click the Login button and select “Copy link address”. The server address is the portion of this URL after “https://” and before the colon “:”.
- {Port} is the port number of your Texada SRM installation, and depends on both your region and whether you are working in a production environment or play environment:
- North America Production: 8008
- North America Play: 8009
- APAC Production: 8012
- APAC Play: 8013
- {s} is the server number - 1, 2, 3, 4, 5, 6, 7, etc.
- {XX} is a 2-digit code that varies by development partner.
- {endpoint} is the particular API endpoint you would like to access. See “Swagger Documentation” to learn how to access the list of endpoints.
You can connect to Texada’s Flask API servers using any web browser, curl command, or any HTTP client application (like Postman).
The URL structure to access these servers is as follows:
https://{serveraddress}:{Port}/WebServices/rws/api/dev/{endpoint}
- {serveraddress} is the URL of your Texada SRM installation, for example naoc6.texadasoftware.com. To learn this address, open your OpenClient login page for Texada SRM, then right-click the Login button and select “Copy link address”. The server address is the portion of this URL after “https://” and before the colon “:”.
- {Port} is the port number of your Texada SRM installation, and depends on both your region and whether you are working in a production environment or play environment:
- North America Production: 8008
- North America Play: 8009
- APAC Production: 8012
- APAC Play: 8013
- {endpoint} is the particular API endpoint you would like to access. See “Swagger Documentation” to learn how to access the list of endpoints.
Authorization
In order to communicate with Texada’s Flask APIs, you will need an authorization token. This token can be obtained using the APIs themselves, by submitting a request via one of two authentication methods:
- /auth/login: Log in using an SRM Operator email address and password.
- /auth/web_api_key: Log in using a Web API Key.
Both of these methods can be found in the “auth” section of the Flask API Swagger documentation.
Once issued, your authentication token will expire after 12 hours, and you will need to re-authenticate in order to continue using Texada’s Flask APIs. Attempting to access the APIs with an expired authentication token will result in an error response.
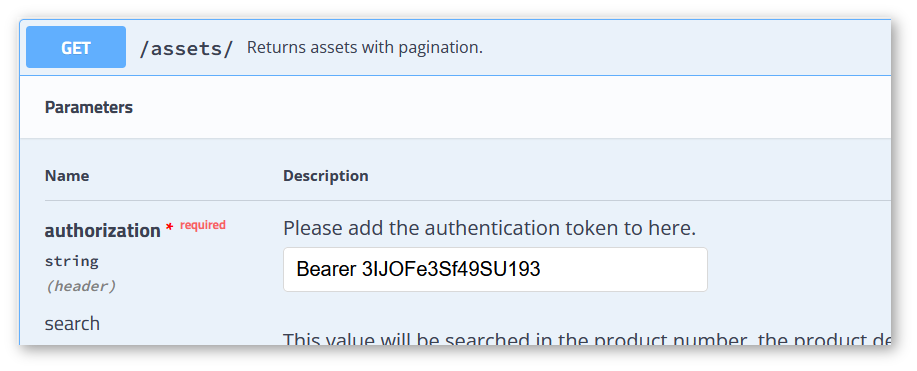
Texada’s Flask APIs use the Bearer authentication schema, which means that HTTP Authorization headers must be in the format “Bearer <token>”: the keyword ‘Bearer’, followed by a space, followed by the authorization token. For example, if the authorization token was 39HF3sUefmU31, the full Authorization header would be “Bearer 39HF3sUefmU31”. Always remember to follow this format when filling out the ‘authorization’ parameter while testing API methods (Fig. 7).
/auth/login
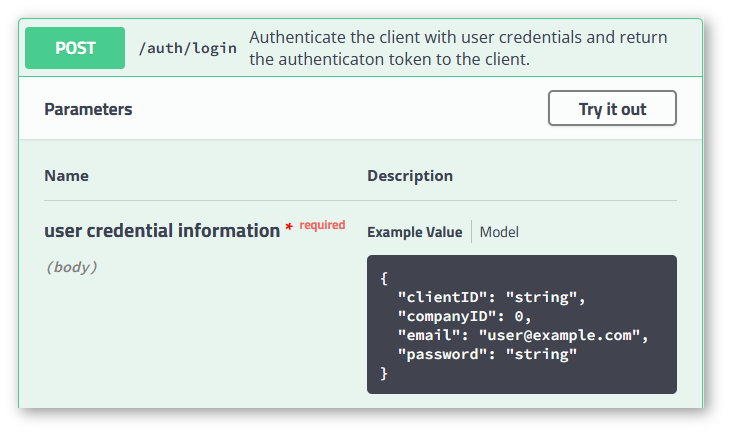
This method accepts a LoginUser object containing a client ID, company ID, email, and password, and returns an auth token and refresh token which can be used in subsequent requests to the Texada Flask API. Use this method when you wish to access the API with a user login.
Input:
LoginUser {

     clientID*      string
     maxLength:     20
     minLength:     3
                    The client ID.

     companyID*     number
     maxLength:     8
     minLength:     1
                    The ID of the company for which the user is requesting access.

     email*         string($email)
     maxLength:     50
     minLength:     1
                    The user’s email address.

     password*      string($password)
     maxLength:     80
     minLength:     1
                    The user’s password.

}
Output:
Tokens {

     authToken      string
                    The authentication token.

     refreshToken   string
                    The refresh token.

}
/auth/web_api_key

This method accepts a WebAPIKey object containing a client ID, operator ID, and Web API Key, and returns an auth token and refresh token which can be used in subsequent requests to the Texada Flask API. Use this method when you wish to access the API using a Web API Key issued by SRM; see “Managing Web API Keys” for more information.
Input:
WebAPIKey {

     clientID*      string
     maxLength:     64
     minLength:     3
                    The client id.

     operatorID*    string
     maxLength:     18
     minLength:     1
                    The operator id.

     webApiKey*     string
     maxLength:     32
     minLength:     1
                    The Web API Key issued by SRM.

}
Output:
Tokens {

     authToken      string
                    The authentication token.

     refreshToken   string
                    The refresh token.

}
Managing Web API Keys
The Web API Keys used to authenticate via the /auth/web_api_key method are managed in Texada SRM. You can review, add, copy, and delete API Keys from the Maintain Web Services API Keys screen, located at System Maintenance → Configure System Settings → Security → Web Services API Keys.
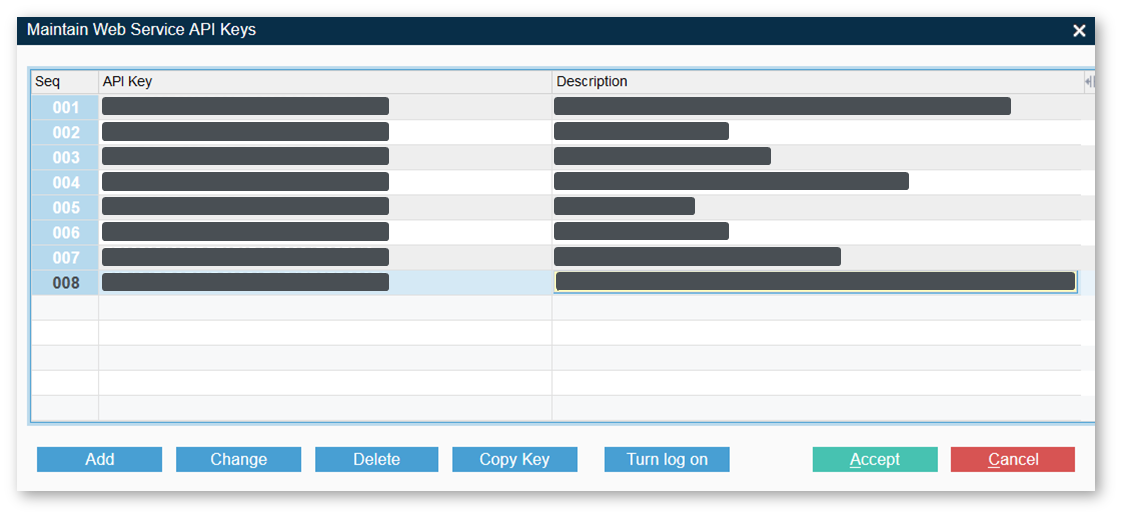
Access to this screen is restricted, and that it is not available to standard SRM Operators. If you are not able to access this screen and require help managing your organization’s API Keys, please contact Texada support.
PROIV APIs
Authorization
Unlike with Texada’s Flask APIs, there is no need to authenticate in advance when accessing Texada’s PROIV APIs. Instead, you will need to pass your API key with each request you make. For more information about this process, please contact Texada support.