
How to modify the Origin or Destination Address of a Pickup, Delivery, or Task Ticket in Texada Web.
Quick Reference
- A Ticket is a type of document indicating that Assets need to be moved between locations. There are three types of Ticket in the Texada system: Pickup Tickets, Delivery Tickets, and Task Tickets.
- All three Ticket types feature an Origin Address – the address Assets need to be moved from – and a Destination Address – the address Assets need to be moved to.
- The Origin and Destination Addresses of a Ticket can be modified both when that Ticket is first created, and when editing it, provided it has not been closed.
- To edit the Origin or Destination Address of a Ticket in Texada Web:
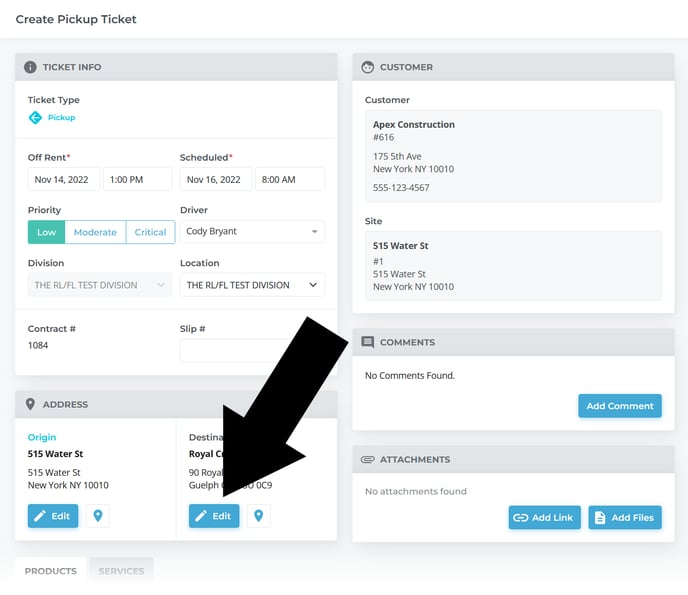
- Navigate to the Create / Edit Ticket screen.
- Scroll down to the Address panel and click the edit button
 under Origin or Destination to edit that address.
Introduction
A Ticket is a type of document indicating that Assets need to be moved between locations. There are three types of Ticket in the Texada system: Pickup Tickets, Delivery Tickets, and Task Tickets.
All three Ticket types feature an Origin Address – the address Assets need to be moved from – and a Destination Address – the address Assets need to be moved to. The following article will detail the process of editing a Ticket’s Origin or Destination Address in Texada Web.
Editing a Ticket’s Address
When creating a Pickup or Delivery Ticket, the Origin and Destination Addresses will be filled out automatically using information from the Ticket’s parent Contract. Task Tickets will not have an Origin or Destination address when they are first created, as they do not have parent Contracts.
With all three Ticket types, it is possible to edit the Ticket’s Origin and Destination Addresses both when initially creating the Ticket and when editing it, provided it has not been closed. This is done via the Edit Address window, accessible via the Create and Edit Ticket screens.
The table below illustrates the navigation needed to access the Create and Edit Ticket screens for all three Ticket types.
|
Ticket Type |
Action |
Navigation |
|
Pickup |
Create |
Tickets → Create Ticket → Pickup → (select an Asset and click Next) |
|
Edit |
Tickets → Pickup → (select a Ticket) |
|
|
Delivery |
Create |
Tickets → Create Ticket → Delivery → (select an Asset and click Next) |
|
Edit |
Tickets → Delivery → (select a Ticket) |
|
|
Task |
Create |
Tickets → Task → (select a Ticket) |
|
Edit |
Tickets → Create Ticket → Task |
Once you have reached the Create or Edit Ticket screen, scroll down to the Address panel and click the edit button ![]() under Origin or Destination to edit that address. This will open the Edit Address window.
under Origin or Destination to edit that address. This will open the Edit Address window.
The Edit Address Window
This window allows you to select a new Origin or Destination Address for your Ticket. There are a number of ways to enter the address:
- Using the controls at the top of the window (1-4), you can automatically populate the address using a Customer Site, a Global Site, the billing address of the Ticket’s parent Contract, or the Ticket’s Location.
- Using the Address Search bar (7), you can search a list of valid addresses to automatically populate the address.
- You can manually fill out the information for the address (8). This option is not recommended, as it does not ensure that the address entered is valid or will be recognized by Google Maps.
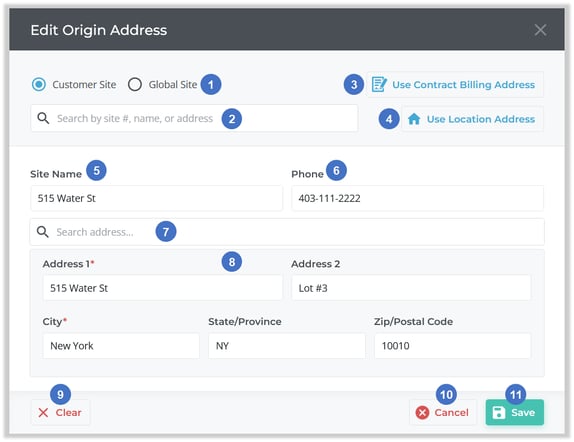
- Customer / Global Site Selector
Use to control whether the site search returns Customer Sites or Global Sites. The Customer Site option will be disabled for Task Tickets, as they do not have a Customer. - Site Search
Use this element to quickly populate the Origin / Destination Address with information from one of the Customer’s Sites or a Global Site, depending on the setting of the Customer / Global Site Selector directly above.
Click on the drop-down to open a list of Sites, then begin typing to filter the list by Site #, Site name, and address. Select a site from the list to populate the Origin / Destination Address (Site Name, Phone, Address 1, Address 2, City, State/Province, and Zip/Postal Code) using information from that Site. Note that this will overwrite any information you have already entered. - Use Contract Billing Address
Use to populate the Origin / Destination Address using information from the billing address of the Ticket’s parent Contract, i.e. the primary address of the Contract’s Customer. This option is not available for Task Tickets. - Use Location Address
Use to populate the Origin / Destination Address using information from the Ticket’s Location. - Site Name
The name of the Customer Site or Location that corresponds to the address below. - Phone
A contact phone number for the address. - Address Search
Begin typing into the search bar to search a list of valid addresses for the address you are looking for. Once you have located the desired address, click on it to populate the Origin / Destination Address (Address 1, Address 2, City, State/Province, and Zip/Postal Code) using information from that address. It is highly recommended to use this feature to ensure that the information entered is valid and will be recognized by Google Maps. - Address Information
If you have opted not to automatically populate the Origin / Destination Address, or if some of the automatically populated information is incorrect, you can enter address information manually using these fields. If you do enter address information manually, it is highly recommended to use the “View in Google Maps” button (pin icon on the Create / Edit Ticket page) to verify that the information is accurate.
Note that if you manually overwrite information that was previously populated from a Customer Site, Global Site, Billing Address, or Location, your changes will only affect the Ticket itself, and will NOT affect the original information. For example, if you used the “Use Location Address” button to pull in information for a Location at your company with the address 187 River St, and changed this address to 155 River St on the Ticket, the Location would be unaffected and would still have an address of 187 River St. - Clear Button
Click to clear all information entered for the Origin / Destination Address – Site Name, Phone, Address 1, Address 2, City, State/Province, and Zip/Postal Code. - Cancel Button
Click to close the Edit Address window without saving any changes. - Save Button
Click to save your changes and close the window.