
How to configure a Customer Contact to receive automated emails in Texada Web or Texada SRM.
Quick Reference
- Both Texada Web and Texada SRM have the ability to send automatically-generated emails directly to your Customers. By configuring specific Customer Contacts to receive system emails, you can easily select them as recipients when sending system emails.
- To configure a Customer Contact to receive system emails in Texada Web:
- Navigate to Customers → List in the left side menu, then locate and click on the Customer whose Contact you want to edit.
- Click the “Edit” button in the bottom-right corner of the screen, then scroll down to the Contact Information panel and click on the Contact you want to edit.
- In the Edit Contact window:
- Ensure that the Contact has a valid email address specified under “Primary Email”.
- Check the “All Documents” checkbox.
- Click “Save Contact”, then “Save Changes” to save the Contact and Customer record.
- To configure a Customer Contact to receive system emails in Texada SRM:
- Navigate to Accounts Receivable → Customer Information.
- Click the “Change” button to switch to Change mode, then enter the Customer # of the Customer whose Contact you want to edit and press Enter.
- Click the three dots
 next to the “Contacts” field, then enter the Contact ID of the Contact you want to edit and press Enter.
 - Once the Contact’s information has loaded:
- Ensure that the Contact has a valid email address specified under “Primary Email”.
- Under “Email Types”, check the checkboxes corresponding to the types of system email this Contact can receive.
- Click “Accept”, then “Accept”, then “Accept” to save the Contact and Customer record.
Introduction
Both Texada Web and Texada SRM have the ability to send automatically-generated emails directly to your Customers. This functionality has a wide variety of applications; for example, sending a Contract for deposit prior to the rental period, or emailing a Customer a copy of a previously-paid Invoice.
In order to send system emails from Texada Web or SRM, the system must first be configured to communicate with your email client. For more information on this process, see:
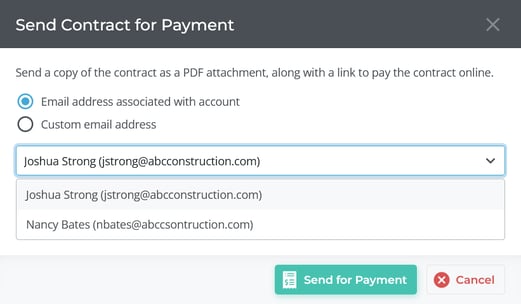
Once your system has been configured to send system emails, you will be able to manually input the email address of the desired recipient at the time an email is sent. However, it is also possible to designate certain Customer Contacts such that their email address will be automatically selectable when sending system emails to that Customer. This makes the process of sending system emails much more convenient and less prone to error. Instead of manually inputting the Contact’s email address each time, you can simply select it from a list, and eliminate the risk of typos or forgetting the correct address:
The process of configuring a Customer Contact to receive system emails is simple. There are only two requirements:
- The Contact must have a valid Primary Email address.
- The Contact must be enabled to receive emails for the type of document you want to send.
The following article will cover this process both in Texada Web and Texada SRM.
Texada Web
- Log in to Texada Web and navigate to Customers → List in the left side menu. Use the search bar to filter the list of Customers, then click on the Customer whose Contact you want to edit.
- On the Edit Customer screen, click the “Edit” button in the bottom-right corner of the screen to enable editing, then scroll down to the Contact Information panel.
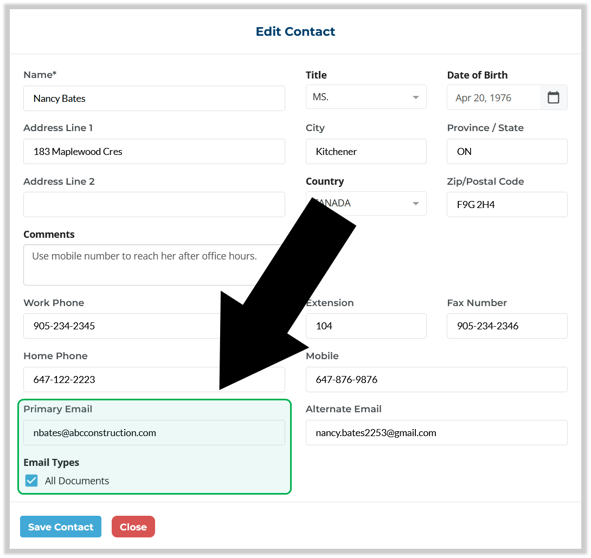
- Click on the Contact you want to edit to open the Edit Contact window, then do the following:
- Ensure that the Contact has a valid email address specified in the “Primary Email” field.
- Check the “All Documents” checkbox. This will allow the Contact to receive all types of system emails. In Texada Web, it is not currently possible to enable or disable specific types of system emails for a Contact; if desired, this can be accomplished in Texada SRM.
- Click “Save Contact” to save and close the Edit Contact window. Repeat step 3 for as many Contacts as desired, then click “Save Changes” to save the Customer record.
Texada SRM
- Log in to Texada SRM and navigate to Accounts Receivable → Customer Information.
- Click the “Change” button to switch to Change mode, then enter the Customer # of the Customer whose Contact you want to edit and press Enter.
- Click the three dots next to the “Contacts” field to open the Contact Information window.
- Enter the Contact ID of the Contact you want to edit, or click the down arrow
 next to the Contact ID field to select them from a list. Once the Contact’s details have been loaded, do the following:
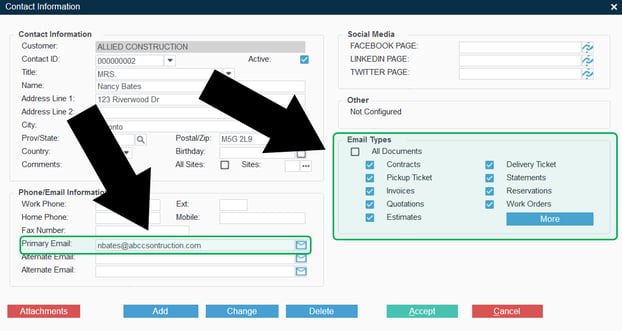
- Ensure that the Contact has a valid email address specified in the “Primary Email” field.
- Under “Email Types”, check the “All Documents” checkbox if you wish for this Contact to be able to receive system emails of all types, or check individual checkboxes as desired to enable specific email types. Click the “More” button to see more options.
- Click “Accept” to save the Contact’s record. Repeat step 4 for as many Contacts as desired, then click “Accept” two more times to close the Contact Information window and save the Customer record.