
How to complete a Check-Out or Return Inspection in the Texada WorkFlow mobile application.
Quick Reference
- When delivering or picking up a rental Asset, it is often desirable to inspect the Asset for damages and take meter and fuel readings. The Texada WorkFlow mobile application features two different processes for carrying out Asset Inspections:
- Check-Out Inspection: Complete an Inspection when dropping off an Asset.
- Return Inspection: Complete an Inspection when picking up an Asset.
- The process of completing a Check-Out or Return inspection in the Texada WorkFlow mobile application is as follows:
- Log in to the Texada WorkFlow mobile application and select a Station.
- Select “Check-Out Inspection” to perform a Check-Out Inspection, or “Return Inspection” to perform a Return Inspection.
- Search for and select the Asset for which you would like to perform an Inspection.
- Enter the Asset’s meter reading, fuel levels, and other readings as appropriate.
- Take pictures of the Asset’s front, back, and sides.
- Repeat for each instance of damage:
- Add a new damage entry and select the location of the damage on the Asset’s pictogram.
- Fill out the details of the damage, then take at least 2 pictures of the damaged area.
- Fill out the equipment condition questionnaire (Return Inspections only).
- Have the Driver and Customer sign off on the Inspection.
- Submit the Inspection.
Introduction
When delivering or picking up an Asset to or from a Customer, it is often desirable to inspect the Asset for damages and take meter and fuel readings. The Texada WorkFlow mobile application features two processes for completing Inspections:
- Check-Out Inspection: Complete an Inspection when dropping off an Asset at the beginning of a Customer Order.
- Return Inspection: Complete an Inspection when picking up an Asset at the end of a Customer Order.
The following article will cover how to complete a Check-Out or Return Inspection in the Texada WorkFlow mobile application.
Complete a Check-Out or Return Inspection
- Login and select a Station
Log in to the Texada WorkFlow mobile application and select a Station.
 - Select an Inspection type
Select “Check-Out Inspection” to perform a Check-Out Inspection, or “Return Inspection” to perform a Return Inspection.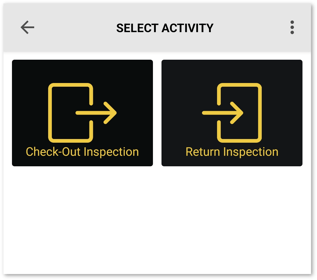
- Search for an Asset
On the Search screen, enter an Equip # in to the “Equip #” field, or an Asset description or Customer name into the “Extended Search” field, then tap the forward arrow to search for matching Assets. To display all Assets, tap the forward arrow without entering any search terms.
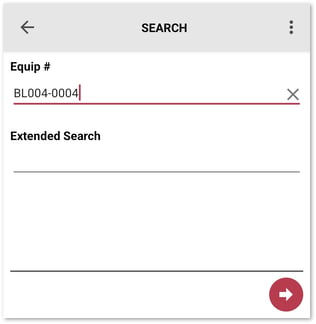
- Select an Asset
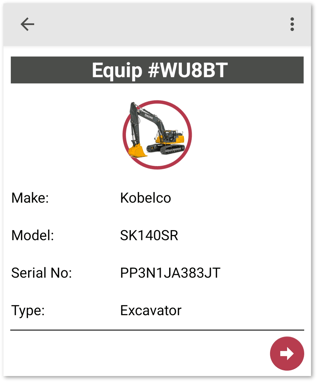
Locate the Asset for which you want to perform an Inspection (left) and tap on it to select it. Review its details (right) to ensure you have selected the correct Asset, then tap the forward arrow.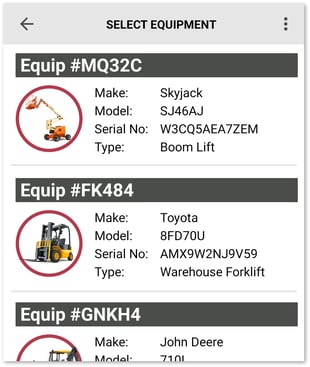
- Enter the Asset’s meter reading and fuel information
Fill out the Asset’s current meter reading, fuel level, and other readings as appropriate, then tap the forward arrow to continue to the Overview Pictures screen.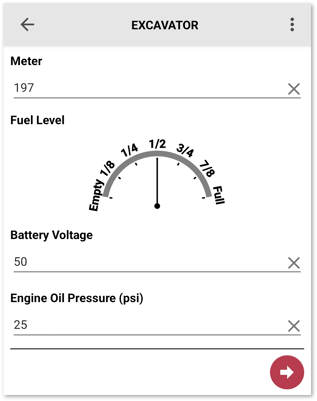
- Submit pictures of the Asset
The Overview Pictures screen allows you to submit general pictures of the Asset you are inspecting.- Tap the plus icon
 under an area of the Asset (Front, Left, Back, etc.) to submit pictures of that area. This will open your device’s camera (right).
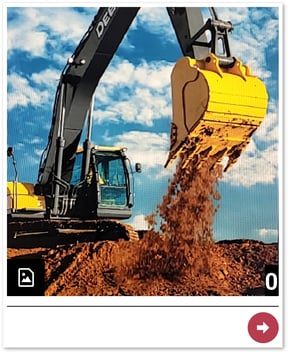
- With the camera open, tap the screen to capture a new picture, or tap the gallery icon
 in the bottom-left corner to add an existing picture from your device’s gallery.
- With the camera open, tap the screen to capture a new picture, or tap the gallery icon
- Swipe left on a picture, then tap the bin icon
 to delete it.
 - Once you are finished adding pictures, tap the forward arrow to advance to the Damages screen.
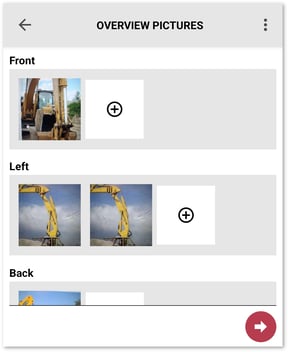
- Tap the plus icon
- Review damages
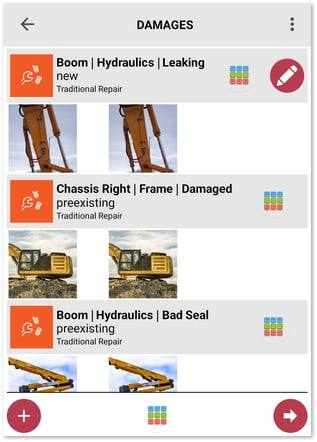
The Damages screen contains a list of all the damages that have been captured for an Asset. Each entry indicates the area, piece, and type of damage, and includes at least two pictures of the damaged area.
Once you are finished adding and reviewing damages, tap the forward arrow to advance to the Equipment Condition screen (step 9, Return Inspections only) or the Employee & Customer signature screen (step 10).
- Tap a picture to view it in full-screen.
- Tap the matrix icon
 next to an entry to view the location of the damage on the Asset’s pictogram.
 - Tap the matrix icon at the bottom of the screen to view all damages on the Asset’s pictogram simultaneously.
- Tap the plus icon
 to add a new damage entry (step 8).
 - Tap the pencil icon
 next to a damage entry to edit its area, piece, type, and severity. Note that you cannot edit a damage’s location on the pictogram once it has been created.
 - Swipe left on a damage entry, then tap the bin icon
 to delete it.
- Add new damage
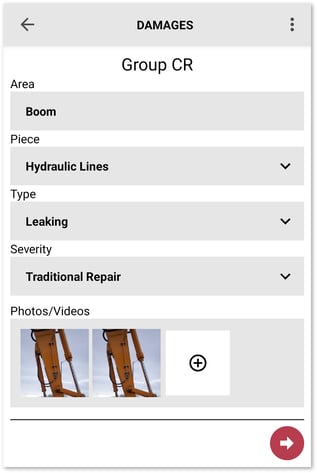
From the Damages screen, tap the plus icon in the bottom-left corner of the screen to add a new damage entry for the Asset. This will open the Asset’s pictogram (left). Tap an area of the Asset to highlight it and indicate the location of the damage. The name of the highlighted area will be displayed at the bottom of the screen.
Once you are satisfied with the location of the damage, tap the forward arrow to advance to the damage details screen (right). Select the piece, type, and severity of the damage, then tap the plus icon under “Photos/Videos” to open your device’s camera and take pictures of the damage. At least 2 pictures must be included. Once you are finished, tap the forward arrow to save your changes and return to the Damages screen.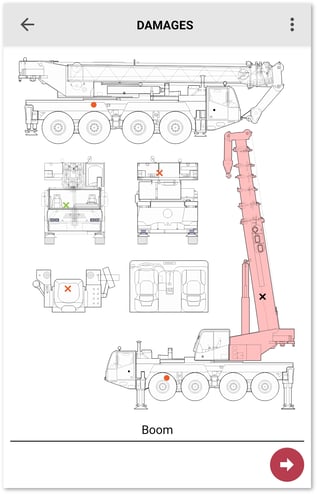
- Fill out the equipment condition questionnaire (Return Inspections ONLY)
If you are completing a Return Inspection, you will be prompted to fill out an equipment condition questionnaire after advancing past the Damages screen. Fill out the questionnaire as required, then tap the forward arrow to proceed.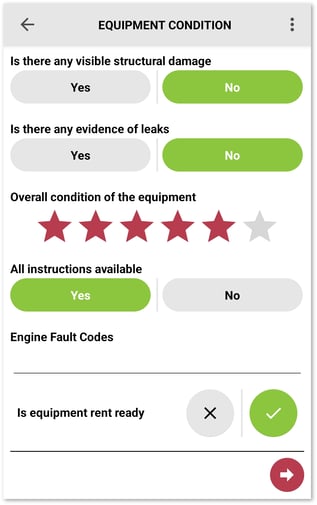
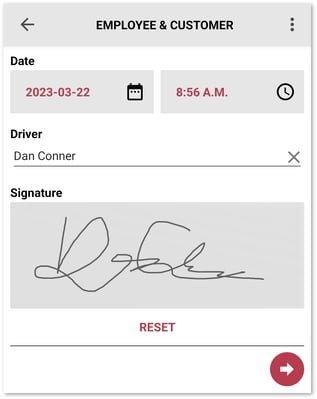
- Gather employee & customer signatures
The Employee & Customer signature screen allows both the Driver and Customer to sign off on the captured damages. This screen comprises the following fields:- Date: The current date and time. This field is read-only.
- Driver: The name of the Driver who completed the Inspection.
- Signature: Draw directly in the gray box to capture the Driver’s signature. Tap the “RESET” button below the signature box to clear it and try again.
- Customer Signature: Indicates the status of the Customer at the time the Inspection is completed:
- Customer Present: The Customer is present and is willing to sign off on the Inspection.
- Customer Not Present: The Customer is not present to sign off on the Inspection. Selecting this option will hide the Customer Name and Signature fields.
- Customer Refuses to Sign: The Customer is present, but is not willing to sign off on the Inspection. Selecting this option will reveal further inputs allowing you to indicate the reason for the refusal.
- Customer Name: The name of the Customer signing off on the Inspection.
- Signature: Draw directly in the gray box to capture the Customer’s signature.
- Submit Inspection
Once you have filled out the Employee & Customer signature screen, tap the forward arrow to finalize and submit the Inspection. Your changes will now be saved, your Inspection photos will be uploaded, and you will be returned to the process list.