
- Texada Knowledge Base
- Texada Mobile
- Getting Started
-
Top Searched Articles
-
Product Updates
-
Support & Troubleshooting
-
Onboarding Programs
-
Equipment CRM
-
Service Management
-
SRM
-
Handle
-
Analytics
-
E-Commerce
- Getting Started
- New Administration Panel
- Administration Panel
- Administration Panel - CMS
- Administration Panel - Products, Categories, and Attributes
- Administration Panel - Users
- Administration Panel - Requests
- Customer Access Portal
- Customer Access Portal - Rentals
- Customer Access Portal - Invoices
- eCommerce Websites
- eCommerce Websites - Ordering
- Integrations
-
Texada Mobile
-
Payments
-
Texada Web
-
Rental Asset Management
-
Order Fulfillment
-
Power Systems Projects
-
Equipment Quoting
-
Condition Monitoring Portal
-
Equipment Monitoring Toolkit
-
Parts and Service Quoting
-
Service Agreement Quoting
-
Equipment CRM - Additional Tools
Electronically Sign a Document in Texada Mobile
How to electronically sign a Ticket, Work Order, or In-Yard Return in Texada Mobile.
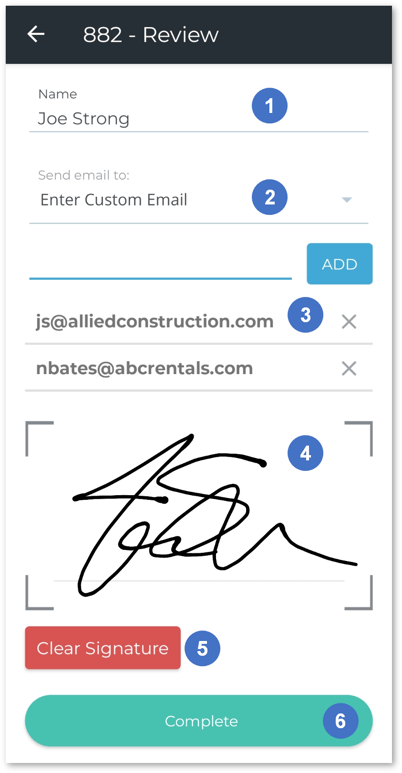
Quick Reference
- One of the steps involved in fulfilling a Ticket, Work Order, or In-Yard Return in Texada Mobile is having the Customer sign off on the work being performed.
- To collect an electronic signature from a Customer in Texada Mobile:
- Enter the signer’s name in the Name field.
- Select the email address(es) to which a copy of the signed document should be sent.
- Pass your mobile device to the Customer and instruct them to sign in the area marked by the gray brackets
 . Tap the “Clear Signature” button to clear this area and try again.
 - Tap “Complete” to submit the signed document.
Introduction
One of the steps involved in fulfilling a Ticket, Work Order, or In-Yard Return in Texada Mobile is having the Customer sign off on the work being performed. Receiving a Customer’s electronic signature on a document ensures that they are aware of and satisfied with the work that has been completed. Texada Mobile offers the option to email a copy of the signed document to one or more recipients, allowing parties on either side of the transaction to possess a record of the completed work.
The following article will detail the process of receiving an electronic signature in Texada Mobile.
The eSignature Screen
This screen allows the Customer to sign off on the document being completed. It also allows you to specify one or more email addresses to which a copy of the signed document should be sent. This screen appears in the following locations in Texada Mobile:
- Pickup Tickets: Upon picking up Assets from the Customer’s work site.
- Delivery and Task Tickets: Upon delivering Assets to their destination.
- Work Orders: Upon completing the Work Order.
- In-Yard Returns: Upon completing the In-Yard Return.
- Signer Name
The name of the party signing off on the document. - Send Email To
The email address(es) to which a copy of the signed document should be sent. Tap the drop-down to select from the following options:- None: Do not send a confirmation email.
- Enter Custom Email: Enter one or more email addresses manually.
- Customer Email: Select an existing Customer email to send a confirmation email to that address.
- Recipient Email Addresses
If “Enter Custom Email” is selected from the “Send Email To” drop-down, the recipient email addresses will be listed here. Enter an email address, then tap the “Add” button to add it. Tap the X button next to an email address to remove it. - Customer Signature
Have the customer draw in the area marked by the gray brackets to sign off on the document. - Clear Signature Button
Tap to clear the signature area and try again. - Complete Button
Once the customer has signed off on the document, tap this button to submit it.