
How to add or modify a driver’s license on a Customer record in Texada Web.
Quick Reference
- A Customer is a company or individual – often a construction company – who rents or purchases equipment from a rental company. In Texada Web, it is possible to attach one or more driver’s license records to each Customer. These records can be used for identification purposes.
- To add or edit a driver’s license record in Texada Web:
- Log in to Texada Web and access the Create Customer screen or Edit Customer screen. If editing a Customer, click the “Edit” button to enable editing.
- Scroll down to the Driver’s Licenses panel. Click on an existing license in the table to edit it, or click the “Add New Driver’s License” button to add a new license.
- Fill out or modify the license’s information as desired, then click “Save License” to save your changes.
- Click the “Create Customer” button or the “Save Changes” button to save the Customer record.
- To delete a driver’s license record in Texada Web:
- Log in to Texada Web and access the Create Customer screen or Edit Customer screen. If editing a Customer, click the “Edit” button to enable editing.
- Scroll down to the Driver’s Licenses panel. Click the bin icon
 next to a license record to delete it.
 - A message will appear that reads “Are you sure you want to delete this license?” Click “Yes” to confirm.
- Click the “Create Customer” button or the “Save Changes” button to save the Customer record.
Introduction
A Customer is a company or individual – often a construction company – who rents or purchases equipment from a rental company. In Texada Web, it is possible to attach one or more driver’s license records to each Customer. This can be done when first creating a Customer, or when editing an existing Customer. These records can then be used for identification purposes.
The following article will detail the process of adding, editing, or deleting a driver’s license record in Texada Web.
Add or Edit a Driver’s License
- Access Customer Record
Log in to Texada Web and navigate to the Create Customer screen or the Edit Customer screen. If you are editing an existing Customer, click the “Edit” button in the bottom-right corner of the screen to enable editing.
 - Select a License
Scroll down to the Driver’s Licenses panel. Click on an existing license in the table to edit it, or click the “Add New Driver’s License” button to add a new license.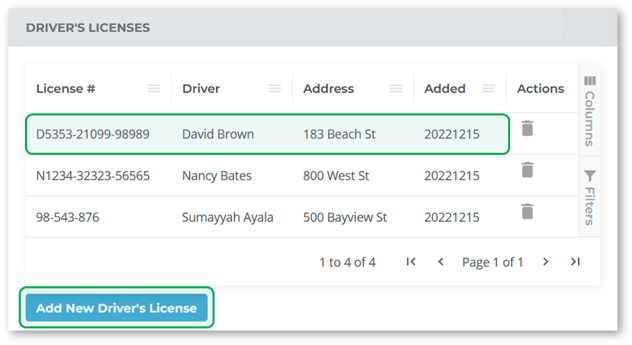
- Add or Edit License
Fill out or modify the license’s information, including the name on the license, the license #, and the holder’s address and date of birth. Click “Save License” to save your changes, or “Close” to cancel.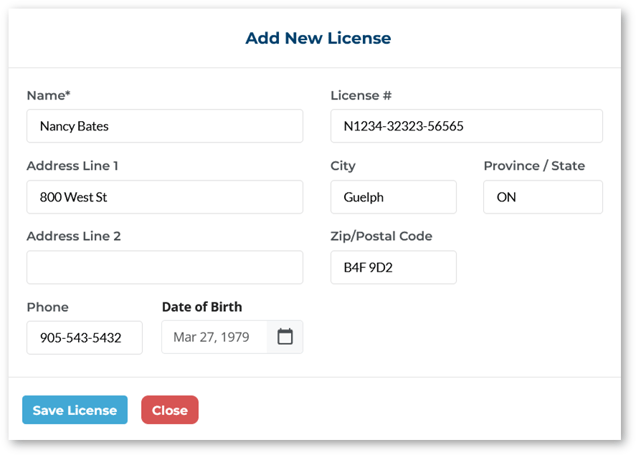
- Save Customer Record
Once you are finished modifying license records, click “Create Customer” if creating a new Customer, or “Save Changes” if editing an existing Customer.
Changes to driver’s license information will only be saved after the Customer record is saved, so make sure to save the Customer record before navigating away from the page!
Delete a Driver’s License
- Access Customer Record
Open the Create or Edit Customer screen and scroll down to the Driver’s Licenses panel. - Delete License
Click the bin icon next to a license record to delete it. A message will appear that reads “Are you sure you want to delete this license?” Click “Yes” to confirm.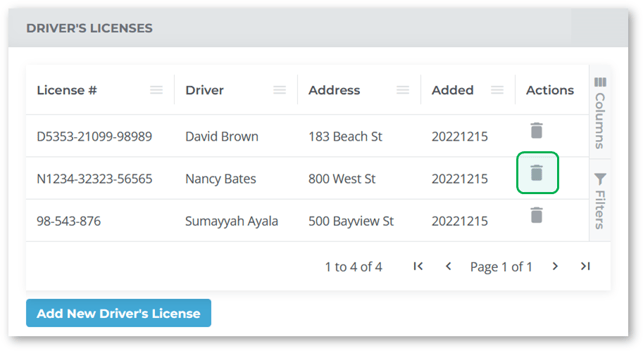
Changes to driver’s license information will only be saved after the Customer record is saved. If you accidentally delete a license while editing a Customer record, you can restore it by clicking “Cancel” instead of “Save Changes”.