.png?width=365&height=50&name=Texada%20Logo%20(Black).png)
Type
How to
Audience
SRM Counter and Bookkeeper
Products
SRM, Texada Pay
Context
Add a credit card on file if your customer prefers to pay using Texada Pay via credit card manually or automatically during cycle billing. You can reuse this credit card information to make further payments for this customer in future transactions, saving you the effort of having to re-enter the information each time.
You can add a credit card on file for use with Texada Pay to either:
- Customer Payments, or
- Counter Payment
depending on what area of the application you have permission to access.
Texada recommends that you only have one on-file credit card or bank account selected as auto-pay, as the automatic pay functionality will use the first account or card in the list with auto-pay enabled.
Notes:
- You can use this credit card with any part of SRM involving customer payments, except Accounts Receivable Customer Payments [ARAR03]
- Credit card information is stored in Texada Pay in a PCI compliant manner. This means that your customers’ credit card information is not shared with anyone other than OpenEdge Payments, ezidebit, or Smartpay
Before You Begin
Required: Valid credit card information, valid SRM account and access permissions, Texada Pay is set up for credit card payments, existing Type M payment method
Steps
To add a credit card on file for use with Texada Pay, do the following:
- Do one of the following:
- On the SRM navigation page, navigate to Accounts Receivable > Payments > Customer Payments
The Customer Payments page opens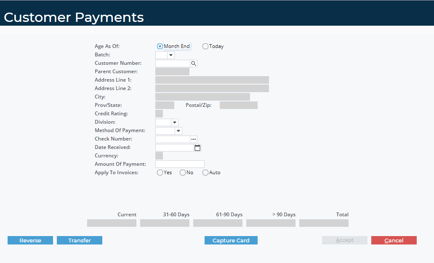
- On the SRM navigation page, navigate to Counter > Counter Payment
The Payments Received at Counter page opens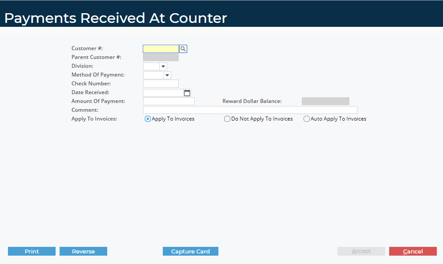
- On the SRM navigation page, navigate to Accounts Receivable > Payments > Customer Payments
- Click Capture Card
The Capture Card/Check on File pop-up opens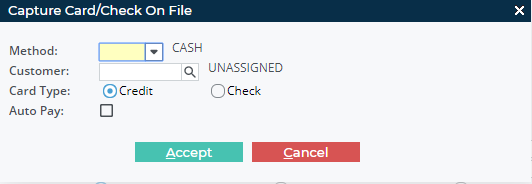
- Use the Method dropdown to select Type M method
- Use the Customer field to identify the customer this bank account applies to
- Click Credit
- Optional: Check Auto Pay if you need to process automatic payments during cycle billing to this credit card
- Click Accept
The Texada Pay - Select Card Type popup opens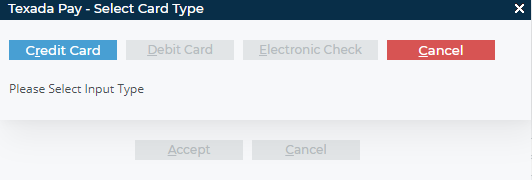
- Click Credit Card
The Texada Pay Credit Card Information popup opens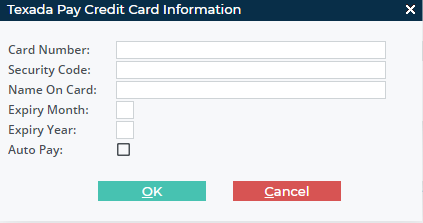
- Type the credit card number in the Card Number field
- Type the card’s security code in the Security Code field
- Type the name that appears on the card in the Name On Card field
- Type the card expiry month as it appears on the card in the Expiry Month field
- Type the last two digits of the card expiry year as it appears on the card in the Expiry Year field
- Optional: Check Auto Pay if you need to process automatic payments during cycle billing to this credit card
- Click OK
- Click Accept
- Click Accept
- Click Accept
The credit card is added on file for the customer and can be used with Texada Pay
Next Steps
| Process an On-File Credit Card Payment Using Texada Pay | ||
Related Articles
- About Texada Pay
- Install Texada Pay Card Reader Hardware in Australia and New Zealand
- Set Up Texada Pay in Canada
- Set up Texada Pay in Australia and New Zealand
- Set Up Payment Methods in Texada Pay
- Process an On-File Credit Card Payment Using Texada Pay
- Manually Process a Credit Card Payment Using Texada Pay in Australia and New Zealand