.png?width=365&height=50&name=Texada%20Logo%20(Black).png)
Type
Conceptual
Audience
All
Products
Texada Web
In This Article
- Sections of the dashboard
- Dashboard components
- Navigating the menu bar
Body
Use the dashboard to navigate between the various sections of Texada Web as you perform your various work tasks.
Note: You can customize the available components of your dashboard to only include the functionality you need for your business. Contact Texada for more information.
Sections of the dashboard
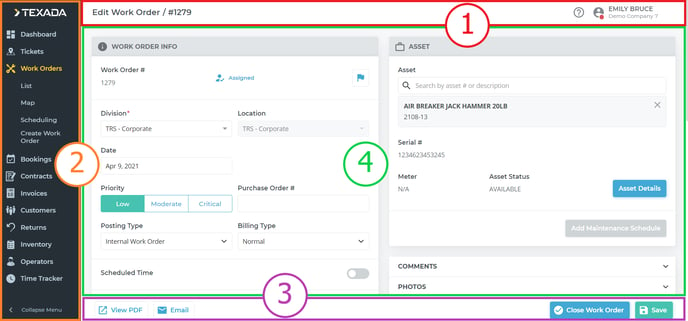
The dashboard is composed of several key sections:
- Header bar
- Use this section to access help, view/edit your personal account information, clock in and out, and log out of Texada Web
- Menu bar
- Use this section to access the menu items containing most of the functionality in Texada Web
- Action bar
- Use this section to use specialized functionality that becomes available when you are in a particular menu item
- Main area
- The sections of this component are updated when you click on a menu item. Use this component to do most of your work in Texada Web
Dashboard components
The following is a list of each dashboard component, along with a brief description of its purpose:
|
Dashboard component |
Description |
|
|
|
Settings |
Use settings to configure Texada Web to meet your business needs Note: You require specific access permissions to access this component of the application |
|
|
Help |
Use help to access the product help documentation at www.help.texadasoftware.com |
|
|
Personal profile |
Use the personal profile to clock in or out, access your information in SRM (Systematic Rental Management), or log out of Texada Web |
|
|
Dashboard |
Use the Dashboard to view what inventory is coming in and going out at a glance |
|
|
Tickets |
Use Tickets to view, edit, and assign pickup and delivery tickets. You can also create, view, edit, and assign task tickets |
|
|
Work Orders |
Use Work Orders to create, view, edit, and assign work order requests |
|
|
Invoices |
Use Invoices to create sales invoices, and search and edit other types of invoices |
|
|
Customers |
Use Customers to create, view, and edit customer records |
|
|
Returns |
Use Returns to search and view yard returns |
|
|
Inventory |
Use Inventory to create, view, and edit assets, parts, and requested parts. |
|
|
Operators |
Use Operators to create, view, and edit driver and technician information and activity |
|
|
Time Tracker |
Use Time Tracker to create, view, and edit a list of user clock in and out records |


Navigating the menu bar
You can toggle between two menu bar modes: collapsed and expanded. Collapse the menu bar when you need more room in the main area. Expand it when you need to navigate to a different part of the application.
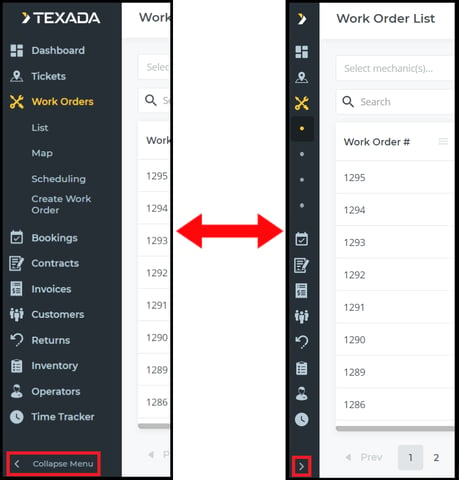
Note: You can hover your mouse over the menu bar when it is in collapsed mode to temporarily show it in expanded mode.
Each menu option, except Dashboard and Time Tracker, has additional menu options beneath it. You can hover your mouse over a menu option to browse or select the additional options.
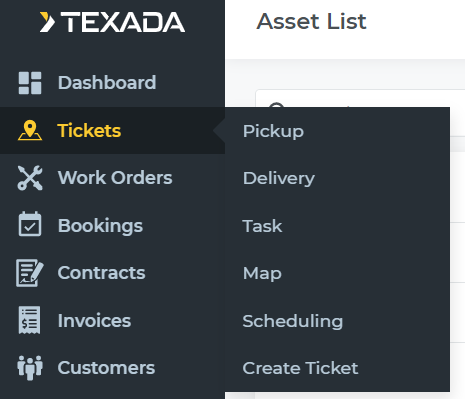
Click a menu option to open that functionality in the main area. When you click a menu option, the additional sub-menu options appear beneath it.
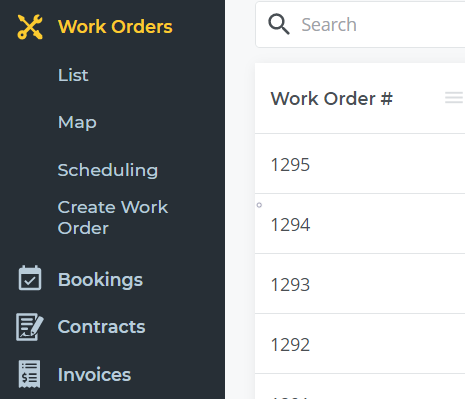
Note: The menu option or sub-menu option you are working in appears in a different color from the other menu options.
When working in a menu option, you can switch between any sub-menus by clicking them in the menu bar. For example, if you are in Work Orders > List, you can click Map to switch to the map functionality in Work Orders > Map.
