
- Texada Knowledge Base
- Rental: Texada Web
- Work Orders
-
Release Notes
-
Texada Academy
-
Rental: SRM
-
Rental: Texada Web
-
Rental: Texada Mobile
-
Rental: GateWay
- Getting Started
- Administration Panel
- Administration Panel - CMS
- Administration Panel - Products, Categories, and Attributes
- Administration Panel - Users
- Administration Panel - Requests
- Customer Access Portal
- Customer Access Portal - Rentals
- Customer Access Portal - Invoices
- eCommerce Websites
- eCommerce Websites - Ordering
- Integrations
-
Rental: WorkFlow
-
Rental: Texada Pay
-
Rental: Analytics
-
Sales & Service: CloudLink
-
Sales: SalesLink
-
Sales: Customer Order to Invoice
-
Sales: iQuote
-
Sales: iMACS
-
Service: ServiceLink
-
Service: Parts & Service Quoter
-
Service: Condition Monitoring Portal
-
Service: Equipment Monitoring Toolkit
-
Service: Service Agreement Quoter
-
Handle CRM
-
Sales & Service: Tools
-
Support & Troubleshooting
Print a Red or Green Tag for a Work Order in Texada Web
Describes how to print a red or green tag for a work order in Texada Web.
Context
Print a tag when you need to mark a piece of equipment as requiring servicing, or when it has been serviced and is ready to be rented again. Generally, red tags are used to indicate that service is needed, while green tags indicate that equipment is ready for rental.
You can only print tags for work orders in the Completed status. See: “About Work Order Statuses in Texada Web and Texada Mobile” for more information on the Completed status.
Tags are printed directly to your printer in Texada Web. You can only print to a printer that you have permission to access. Those permissions are set up in your company’s SRM (Systematic Rental Management) application by the administrator.
Before You Begin
Required: Internet connection, valid Texada Web login credentials and access permissions existing work order with the Completed status, existing printer, sufficient printer permissions in SRM
Steps
To print a tag, do the following:
- In the Texada Web menu bar, navigate to Work Orders > List
The list of work orders opens in the main area.png?width=624&name=Screenshot%20(101).png)
- Locate and click the work order that you need to print a tag for
The work order details page opens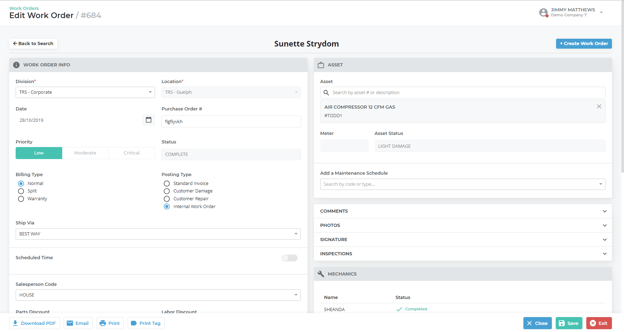
Note: The work order must be in the Completed status - Scroll to the bottom of the work order details page and click Print Tag
The print tag popup opens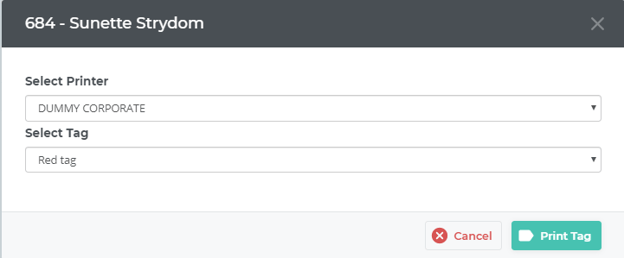
- Use the Select Printer dropdown to select the printer you need to print to
- Use the Select Tag dropdown to do one of the following:
- Select Red tag if you need to print a red tag because the piece of equipment requires servicing
- Select Green tag if you need to print a green tag because the piece of equipment has completed servicing and is ready to be rented
- Click Print Tag
The tag is printed to the selected printer