How to create and load custom views for tables in Texada Web and Texada GateWay.
Quick Reference
- The View Manager, found near the top-right corner of most tables in Texada Web and Texada GateWay, is a tool that allows you to save a table’s current configuration and restore it in future sessions.
- When you save a view using the View Manager, all of the following will be captured:
- Which of the table’s columns are visible/hidden
- The table’s current sorting method (column and direction)
- Any filters that have been applied
- Each table has its own View Manager with its own list of views.
- The View Manager is especially useful when used in conjunction with the export button, as this allows you to export a table in the same format across multiple sessions.
Introduction
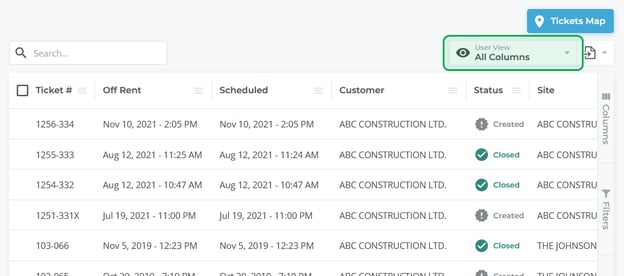 The Open Rentals page in Texada GateWay, showing the location of the View Manager.
The View Manager is a tool found on several pages throughout Texada Web and Texada GateWay. It is often located near the top-right corner of a table, next to the export button.
This tool allows you to save, load, and modify views for a table. Think of a view as a set of configurations that affect a table’s appearance and the data it contains. Specifically, a view comprises the following settings:
- Which of the table’s columns are visible/hidden
- The table’s current sorting method (column and direction)
- Any filters that have been applied
See “Working with Tables” for more information on how to customize tables in Texada Web and Texada GateWay.
The View Manager makes it easy to return to the views which you find most useful - for example, filtering your Invoice list by a particular date range in Texada GateWay, or filtering your Ticket list by a particular Customer in Texada Web.
This feature works well when used in conjunction with the export button: by saving a view before exporting it, you can easily return to that view and export the table in the same format in the future. Please see “Exporting the Contents of a Table” for more details.
Note that every table has its own View Manager with its own list of views. This means that any views you save for a table will only appear under the View Manager for that specific table.
Using the View Manager
By default, when you first navigate to a page that includes a View Manager, no view will be loaded, and the View Manager will read “Default View (None Selected)”:
![]()
Click on the View Manager to see the full list of options:
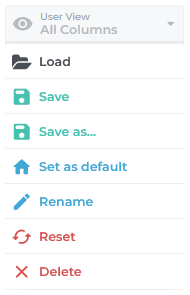
- Load: Load a previously-saved view.
- Save: Save your current view. Note that this will overwrite the view’s previous settings.
- Save as…: Save the current view under a new name.
- Set as default: Make the current view the default when navigating to this page in the future.
- Rename: Rename the current view.
- Reset: Closes the current view without saving any changes to it, and returns the table to the default view.
- Delete: Deletes the current view.
Note that most of the options in this menu will be greyed out when no view is selected. Use the “Save as…” button to save your current view and enable these options.
Saving a New View
To save a new view to the View Manager:
- Navigate to the table you wish to work with. Most tables in Texada Web and Texada GateWay have a View Manager; look in the top-right corner of the table for the eye symbol, or the text that says “Default View (None Selected)”.
- Modify the table as desired. See “Working with Tables” for more information. Remember that all of the following will be saved when you save your view:
- Which of the table’s columns are visible/hidden
- The table’s current sorting method (column and direction)
- Any filters that have been applied
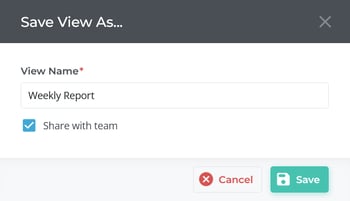
- Open the View Manager and click “Save as…”
- In the dialogue box, enter a name for your view. If you would like to make the view available to your coworkers, check the “Share with team” checkbox. This will cause your view to appear in the list of available views in the Load View window. Once you are finished, click “Save” to save your view, or click “Cancel” to go back.
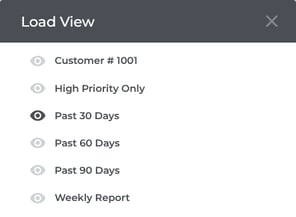
Loading an Existing View
To load a previously-saved view:
- Navigate to the table you wish to work with. Note that each table has its own View Manager, so any views saved under a table will only appear in the View Manager for that table.
- Open the View Manager and click “Load” to see a list of saved views. If this option is grayed out, it means that no views have been saved for this table yet.